9 Managing RADOS Block Devices #
To list all available RADOS Block Devices (RBDs), click / from the main menu.
The list shows brief information about the device, such as the device's name, the related pool name, size of the device, number and size of objects on the device.
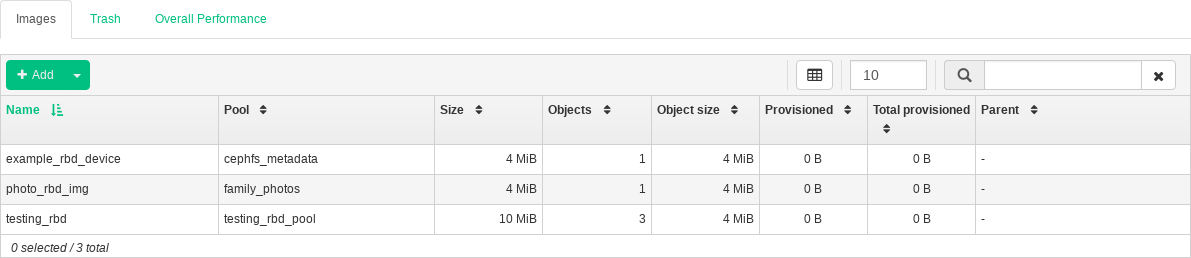
Figure 9.1: List of RBD Images #
9.1 Viewing Details about RBDs #
To view more detailed information about a device, click its row in the table:
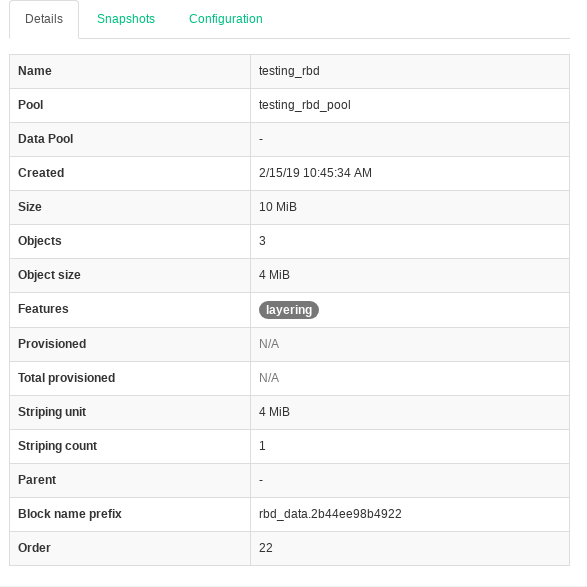
Figure 9.2: RBD Details #
9.2 Viewing RBD's Configuration #
To view detailed configuration of a device, click its row in the table and then the tab in the lower table:
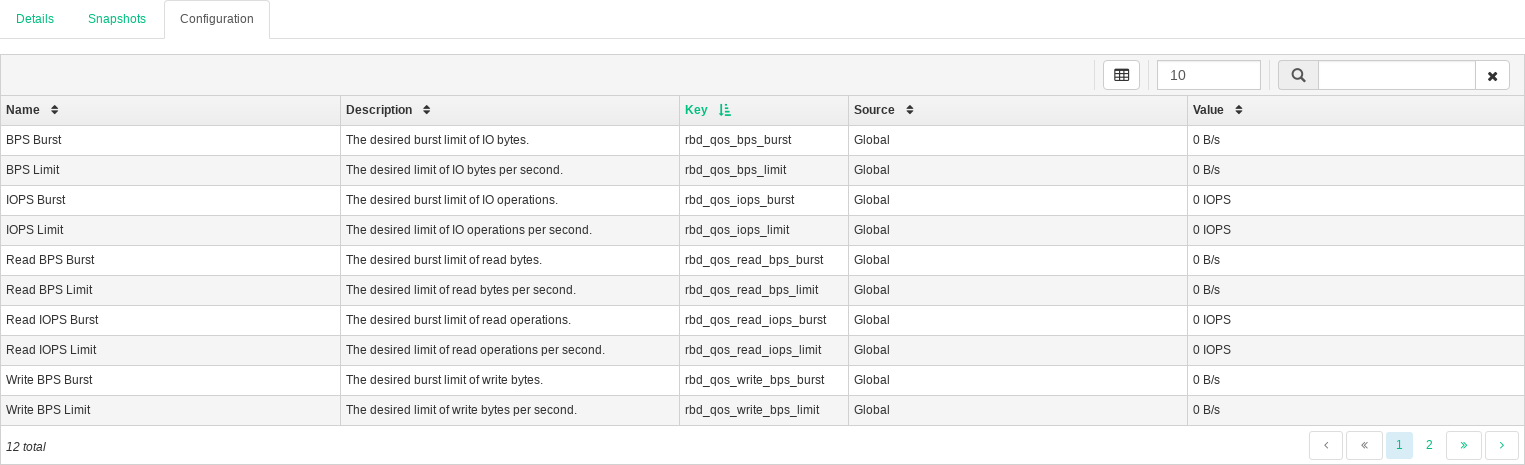
Figure 9.3: RBD Configuration #
9.3 Creating RBDs #
To add a new device, click in the top left of the table heading and do the following on the screen:
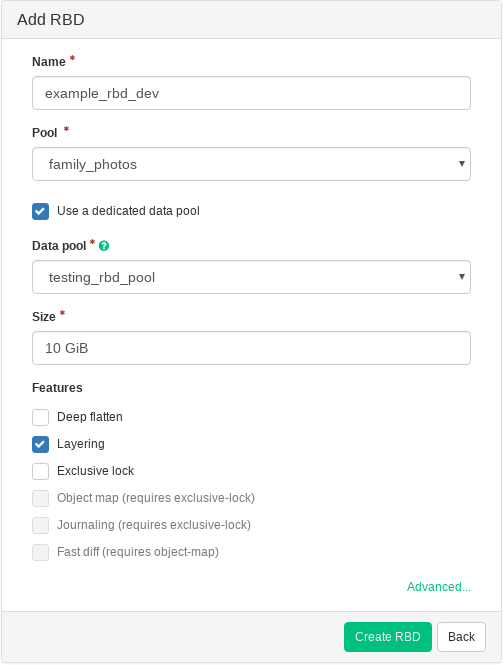
Figure 9.4: Adding a New RBD #
Enter the name of the new device. Refer to Book “Deployment Guide”, Chapter 2 “Hardware Requirements and Recommendations”, Section 2.11 “Naming Limitations” for naming limitations.
Select the pool with the 'rbd' application assigned from which the new RBD device will be created.
Specify the size of the new device.
Specify additional options for the device. To fine-tune the device parameters, click and enter values for object size, stripe unit, or stripe count. To enter Quality of Service (QoS) limits, click and enter them.
Confirm with .
9.4 Deleting RBDs #
To delete a device, click its row in the table and select in the top left of the table heading. Confirm the deletion with .
Tip: Moving RBDs to Trash
Deleting an RBD is an irreversible action. If you instead, you can restore the device later on by selecting it on the tab of the main table and clicking in the top left of the table heading.
9.5 RADOS Block Device Snapshots #
To create a RADOS Block Device snapshot, click the device's table row and in the tab below the main table, click in the top left of the table heading. Enter the snapshot's name and confirm with .
After selecting a snapshot, you can perform additional actions on the device, such as rename, protect, clone, copy, or delete. restores the device's state from the current snapshot.
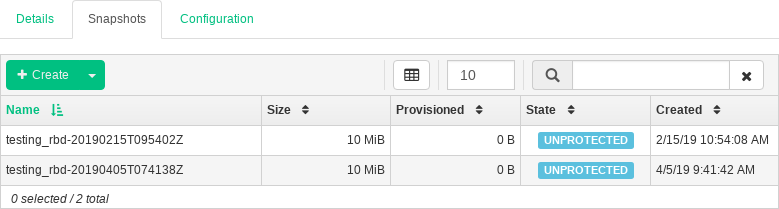
Figure 9.5: RBD Snapshots #
9.6 Managing iSCSI Gateways #
Tip: More Information on iSCSI Gateways
For more general information about iSCSI Gateways, refer to Book “Deployment Guide”, Chapter 10 “Installation of iSCSI Gateway” and Chapter 27, Ceph iSCSI Gateway.
To list all available gateways and mapped images, click / from the main menu. An tab opens, listing currently configured iSCSI Gateways and mapped RBD images.
The table lists each gateway's state, number of iSCSI targets, and number of sessions. The table lists each mapped image's name, related pool name backstore type, and other statistical details.
The tab lists currently configured iSCSI targets.
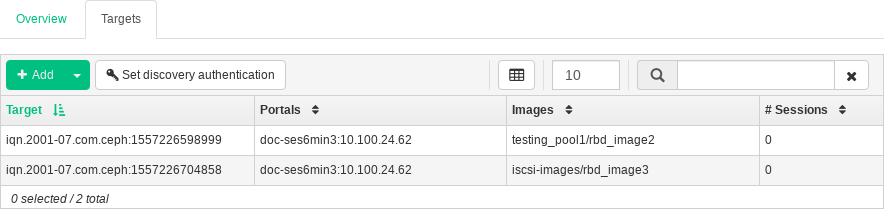
Figure 9.6: List of iSCSI Targets #
To view more detailed information about a target, click its table row. A tree-structured schema opens, listing disks, portals, initiators, and groups. Click an item to expand it and view its detailed contents, optionally with a related configuration in the table on the right.
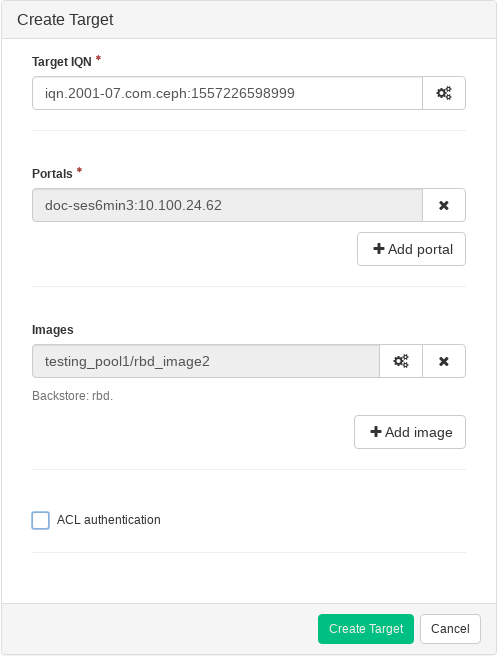
Figure 9.7: iSCSI Target Details #
9.6.1 Adding iSCSI Targets #
To add a new iSCSI target, click in the top left of the table and enter the required information.
Figure 9.8: Adding a New Target #
Enter the target address of the new gateway.
Click and select one or multiple iSCSI portals from the list.
Click and select one or multiple RBD images for the gateway.
If you need to use authentication to access the gateway, activate the check box and enter the credentials. You can find more advanced authentication options after activating and .
Confirm with .
9.6.2 Editing iSCSI Targets #
To edit an existing iSCSI target, click its row in the table and click in the top left of the table.
You can then modify the iSCSI target, add or delete portals, and add or delete related RBD images. You can also adjust authentication information for the gateway.
9.6.3 Deleting iSCSI Targets #
To delete an iSCSI target, click its table row and select in the top left of the gateways table. Activate and confirm with .
9.7 RBD Quality of Service (QoS) #
Tip: For More Information
For more general information and a description of RBD QoS configuration options, refer to Section 23.6, “QoS Settings”.
The QoS options can be configured at different levels.
Globally
On a per-pool basis
On a per-image basis
The global configuration is at the top of the list and will be used for all newly created RBD images and for those images that do not override these values on the pool or RBD image layer. An option value specified globally can be overridden on a per-pool or per-image basis. Options specified on a pool will be applied to all RBD images of that pool unless overridden by a configuration option set on an image. Options specified on an image will override options specified on a pool and will override options specified globally.
This way it is possible to define defaults globally, adapt them for all RBD images of a specific pool, and override the pool configuration for individual RBD images.
9.7.1 Configuring Options Globally #
To configure RBD options globally, select / from the main menu.
To list all available global configuration options, click / . Then filter the results of the table by filtering for 'rbd_qos' in the search field. This lists all available configuration options for QoS. To change a value, click its row in the table, then select at the top left of the table. The dialog contains six different fields for specifying values. The RBD configuration option values are required in the text box. Note that unlike the other dialogs, this one does not allow you to specify the value in convenient units. You need to set these values in either bytes or IOPS, depending on the option you are editing.
9.7.2 Configuring Options on a New Pool #
To create a new pool and configure RBD configuration options on it, click / . Select as pool type. You will then need to add the application tag to the pool to be able to configure the RBD QoS options.
Note
It is not possible to configure RBD QoS configuration options on an erasure coded pool. To configure the RBD QoS options for erasure coded pools, you need to edit the replicated metadata pool of an RBD image. The configuration will then be applied to the erasure coded data pool of that image.
9.7.3 Configuring Options on an Existing Pool #
To configure RBD QoS options on an existing pool, click , then click the pool's table row and select at the top left of the table.
You should see the section in the dialog, followed by a section.
Note
If you see neither the nor the section, you are likely either editing an erasure coded pool, which cannot be used to set RBD configuration options, or the pool is not configured to be used by RBD images. In the latter case, assign the application tag to the pool and the corresponding configuration sections will show up.
9.7.4 Configuration Options #
Click to expand the configuration options. A list of all available options will show up. The units of the configuration options are already shown in the text boxes. In case of any bytes per second (BPS) option, you are free to use shortcuts such as '1M' or '5G'. They will be automatically converted to '1 MB/s' and '5 GB/s' respectively.
By clicking the reset button to the right of each text box, any value set on the pool will be removed. This does not remove configuration values of options configured globally or on an RBD image.
9.7.5 Creating RBD QoS Options with a New RBD Image #
To create an RBD image with RBD QoS options set on that image, select / and then click . Click to expand the advanced configuration section. Click to open all available configuration options.
9.7.6 Editing RBD QoS Options on Existing Images #
To edit RBD QoS options on an existing image, select / , then click the pool's table row, and lastly click . The edit dialog will show up. Click to expand the advanced configuration section. Click to open all available configuration options.
9.7.7 Changing Configuration Options When Copying or Cloning Images #
If an RBD image is cloned or copied, the values set on that particular image will be copied too, by default. If you want to change them while copying or cloning, you can do so by specifying the updated configuration values in the copy/clone dialog, the same way as when creating or editing an RBD image. Doing so will only set (or reset) the values for the RBD image that is copied or cloned. This operation changes neither the source RBD image configuration, nor the global configuration.
If you choose to reset the option value on copying/cloning, no value for that option will be set on that image. This means that any value of that option specified for the parent pool will be used if the parent pool has the value configured. Otherwise, the global default will be used.
9.8 RBD Mirroring #
Tip: General Information
For general information and the command line approach to RADOS Block Device mirroring, refer to Section 23.4, “Mirroring”.
You can use the Ceph Dashboard to configure replication of RBD images between two or more clusters.
9.8.1 Primary Cluster and Secondary Cluster(s) #
Primary cluster is where the original pool with images is created. Secondary cluster(s) is where the pool/images are replicated from the primary cluster.
Note: Relative Naming
The primary and secondary terms can be relative in the context of replication because they relate more to individual pools than to clusters. For example, in two-way replication, one pool can be mirrored from the primary cluster to the secondary one, while another pool can be mirrored from the secondary cluster to the primary one.
9.8.2 Replication Modes #
There are two modes of data replication:
Using the pool mode, you replicate all the RBD images in a pool.
Using the image mode, you can activate mirroring only for specific image(s) in a pool.
9.8.3 Configure the rbd-mirror Daemon #
The rbd-mirror daemon performs the
actual cluster data replication. To install, configure, and run it, follow
these steps:
The
rbd-mirrordaemon needs to run on one of the nodes on the secondary cluster other than the Admin Node. Because it is not installed by default, install it:root@minion >zypper install rbd-mirrorOn the primary cluster, create a unique Ceph user ID for the
rbd-mirrordaemon process. In this example, we will use 'uid1' as the user ID:cephadm@adm >ceph auth get-or-create client.rbd-mirror.uid1 \ mon 'profile rbd-mirror' osd 'profile rbd' [client.rbd-mirror.uid1] key = AQBbDJddZKLBIxAAdsmSCCjXoKwzGkGmCpUQ9g==On the node where you previously installed the rbd-mirror package on the secondary cluster, create the same Ceph user and save the output to a keyring:
root@minion >ceph auth get-or-create client.rbd-mirror.uid1 \ mon 'profile rbd-mirror' osd 'profile rbd' \ > /etc/ceph/ceph.client.rbd-mirror.uid1.keyringOn the same node, enable and run the
rbd-mirrorservice:root@minion >systemctl enable ceph-rbd-mirror@rbd-mirror.uid1root@minion >systemctl start ceph-rbd-mirror@rbd-mirror.uid1root@minion >systemctl status ceph-rbd-mirror@rbd-mirror.uid1 ● ceph-rbd-mirror@rbd-mirror.uid1.service - Ceph rbd mirror daemon Loaded: loaded (/usr/lib/systemd/system/ceph-rbd-mirror@.service; enabled; vendor preset: disabled) Active: active (running) since Fri 2019-10-04 07:48:53 EDT; 2 days ago Main PID: 212434 (rbd-mirror) Tasks: 47 CGroup: /system.slice/system-ceph\x2drbd\x2dmirror.slice/ceph-rbd-mirror@rbd-mirror.uid1.service └─212434 /usr/bin/rbd-mirror -f --cluster ceph --id rbd-mirror.test --setuser ceph --setgroup ceph Oct 04 07:48:53 doc-ses6min4 systemd[1]: Started Ceph rbd mirror daemon.On the secondary cluster's Ceph Dashboard, navigate to / . The table to the left shows actively running
rbd-mirrordaemons and their health.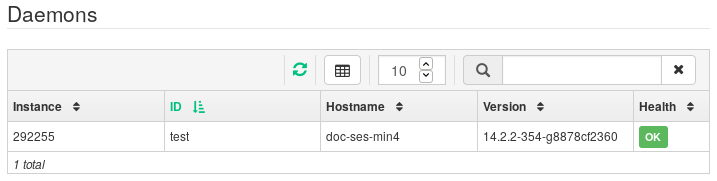
Figure 9.9: Running
rbd-mirrorDaemons #
9.8.4 Configure Pool Replication in Ceph Dashboard #
The rbd-mirror daemon needs to have
access to the primary cluster to be able to mirror RBD images. Therefore
you need to create a peer Ceph user account on the
primary cluster and let the secondary cluster know about its keyring:
On the primary cluster, create a new 'client.rbd-mirror-peer' user that will be used for data replication:
cephadm@adm >ceph auth get-or-create client.rbd-mirror-peer \ mon 'profile rbd' osd 'profile rbd' [client.rbd-mirror-peer] key = AQBbDJddZKLBIxAAdsmSCCjXoKwzGkGmCpUQ9g==On both the primary and secondary cluster, create a pool with an identical name and assign the 'rbd' application to it. Refer to Section 8.1, “Adding a New Pool” for more details on creating a new pool.
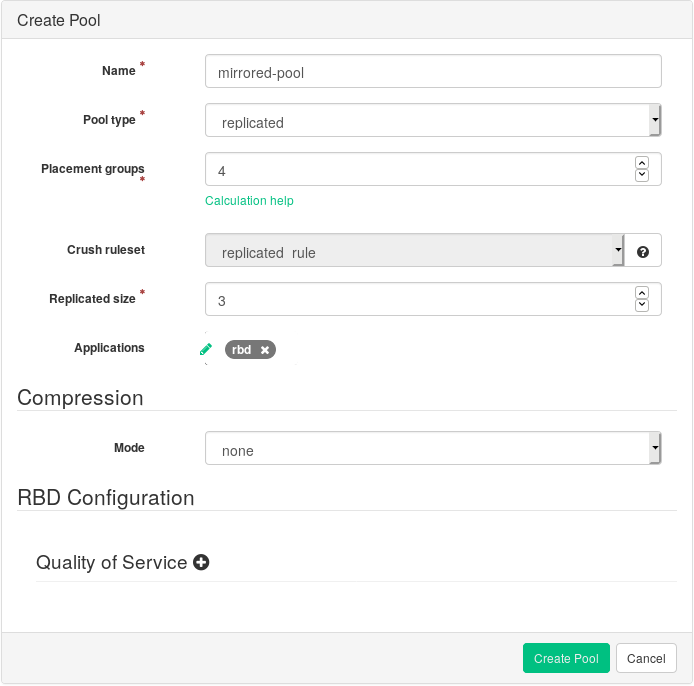
Figure 9.10: Creating a Pool with RBD Application #
On both the primary and secondary cluster's dashboards, navigate to / . In the table on the right, click the name of the pool to replicate, and after clicking , select the replication mode. In this example, we will work with a pool replication mode, which means that all images within a given pool will be replicated. Confirm with .
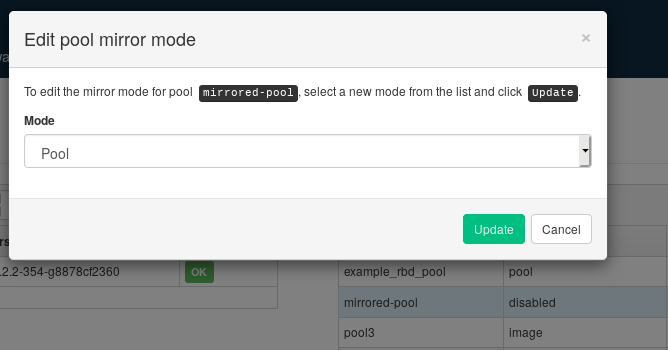
Figure 9.11: Configuring the Replication Mode #

Important: Error or Warning on the Primary Cluster
After updating the replication mode, an error or warning flag will appear in the corresponding right column. That is because the pool has no peer user for replication assigned yet. Ignore this flag for the primary cluster as we assign a peer user to the secondary cluster only.
On the secondary cluster's Dashboard, navigate to / . Register the 'client.rbd-mirror-peer' user keyring to the mirrored pool by clicking the pool's name and selecting . Provide the primary cluster's details:
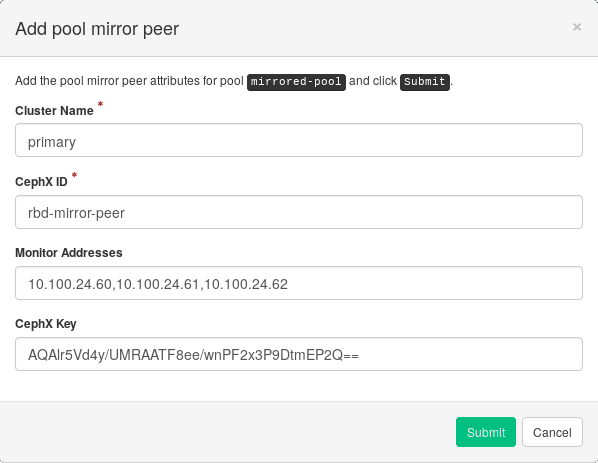
Figure 9.12: Adding Peer Credentials #
An arbitrary unique string that identifies the primary cluster, such as 'primary'. The cluster name needs to be different from the real secondary cluster's name.
The Ceph user ID that you created as a mirroring peer. In this example it is 'rbd-mirror-peer'.
Comma separated list of IP addresses/host names of the primary cluster's Ceph Monitor nodes.
The key related to the peer user ID. You can retrieve it by running the following example command on the primary cluster:
cephadm@adm >ceph auth print_key client.rbd-mirror-peer
Confirm with .
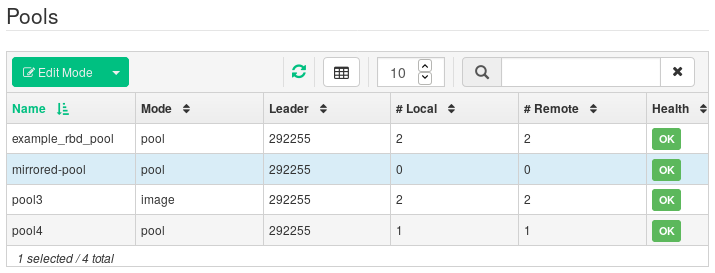
Figure 9.13: List of Replicated Pools #
9.8.5 Verify That RBD Image Replication Works #
When the rbd-mirror daemon is
running and RBD image replication is configured on the Ceph Dashboard, it is
time to verify whether the replication actually works:
On the primary cluster's Ceph Dashboard, create an RBD image so that its parent pool is the pool that you already created for replication purposes. Enable the
Exclusive lockandJournalingfeatures for the image. Refer to Section 9.3, “Creating RBDs” for details on how to create RBD images.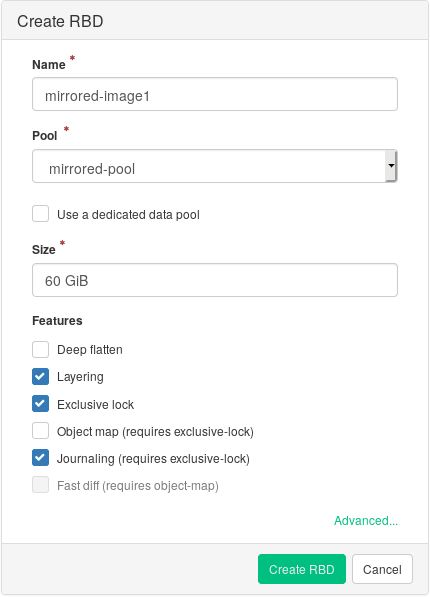
Figure 9.14: New RBD Image #
After you create the image that you want to replicate, open the secondary cluster's Ceph Dashboard and navigate to / . The table on the right will reflect the change in the number of images and synchronize the number of images.
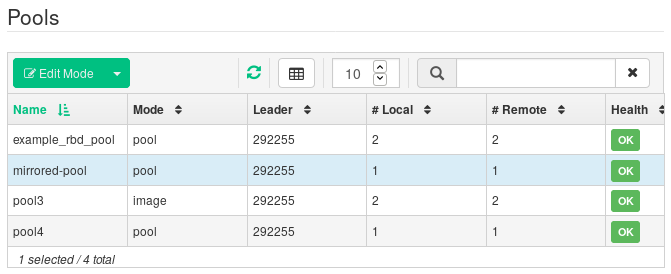
Figure 9.15: New RBD Image Synchronized #

Tip: Replication Progress
The table at the bottom of the page shows the status of replication of RBD images. The tab includes possible problems, the tab displays the progress of image replication, and the tab lists all images with successful replication.
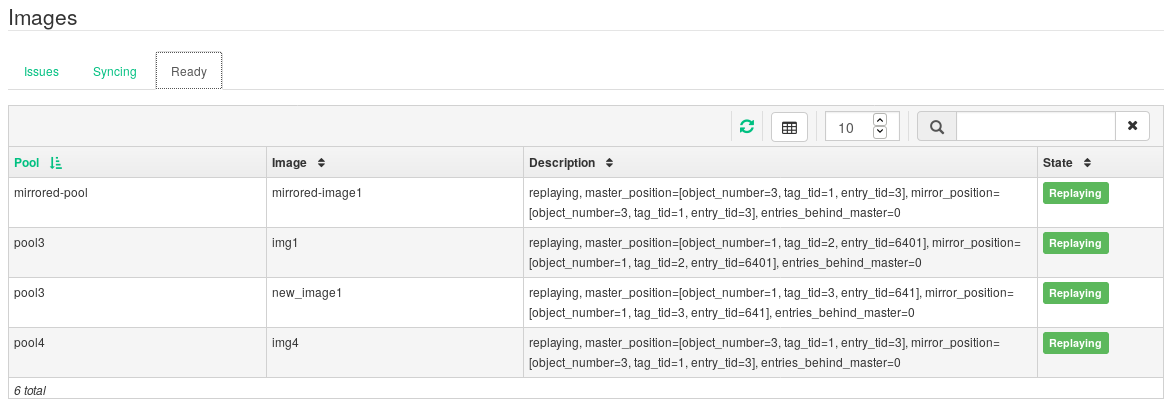
Figure 9.16: RBD Images' Replication Status #
On the primary cluster, write data to the RBD image. On the secondary cluster's Ceph Dashboard, navigate to / and monitor whether the corresponding image's size is growing as the data on the primary cluster is written.