Deploying With Crowbar
- About This Guide
- I Architecture and Requirements
- II Setting Up the Administration Server
- 3 Installing the Administration Server
- 4 Installing and Setting Up an SMT Server on the Administration Server (Optional)
- 5 Software Repository Setup
- 6 Service Configuration: Administration Server Network Configuration
- 7 Crowbar Setup
- 8 Starting the SUSE OpenStack Cloud Crowbar installation
- 9 Customizing Crowbar
- III Setting Up OpenStack Nodes and Services
- IV Setting Up Non-OpenStack Services
- V Maintenance and Support
- VI Proof of Concepts Deployments
- A VMware vSphere Installation Instructions
- B Using Cisco Nexus Switches with Neutron
- C Documentation Updates
- Glossary of Terminology and Product Names
15 Installing SUSE CaaS Platform Heat Templates #
- File Name: crowbar_install_caasp_heat_templates.xml
- ID: install-heat-templates
This chapter describes how to install SUSE CaaS Platform Heat template on SUSE OpenStack Cloud Crowbar.
15.1 SUSE CaaS Platform Heat Installation Procedure #
- File Name: crowbar_install_caasp_heat_templates.xml
- ID: sec-heat-templates-install
Procedure 15.1: Preparation #
Download the latest SUSE CaaS Platform for OpenStack image (for example,
SUSE-CaaS-Platform-3.0-OpenStack-Cloud.x86_64-1.0.0-GM.qcow2) from https://download.suse.com.Upload the image to Glance:
openstack image create --public --disk-format qcow2 --container-format \
bare --file SUSE-CaaS-Platform-3.0-OpenStack-Cloud.x86_64-1.0.0-GM.qcow2 \
CaaSP-3
Install the caasp-openstack-heat-templates package on a machine with SUSE OpenStack Cloud Crowbar repositories:
zypper in caasp-openstack-heat-templates
The installed templates are located in
/usr/share/caasp-openstack-heat-templates.Alternatively, you can get official Heat templates by cloning the appropriate Git repository:
git clone https://github.com/SUSE/caasp-openstack-heat-templates
Procedure 15.2: Installing Templates via Horizon #
In Horizon, go to › › .
Select from the drop-down box and upload the
caasp-stack.yamlfile.In the dialog, provide the required information (stack name, password, flavor size, external network of your environment, etc.).
Click to launch the stack. This creates all required resources for running SUSE CaaS Platform in an OpenStack environment. The stack creates one Admin Node, one Master Node, and server worker nodes as specified.
Procedure 15.3: Install Templates from the Command Line #
Specify the appropriate flavor and network settings in the
caasp-environment.yamlfile.Create a stack in Heat by passing the template, environment file, and parameters:
openstack stack create -t caasp-stack.yaml -e caasp-environment.yaml \
--parameter image=CaaSP-3 caasp-stack
Procedure 15.4: Accessing Velum SUSE CaaS Platform dashboard #
After the stack has been created, the Velum SUSE CaaS Platform dashboard runs on the Admin Node. You can access it using the Admin Node's floating IP address.
Create an account and follow the steps in the Velum SUSE CaaS Platform dashboard to complete the SUSE CaaS Platform installation.
When you have successfully accessed the admin node web interface via the floating IP, follow the instructions at https://documentation.suse.com/suse-caasp/3/single-html/caasp-deployment/ to continue the setup of SUSE CaaS Platform.
15.2 Installing SUSE CaaS Platform with Multiple Masters #
- File Name: crowbar_install_caasp_heat_templates.xml
- ID:
Note
A Heat stack with load balancing and multiple master nodes can only be created from the command line, because Horizon does not have support for nested Heat templates.
Install the caasp-openstack-heat-templates package on a machine with SUSE OpenStack Cloud Crowbar repositories:
zypper in caasp-openstack-heat-templates
The installed templates are located in
/usr/share/caasp-openstack-heat-templates.
A working load balancer is needed in your SUSE OpenStack Cloud deployment. SUSE OpenStack Cloud Crowbar uses HAProxy.
Verify that load balancing with HAProxy is working correctly
in your OpenStack installation by creating a load balancer manually and
checking that the provisioning_status changes to
Active.
tux > openstack loadbalancer show
<LOAD_BALANCER_ID>
HAProxy is the default load balancer provider in SUSE OpenStack Cloud Crowbar.
The steps below can be used to set up a network, subnet, router, security
and IPs for a test lb_net1 network with
lb_subnet1 subnet.
tux >openstack network create lb_net1tux >openstack subnet create --name lb_subnet1 lb_net1 \ --subnet-range 172.29.0.0/24 --gateway 172.29.0.2tux >openstack router create lb_router1tux >openstack router add subnet lb_router1 lb_subnet1tux >openstack router set lb_router1 --external-gateway ext-nettux >openstack network list
Procedure 15.5: Steps to Install SUSE CaaS Platform with Multiple Masters #
Specify the appropriate flavor and network settings in the
caasp-multi-master-environment.yamlfile.Set
master_countto the desired number in thecaasp-multi-master-environment.yamlfile. The master count must be set to an odd number of nodes.master_count: 3
Create a stack in Heat by passing the template, environment file, and parameters:
tux >openstack stack create -t caasp-multi-master-stack.yaml \ -e caasp-multi-master-environment.yaml --parameter image=CaaSP-3 caasp-multi-master-stackFind the floating IP address of the load balancer. This is necessary for accessing the Velum SUSE CaaS Platform dashboard.
tux >openstack loadbalancer list --providerFrom the output, copy the
idand enter it in the following command as shown in the following example:tux >openstack loadbalancer show id+---------------------+------------------------------------------------+ | Field | Value | +---------------------+------------------------------------------------+ | admin_state_up | True | | description | | | id | 0d973d80-1c79-40a4-881b-42d111ee9625 | | listeners | {"id": "c9a34b63-a1c8-4a57-be22-75264769132d"} | | | {"id": "4fa2dae0-126b-4eb0-899f-b2b6f5aab461"} | | name | caasp-stack-master_lb-bhr66gtrx3ue | | operating_status | ONLINE | | pools | {"id": "8c011309-150c-4252-bb04-6550920e0059"} | | | {"id": "c5f55af7-0a25-4dfa-a088-79e548041929"} | | provider | haproxy | | provisioning_status | ACTIVE | | tenant_id | fd7ffc07400642b1b05dbef647deb4c1 | | vip_address | 172.28.0.6 | | vip_port_id | 53ad27ba-1ae0-4cd7-b798-c96b53373e8b | | vip_subnet_id | 87d18a53-ad0c-4d71-b82a-050c229b710a | +---------------------+------------------------------------------------+Search the floating IP list for
vip_addresstux >openstack floating ip list | grep 172.28.0.6 | d636f3...481b0c | fd7ff...deb4c1 | 172.28.0.6 | 10.84.65.37 | 53ad2...373e8b |The load balancer floating ip address is 10.84.65.37
Accessing the Velum SUSE CaaS Platform Dashboard
After the stack has been created, the Velum SUSE CaaS Platform dashboard runs on the admin node. You can access it using the floating IP address of the admin node.
Create an account and follow the steps in the Velum SUSE CaaS Platform dashboard to complete the SUSE CaaS Platform installation.
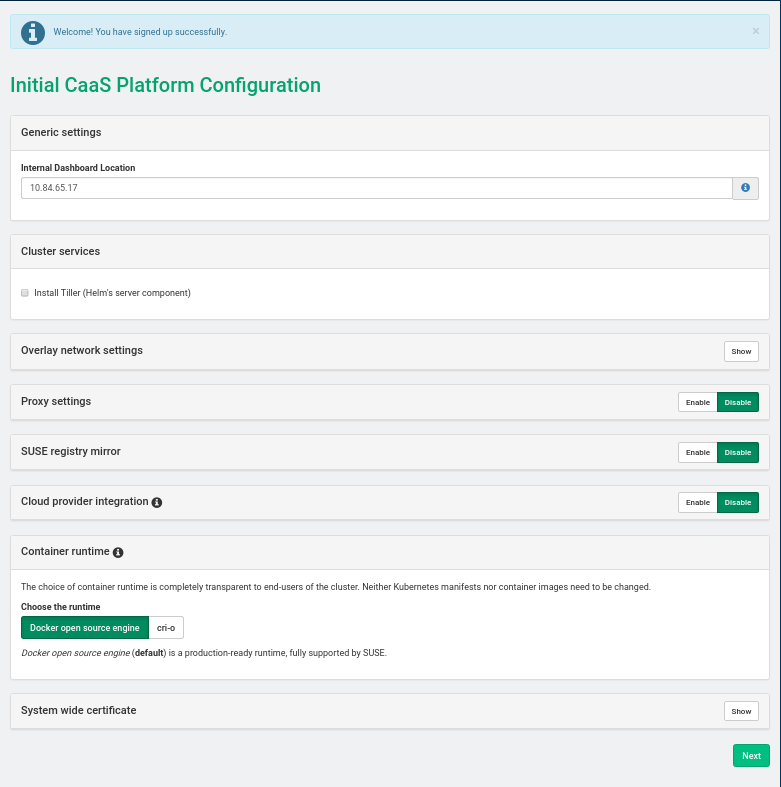
SUSE CaaS Platform Admin Node Install: Screen 1
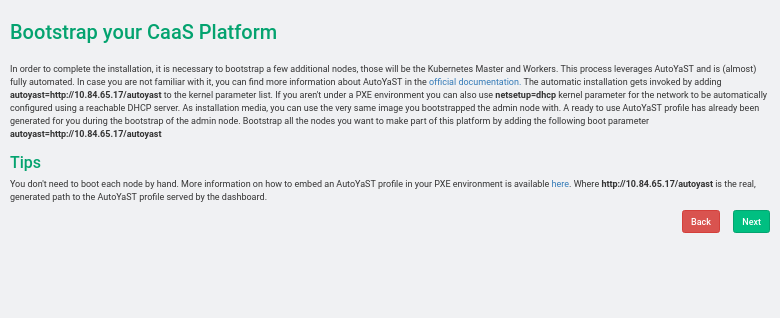
SUSE CaaS Platform Admin Node Install: Screen 2
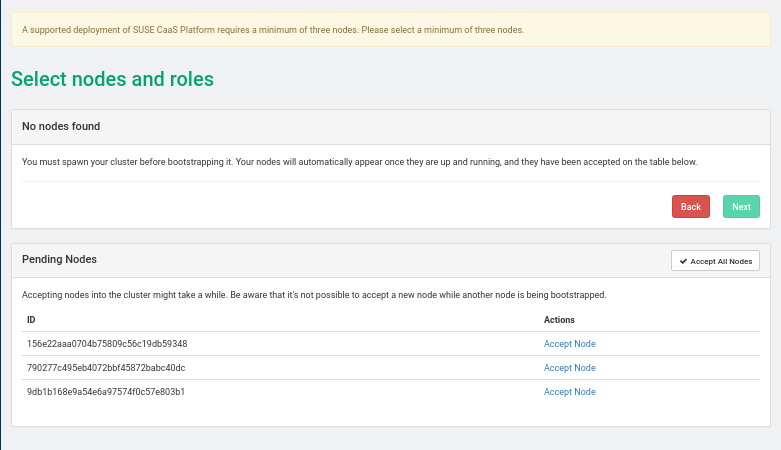
SUSE CaaS Platform Admin Node Install: Screen 3
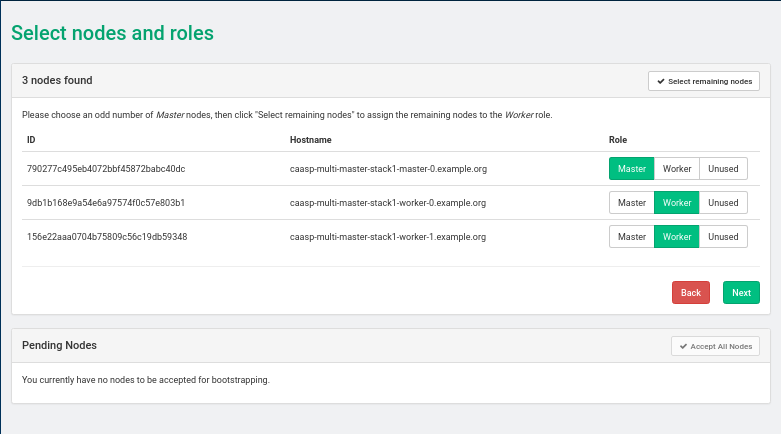
SUSE CaaS Platform Admin Node Install: Screen 4
SUSE CaaS Platform Admin Node Install: Screen 5
Set External Kubernetes API to LOADBALANCER_FLOATING_IP, External Dashboard FQDN to ADMIN_NODE_FLOATING_IP
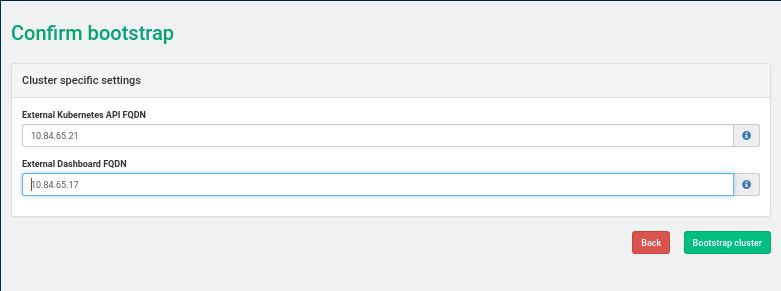
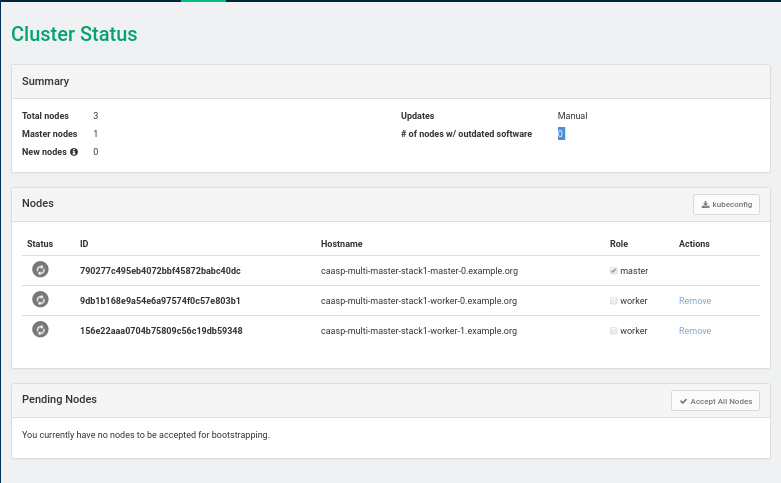
SUSE CaaS Platform Admin Node Install: Screen 6
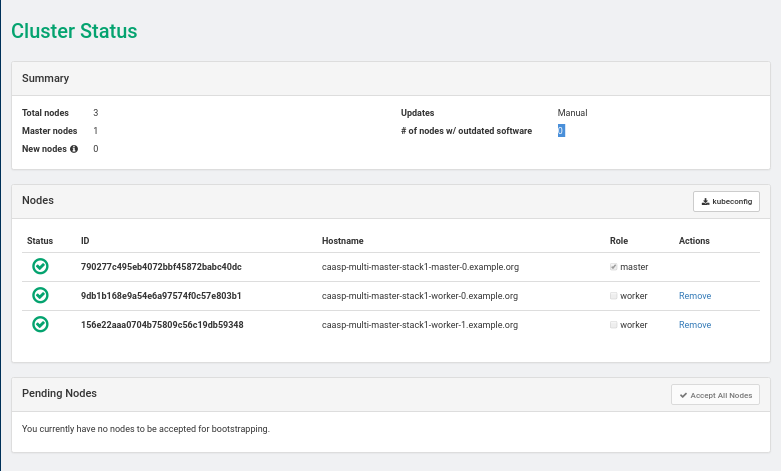
SUSE CaaS Platform Admin Node Install: Screen 7
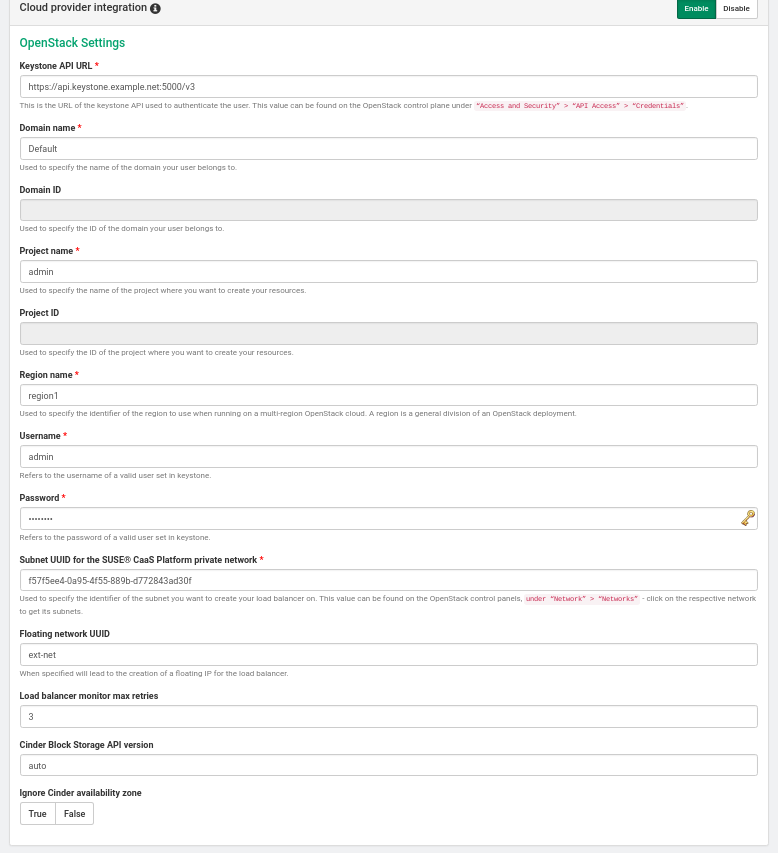
15.3 Enabling the Cloud Provider Integration (CPI) Feature #
- File Name: crowbar_install_caasp_heat_templates.xml
- ID:
When deploying a CaaaSP cluster using SUSE CaaS Platform OpenStack Heat
templates, the following CPI parameters can be set in
caasp-environment.yaml or
caasp-multi-master-environment.yaml.
- cpi_auth_url
The URL of the Keystone API used to authenticate the user. This value can be found on OpenStack Dashboard under › › (for example, https://api.keystone.example.net:5000/v3/)
- cpi_domain_name
Name of the domain the user belongs to
- cpi_tenant_name
Name of the project the user belongs to. This is the project where the resources will be created.
- cpi_region
Name of the region to use when running a multi-region OpenStack cloud. The region is a general division of an OpenStack deployment.
- cpi_username
Username of a valid user that has been set in Keystone. Default: admin
- cpi_password
Password of a valid user that has been set in Keystone.
- cpi_monitor_max_retries
Neutron load balancer monitoring max retries. Default: 3
- cpi_bs_version
Cinder Block Storage API version. Possible values are v1, v2 , v3 or auto. Default: auto
- cpi_ignore_volume_az
Ignore Cinder and Nova availability zones. Default: true
When the SUSE CaaS Platform cluster has been deployed by the Heat templates, the
Velum dashboard on the admin node
(https://ADMIN-NODE-IP/) will have entries for
(CPI). The OpenStack
settings form will show the values that were set in the
caasp-environment.yaml or
caasp-multi-master-environment.yaml files.
After the SUSE CaaS Platform cluster comes up, install the latest SUSE CaaS Platform 3.0 Maintenance Update using the following steps:
Spin up a SUSE CaaS Platform cluster using Heat templates following the instructions in Section 15.1, “SUSE CaaS Platform Heat Installation Procedure”. Do not go through the bootstrapping steps, because the SUSE CaaS Platform Maintenance Update (MU) must be applied first. After the maintenance update process below succeeds, return to the SUSE CaaS Platform installation instructions and follow the admin node bootstrapping steps.
Apply the SUSE CaaS Platform 3.0 Maintenance Update with the following steps:
Log in to each node and add the update repository.
tux >sudo zypper ar http://nu.novell.com/SUSE/Updates/SUSE-CAASP/3.0/x86_64/update/ caasp_updateWith root privileges, run
transactional-updateon each node.Reboot each node
Verify that the Velum image packages were updated
tux >zypper se --detail velum-image i | sles12-velum-image | package | 3.1.7-3.27.3 | x86_64 | update_caasp
Upload a valid trust certificate that can validate a certificate presented by Keystone at the specified
keystone_auth_urlin thesystem-wide certificatesection of Velum. If the SSL certificate provided by Keystone cannot be verified, bootstrapping fails with the error messagex509: certificate signed by unknown authority.
Note
If your OpenStack endpoints operate on the Internet, or if the SSL certificates in use have been signed by a public authority, no action is needed to enable secure communication with them.
If your OpenStack services operate in a private network using SSL certificates signed by an organizational certificate authority, provide that CA certificate as the system-wide certificate.
If your OpenStack service SSL infrastructure was self-signed during the installation of SUSE OpenStack Cloud Crowbar (as is done by default), its CA certificate (with the file extension
.pem) can be retrieved from the admin node in the/etc/ssl/certs/directory. The filename should match the node name of your primary controller node. Download this file and provide it as the system-wide certificate.After the nodes come up, continue with the installation instructions in Section 15.1, “SUSE CaaS Platform Heat Installation Procedure” following the admin node cluster bootstrapping steps.
15.4 More Information about SUSE CaaS Platform #
- File Name: crowbar_install_caasp_heat_templates.xml
- ID:
More information about SUSE CaaS Platform is available at https://documentation.suse.com/suse-caasp/3/single-html/caasp-deployment/