Deploying With Crowbar
- About This Guide
- I Architecture and Requirements
- II Setting Up the Administration Server
- 3 Installing the Administration Server
- 4 Installing and Setting Up an SMT Server on the Administration Server (Optional)
- 5 Software Repository Setup
- 6 Service Configuration: Administration Server Network Configuration
- 7 Crowbar Setup
- 8 Starting the SUSE OpenStack Cloud Crowbar installation
- 9 Customizing Crowbar
- III Setting Up OpenStack Nodes and Services
- IV Setting Up Non-OpenStack Services
- V Maintenance and Support
- VI Proof of Concepts Deployments
- A VMware vSphere Installation Instructions
- B Using Cisco Nexus Switches with Neutron
- C Documentation Updates
- Glossary of Terminology and Product Names
11 Installing the OpenStack Nodes #
- File Name: depl_inst_nodes.xml
- ID: cha-depl-inst-nodes
The OpenStack nodes represent the actual cloud infrastructure. Node installation and service deployment is done automatically from the Administration Server. Before deploying the OpenStack services, SUSE Linux Enterprise Server 12 SP3 will be installed on all Control Nodes and Storage Nodes.
To prepare the installation, each node needs to be booted using PXE, which
is provided by the tftp server
from the Administration Server. Afterward you can allocate the nodes and trigger
the operating system installation.
11.1 Preparations #
- File Name: depl_inst_nodes.xml
- ID: sec-depl-inst-nodes-prep
- Meaningful Node Names
Make a note of the MAC address and the purpose of each node (for example, controller, block storage, object storage, compute). This will make deploying the OpenStack components a lot easier and less error-prone. It also enables you to assign meaningful names (aliases) to the nodes, which are otherwise listed with the MAC address by default.
- BIOS Boot Settings
Make sure booting using PXE (booting from the network) is enabled and configured as the primary boot-option for each node. The nodes will boot twice from the network during the allocation and installation phase. Booting from the first hard disk needs to be configured as the second boot option.
- Custom Node Configuration
All nodes are installed using AutoYaST with the same configuration located at
/opt/dell/chef/cookbooks/provisioner/templates/default/autoyast.xml.erb. If this configuration does not match your needs (for example if you need special third party drivers) you need to make adjustments to this file. See the https://documentation.suse.com/sles/12-SP5/single-html/SLES-autoyast/ for details. If you change the AutoYaST configuration file, you need to re-upload it to Chef using the following command:knife cookbook upload -o /opt/dell/chef/cookbooks/ provisioner
- Direct
rootLogin By default, the
rootaccount on the nodes has no password assigned, so a directrootlogin is not possible. Logging in on the nodes asrootis only possible via SSH public keys (for example, from the Administration Server).If you want to allow direct
rootlogin, you can set a password via the Crowbar Provisioner barclamp before deploying the nodes. That password will be used for therootaccount on all OpenStack nodes. Using this method after the nodes are deployed is not possible. In that case you would need to log in to each node via SSH from the Administration Server and change the password manually withpasswd.Setting a
rootPassword for the OpenStack Nodes #Create an md5-hashed
root-password, for example by usingopenssl passwd-1.Open a browser and point it to the Crowbar Web interface on the Administration Server, for example
http://192.168.124.10. Log in as usercrowbar. The password iscrowbarby default, if you have not changed it during the installation.Open the barclamp menu by clicking › . Click the barclamp entry and the proposal.
Click in the section to edit the configuration file.
Add the following line to the end of the file before the last closing curly bracket:
, "root_password_hash": "HASHED_PASSWORD"
replacing "HASHED_PASSWORD" with the password you generated in the first step.
Click .
11.2 Node Installation #
- File Name: depl_inst_nodes.xml
- ID: sec-depl-inst-nodes-install
To install a node, you need to boot it first using PXE. It will be booted with an image that enables the Administration Server to discover the node and make it available for installation. When you have allocated the node, it will boot using PXE again and the automatic installation will start.
Boot all nodes that you want to deploy using PXE. The nodes will boot into the SLEShammer image, which performs the initial hardware discovery.

Important: Limit the Number of Concurrent Boots using PXE
Booting many nodes at the same time using PXE will cause heavy load on the TFTP server, because all nodes will request the boot image at the same time. We recommend booting the nodes at different intervals.
Open a browser and point it to the Crowbar Web interface on the Administration Server, for example
http://192.168.124.10/. Log in as usercrowbar. The password iscrowbarby default, if you have not changed it.Click › to open the .
Each node that has successfully booted will be listed as being in state
Discovered, indicated by a yellow bullet. The nodes will be listed with their MAC address as a name. Wait until all nodes are listed asDiscoveredbefore proceeding. If a node does not report asDiscovered, it may need to be rebooted manually.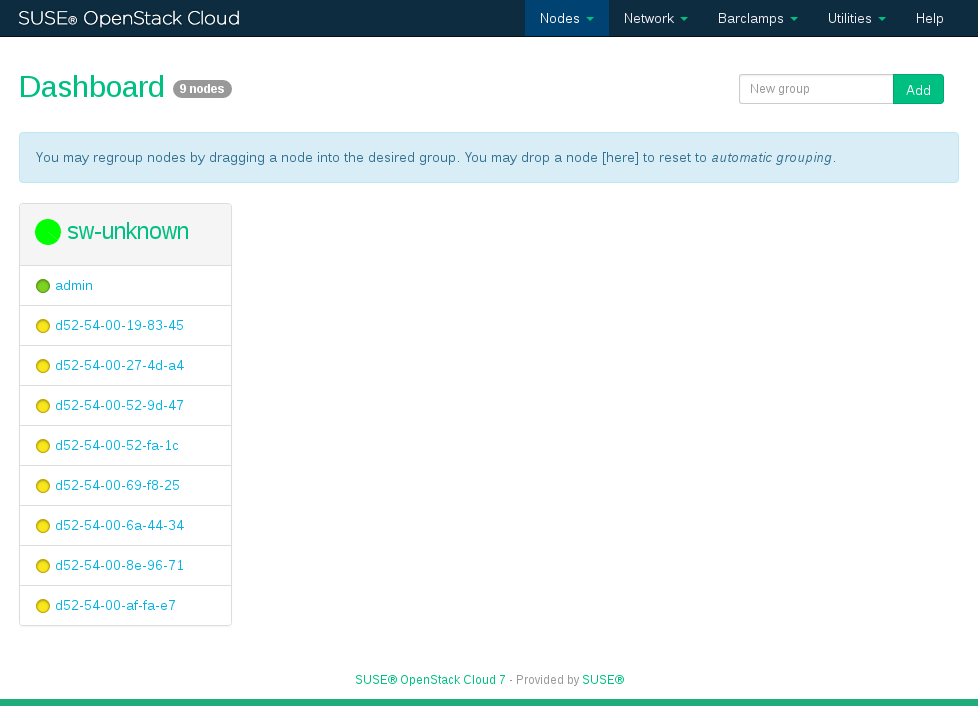
Figure 11.1: Discovered Nodes #
Although this step is optional, we recommend properly grouping your nodes at this stage, since it lets you clearly arrange all nodes. Grouping the nodes by role would be one option, for example control, compute and object storage (Swift).
Enter the name of a new group into the text box and click .
Drag and drop a node onto the title of the newly created group. Repeat this step for each node you want to put into the group.
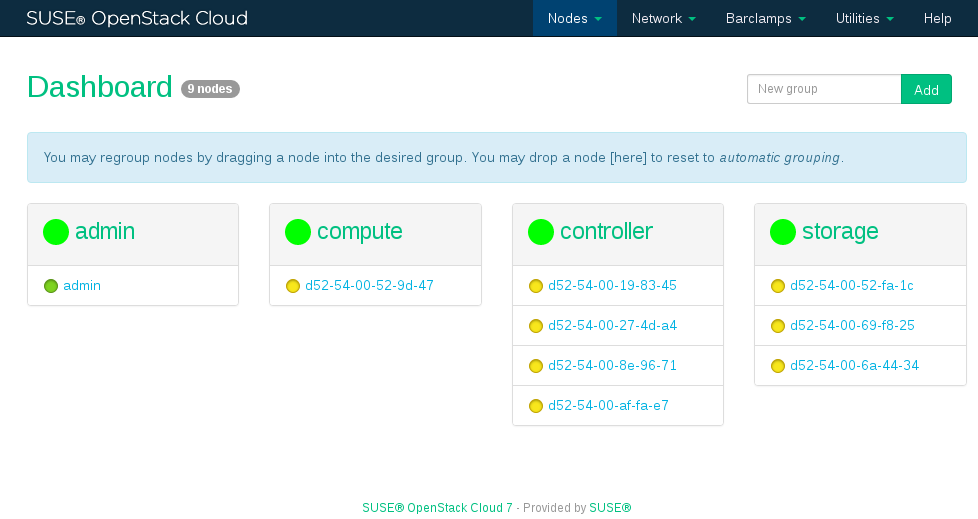
Figure 11.2: Grouping Nodes #
To allocate all nodes, click › . To allocate a single node, click the name of a node, then click .
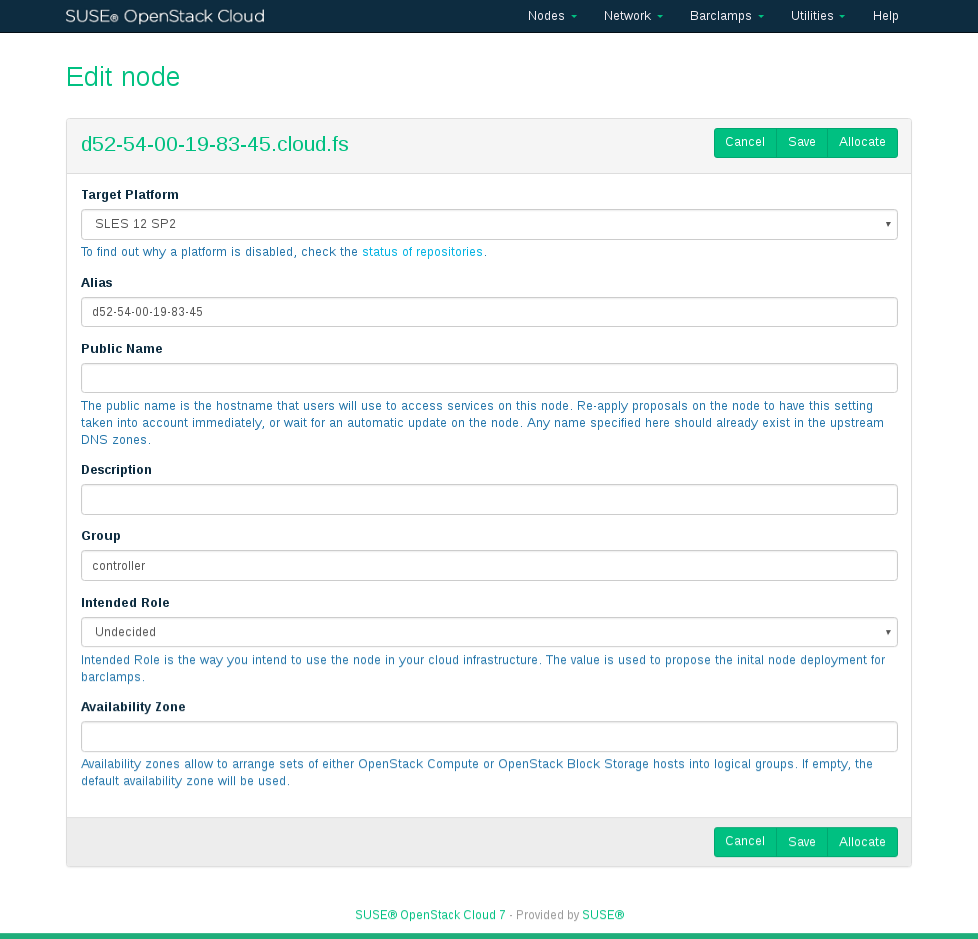
Figure 11.3: Editing a Single Node #
Important: Limit the Number of Concurrent Node Deployments
Deploying many nodes in bulk mode will cause heavy load on the Administration Server. The subsequent concurrent Chef client runs triggered by the nodes will require a lot of RAM on the Administration Server.
Therefore it is recommended to limit the number of concurrent “Allocations” in bulk mode. The maximum number depends on the amount of RAM on the Administration Server—limiting concurrent deployments to five up to ten is recommended.
In single node editing mode, you can also specify the for the node. By default, it is set to
ext4for all nodes. We recommended using the default.Provide a meaningful , , and a for each node, and then check the box. You can also specify the for the node. This optional setting is used to make reasonable proposals for the barclamps.
By default the is set to .

Tip: Alias Names
Providing an alias name will change the default node names (MAC address) to the name you provided, making it easier to identify the node. Furthermore, this alias will also be used as a DNS
CNAMEfor the node in the admin network. As a result, you can access the node via this alias when, for example, logging in via SSH.Tip: Public Names
A node's is resolved by the DNS server installed on the Administration Server and therefore only available within the cloud network. The OpenStack Dashboard or some APIs (
keystone-server,glance-server,cinder-controller,neutron-server,nova-controller, andswift-proxy) can be accessed from outside the SUSE OpenStack Cloud network. To be able to access them by name, these names need to be resolved by a name server placed outside of the SUSE OpenStack Cloud network. If you have created DNS entries for nodes, specify the name in the field.The is never used within the SUSE OpenStack Cloud network. However, if you create an SSL certificate for a node that has a public name, this name must be added as an
AlternativeNameto the certificate. See Section 2.3, “SSL Encryption” for more information.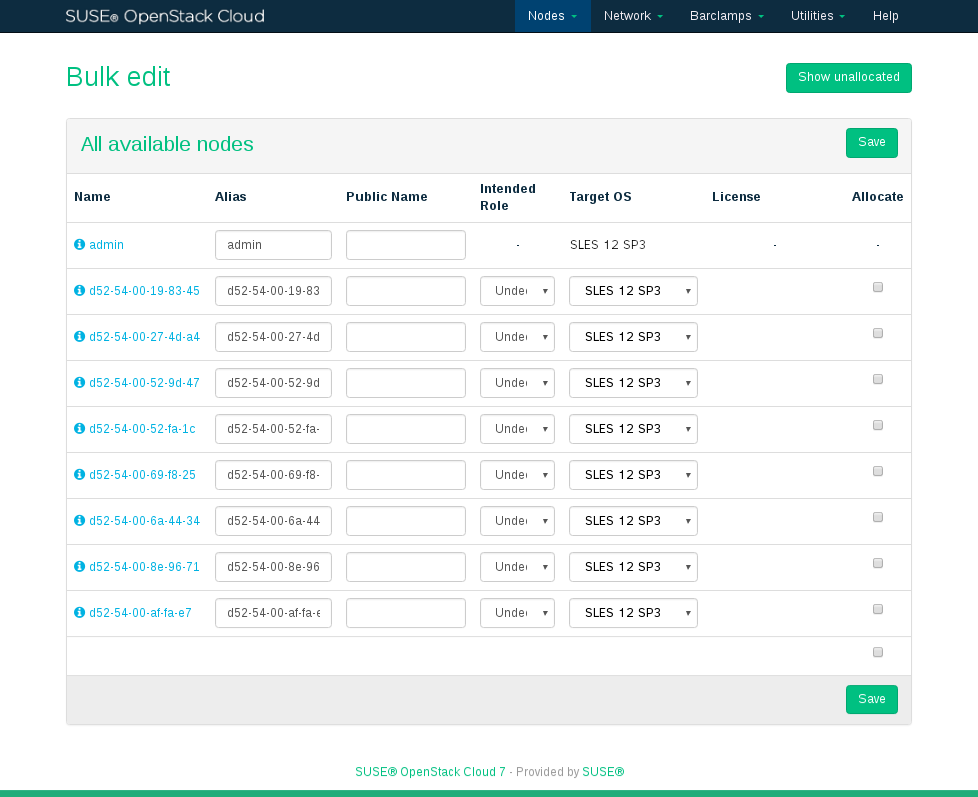
Figure 11.4: Bulk Editing Nodes #
When you have filled in the data for all nodes, click . The nodes will reboot and commence the AutoYaST-based SUSE Linux Enterprise Server installation (or installation of other target platforms, if selected) via a second boot using PXE. Click › to return to the .
Nodes that are being installed are listed with the status
Installing(yellow/green bullet). When the installation of a node has finished, it is listed as beingReady, indicated by a green bullet. Wait until all nodes are listed asReadybefore proceeding.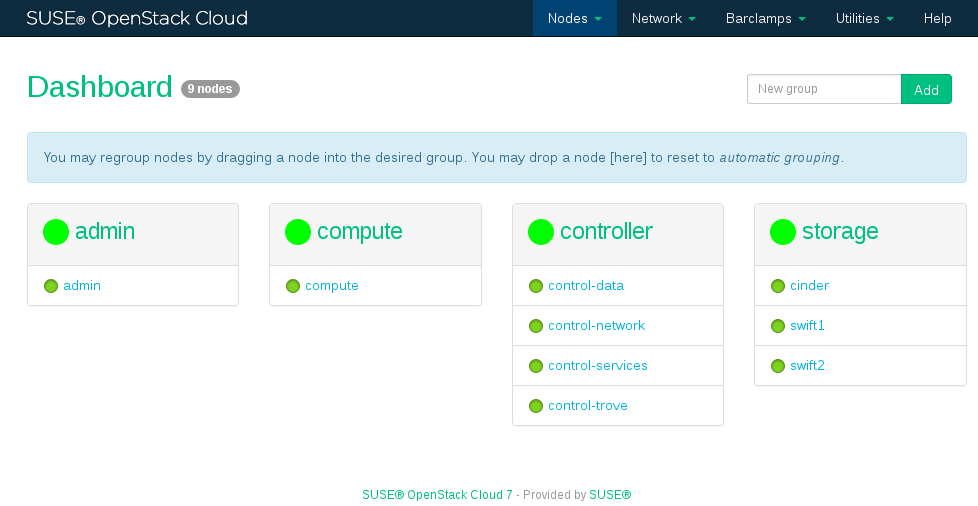
Figure 11.5: All Nodes Have Been Installed #
11.3 Converting Existing SUSE Linux Enterprise Server 12 SP3 Machines Into SUSE OpenStack Cloud Nodes #
- File Name: depl_inst_nodes.xml
- ID: sec-depl-inst-nodes-install-external
SUSE OpenStack Cloud allows adding existing machines installed with SUSE Linux Enterprise Server 12 SP3 to the pool of nodes. This enables you to use spare machines for SUSE OpenStack Cloud, and offers an alternative way of provisioning and installing nodes (via SUSE Manager for example). The machine must run SUSE Linux Enterprise Server 12 SP3.
The machine also needs to be on the same network as the Administration Server, because it needs to communicate with this server. Since the Administration Server provides a DHCP server, we recommend configuring this machine to get its network assignments from DHCP. If it has a static IP address, make sure it is not already used in the admin network. Check the list of used IP addresses with the YaST Crowbar module as described in Section 7.2, “”.
Proceed as follows to convert an existing SUSE Linux Enterprise Server 12 SP3 machine into a SUSE OpenStack Cloud node:
Download the
crowbar_registerscript from the Administration Server athttp://192.168.124.10:8091/suse-12.3/x86_64/crowbar_register. Replace the IP address with the IP address of your Administration Server usingcurlorwget. Note that the download only works from within the admin network.Make the
crowbar_registerscript executable (chmoda+xcrowbar_register).Run the
crowbar_registerscript. If you have multiple network interfaces, the script tries to automatically detect the one that is connected to the admin network. You may also explicitly specify which network interface to use by using the--interfaceswitch, for examplecrowbar_register--interface eth1.After the script has successfully run, the machine has been added to the pool of nodes in the SUSE OpenStack Cloud and can be used as any other node from the pool.
11.4 Post-Installation Configuration #
- File Name: depl_inst_nodes.xml
- ID: sec-depl-inst-nodes-post
The following lists some optional configuration steps like configuring node updates, monitoring, access, and enabling SSL. You may entirely skip the following steps or perform any of them at a later stage.
11.4.1 Deploying Node Updates with the Updater Barclamp #
- File Name: depl_inst_nodes.xml
- ID: sec-depl-inst-nodes-post-updater
To keep the operating system and the SUSE OpenStack Cloud software itself up-to-date on the nodes, you can deploy either the Updater barclamp or the SUSE Manager barclamp. The latter requires access to a SUSE Manager server. The Updater barclamp uses Zypper to install updates and patches from repositories made available on the Administration Server.
The easiest way to provide the required repositories on the Administration Server is to set up an SMT server as described in Chapter 4, Installing and Setting Up an SMT Server on the Administration Server (Optional). Alternatives to setting up an SMT server are described in Chapter 5, Software Repository Setup.
The Updater barclamp lets you deploy updates that are available on the update repositories at the moment of deployment. Each time you deploy updates with this barclamp you can choose a different set of nodes to which the updates are deployed. This lets you exactly control where and when updates are deployed.
To deploy the Updater barclamp, proceed as follows. For general instructions on how to edit barclamp proposals refer to Section 10.3, “Deploying Barclamp Proposals”.
Open a browser and point it to the Crowbar Web interface on the Administration Server, for example
http://192.168.124.10/. Log in as usercrowbar. The password iscrowbarby default, if you have not changed it during the installation.Open the barclamp menu by clicking › . Click the barclamp entry and to open the proposal.
Configure the barclamp by the following attributes. This configuration always applies to all nodes on which the barclamp is deployed. Individual configurations for certain nodes are only supported by creating a separate proposal.
Define which Zypper subcommand to use for updating. will install all patches applying to the system from the configured update repositories that are available. will update packages from all configured repositories (not just the update repositories) that have a higher version number than the installed packages. replaces each package installed with the version from the repository and deletes packages not available in the repositories.
We recommend using .
If set to true (recommended), checks if packages are correctly signed.
If set to true (recommended), Zypper automatically accepts third party licenses.
Installs patches that require a reboot (for example Kernel or glibc updates). Only set this option to
truewhen you can safely reboot the affected nodes. Refer to Chapter 17, SUSE OpenStack Cloud Maintenance for more information. Installing a new Kernel and not rebooting may result in an unstable system.Automatically reboots the system in case a patch requiring a reboot has been installed. Only set this option to
truewhen you can safely reboot the affected nodes. Refer to Chapter 17, SUSE OpenStack Cloud Maintenance for more information.
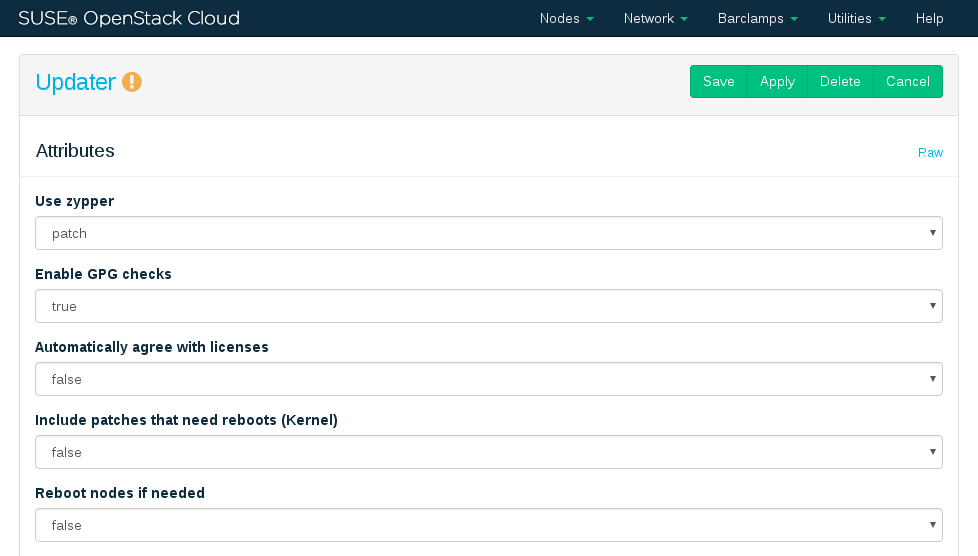
Figure 11.6: SUSE Updater barclamp: Configuration #
Choose the nodes on which the Updater barclamp should be deployed in the section by dragging them to the column.
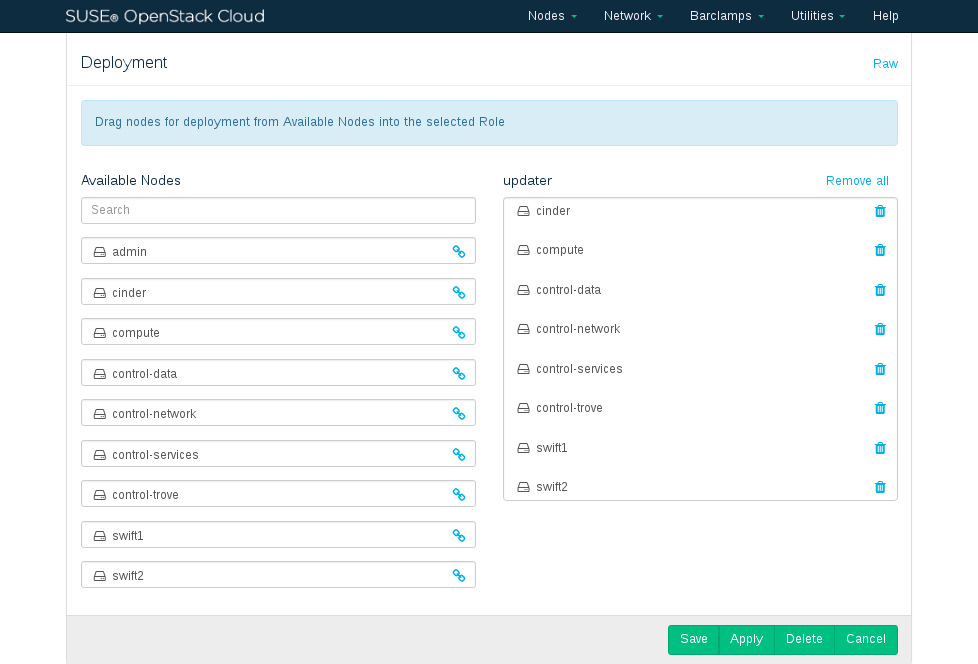
Figure 11.7: SUSE Updater barclamp: Node Deployment #
zypper keeps track of the packages and patches it
installs in /var/log/zypp/history. Review that log
file on a node to find out which updates have been installed. A second
log file recording debug information on the zypper
runs can be found at /var/log/zypper.log on each
node.
Warning: Updating Software Packages on Cluster Nodes
Before starting an update for a cluster node, either stop the cluster stack on that node or put the cluster into maintenance mode. If the cluster resource manager on a node is active during the software update, this can lead to unpredictable results like fencing of active nodes. For detailed instructions refer to https://documentation.suse.com/sle-ha/12-SP5/single-html/SLE-HA-guide/#sec-ha-migration-update.
11.4.2 Configuring Node Updates with the Barclamp #
- File Name: depl_inst_nodes.xml
- ID: sec-depl-inst-nodes-post-manager
To keep the operating system and the SUSE OpenStack Cloud software itself up-to-date on the nodes, you can deploy either barclamp or the Updater barclamp. The latter uses Zypper to install updates and patches from repositories made available on the Administration Server.
To enable the SUSE Manager server to manage the SUSE OpenStack Cloud nodes, you must make the respective SUSE OpenStack Cloud Crowbar 8 channels, the SUSE Linux Enterprise Server 12 SP3 channels, and the channels for extensions used with your deployment (High Availability Extension, SUSE Enterprise Storage) available via an activation key.
The barclamp requires access to the SUSE Manager server from every node it is deployed to.
To deploy the barclamp, proceed as follows. For general instructions on how to edit barclamp proposals refer to Section 10.3, “Deploying Barclamp Proposals”.
Download the package
rhn-org-trusted-ssl-cert-VERSION-RELEASE.noarch.rpmfrom https://susemanager.example.com/pub/. VERSION and RELEASE may vary, ask the administrator of the SUSE Manager for the correct values. susemanager.example.com needs to be replaced by the address of your SUSE Manager server. Copy the file you downloaded to/opt/dell/chef/cookbooks/suse-manager-client/files/default/ssl-cert.rpmon the Administration Server. The package contains the SUSE Manager's CA SSL Public Certificate. The certificate installation has not been automated on purpose, because downloading the certificate manually enables you to check it before copying it.Re-install the barclamp by running the following command:
/opt/dell/bin/barclamp_install.rb --rpm core
Open a browser and point it to the Crowbar Web interface on the Administration Server, for example
http://192.168.124.10/. Log in as usercrowbar. The password iscrowbarby default, if you have not changed it during the installation.Open the barclamp menu by clicking › . Click the barclamp entry and to open the proposal.
Specify the URL of the script for activation of the clients in the field.
Choose the nodes on which the SUSE Manager barclamp should be deployed in the section by dragging them to the column. We recommend deploying it on all nodes in the SUSE OpenStack Cloud.
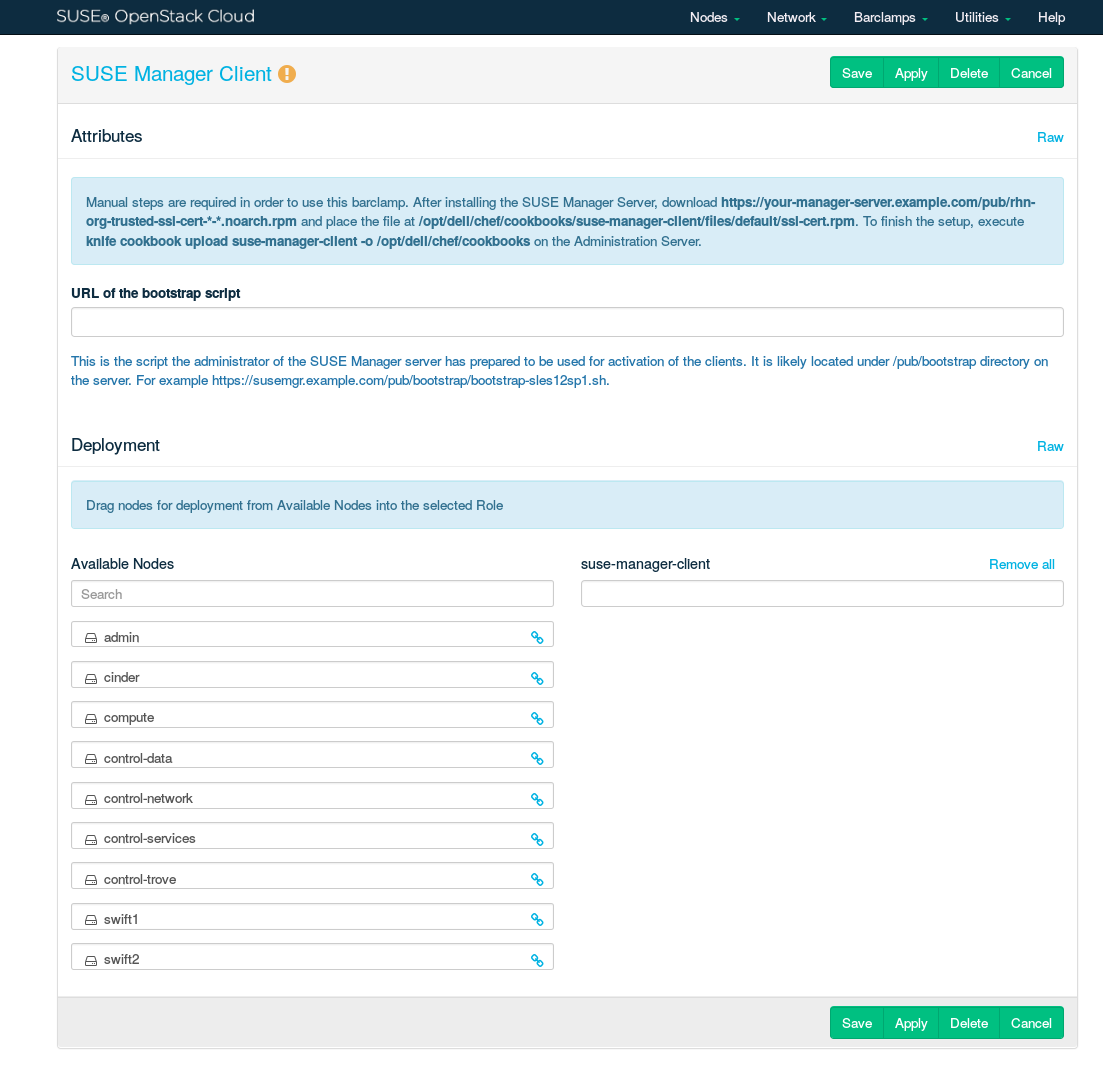
Figure 11.8: SUSE Manager barclamp #
Warning: Updating Software Packages on Cluster Nodes
Before starting an update for a cluster node, either stop the cluster stack on that node or put the cluster into maintenance mode. If the cluster resource manager on a node is active during the software update, this can lead to unpredictable results like fencing of active nodes. For detailed instructions refer to https://documentation.suse.com/sle-ha/12-SP5/single-html/SLE-HA-guide/#sec-ha-migration-update.
11.4.3 Mounting NFS Shares on a Node #
- File Name: depl_inst_nodes.xml
- ID: sec-depl-inst-nodes-post-nfs
The NFS barclamp allows you to mount NFS share from a remote host on nodes in the cloud. This feature can, for example, be used to provide an image repository for Glance. Note that all nodes which are to mount an NFS share must be able to reach the NFS server. This requires manually adjusting the network configuration.
To deploy the NFS barclamp, proceed as follows. For general instructions on how to edit barclamp proposals refer to Section 10.3, “Deploying Barclamp Proposals”.
Open a browser and point it to the Crowbar Web interface on the Administration Server, for example
http://192.168.124.10/. Log in as usercrowbar. The password iscrowbarby default, if you have not changed it during the installation.Open the barclamp menu by clicking › . Click the barclamp entry and to open the proposal.
Configure the barclamp by the following attributes. Each set of attributes is used to mount a single NFS share.
Unique name for the current configuration. This name is used in the Web interface only to distinguish between different shares.
Fully qualified host name or IP address of the NFS server.
Export name for the share on the NFS server.
Mount point on the target machine.
Mount options that will be used on the node. See
man 8
         mount
for general mount options andman 5 nfsfor a list of NFS-specific options. Note that the general optionnofail(do not report errors if device does not exist) is automatically set.
After having filled in all attributes, click . If you want to mount more than one share, fill in the data for another NFS mount. Otherwise click to save the data, or to deploy the proposal. Note that you must always click before saving or applying the barclamp, otherwise the data that was entered will be lost.
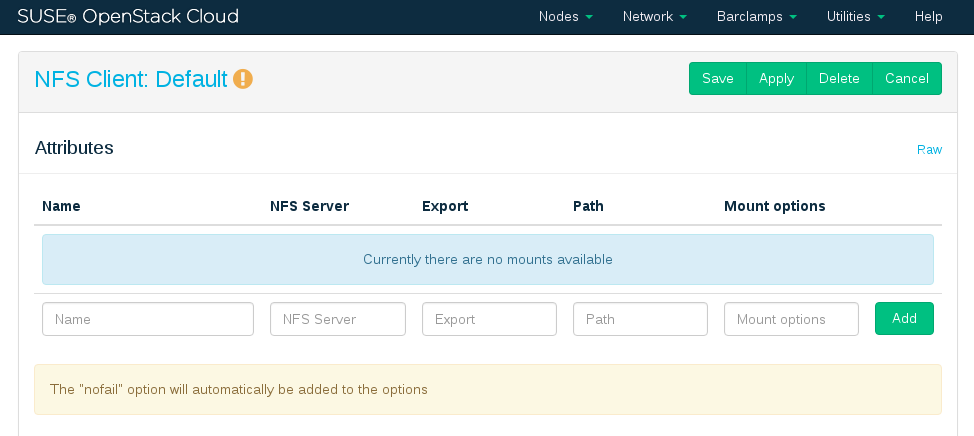
Figure 11.9: NFS barclamp #
Go to the section and drag and drop all nodes, on which the NFS shares defined above should be mounted, to the column. Click to deploy the proposal.
The NFS barclamp is the only barclamp that lets you create different proposals, enabling you to mount different NFS shares on different nodes. When you have created an NFS proposal, a special is shown in the barclamp overview of the Crowbar Web interface. Click it to either an existing proposal or a new one. New proposals must have unique names.

Figure 11.10: Editing an NFS barclamp Proposal #
11.4.4 Using an Externally Managed Ceph Cluster #
- File Name: depl_inst_nodes.xml
- ID: sec-depl-inst-nodes-post-ceph-ext
The following chapter provides instructions on using an external Ceph cluster in SUSE OpenStack Cloud Crowbar.
11.4.4.1 Requirements #
- File Name: depl_inst_nodes.xml
- ID: sec-depl-inst-nodes-post-ceph-ext-requirements
- Ceph Release
External Ceph cluster are supported with SUSE Enterprise Storage 5 or higher. The version of Ceph should be compatible with the version of the Ceph client supplied with SUSE Linux Enterprise Server 12 SP3.
- Network Configuration
The external Ceph cluster needs to be connected to a separate VLAN, which is mapped to the SUSE OpenStack Cloud storage VLAN. See Section 2.1, “Network” for more information.
11.4.4.2 Making Ceph Available on the SUSE OpenStack Cloud Nodes #
- File Name: depl_inst_nodes.xml
- ID: sec-depl-inst-nodes-post-ceph-ext-install
Ceph can be used from the KVM Compute Nodes, with Cinder, and with Glance. The following installation steps need to be executed on each node accessing Ceph:
Important: Installation Workflow
The following steps need to be executed before the barclamps get deployed.
Log in as user
rootto a machine in the Ceph cluster and generate keyring files for Cinder users. Optionally, you can generate keyring files for the Glance users (only needed when using Glance with Ceph/Rados). The keyring file that will be generated for Cinder will also be used on the Compute Nodes. To do so, you need to specify pool names and user names for both services. The default names are:Glance
Cinder
User
glance
cinder
Pool
images
volumes
Make a note of user and pool names in case you do not use the default values. You will need this information later, when deploying Glance and Cinder.

Warning: Automatic Changes to the Cluster
If you decide to use the admin keyring file to connect the external Ceph cluster, be aware that after Crowbar discovers this admin keyring, it will create client keyring files, pools, and capabilities needed to run Glance, Cinder, or Nova integration.
If you have access to the admin keyring file and agree that automatic changes will be done to the cluster as described above, copy it together with the Ceph configuration file to the Administration Server. If you cannot access this file, create a keyring:
When you can access the admin keyring file
ceph.client.admin.keyring, copy it together withceph.conf(both files are usually located in/etc/ceph) to a temporary location on the Administration Server, for example/root/tmp/.If you cannot access the admin keyring file create a new keyring file with the following commands. Re-run the commands for Glance, too, if needed. First create a key:
ceph auth get-or-create-key client.USERNAME mon "allow r" \
osd 'allow class-read object_prefix rbd_children, allow rwx \
pool=POOLNAME'
Replace USERNAME and POOLNAME with the respective values.
Now use the key to generate the keyring file
/etc/ceph/ceph.client.USERNAME.keyring:ceph-authtool \ /etc/ceph/ceph.client.USERNAME.keyring \ --create-keyring --name=client.USERNAME> \ --add-key=KEY
Replace USERNAME with the respective value.
Copy the Ceph configuration file
ceph.conf(usually located in/etc/ceph) and the keyring file(s) generated above to a temporary location on the Administration Server, for example/root/tmp/.
Log in to the Crowbar Web interface and check whether the nodes which should have access to the Ceph cluster already have an IP address from the storage network. Do so by going to the and clicking the node name. An should be listed for . Make a note of the of each node that has no storage network IP address.
Log in to the Administration Server as user
rootand run the following command for all nodes you noted down in the previous step:crowbar network allocate_ip "default" NODE "storage" "host" chef-client
NODE needs to be replaced by the node's name.
After executing the command in the previous step for all affected nodes, run the command
chef-clienton the Administration Server.Log in to each affected node as user
root. See How can I log in to a node as root? for instructions. On each node, do the following:Manually install nova, cinder (if using cinder) and/or glance (if using glance) packages with the following commands:
zypper in openstack-glance
zypper in openstack-cinder
zypper in openstack-nova
Copy the ceph.conf file from the Administration Server to
/etc/ceph:mkdir -p /etc/ceph scp root@admin:/root/tmp/ceph.conf /etc/ceph chmod 664 /etc/ceph/ceph.conf
Copy the keyring file(s) to
/etc/ceph. The exact process depends on whether you have copied the admin keyring file or whether you have created your own keyrings:If you have copied the admin keyring file, run the following command on the Control Node(s) on which Cinder and Glance will be deployed, and on all KVM Compute Nodes:
scp root@admin:/root/tmp/ceph.client.admin.keyring /etc/ceph
chmod 640 /etc/ceph/ceph.client.admin.keyring
If you have created you own keyrings, run the following command on the Control Node on which Cinder will be deployed, and on all KVM Compute Nodes to copy the Cinder keyring:
scp root@admin:/root/tmp/ceph.client.cinder.keyring /etc/ceph
chmod 640 /etc/ceph/ceph.client.cinder.keyring
On Control Node on which Cinder will be deployed run the following command to update file ownership:
chown root.cinder /etc/ceph/ceph.client.cinder.keyring
On KVM Compute Nodes run the following command to update file ownership:
chown root.nova /etc/ceph/ceph.client.cinder.keyring
Now copy the Glance keyring to the Control Node on which Glance will be deployed:
scp root@admin:/root/tmp/ceph.client.glance.keyring /etc/ceph
chmod 640 /etc/ceph/ceph.client.glance.keyring
chown root.glance /etc/ceph/ceph.client.glance.keyring
11.4.5 Accessing the Nodes #
- File Name: depl_inst_nodes.xml
- ID: sec-depl-inst-nodes-post-access
The nodes can only be accessed via SSH from the Administration Server—it is not possible to connect to them from any other host in the network.
The root account on the nodes has no
password assigned, therefore logging in to a node as
root@node is only possible via SSH
with key authentication. By default, you can only log in with the key of
the root of the Administration Server
(root@admin) via SSH only.
If you have added users to the Administration Server and want to
give them permission to log in to the nodes as well, you need to add
these users' public SSH keys to root's
authorized_keys file on all nodes. Proceed as
follows:
Procedure 11.1: Copying SSH Keys to All Nodes #
If they do not already exist, generate an SSH key pair with
ssh-keygen. This key pair belongs to the user that you use to log in to the nodes. Alternatively, copy an existing public key withssh-copy-id. Refer to the respective man pages for more information.Log in to the Crowbar Web interface on the Administration Server, for example
http://192.168.124.10/(user name and default password:crowbar).Open the barclamp menu by clicking › . Click the barclamp entry and the proposal.
Copy and paste the public SSH key of the user into the text box. If adding keys for multiple users, note that each key needs to be placed on a new line.
Click to deploy the keys and save your changes to the proposal.
11.4.6 Enabling SSL #
- File Name: depl_inst_nodes.xml
- ID: sec-depl-inst-nodes-post-ssl
To enable SSL to encrypt communication within the cloud (see Section 2.3, “SSL Encryption” for details), all nodes running encrypted services need SSL certificates. An SSL certificate is, at a minimum, required on the Control Node.
Each certificate consists
of a pair of files: the certificate file (for example,
signing_cert.pem) and the key file (for example,
signing_key.pem). If you use your own certificate
authority (CA) for signing, you will also need a certificate file for
the CA (for example, ca.pem). We recommend copying the files to the /etc directory using the
directory structure outlined below. If you use a dedicated certificate
for each service, create directories named after the services (for
example, /etc/keystone). If you are using shared
certificates, use a directory such as /etc/cloud.
Recommended Locations for Shared Certificates #
- SSL Certificate File
/etc/cloud/ssl/certs/signing_cert.pem- SSL Key File
/etc/cloud/private/signing_key.pem- CA Certificates File
/etc/cloud/ssl/certs/ca.pem
11.5 Editing Allocated Nodes #
- File Name: depl_inst_nodes.xml
- ID: sec-depl-inst-nodes-edit
All nodes that have been allocated can be decommissioned or re-installed. Click a node's name in the to open a screen with the node details. The following options are available:
Deletes a node from the pool. If you want to re-use this node again, it needs to be reallocated and re-installed from scratch.
Triggers a reinstallation. The machine stays allocated. Any barclamps that were deployed on the machine will be re-applied after the installation.
Temporarily removes the node from the pool of nodes. After you reallocate the node it will take its former role. Useful for adding additional machines in times of high load or for decommissioning machines in times of low load.
- ›
Reboots the node.
- ›
Shuts the node down.
- ›
Forces a (non-clean) shuts down and a restart afterward. Only use if a reboot does not work.
- ›
Forces a (non-clean) node shut down. Only use if a clean shut down does not work.
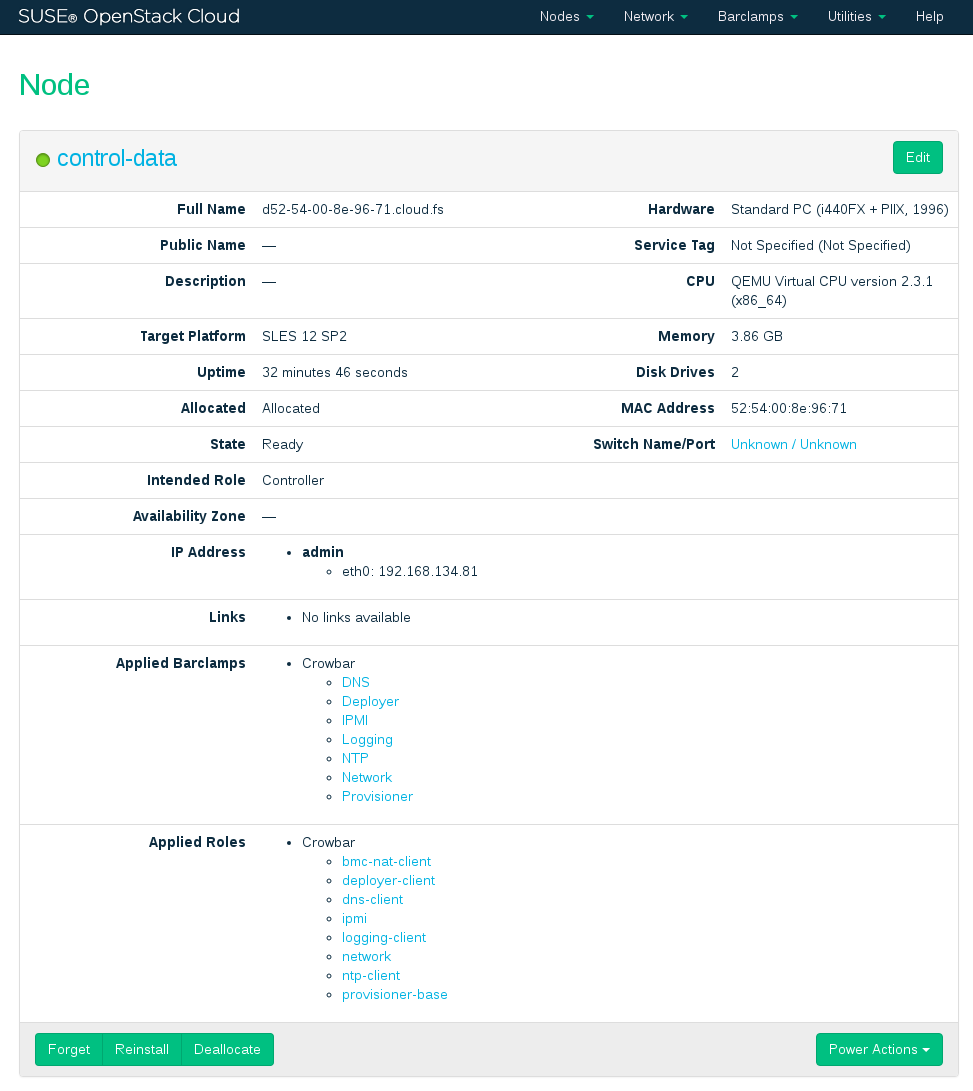
Figure 11.11: Node Information #
Warning: Editing Nodes in a Production System
When de-allocating nodes that provide essential services, the complete cloud will become unusable. If you have not disabled redundancy, you can disable single storage nodes or single compute nodes. However, disabling Control Node(s) will cause major problems. It will either “kill” certain services (for example Swift) or, at worst the complete cloud (when deallocating the Control Node hosting Neutron). You should also not disable the nodes providing swift ring and proxy services.