Deploying With Crowbar
- About This Guide
- I Architecture and Requirements
- II Setting Up the Administration Server
- 3 Installing the Administration Server
- 4 Installing and Setting Up an SMT Server on the Administration Server (Optional)
- 5 Software Repository Setup
- 6 Service Configuration: Administration Server Network Configuration
- 7 Crowbar Setup
- 8 Starting the SUSE OpenStack Cloud Crowbar installation
- 9 Customizing Crowbar
- III Setting Up OpenStack Nodes and Services
- IV Setting Up Non-OpenStack Services
- V Maintenance and Support
- VI Proof of Concepts Deployments
- A VMware vSphere Installation Instructions
- B Using Cisco Nexus Switches with Neutron
- C Documentation Updates
- Glossary of Terminology and Product Names
12 Deploying the OpenStack Services #
- File Name: depl_nodes.xml
- ID: cha-depl-ostack
- 12.1 Deploying Designate
- 12.2 Deploying Pacemaker (Optional, HA Setup Only)
- 12.3 Deploying the Database
- 12.4 Deploying RabbitMQ
- 12.5 Deploying Keystone
- 12.6 Deploying Monasca (Optional)
- 12.7 Deploying Swift (optional)
- 12.8 Deploying Glance
- 12.9 Deploying Cinder
- 12.10 Deploying Neutron
- 12.11 Deploying Nova
- 12.12 Deploying Horizon (OpenStack Dashboard)
- 12.13 Deploying Heat (Optional)
- 12.14 Deploying Ceilometer (Optional)
- 12.15 Deploying Manila
- 12.16 Deploying Tempest (Optional)
- 12.17 Deploying Magnum (Optional)
- 12.18 Deploying Barbican (Optional)
- 12.19 Deploying Sahara
- 12.20 Deploying Ironic (optional)
- 12.21 How to Proceed
- 12.22 SUSE Enterprise Storage integration
- 12.23 Roles and Services in SUSE OpenStack Cloud Crowbar
- 12.24 Crowbar Batch Command
After the nodes are installed and configured you can start deploying the OpenStack components to finalize the installation. The components need to be deployed in a given order, because they depend on one another. The component for an HA setup is the only exception from this rule—it can be set up at any time. However, when deploying SUSE OpenStack Cloud Crowbar from scratch, we recommend deploying the proposal(s) first. Deployment for all components is done from the Crowbar Web interface through recipes, so-called “barclamps”. (See Section 12.23, “Roles and Services in SUSE OpenStack Cloud Crowbar” for a table of all roles and services, and how to start and stop them.)
The components controlling the cloud, including storage management and control components, need to be installed on the Control Node(s) (refer to Section 1.2, “The Control Node(s)” for more information). However, you may not use your Control Node(s) as a compute node or storage host for Swift. Do not install he components and on the Control Node(s). These components must be installed on dedicated Storage Nodes and Compute Nodes.
When deploying an HA setup, the Control Nodes are replaced by one or more controller clusters consisting of at least two nodes, and three are recommended. We recommend setting up three separate clusters for data, services, and networking. See Section 2.6, “High Availability” for more information on requirements and recommendations for an HA setup.
The OpenStack components need to be deployed in the following order. For general instructions on how to edit and deploy barclamps, refer to Section 10.3, “Deploying Barclamp Proposals”. Any optional components that you elect to use must be installed in their correct order.
12.1 Deploying Designate #
- File Name: depl_nodes.xml
- ID: sec-depl-ostack-designate
Designate provides SUSE OpenStack Cloud Crowbar DNS as a Service (DNSaaS). It is used to
create and propagate zones and records over the network using pools of DNS
servers. Deployment defaults are in place, so not much is required to
configure Designate. Neutron needs additional settings for integration with
Designate, which are also present in the [designate] section in Neutron configuration.
The Designate barclamp relies heavily on the DNS barclamp and expects it to be applied without any failures.
Note
In order to deploy Designate, at least one node is necessary in the DNS barclamp that is not the admin node. The admin node is not added to the public network. So another node is needed that can be attached to the public network and appear in the designate default pool.
We recommend that DNS services are running in a cluster in highly available deployments where Designate services are running in a cluster. For example, in a typical HA deployment where the controllers are deployed in a 3-node cluster, the DNS barclamp should be applied to all the controllers, in the same manner as Designate.
- designate-server role
Installs the Designate server packages and configures the mini-dns (mdns) service required by Designate.
- designate-worker role
Configures a Designate worker on the selected nodes. Designate uses the workers to distribute its workload.
Designate Sink is an optional service and is not configured as part
of this barclamp.
Designate uses pool(s) over which it can distribute zones and records. Pools can have varied configuration. Any misconfiguration can lead to information leakage.
The Designate barclamp creates default Bind9 pool out of the box, which can be
modified later as needed. The default Bind9 pool configuration is created by Crowbar
on a node with designate-server role in
/etc/designate/pools.crowbar.yaml. You can copy
this file and edit it according to your requirements. Then provide this
configuration to Designate using the command:
ardana > designate-manage pool update --file /etc/designate/pools.crowbar.yaml
The dns_domain specified in Neutron configuration in [designate] section
is the default Zone where DNS records for Neutron resources are created via
Neutron-Designate integration. If this is desired, you have to create this zone
explicitly using the following command:
ardana > openstack zone create < email > < dns_domain >Editing the Designate proposal:
12.1.1 Using PowerDNS Backend #
- File Name: depl_nodes.xml
- ID: sec-depl-ostack-designate-powerdns
Designate uses Bind9 backend by default. It is also possible to use PowerDNS backend in addition to, or as an alternative, to Bind9 backend. To do so PowerDNS must be manually deployed as The Designate barclamp currently does not provide any facility to automatically install and configure PowerDNS. This section outlines the steps to deploy PowerDNS backend.
Note
If PowerDNS is already deployed, you may skip the Section 12.1.1.1, “Install PowerDNS” section and jump to the Section 12.1.1.2, “Configure Designate To Use PowerDNS Backend” section.
12.1.1.1 Install PowerDNS #
- File Name: depl_nodes.xml
- ID: sec-depl-ostack-install-powerdns
Follow these steps to install and configure PowerDNS on a Crowbar node. Keep in mind that PowerDNS must be deployed with MySQL backend.
Note
We recommend that PowerDNS are running in a cluster in highly availability deployments where Designate services are running in a cluster. For example, in a typical HA deployment where the controllers are deployed in a 3-node cluster, PowerDNS should be running on all the controllers, in the same manner as Designate.
Install PowerDNS packages.
root #zypper install pdns pdns-backend-mysqlEdit
/etc/pdns/pdns.confand provide these options: (See https://doc.powerdns.com/authoritative/settings.html for a complete reference).- api
Set it to
yesto enable Web service Rest API.- api-key
Static Rest API access key. Use a secure random string here.
- launch
Must set to
gmysqlto use MySQL backend.- gmysql-host
Hostname (i.e. FQDN) or IP address of the MySQL server.
- gmysql-user
MySQL user which have full access to the PowerDNS database.
- gmysql-password
Password for the MySQL user.
- gmysql-dbname
MySQL database name for PowerDNS.
- local-port
Port number where PowerDNS is listening for upcoming requests.
- setgid
The group where the PowerDNS process is running under.
- setuid
The user where the PowerDNS process is running under.
- webserver
Must set to
yesto enable web service RestAPI.- webserver-address
Hostname (FQDN) or IP address of the PowerDNS web service.
- webserver-allow-from
List of IP addresses (IPv4 or IPv6) of the nodes that are permitted to talk to the PowerDNS web service. These must include the IP address of the Designate worker nodes.
For example:
api=yes
api-key=Sfw234sDFw90z
launch=gmysql
gmysql-host=mysql.acme.com
gmysql-user=powerdns
gmysql-password=SuperSecured123
gmysql-dbname=powerdns
local-port=54
setgid=pdns
setuid=pdns
webserver=yes
webserver-address=192.168.124.83
webserver-allow-from=0.0.0.0/0,::/0
Login to MySQL from a Crowbar MySQL node and create the PowerDNS database and the user which has full access to the PowerDNS database. Remember, the database name, username, and password must match
gmysql-dbname,gmysql-user, andgmysql-passwordthat were specified above respectively.For example:
root #mysql Welcome to the MariaDB monitor. Commands end with ; or \g. Your MariaDB connection id is 20075 Server version: 10.2.29-MariaDB-log SUSE package Copyright (c) 2000, 2018, Oracle, MariaDB Corporation Ab and others. Type 'help;' or '\h' for help. Type '\c' to clear the current input statement. MariaDB [(none)]> CREATE DATABASE powerdns; Query OK, 1 row affected (0.01 sec) MariaDB [(none)]> GRANT ALL ON powerdns.* TO 'powerdns'@'localhost' IDENTIFIED BY 'SuperSecured123'; Query OK, 0 rows affected (0.00 sec) MariaDB [(none)]> GRANT ALL ON powerdns.* TO 'powerdns'@'192.168.124.83' IDENTIFIED BY 'SuperSecured123'; Query OK, 0 rows affected, 1 warning (0.02 sec) MariaDB [(none)]> FLUSH PRIVILEGES; Query OK, 0 rows affected (0.01 sec) MariaDB [(none)]> exit ByeCreate a MySQL schema file, named
powerdns-schema.sql, with the following content:/* SQL statements to create tables in designate_pdns DB. Note: This file is taken as is from: https://raw.githubusercontent.com/openstack/designate/master/devstack/designate_plugins/backend-pdns4-mysql-db.sql */ CREATE TABLE domains ( id INT AUTO_INCREMENT, name VARCHAR(255) NOT NULL, master VARCHAR(128) DEFAULT NULL, last_check INT DEFAULT NULL, type VARCHAR(6) NOT NULL, notified_serial INT DEFAULT NULL, account VARCHAR(40) DEFAULT NULL, PRIMARY KEY (id) ) Engine=InnoDB; CREATE UNIQUE INDEX name_index ON domains(name); CREATE TABLE records ( id INT AUTO_INCREMENT, domain_id INT DEFAULT NULL, name VARCHAR(255) DEFAULT NULL, type VARCHAR(10) DEFAULT NULL, -- Changed to "TEXT", as VARCHAR(65000) is too big for most MySQL installs content TEXT DEFAULT NULL, ttl INT DEFAULT NULL, prio INT DEFAULT NULL, change_date INT DEFAULT NULL, disabled TINYINT(1) DEFAULT 0, ordername VARCHAR(255) BINARY DEFAULT NULL, auth TINYINT(1) DEFAULT 1, PRIMARY KEY (id) ) Engine=InnoDB; CREATE INDEX nametype_index ON records(name,type); CREATE INDEX domain_id ON records(domain_id); CREATE INDEX recordorder ON records (domain_id, ordername); CREATE TABLE supermasters ( ip VARCHAR(64) NOT NULL, nameserver VARCHAR(255) NOT NULL, account VARCHAR(40) NOT NULL, PRIMARY KEY (ip, nameserver) ) Engine=InnoDB; CREATE TABLE comments ( id INT AUTO_INCREMENT, domain_id INT NOT NULL, name VARCHAR(255) NOT NULL, type VARCHAR(10) NOT NULL, modified_at INT NOT NULL, account VARCHAR(40) NOT NULL, -- Changed to "TEXT", as VARCHAR(65000) is too big for most MySQL installs comment TEXT NOT NULL, PRIMARY KEY (id) ) Engine=InnoDB; CREATE INDEX comments_domain_id_idx ON comments (domain_id); CREATE INDEX comments_name_type_idx ON comments (name, type); CREATE INDEX comments_order_idx ON comments (domain_id, modified_at); CREATE TABLE domainmetadata ( id INT AUTO_INCREMENT, domain_id INT NOT NULL, kind VARCHAR(32), content TEXT, PRIMARY KEY (id) ) Engine=InnoDB; CREATE INDEX domainmetadata_idx ON domainmetadata (domain_id, kind); CREATE TABLE cryptokeys ( id INT AUTO_INCREMENT, domain_id INT NOT NULL, flags INT NOT NULL, active BOOL, content TEXT, PRIMARY KEY(id) ) Engine=InnoDB; CREATE INDEX domainidindex ON cryptokeys(domain_id); CREATE TABLE tsigkeys ( id INT AUTO_INCREMENT, name VARCHAR(255), algorithm VARCHAR(50), secret VARCHAR(255), PRIMARY KEY (id) ) Engine=InnoDB; CREATE UNIQUE INDEX namealgoindex ON tsigkeys(name, algorithm);
Create the PowerDNS schema for the database using
mysqlCLI. For example:root #mysql powerdns < powerdns-schema.sqlEnable
pdnssystemd service.root #systemctl enable pdnsroot #systemctl start pdnsIf
pdnsis successfully running, you should see the following logs by runningjournalctl -u pdnscommand.Feb 07 01:44:12 d52-54-77-77-01-01 systemd[1]: Started PowerDNS Authoritative Server. Feb 07 01:44:12 d52-54-77-77-01-01 pdns_server[21285]: Done launching threads, ready to distribute questions
12.1.1.2 Configure Designate To Use PowerDNS Backend #
- File Name: depl_nodes.xml
- ID: sec-depl-ostack-designate-use-powerdns-backend
Configure Designate to use PowerDNS backend by appending the PowerDNS
servers to /etc/designate/pools.crowbar.yaml file
on a Designate worker node.
Note
If we are replacing Bind9 backend with PowerDNS backend, make sure to
remove the bind9 entries from
/etc/designate/pools.crowbar.yaml.
In HA deployment, there should be multiple PowerDNS entries.
Also, make sure the api_token matches the
api-key that was specified in the
/etc/pdns/pdns.conf file earlier.
Append the PowerDNS entries to the end of
/etc/designate/pools.crowbar.yaml. For example:
---
- name: default-bind
  description: Default BIND9 Pool
  id: 794ccc2c-d751-44fe-b57f-8894c9f5c842
  attributes: {}
  ns_records:
  - hostname: public-d52-54-77-77-01-01.virtual.cloud.suse.de.
    priority: 1
  - hostname: public-d52-54-77-77-01-02.virtual.cloud.suse.de.
    priority: 1
  nameservers:
  - host: 192.168.124.83
    port: 53
  - host: 192.168.124.81
    port: 53
  also_notifies: []
  targets:
  - type: bind9
    description: BIND9 Server
    masters:
    - host: 192.168.124.83
      port: 5354
    - host: 192.168.124.82
      port: 5354
    - host: 192.168.124.81
      port: 5354
    options:
      host: 192.168.124.83
      port: 53
      rndc_host: 192.168.124.83
      rndc_port: 953
      rndc_key_file: "/etc/designate/rndc.key"
  - type: bind9
    description: BIND9 Server
    masters:
    - host: 192.168.124.83
      port: 5354
    - host: 192.168.124.82
      port: 5354
    - host: 192.168.124.81
      port: 5354
    options:
      host: 192.168.124.81
      port: 53
      rndc_host: 192.168.124.81
      rndc_port: 953
      rndc_key_file: "/etc/designate/rndc.key"
  - type: pdns4
    description: PowerDNS4 DNS Server
    masters:
      - host: 192.168.124.83
        port: 5354
      - host: 192.168.124.82
        port: 5354
      - host: 192.168.124.81
        port: 5354
    options:
      host: 192.168.124.83
      port: 54
      api_endpoint: http://192.168.124.83:8081
      api_token: Sfw234sDFw90z
Update the pools using designate-manage CLI.
tux > designate-manage pool update --file /etc/designate/pools.crowbar.yamlOnce Designate sync up with PowerDNS, you should see the domains in the PowerDNS database which reflects the zones in Designate.
Note
It make take a few minutes for Designate to sync with PowerDNS.
We can verify that the domains are successfully sync up with Designate
by inpsecting the domains table in the database.
For example:
root # mysql powerdns
Reading table information for completion of table and column names
You can turn off this feature to get a quicker startup with -A

Welcome to the MariaDB monitor.  Commands end with ; or \g.
Your MariaDB connection id is 21131
Server version: 10.2.29-MariaDB-log SUSE package

Copyright (c) 2000, 2018, Oracle, MariaDB Corporation Ab and others.

Type 'help;' or '\h' for help. Type '\c' to clear the current input statement.

MariaDB [powerdns]> select * from domains;
+----+---------+--------------------------------------------------------------+------------+-------+-----------------+---------+
| id | name    | master                                                       | last_check | type  | notified_serial | account |
+----+---------+--------------------------------------------------------------+------------+-------+-----------------+---------+
|  1 | foo.bar | 192.168.124.81:5354 192.168.124.82:5354 192.168.124.83:5354  |       NULL | SLAVE |            NULL |         |
+----+---------+--------------------------------------------------------------+------------+-------+-----------------+---------+
1 row in set (0.00 sec)
12.2 Deploying Pacemaker (Optional, HA Setup Only) #
- File Name: depl_nodes.xml
- ID: sec-depl-ostack-pacemaker
To make the SUSE OpenStack Cloud controller functions and the Compute Nodes highly available, set up one or more clusters by deploying Pacemaker (see Section 2.6, “High Availability” for details). Since it is possible (and recommended) to deploy more than one cluster, a separate proposal needs to be created for each cluster.
Deploying Pacemaker is optional. In case you do not want to deploy it, skip this section and start the node deployment by deploying the database as described in Section 12.3, “Deploying the Database”.
Note: Number of Cluster Nodes
To set up a cluster, at least two nodes are required. See Section 2.6.5, “Cluster Requirements and Recommendations” for more information.
To create a proposal, go to › and click for the Pacemaker barclamp. A drop-down box where you can enter a name and a description for the proposal opens. Click to open the configuration screen for the proposal.

Important: Proposal Name
The name you enter for the proposal will be used to generate host names for the virtual IP addresses of HAProxy. By default, the names follow this scheme:
cluster-PROPOSAL_NAME.FQDN
(for the internal name) |
public-cluster-PROPOSAL_NAME.FQDN
(for the public name) |
For example, when PROPOSAL_NAME is set to
data, this results in the following names:
cluster-data.example.com
|
public-cluster-data.example.com
|
For requirements regarding SSL encryption and certificates, see Section 2.3, “SSL Encryption”.
The following options are configurable in the Pacemaker configuration screen:
- Transport for Communication
Choose a technology used for cluster communication. You can choose between , sending a message to multiple destinations, or , sending a message to a single destination. By default unicast is used.
Whenever communication fails between one or more nodes and the rest of the cluster a “cluster partition” occurs. The nodes of a cluster are split in partitions but are still active. They can only communicate with nodes in the same partition and are unaware of the separated nodes. The cluster partition that has the majority of nodes is defined to have “quorum”.
This configuration option defines what to do with the cluster partition(s) that do not have the quorum. See https://documentation.suse.com/sle-ha/12-SP5/single-html/SLE-HA-guide/#sec-ha-config-basics-global-quorum, for details.
The recommended setting is to choose . However, is enforced for two-node clusters to ensure that the remaining node continues to operate normally in case the other node fails. For clusters using shared resources, choosing may be used to ensure that these resources continue to be available.
- STONITH: Configuration mode for STONITH
“Misbehaving” nodes in a cluster are shut down to prevent them from causing trouble. This mechanism is called STONITH (“Shoot the other node in the head”). STONITH can be configured in a variety of ways, refer to https://documentation.suse.com/sle-ha/12-SP5/single-html/SLE-HA-guide/#cha-ha-fencing for details. The following configuration options exist:
STONITH will not be configured when deploying the barclamp. It needs to be configured manually as described in https://documentation.suse.com/sle-ha/12-SP5/single-html/SLE-HA-guide/#cha-ha-fencing. For experts only.
Using this option automatically sets up STONITH with data received from the IPMI barclamp. Being able to use this option requires that IPMI is configured for all cluster nodes. This should be done by default. To check or change the IPMI deployment, go to › › › . Also make sure the option is set to on this barclamp.

Important: STONITH Devices Must Support IPMI
To configure STONITH with the IPMI data, all STONITH devices must support IPMI. Problems with this setup may occur with IPMI implementations that are not strictly standards compliant. In this case it is recommended to set up STONITH with STONITH block devices (SBD).
This option requires manually setting up shared storage and a watchdog on the cluster nodes before applying the proposal. To do so, proceed as follows:
Prepare the shared storage. The path to the shared storage device must be persistent and consistent across all nodes in the cluster. The SBD device must not use host-based RAID or cLVM2.
Install the package
sbdon all cluster nodes.Initialize the SBD device with by running the following command. Make sure to replace
/dev/SBDwith the path to the shared storage device.sbd -d /dev/SBD create
Refer to https://documentation.suse.com/sle-ha/12-SP5/single-html/SLE-HA-guide/#pro-ha-storage-protect-sbd-create for details.
In , specify the respective kernel module to be used. Find the most commonly used watchdog drivers in the following table:
Hardware Driver HP hpwdtDell, Fujitsu, Lenovo (Intel TCO) iTCO_wdtXen VM (DomU) xen_xdtGeneric softdogIf your hardware is not listed above, either ask your hardware vendor for the right name or check the following directory for a list of choices:
/lib/modules/KERNEL_VERSION/kernel/drivers/watchdog.Alternatively, list the drivers that have been installed with your kernel version:
root #rpm-ql kernel-VERSION |grepwatchdogIf the nodes need different watchdog modules, leave the text box empty.
After the shared storage has been set up, specify the path using the “by-id” notation (
/dev/disk/by-id/DEVICE). It is possible to specify multiple paths as a comma-separated list.Deploying the barclamp will automatically complete the SBD setup on the cluster nodes by starting the SBD daemon and configuring the fencing resource.
All nodes will use the identical configuration. Specify the to use and enter for the agent.
To get a list of STONITH devices which are supported by the High Availability Extension, run the following command on an already installed cluster nodes:
stonith -L. The list of parameters depends on the respective agent. To view a list of parameters use the following command:stonith -t agent -n
All nodes in the cluster use the same , but can be configured with different parameters. This setup is, for example, required when nodes are in different chassis and therefore need different IPMI parameters.
To get a list of STONITH devices which are supported by the High Availability Extension, run the following command on an already installed cluster nodes:
stonith -L. The list of parameters depends on the respective agent. To view a list of parameters use the following command:stonith -t agent -n
Use this setting for completely virtualized test installations. This option is not supported.
- STONITH: Do not start corosync on boot after fencing
With STONITH, Pacemaker clusters with two nodes may sometimes hit an issue known as STONITH deathmatch where each node kills the other one, resulting in both nodes rebooting all the time. Another similar issue in Pacemaker clusters is the fencing loop, where a reboot caused by STONITH will not be enough to fix a node and it will be fenced again and again.
This setting can be used to limit these issues. When set to , a node that has not been properly shut down or rebooted will not start the services for Pacemaker on boot. Instead, the node will wait for action from the SUSE OpenStack Cloud operator. When set to , the services for Pacemaker will always be started on boot. The value is used to have the most appropriate value automatically picked: it will be for two-node clusters (to avoid STONITH deathmatches), and otherwise.
When a node boots but not starts corosync because of this setting, then the node's status is in the is set to "
Problem" (red dot).- Mail Notifications: Enable Mail Notifications
Get notified of cluster node failures via e-mail. If set to , you need to specify which to use, a prefix for the mails' subject and sender and recipient addresses. Note that the SMTP server must be accessible by the cluster nodes.
The public name is the host name that will be used instead of the generated public name (see Important: Proposal Name) for the public virtual IP address of HAProxy. (This is the case when registering public endpoints, for example). Any name specified here needs to be resolved by a name server placed outside of the SUSE OpenStack Cloud network.
Figure 12.1: The Pacemaker Barclamp #
The Pacemaker component consists of the following roles. Deploying the role is optional:
Deploy this role on all nodes that should become member of the cluster.
Deploying this role is optional. If deployed, sets up the Hawk Web interface which lets you monitor the status of the cluster. The Web interface can be accessed via
https://IP-ADDRESS:7630. The default hawk credentials are usernamehacluster, passwordcrowbar.The password is visible and editable in the view of the Pacemaker barclamp, and also in the
"corosync":section of the view.Note that the GUI on SUSE OpenStack Cloud can only be used to monitor the cluster status and not to change its configuration.
may be deployed on at least one cluster node. It is recommended to deploy it on all cluster nodes.
Deploy this role on all nodes that should become members of the Compute Nodes cluster. They will run as Pacemaker remote nodes that are controlled by the cluster, but do not affect quorum. Instead of the complete cluster stack, only the
pacemaker-remotecomponent will be installed on this nodes.
Figure 12.2: The Pacemaker Barclamp: Node Deployment Example #
After a cluster has been successfully deployed, it is listed under in the section and can be used for role deployment like a regular node.
Warning: Deploying Roles on Single Cluster Nodes
When using clusters, roles from other barclamps must never be deployed to single nodes that are already part of a cluster. The only exceptions from this rule are the following roles:
cinder-volume
swift-proxy + swift-dispersion
swift-ring-compute
swift-storage
Important: Service Management on the Cluster
After a role has been deployed on a cluster, its services are managed by the HA software. You must never manually start or stop an HA-managed service, nor configure it to start on boot. Services may only be started or stopped by using the cluster management tools Hawk or the crm shell. See https://documentation.suse.com/sle-ha/12-SP5/single-html/SLE-HA-guide/#sec-ha-config-basics-resources for more information.
Note: Testing the Cluster Setup
To check whether all cluster resources are running, either use the Hawk
Web interface or run the command crm_mon
-1r. If it is not the case, clean up the respective
resource with crm resource
cleanup RESOURCE , so it gets
respawned.
Also make sure that STONITH correctly works before continuing with the SUSE OpenStack Cloud setup. This is especially important when having chosen a STONITH configuration requiring manual setup. To test if STONITH works, log in to a node on the cluster and run the following command:
pkill -9 corosync
In case STONITH is correctly configured, the node will reboot.
Before testing on a production cluster, plan a maintenance window in case issues should arise.
12.3 Deploying the Database #
- File Name: depl_nodes.xml
- ID: sec-depl-ostack-db
The very first service that needs to be deployed is the . The database component is using MariaDB and is used by all other components. It must be installed on a Control Node. The Database can be made highly available by deploying it on a cluster.
The only attribute you may change is the maximum number of database connections (). The default value should usually work—only change it for large deployments in case the log files show database connection failures.
Figure 12.3: The Database Barclamp #
12.3.1 Deploying MariaDB #
- File Name: depl_nodes.xml
- ID: sec-depl-ostack-db-mariadb
Deploying the database requires the use of MariaDB
Note: MariaDB and HA
MariaDB back end features full HA support based on the Galera clustering technology. The HA setup requires an odd number of nodes. The recommended number of nodes is 3.
12.3.1.1 SSL Configuration #
- File Name: depl_nodes.xml
- ID: sec-depl-ostack-db-mariadb-ssl
SSL can be enabled with either a stand-alone or cluster deployment. The replication traffic between database nodes is not encrypted, whilst traffic between the database server(s) and clients are, so a separate network for the database servers is recommended.
Certificates can be provided, or the barcamp can generate self-signed
certificates. The certificate filenames are configurable in the
barclamp, and the directories /etc/mysql/ssl/certs
and /etc/mysql/ssl/private to use the defaults will
need to be created before the barclamp is applied. The CA certificate
and the certificate for MariaDB to use both go into
/etc/mysql/ssl/certs. The appropriate private key
for the certificate is placed into the
/etc/mysql/ssl/private directory. As long as the
files are readable when the barclamp is deployed, permissions can be
tightened after a successful deployment once the appropriate UNIX
groups exist.
The Common Name (CN) for the SSL certificate must be fully
qualified server name for single host deployments, and
cluster-cluster name.full domain
name for cluster deployments.
Note: Certificate validation errors
If certificate validation errors are causing issues with deploying
other barclamps (for example, when creating databases or users) you
can check the configuration with
mysql --ssl-verify-server-cert which will perform
the same verification that Crowbar does when connecting to the
database server.
If certificates are supplied, the CA certificate and its full trust
chain must be in the ca.pem file. The certificate
must be trusted by the machine (or all cluster members in a cluster
deployment), and it must be available on all client machines —
IE, if the OpenStack services are deployed on separate machines or
cluster members they will all require the CA certificate to be in
/etc/mysql/ssl/certs as well as trusted by the
machine.
12.3.1.2 MariaDB Configuration Options #
- File Name: depl_nodes.xml
- ID:
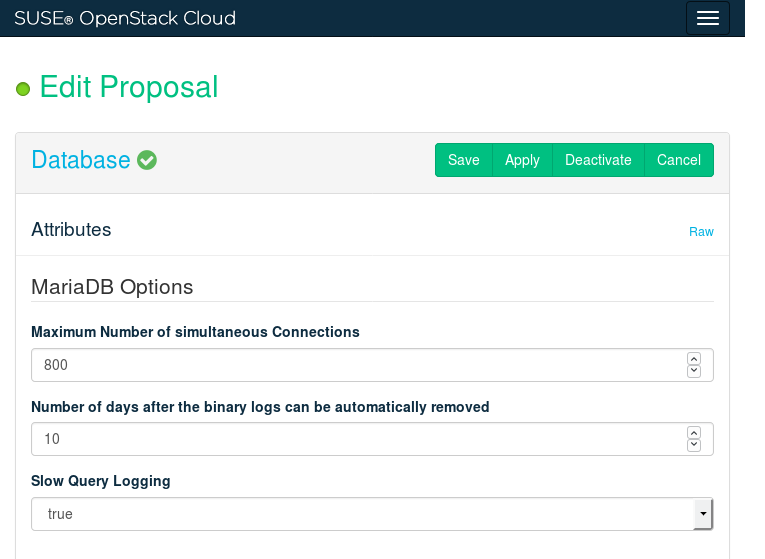
Figure 12.4: MariaDB Configuration #
The following configuration settings are available via the barclamp graphical interface:
- Datadir
Path to a directory for storing database data.
- Maximum Number of Simultaneous Connections
The maximum number of simultaneous client connections.
- Number of days after the binary logs can be automatically removed
A period after which the binary logs are removed.
- Slow Query Logging
When enabled, all queries that take longer than usual to execute are logged to a separate log file (by default, it's
/var/log/mysql/mysql_slow.log). This can be useful for debugging.
Warning: MariaDB Deployment Restriction
When MariaDB is used as the database back end, the role cannot be deployed to the node with the role. These two roles cannot coexist due to the fact that Monasca uses its own MariaDB instance.
12.4 Deploying RabbitMQ #
- File Name: depl_nodes.xml
- ID: sec-depl-ostack-rabbit
The RabbitMQ messaging system enables services to communicate with the other nodes via Advanced Message Queue Protocol (AMQP). Deploying it is mandatory. RabbitMQ needs to be installed on a Control Node. RabbitMQ can be made highly available by deploying it on a cluster. We recommend not changing the default values of the proposal's attributes.
Name of the default virtual host to be created and used by the RabbitMQ server (
default_vhostconfiguration option inrabbitmq.config).- Port
Port the RabbitMQ server listens on (
tcp_listenersconfiguration option inrabbitmq.config).- User
RabbitMQ default user (
default_userconfiguration option inrabbitmq.config).
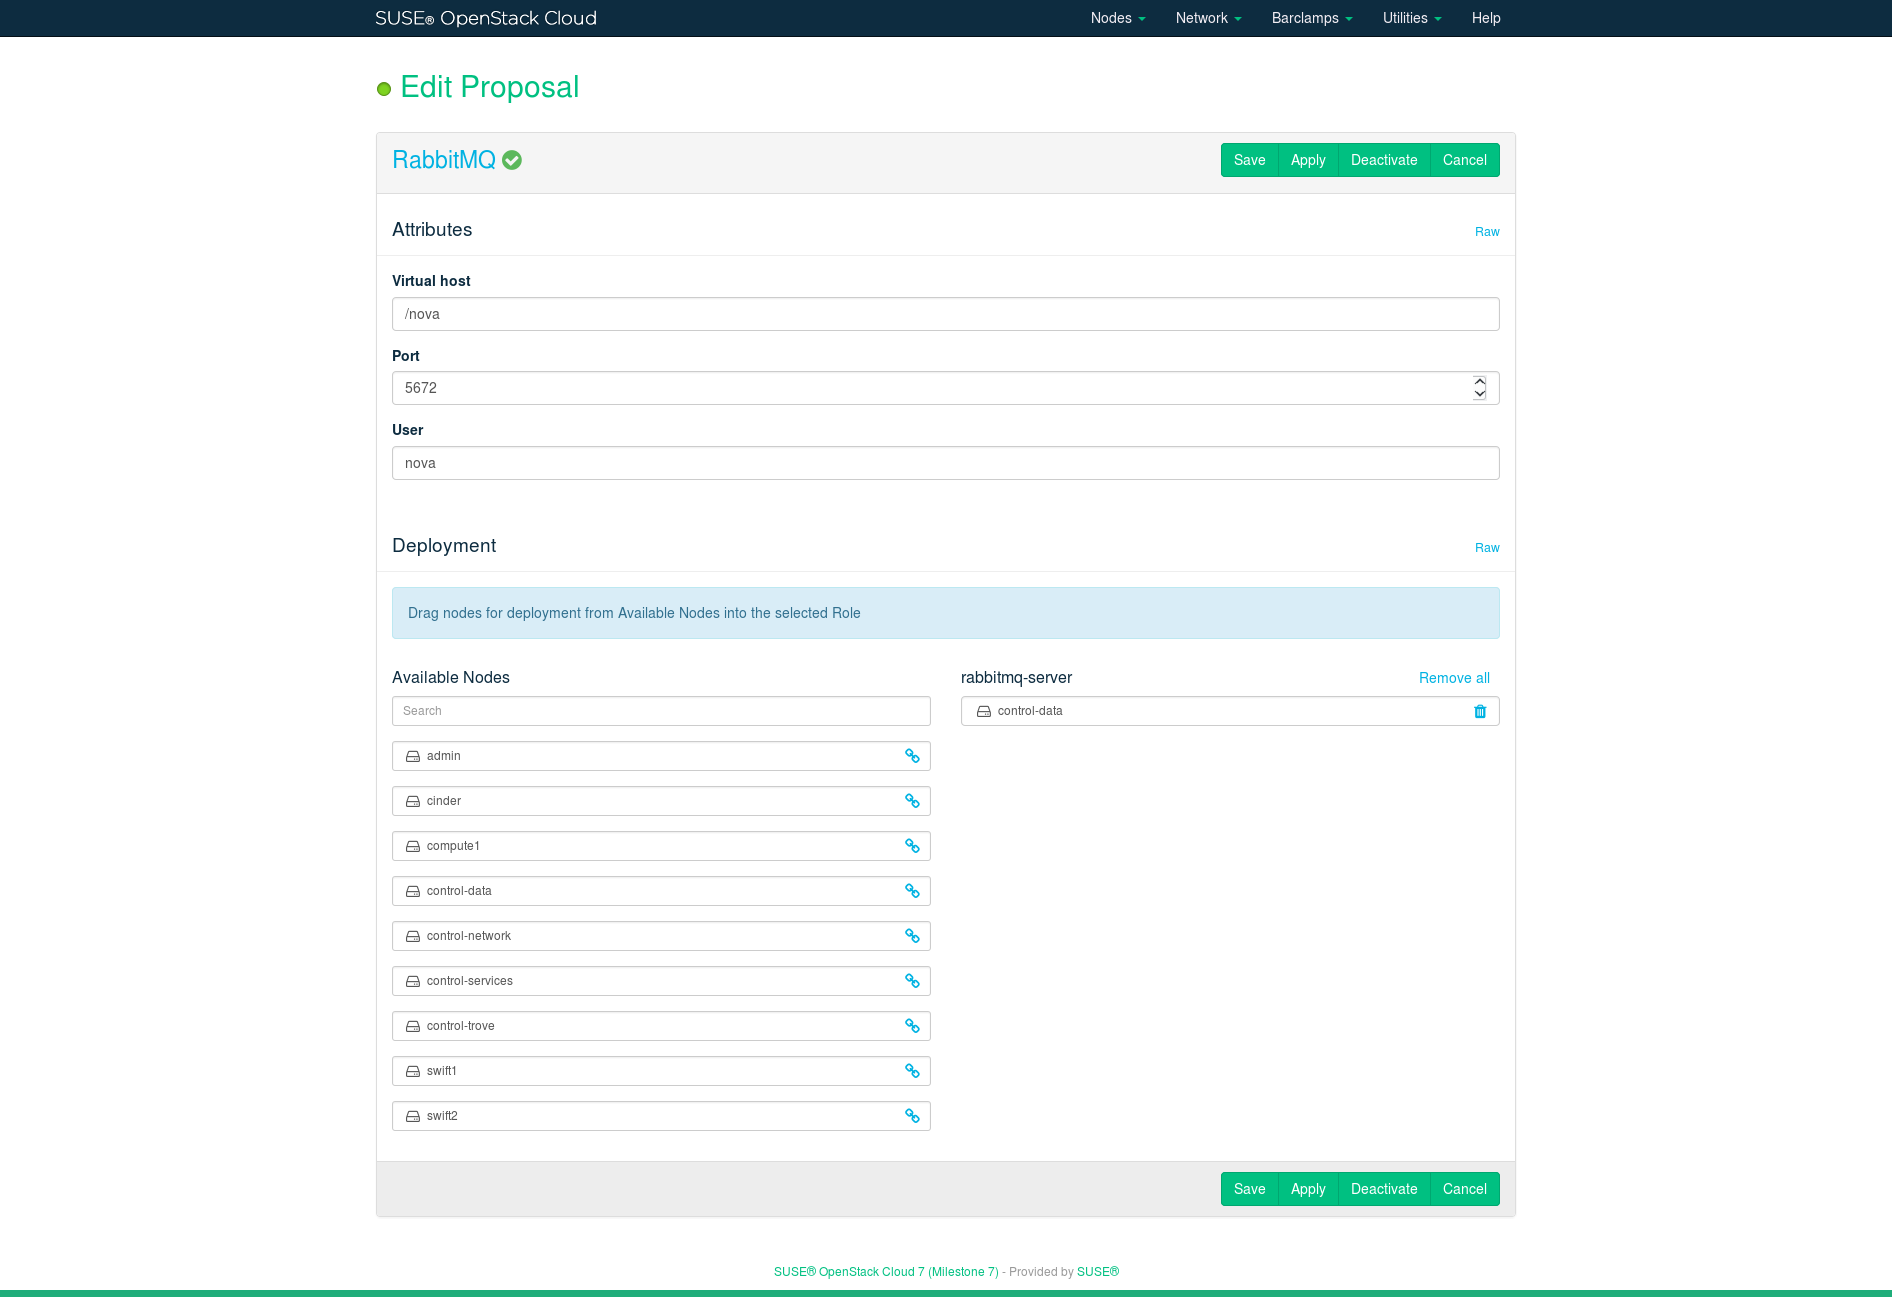
Figure 12.5: The RabbitMQ Barclamp #
12.4.1 HA Setup for RabbitMQ #
- File Name: depl_nodes.xml
- ID: sec-depl-ostack-rabbit-ha
To make RabbitMQ highly available, deploy it on a cluster instead of a single Control Node. This also requires shared storage for the cluster that hosts the RabbitMQ data. We recommend using a dedicated cluster to deploy RabbitMQ together with the database, since both components require shared storage.
Deploying RabbitMQ on a cluster makes an additional section available in the section of the proposal. Configure the in this section.
12.4.2 SSL Configuration for RabbitMQ #
- File Name: depl_nodes.xml
- ID: sec-depl-ostack-rabbitmq-ssl
The RabbitMQ barclamp supports securing traffic via SSL. This is similar to the SSL support in other barclamps, but with these differences:
RabbitMQ can listen on two ports at the same time, typically port 5672 for unsecured and port 5671 for secured traffic.
The Ceilometer pipeline for OpenStack Swift cannot be passed SSL-related parameters. When SSL is enabled for RabbitMQ the Ceilometer pipeline in Swift is turned off, rather than sending it over an unsecured channel.
The following steps are the fastest way to set up and test a new SSL certificate authority (CA).
In the RabbitMQ barclamp set to , and to
true, then apply the barclamp. The barclamp will create a new CA, enter the correct settings in/etc/rabbitmq/rabbitmq.config, and start RabbitMQ.Test your new CA with OpenSSL, substituting the hostname of your control node:
openssl s_client -connect d52-54-00-59-e5-fd:5671
[...]
Verify return code: 18 (self signed certificate)
This outputs a lot of information, including a copy of the server's public certificate, protocols, ciphers, and the chain of trust.
The last step is to configure client services to use SSL to access the RabbitMQ service. (See https://docs.openstack.org/oslo.messaging/pike/#oslo-messaging-rabbit for a complete reference).
It is preferable to set up your own CA. The best practice is to use a commercial certificate authority. You may also deploy your own self-signed certificates, provided that your cloud is not publicly-accessible, and only for your internal use. Follow these steps to enable your own CA in RabbitMQ and deploy it to SUSE OpenStack Cloud:
Configure the RabbitMQ barclamp to use the control node's certificate authority (CA), if it already has one, or create a CA specifically for RabbitMQ and configure the barclamp to use that. (See Section 2.3, “SSL Encryption”, and the RabbitMQ manual has a detailed howto on creating your CA at http://www.rabbitmq.com/ssl.html, with customizations for .NET and Java clients.)
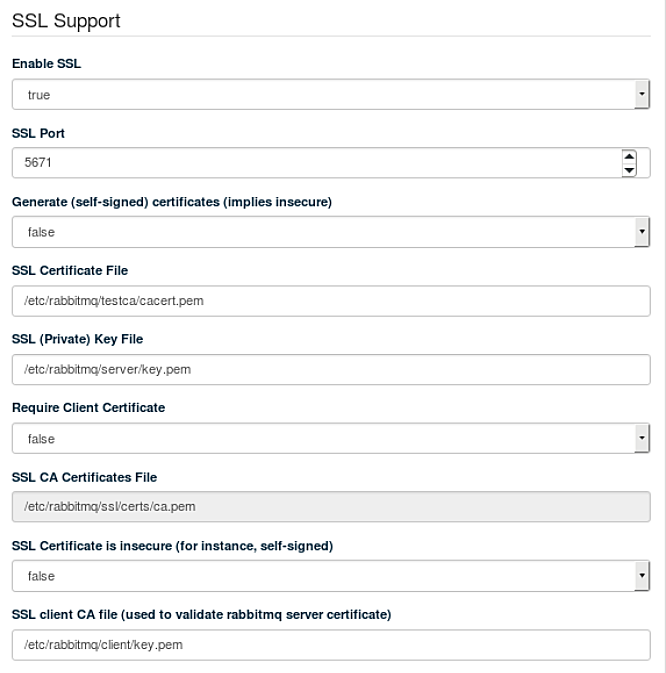
Figure 12.6: SSL Settings for RabbitMQ Barclamp #
The configuration options in the RabbitMQ barclamp allow tailoring the barclamp to your SSL setup.
Set this to to expose all of your configuration options.
RabbitMQ's SSL listening port. The default is 5671.
When this is set to
true, self-signed certificates are automatically generated and copied to the correct locations on the control node, and all other barclamp options are set automatically. This is the fastest way to apply and test the barclamp. Do not use this on production systems. When this is set tofalsethe remaining options are exposed.The location of your public root CA certificate.
The location of your private server key.
This goes with . Set to to require clients to present SSL certificates to RabbitMQ.
Trust client certificates presented by the clients that are signed by other CAs. You'll need to store copies of the CA certificates; see "Trust the Client's Root CA" at http://www.rabbitmq.com/ssl.html.
When this is set to , clients validate the RabbitMQ server certificate with the file.
Tells clients of RabbitMQ where to find the CA bundle that validates the certificate presented by the RabbitMQ server, when is set to .
12.4.3 Configuring Clients to Send Notifications #
- File Name: depl_nodes.xml
- ID: sec-depl-ostack-rabbitmq-send-notifications
RabbitMQ has an option called Configure clients to send
notifications. It defaults to false, which
means no events will be sent. It is required to be set to
true for Ceilometer, Monasca, and any other services
consuming notifications. When it is set to true,
OpenStack services are configured to submit lifecycle audit events to the
notification RabbitMQ queue.
This option should only be enabled if an active consumer is configured, otherwise events will accumulate on the RabbitMQ server, clogging up CPU, memory, and disk storage.
Any accumulation can be cleared by running:
$ rabbitmqctl -p /openstack purge_queue notifications.info
$ rabbitmqctl -p /openstack purge_queue notifications.error
12.5 Deploying Keystone #
- File Name: depl_nodes.xml
- ID: sec-depl-ostack-keystone
Keystone is another core component that is used by all other OpenStack components. It provides authentication and authorization services. Keystone needs to be installed on a Control Node. Keystone can be made highly available by deploying it on a cluster. You can configure the following parameters of this barclamp:
Set the algorithm used by Keystone to generate the tokens. You can choose between
Fernet(the default) orUUID. Note that for performance and security reasons it is strongly recommended to useFernet.Allows customizing the region name that crowbar is going to manage.
Tenant for the users. Do not change the default value of
openstack.User name and password for the administrator.
Specify whether a regular user should be created automatically. Not recommended in most scenarios, especially in an LDAP environment.
User name and password for the regular user. Both the regular user and the administrator accounts can be used to log in to the SUSE OpenStack Cloud Dashboard. However, only the administrator can manage Keystone users and access.
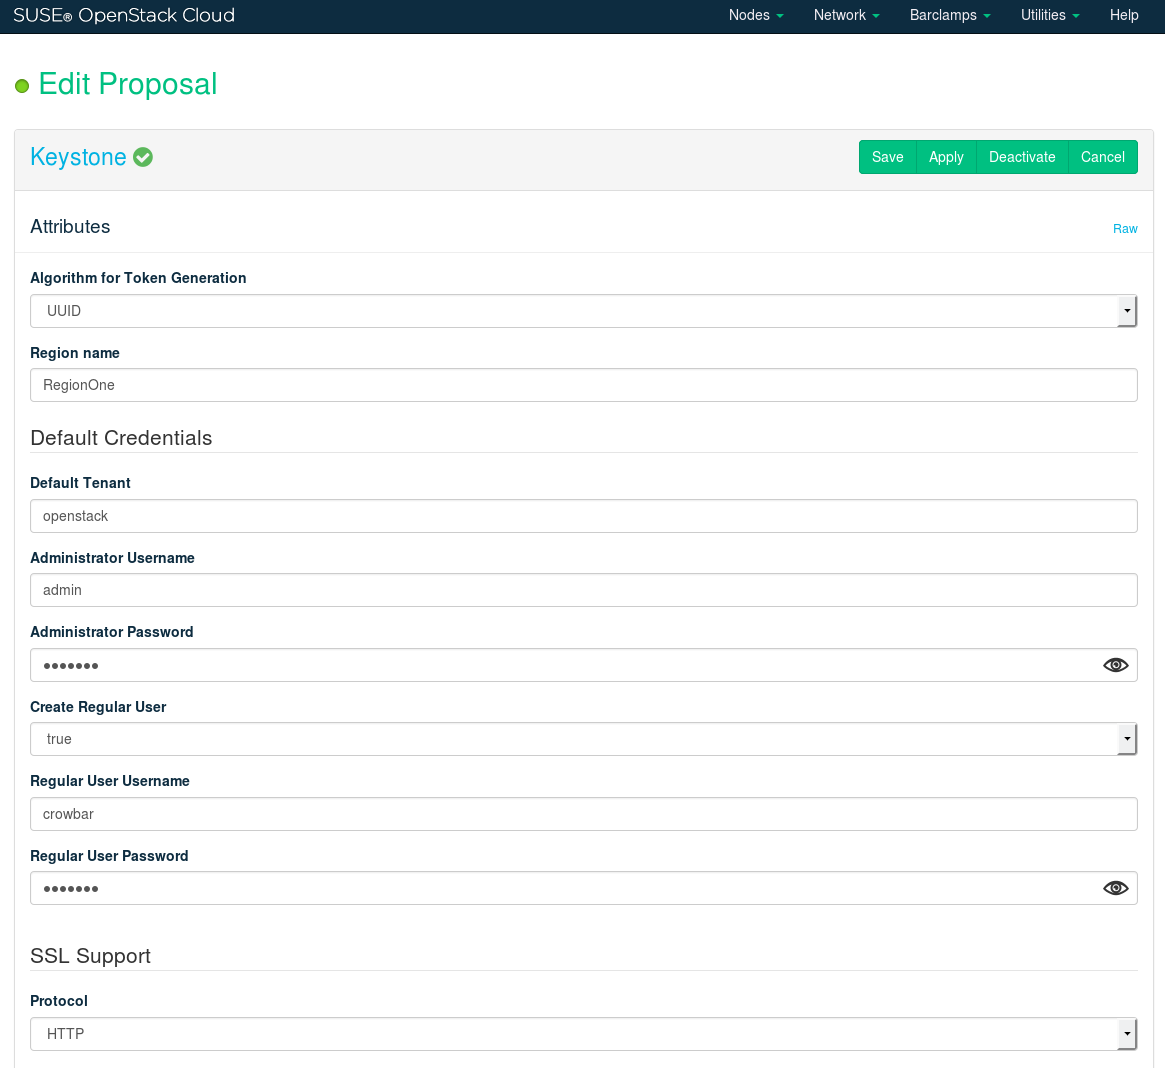
Figure 12.7: The Keystone Barclamp #
- SSL Support: Protocol
When you use the default value , public communication will not be encrypted. Choose to use SSL for encryption. See Section 2.3, “SSL Encryption” for background information and Section 11.4.6, “Enabling SSL” for installation instructions. The following additional configuration options will become available when choosing :
When set to
true, self-signed certificates are automatically generated and copied to the correct locations. This setting is for testing purposes only and should never be used in production environments!- /
Location of the certificate key pair files.
Set this option to
truewhen using self-signed certificates to disable certificate checks. This setting is for testing purposes only and should never be used in production environments!Specify the absolute path to the CA certificate. This field is mandatory, and leaving it blank will cause the barclamp to fail. To fix this issue, you have to provide the absolute path to the CA certificate, restart the
apache2service, and re-deploy the barclamp.When the certificate is not already trusted by the pre-installed list of trusted root certificate authorities, you need to provide a certificate bundle that includes the root and all intermediate CAs.
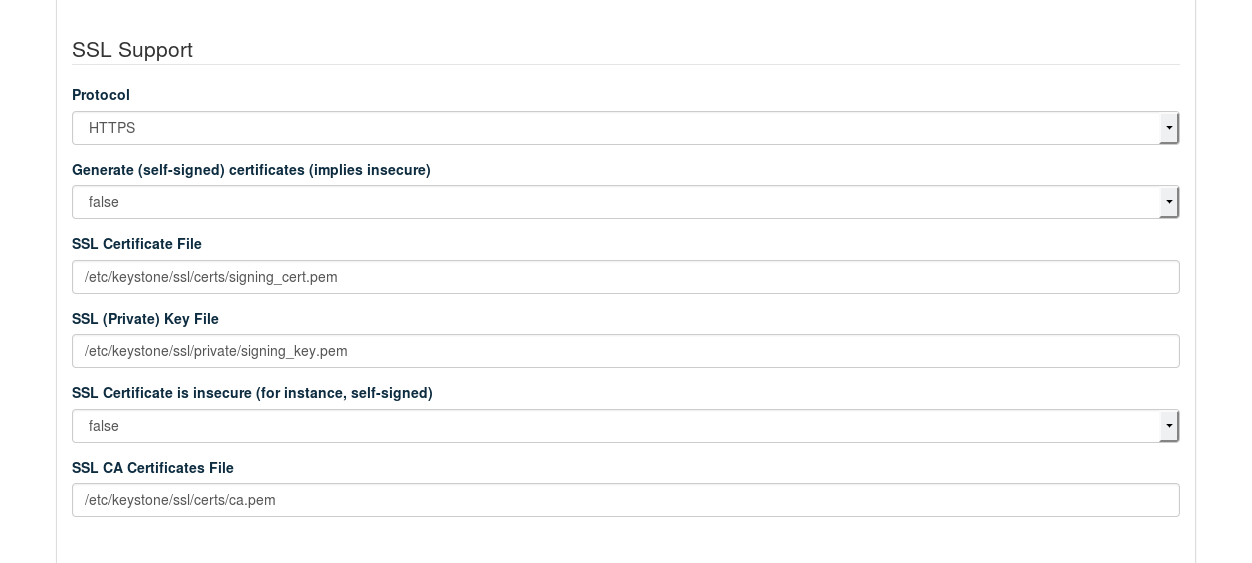
Figure 12.8: The SSL Dialog #
12.5.1 Authenticating with LDAP #
- File Name: depl_nodes.xml
- ID: sec-depl-ostack-keystone-ldap
Keystone has the ability to separate identity backends by domains. SUSE OpenStack Cloud 8 uses this method for authenticating users.
The Keystone barclamp sets up a MariaDB database by default. Configuring an LDAP back-end is done in the view.
Set
Then in the section configure a map with domain names as keys, and configuration as values. In the default proposal the domain name key is , and the keys are the two required sections for an LDAP-based identity driver configuration, the section which sets the driver, and the section which sets the LDAP connection options. You may configure multiple domains, each with its own configuration.
You may make this available to Horizon by setting to in the Horizon barclamp.
Users in the LDAP-backed domain have to know the name of the domain in order to authenticate, and must use the Keystone v3 API endpoint. (See the OpenStack manuals, Domain-specific Configuration and Integrate Identity with LDAP, for additional details.)
12.5.2 HA Setup for Keystone #
- File Name: depl_nodes.xml
- ID: sec-depl-ostack-keystone-ha
Making Keystone highly available requires no special configuration—it is sufficient to deploy it on a cluster.
12.6 Deploying Monasca (Optional) #
- File Name: depl_nodes.xml
- ID: sec-depl-ostack-monasca
Monasca is an open-source monitoring-as-a-service solution that integrates with OpenStack. Monasca is designed for scalability, high performance, and fault tolerance.
Accessing the interface is not required for day-to-day operation. But as not all Monasca settings are exposed in the barclamp graphical interface (for example, various performance tuneables), it is recommended to configure Monasca in the mode. Below are the options that can be configured via the interface of the Monasca barclamp.

Figure 12.9: The Monasca barclamp Raw Mode #
- keystone
Contains Keystone credentials that the agents use to send metrics. Do not change these options, as they are configured by Crowbar.
- insecure
Specifies whether SSL certificates are verified when communicating with Keystone. If set to
false, theca_fileoption must be specified.- ca_file
Specifies the location of a CA certificate that is used for verifying Keystone's SSL certificate.
- log_dir
Path for storing log files. The specified path must exist. Do not change the default
/var/log/monasca-agentpath.- log_level
Agent's log level. Limits log messages to the specified level and above. The following levels are available: Error, Warning, Info (default), and Debug.
- check_frequency
Interval in seconds between running agents' checks.
- num_collector_threads
Number of simultaneous collector threads to run. This refers to the maximum number of different collector plug-ins (for example,
http_check) that are allowed to run simultaneously. The default value1means that plug-ins are run sequentially.- pool_full_max_retries
If a problem with the results from multiple plug-ins results blocks the entire thread pool (as specified by the
num_collector_threadsparameter), the collector exits, so it can be restarted by thesupervisord. The parameterpool_full_max_retriesspecifies when this event occurs. The collector exits when the defined number of consecutive collection cycles have ended with the thread pool completely full.- plugin_collect_time_warn
Upper limit in seconds for any collection plug-in's run time. A warning is logged if a plug-in runs longer than the specified limit.
- max_measurement_buffer_size
Maximum number of measurements to buffer locally if the Monasca API is unreachable. Measurements will be dropped in batches, if the API is still unreachable after the specified number of messages are buffered. The default
-1value indicates unlimited buffering. Note that a large buffer increases the agent's memory usage.- backlog_send_rate
Maximum number of measurements to send when the local measurement buffer is flushed.
- amplifier
Number of extra dimensions to add to metrics sent to the Monasca API. This option is intended for load testing purposes only. Do not enable the option in production! The default
0value disables the addition of dimensions.
- max_data_size_kb
Maximum payload size in kilobytes for a request sent to the Monasca log API.
- num_of_logs
Maximum number of log entries the log agent sends to the Monasca log API in a single request. Reducing the number increases performance.
- elapsed_time_sec
Time interval in seconds between sending logs to the Monasca log API.
- delay
Interval in seconds for checking whether
elapsed_time_sechas been reached.- keystone
Keystone credentials the log agents use to send logs to the Monasca log API. Do not change this option manually, as it is configured by Crowbar.
- bind_host
Interfaces
monasca-apilistens on. Do not change this option, as it is configured by Crowbar.- processes
Number of processes to spawn.
- threads
Number of WSGI worker threads to spawn.
- log_level
Log level for
openstack-monasca-api. Limits log messages to the specified level and above. The following levels are available: Critical, Error, Warning, Info (default), Debug, and Trace.
- repo_dir
List of directories for storing elasticsearch snapshots. Must be created manually and be writeable by the
elasticsearchuser. Must contain at least one entry in order for the snapshot functionality to work.For instructions on creating an elasticsearch snapshot, see https://documentation.suse.com/soc/8/html/suse-openstack-cloud-socmmsoperator/idg-msoperator-shared-operationmaintenance-c-operate-xml-1.html.
elasticsearch-curator removes old and large
elasticsearch indices. The settings below determine its behavior.
- delete_after_days
Time threshold for deleting indices. Indices older the specified number of days are deleted. This parameter is unset by default, so indices are kept indefinitely.
- delete_after_size
Maximum size in megabytes of indices. Indices larger than the specified size are deleted. This parameter is unset by default, so indices are kept irrespective of their size.
- delete_exclude_index
List of indices to exclude from
elasticsearch-curatorruns. By default, only the.kibanafiles are excluded.- cron_config
Specifies when to run
elasticsearch-curator. Attributes of this parameter correspond to the fields incrontab(5).
- log_retention_hours
Number of hours for retaining log segments in Kafka's on-disk log. Messages older than the specified value are dropped.
- log_retention_bytes
Maximum size for Kafka's on-disk log in bytes. If the log grows beyond this size, the oldest log segments are dropped.
- influxdb_retention_policy
Number of days to keep metrics records in influxdb.
For an overview of all supported values, see https://docs.influxdata.com/influxdb/v1.1/query_language/database_management/#create-retention-policies-with-create-retention-policy.
- notification_enable_email
Enable or disable email alarm notifications.
- smtp_host
SMTP smarthost for sending alarm notifications.
- smtp_port
Port for the SMTP smarthost.
- smtp_user
User name for authenticating against the smarthost.
- smtp_password
Password for authenticating against the smarthost.
- smtp_from_address
Sender address for alarm notifications.
- monitor_libvirt
The global switch for toggling libvirt monitoring. If set to true, libvirt metrics will be gathered on all libvirt based Compute Nodes. This setting is available in the Crowbar UI.
- monitor_ceph
The global switch for toggling Ceph monitoring. If set to true, Ceph metrics will be gathered on all Ceph-based Compute Nodes. This setting is available in Crowbar UI. If the Ceph cluster has been set up independently, Crowbar ignores this setting.
- cache_dir
The directory where monasca-agent will locally cache various metadata about locally running VMs on each Compute Node.
- customer_metadata
Specifies the list of instance metadata keys to be included as dimensions with customer metrics. This is useful for providing more information about an instance.
- disk_collection_period
Specifies a minimum interval in seconds for collecting disk metrics. Increase this value to reduce I/O load. If the value is lower than the global agent collection period (
check_frequency), it will be ignored in favor of the global collection period.- max_ping_concurrency
Specifies the number of ping command processes to run concurrently when determining whether the VM is reachable. This should be set to a value that allows the plug-in to finish within the agent's collection period, even if there is a networking issue. For example, if the expected number of VMs per Compute Node is 40 and each VM has one IP address, then the plug-in will take at least 40 seconds to do the ping checks in the worst-case scenario where all pings fail (assuming the default timeout of 1 second). Increasing
max_ping_concurrencyallows the plug-in to finish faster.- metadata
Specifies the list of Nova side instance metadata keys to be included as dimensions with the cross-tenant metrics for the project. This is useful for providing more information about an instance.
- nova_refresh
Specifies the number of seconds between calls to the Nova API to refresh the instance cache. This is helpful for updating VM hostname and pruning deleted instances from the cache. By default, it is set to 14,400 seconds (four hours). Set to 0 to refresh every time the Collector runs, or to None to disable regular refreshes entirely. In this case, the instance cache will only be refreshed when a new instance is detected.
- ping_check
Includes the entire ping command (without the IP address, which is automatically appended) to perform a ping check against instances. The
NAMESPACEkeyword is automatically replaced with the appropriate network namespace for the VM being monitored. Set to False to disable ping checks.- vnic_collection_period
Specifies a minimum interval in seconds for collecting disk metrics. Increase this value to reduce I/O load. If the value is lower than the global agent collection period (
check_frequency), it will be ignored in favor of the global collection period.- vm_cpu_check_enable
Toggles the collection of VM CPU metrics. Set to true to enable.
- vm_disks_check_enable
Toggles the collection of VM disk metrics. Set to true to enable.
- vm_extended_disks_check_enable
Toggles the collection of extended disk metrics. Set to true to enable.
- vm_network_check_enable
Toggles the collection of VM network metrics. Set to true to enable.
- vm_ping_check_enable
Toggles ping checks for checking whether a host is alive. Set to true to enable.
- vm_probation
Specifies a period of time (in seconds) in which to suspend metrics from a newly-created VM. This is to prevent quickly-obsolete metrics in an environment with a high amount of instance churn (VMs created and destroyed in rapid succession). The default probation length is 300 seconds (5 minutes). Set to 0 to disable VM probation. In this case, metrics are recorded immediately after a VM is created.
- vnic_collection_period
Specifies a minimum interval in seconds for collecting VM network metrics. Increase this value to reduce I/O load. If the value is lower than the global agent collection period (check_frequency), it will be ignored in favor of the global collection period.
The Monasca component consists of following roles:
- monasca-server
Monasca server-side components that are deployed by Chef. Currently, this only creates Keystone resources required by Monasca, such as users, roles, endpoints, etc. The rest is left to the Ansible-based
monasca-installerrun by themonasca-masterrole.- monasca-master
Runs the Ansible-based
monasca-installerfrom the Crowbar node. The installer deploys the Monasca server-side components to the node that has themonasca-serverrole assigned to it. These components areopenstack-monasca-api, andopenstack-monasca-log-api, as well as all the back-end services they use.- monasca-agent
Deploys
openstack-monasca-agentthat is responsible for sending metrics tomonasca-apion nodes it is assigned to.- monasca-log-agent
Deploys
openstack-monasca-log-agentresponsible for sending logs tomonasca-log-apion nodes it is assigned to.

Figure 12.10: The Monasca Barclamp: Node Deployment Example #
12.7 Deploying Swift (optional) #
- File Name: depl_nodes.xml
- ID: sec-depl-ostack-swift
Swift adds an object storage service to SUSE OpenStack Cloud for storing single files such as images or snapshots. It offers high data security by storing the data redundantly on a pool of Storage Nodes—therefore Swift needs to be installed on at least two dedicated nodes.
To properly configure Swift it is important to understand how it places the data. Data is always stored redundantly within the hierarchy. The Swift hierarchy in SUSE OpenStack Cloud is formed out of zones, nodes, hard disks, and logical partitions. Zones are physically separated clusters, for example different server rooms each with its own power supply and network segment. A failure of one zone must not affect another zone. The next level in the hierarchy are the individual Swift storage nodes (on which has been deployed), followed by the hard disks. Logical partitions come last.
Swift automatically places three copies of each object on the highest hierarchy level possible. If three zones are available, then each copy of the object will be placed in a different zone. In a one zone setup with more than two nodes, the object copies will each be stored on a different node. In a one zone setup with two nodes, the copies will be distributed on different hard disks. If no other hierarchy element fits, logical partitions are used.
The following attributes can be set to configure Swift:
Set to
trueto enable public access to containers.If set to true, a copy of the current version is archived each time an object is updated.
Number of zones (see above). If you do not have different independent installations of storage nodes, set the number of zones to
1.Partition power. The number entered here is used to compute the number of logical partitions to be created in the cluster. The number you enter is used as a power of 2 (2^X).
We recommend using a minimum of 100 partitions per disk. To measure the partition power for your setup, multiply the number of disks from all Swift nodes by 100, and then round up to the nearest power of two. Keep in mind that the first disk of each node is not used by Swift, but rather for the operating system.
Example: 10 Swift nodes with 5 hard disks each. Four hard disks on each node are used for Swift, so there is a total of forty disks. 40 x 100 = 4000. The nearest power of two, 4096, equals 2^12. So the partition power that needs to be entered is
12.Important: Value Cannot be Changed After the Proposal Has Been Deployed
Changing the number of logical partition after Swift has been deployed is not supported. Therefore the value for the partition power should be calculated from the maximum number of partitions this cloud installation is likely going to need at any point in time.
This option sets the number of hours before a logical partition is considered for relocation.
24is the recommended value.The number of copies generated for each object. The number of replicas depends on the number of disks and zones.
Time (in seconds) after which to start a new replication process.
Shows debugging output in the log files when set to
true.Choose whether to encrypt public communication () or not (). If you choose , you have two options. You can either or provide the locations for the certificate key pair files. Using self-signed certificates is for testing purposes only and should never be used in production environments!
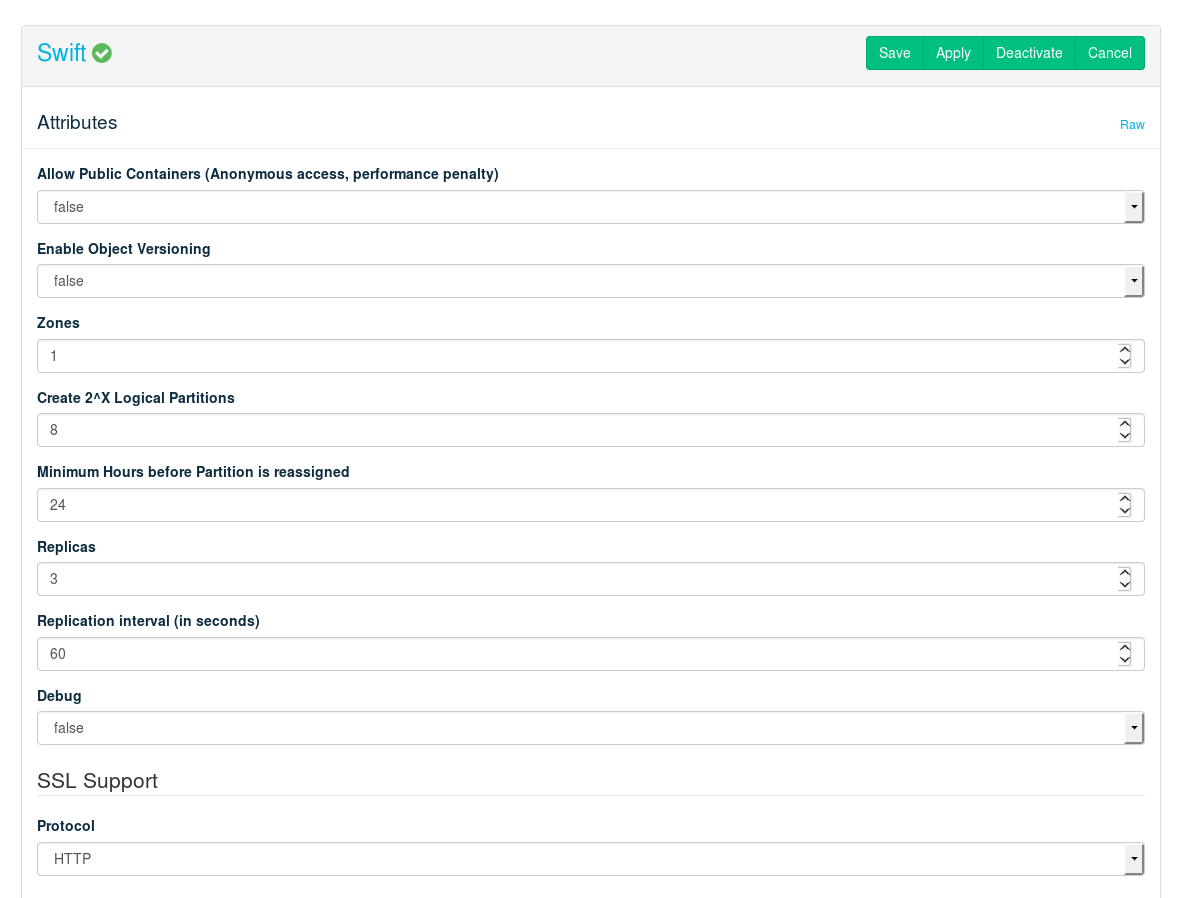
Figure 12.11: The Swift Barclamp #
Apart from the general configuration described above, the Swift barclamp lets you also activate and configure . The features these middlewares provide can be used via the Swift command line client only. The Ratelimit and S3 middleware provide for the most interesting features, and we recommend enabling other middleware only for specific use-cases.
Provides an S3 compatible API on top of Swift.
Serve container data as a static Web site with an index file and optional file listings. See http://docs.openstack.org/developer/swift/middleware.html#staticweb for details.
This middleware requires setting to
true.Create URLs to provide time-limited access to objects. See http://docs.openstack.org/developer/swift/middleware.html#tempurl for details.
Upload files to a container via Web form. See http://docs.openstack.org/developer/swift/middleware.html#formpost for details.
Extract TAR archives into a Swift account, and delete multiple objects or containers with a single request. See http://docs.openstack.org/developer/swift/middleware.html#module-swift.common.middleware.bulk for details.
Interact with the Swift API via Flash, Java, and Silverlight from an external network. See http://docs.openstack.org/developer/swift/middleware.html#module-swift.common.middleware.crossdomain for details.
Translates container and account parts of a domain to path parameters that the Swift proxy server understands. Can be used to create short URLs that are easy to remember, for example by rewriting
home.tux.example.com/$ROOT/tux/home/myfiletohome.tux.example.com/myfile. See http://docs.openstack.org/developer/swift/middleware.html#module-swift.common.middleware.domain_remap for details.Throttle resources such as requests per minute to provide denial of service protection. See http://docs.openstack.org/developer/swift/middleware.html#module-swift.common.middleware.ratelimit for details.
The Swift component consists of four different roles. Deploying is optional:
The virtual object storage service. Install this role on all dedicated Swift Storage Nodes (at least two), but not on any other node.

Warning: swift-storage Needs Dedicated Machines
Never install the swift-storage service on a node that runs other OpenStack components.
The ring maintains the information about the location of objects, replicas, and devices. It can be compared to an index that is used by various OpenStack components to look up the physical location of objects. must only be installed on a single node, preferably a Control Node.
The Swift proxy server takes care of routing requests to Swift. Installing a single instance of on a Control Node is recommended. The role can be made highly available by deploying it on a cluster.
Deploying is optional. The Swift dispersion tools can be used to test the health of the cluster. It creates a heap of dummy objects (using 1% of the total space available). The state of these objects can be queried using the swift-dispersion-report query. needs to be installed on a Control Node.
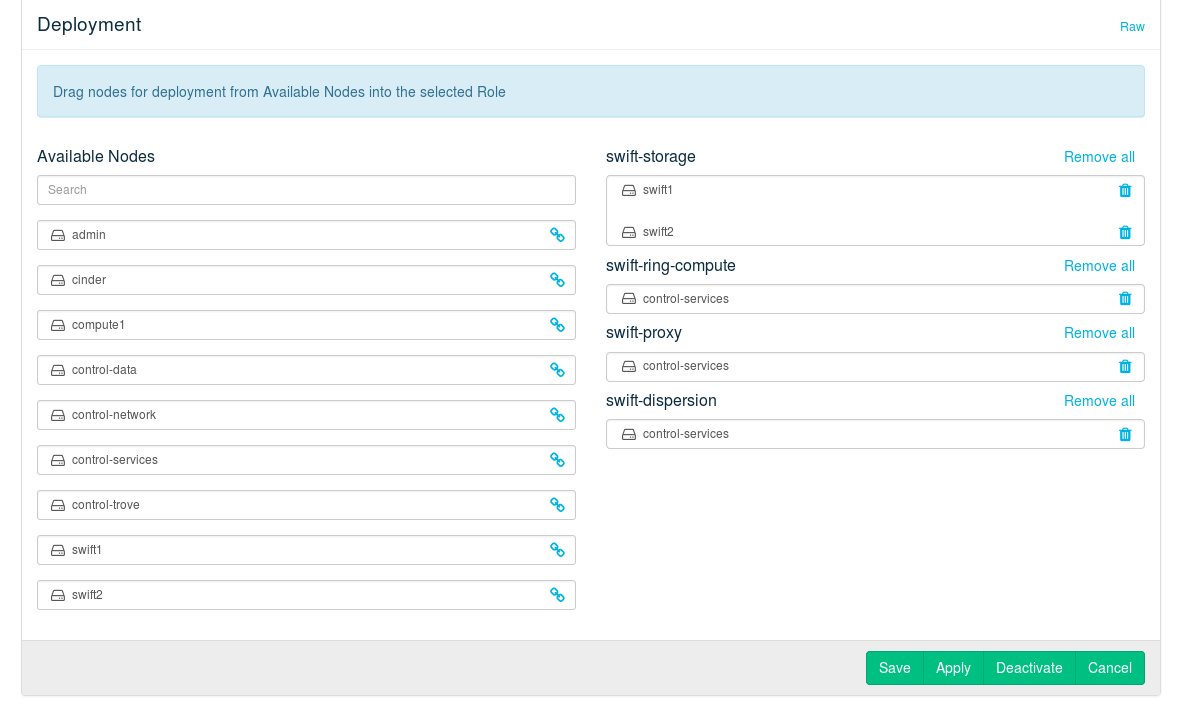
Figure 12.12: The Swift Barclamp: Node Deployment Example #
12.7.1 HA Setup for Swift #
- File Name: depl_nodes.xml
- ID: sec-depl-ostack-swift-ha
Swift replicates by design, so there is no need for a special HA setup. Make sure to fulfill the requirements listed in Section 2.6.4.1, “Swift—Avoiding Points of Failure”.
12.8 Deploying Glance #
- File Name: depl_nodes.xml
- ID: sec-depl-ostack-glance
Glance provides discovery, registration, and delivery services for virtual disk images. An image is needed to start an instance—it is its pre-installed root-partition. All images you want to use in your cloud to boot instances from, are provided by Glance. Glance must be deployed onto a Control Node. Glance can be made highly available by deploying it on a cluster.
There are a lot of options to configure Glance. The most important ones are explained below—for a complete reference refer to http://github.com/crowbar/crowbar/wiki/Glance-barclamp.
Important: Glance API Versions
As of SUSE OpenStack Cloud Crowbar 7, the Glance API v1 is no longer enabled by default. Instead, Glance API v2 is used by default.
If you need to re-enable API v1 for compatibility reasons:
Switch to the view of the Glance barclamp.
Search for the
enable_v1entry and set it totrue:"enable_v1": true
In new installations, this entry is set to
falseby default. When upgrading from an older version of SUSE OpenStack Cloud Crowbar it is set totrueby default.Apply your changes.
. Images are stored in an image file on the Control Node.
. Provides volume block storage to SUSE OpenStack Cloud Crowbar. Use it to store images.
. Provides an object storage service to SUSE OpenStack Cloud Crowbar.
. SUSE Enterprise Storage (based on Ceph) provides block storage service to SUSE OpenStack Cloud Crowbar.
. If you are using VMware as a hypervisor, it is recommended to use for storing images. This will make starting VMware instances much faster.
. If this is set to , the API will communicate the direct URl of the image's back-end location to HTTP clients. Set to by default.
Depending on the storage back-end, there are additional configuration options available:
Only required if is set to .
Specify the directory to host the image file. The directory specified here can also be an NFS share. See Section 11.4.3, “Mounting NFS Shares on a Node” for more information.
Only required if is set to .
Set the name of the container to use for the images in Swift.
Only required if is set to .
- RADOS User for CephX Authentication
If you are using an external Ceph cluster, specify the user you have set up for Glance (see Section 11.4.4, “Using an Externally Managed Ceph Cluster” for more information).
- RADOS Pool for Glance images
If you are using a SUSE OpenStack Cloud internal Ceph setup, the pool you specify here is created if it does not exist. If you are using an external Ceph cluster, specify the pool you have set up for Glance (see Section 11.4.4, “Using an Externally Managed Ceph Cluster” for more information).
Only required if is set to .
Name or IP address of the vCenter server.
- /
vCenter login credentials.
A comma-separated list of datastores specified in the format: DATACENTER_NAME:DATASTORE_NAME
Specify an absolute path here.
Choose whether to encrypt public communication () or not (). If you choose , refer to SSL Support: Protocol for configuration details.
Enable and configure image caching in this section. By default, image caching is disabled. You can see this the Raw view of your Nova barclamp:
image_cache_manager_interval = -1
This option sets the number of seconds to wait between runs of the image cache manager. Disabling it means that the cache manager will not automatically remove the unused images from the cache, so if you have many Glance images and are running out of storage you must manually remove the unused images from the cache. We recommend leaving this option disabled as it is known to cause issues, especially with shared storage. The cache manager may remove images still in use, e.g. when network outages cause synchronization problems with compute nodes.
If you wish to enable caching, re-enable it in a custom Nova configuration file, for example
/etc/nova/nova.conf.d/500-nova.conf. This sets the interval to four minutes:image_cache_manager_interval = 2400
See Chapter 14, Configuration Files for OpenStack Services for more information on custom configurations.
Learn more about Glance's caching feature at http://docs.openstack.org/developer/glance/cache.html.
Shows debugging output in the log files when set to .
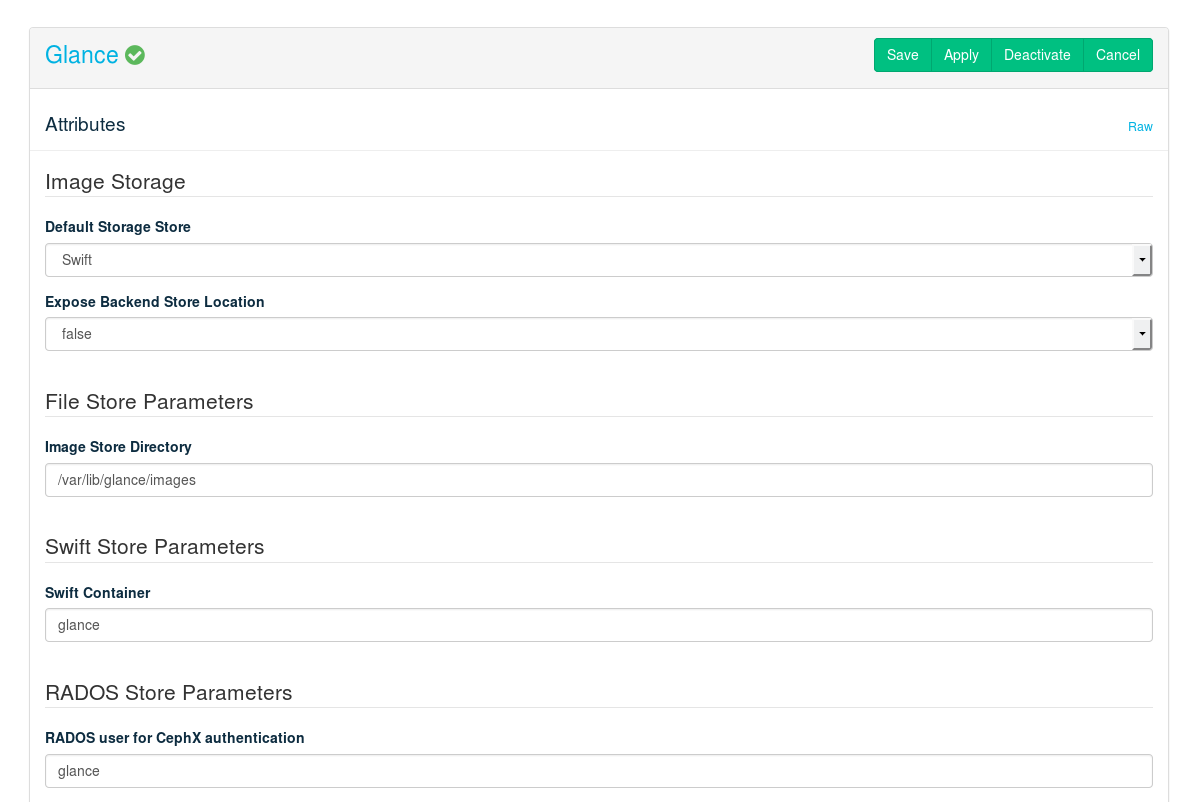
Figure 12.13: The Glance Barclamp #
12.8.1 HA Setup for Glance #
- File Name: depl_nodes.xml
- ID: sec-depl-ostack-glance-ha
Glance can be made highly available by deploying it on a cluster. We strongly recommended doing this for the image data as well. The recommended way is to use Swift or an external Ceph cluster for the image repository. If you are using a directory on the node instead (file storage back-end), you should set up shared storage on the cluster for it.
12.9 Deploying Cinder #
- File Name: depl_nodes.xml
- ID: sec-depl-ostack-cinder
Cinder, the successor of Nova Volume, provides volume block storage. It adds persistent storage to an instance that will persist until deleted, contrary to ephemeral volumes that only persist while the instance is running.
Cinder can provide volume storage by using different back-ends such as local file, one or more local disks, Ceph (RADOS), VMware, or network storage solutions from EMC, EqualLogic, Fujitsu, NetApp or Pure Storage. Since SUSE OpenStack Cloud Crowbar 5, Cinder supports using several back-ends simultaneously. It is also possible to deploy the same network storage back-end multiple times and therefore use different installations at the same time.
The attributes that can be set to configure Cinder depend on the back-end. The only general option is (see SSL Support: Protocol for configuration details).
Tip: Adding or Changing a Back-End
When first opening the Cinder barclamp, the default proposal——is already available for configuration. To optionally add a back-end, go to the section and choose a from the drop-down box. Optionally, specify the . This is recommended when deploying the same volume type more than once. Existing back-end configurations (including the default one) can be deleted by clicking the trashcan icon if no longer needed. Note that you must configure at least one back-end.
(local disks) #
Choose whether to use the disk or disks. “Available disks” are all disks currently not used by the system. Note that one disk (usually
/dev/sda) of every block storage node is already used for the operating system and is not available for Cinder.Specify a name for the Cinder volume.
(EMC² Storage) #
- /
IP address and Port of the ECOM server.
- /
Login credentials for the ECOM server.
VMAX port groups that expose volumes managed by this back-end.
Unique VMAX array serial number.
Unique pool name within a given array.
Name of the FAST Policy to be used. When specified, volumes managed by this back-end are managed as under FAST control.
For more information on the EMC driver refer to the OpenStack documentation at http://docs.openstack.org/liberty/config-reference/content/emc-vmax-driver.html.
EqualLogic drivers are included as a technology preview and are not supported.
Select the protocol used to connect, either or .
- /
IP address and port of the ETERNUS SMI-S Server.
- /
Login credentials for the ETERNUS SMI-S Server.
Storage pool (RAID group) in which the volumes are created. Make sure that the RAID group on the server has already been created. If a RAID group that does not exist is specified, the RAID group is built from unused disk drives. The RAID level is automatically determined by the ETERNUS DX Disk storage system.
For information on configuring the Hitachi HUSVM back-end, refer to http://docs.openstack.org/ocata/config-reference/block-storage/drivers/hitachi-storage-volume-driver.html.
- /
SUSE OpenStack Cloud can use “Data ONTAP” in , or in . In vFiler will be configured, in vServer will be configured. The can be set to either or . Choose the driver and the protocol your NetApp is licensed for.
The management IP address for the 7-Mode storage controller, or the cluster management IP address for the clustered Data ONTAP.
Transport protocol for communicating with the storage controller or clustered Data ONTAP. Supported protocols are HTTP and HTTPS. Choose the protocol your NetApp is licensed for.
The port to use for communication. Port 80 is usually used for HTTP, 443 for HTTPS.
- /
Login credentials.
The vFiler unit to be used for provisioning of OpenStack volumes. This setting is only available in .
Provide a list of comma-separated volume names to be used for provisioning. This setting is only available when using iSCSI as storage protocol.
A list of available file systems on an NFS server. Enter your NFS mountpoints in the form in this format: host:mountpoint -o options. For example:
host1:/srv/nfs/share1 /mnt/nfs/share1 -o rsize=8192,wsize=8192,timeo=14,intr
IP address of the FlashArray management VIP
API token for access to the FlashArray
Enable or disable iSCSI CHAP authentication
For more information on the Pure Storage FlashArray driver refer to the OpenStack documentation at https://docs.openstack.org/ocata/config-reference/block-storage/drivers/pure-storage-driver.html.
(Ceph) #
Select , if you are using an external Ceph cluster (see Section 11.4.4, “Using an Externally Managed Ceph Cluster” for setup instructions).
Name of the pool used to store the Cinder volumes.
Ceph user name.
Host name or IP address of the vCenter server.
- /
vCenter login credentials.
Provide a comma-separated list of cluster names.
Path to the directory used to store the Cinder volumes.
Absolute path to the vCenter CA certificate.
Default value:
false(the CA truststore is used for verification). Set this option totruewhen using self-signed certificates to disable certificate checks. This setting is for testing purposes only and must not be used in production environments!
Absolute path to the file to be used for block storage.
Maximum size of the volume file. Make sure not to overcommit the size, since it will result in data loss.
Specify a name for the Cinder volume.
Note: Using for Block Storage
Using a file for block storage is not recommended for production systems, because of performance and data security reasons.
Lets you manually pick and configure a driver. Only use this option for testing purposes, as it is not supported.
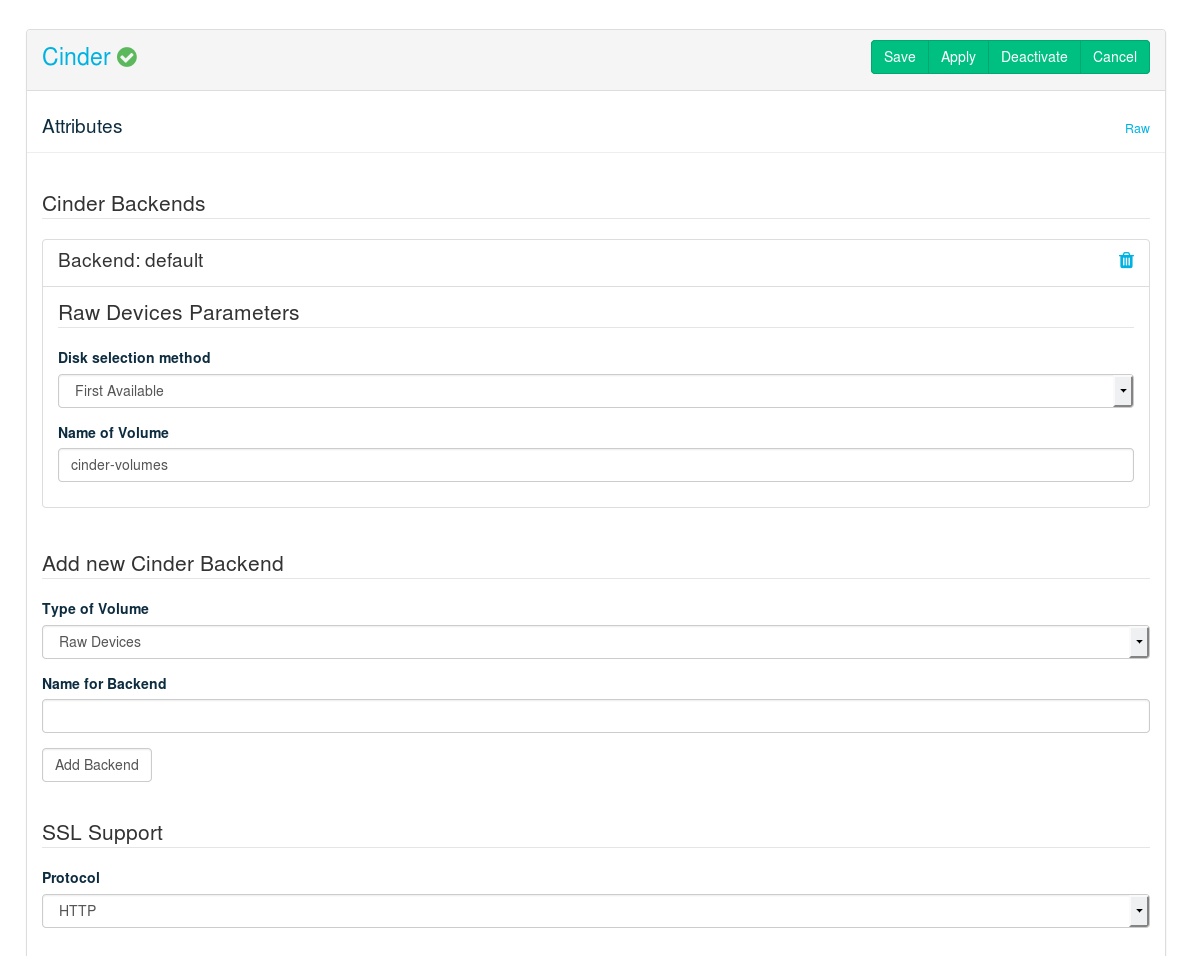
Figure 12.14: The Cinder Barclamp #
The Cinder component consists of two different roles:
The Cinder controller provides the scheduler and the API. Installing on a Control Node is recommended.
The virtual block storage service. It can be installed on a Control Node. However, we recommend deploying it on one or more dedicated nodes supplied with sufficient networking capacity to handle the increase in network traffic.
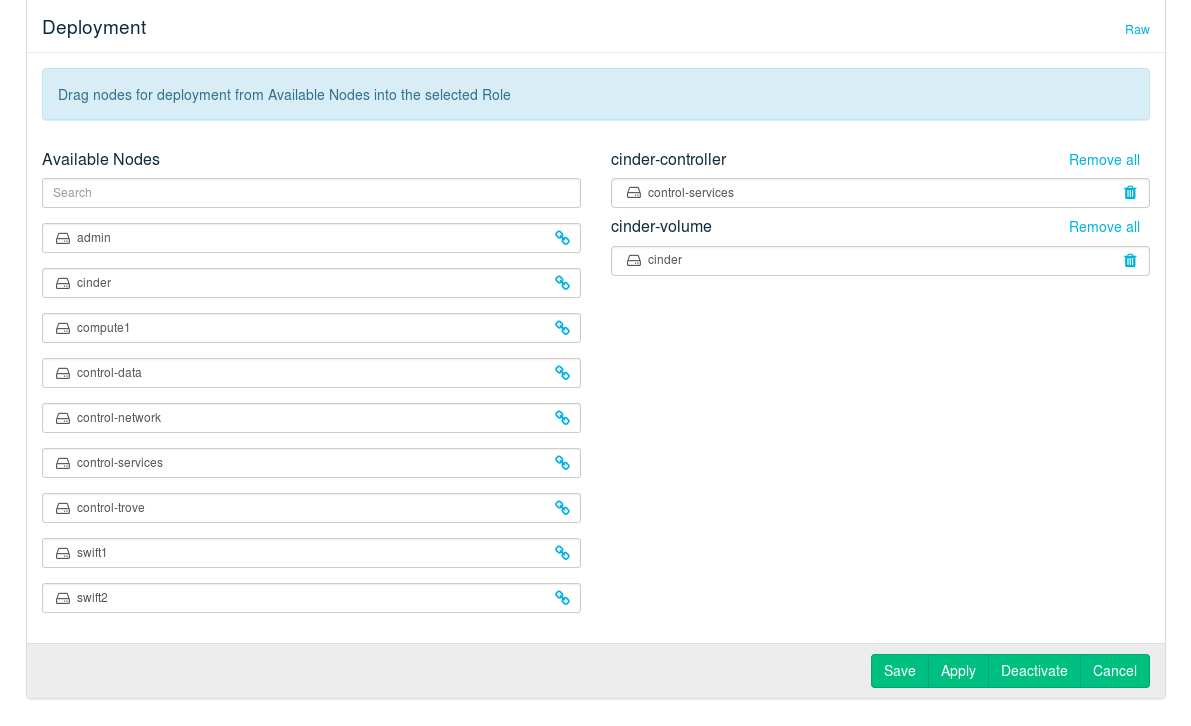
Figure 12.15: The Cinder Barclamp: Node Deployment Example #
12.9.1 HA Setup for Cinder #
- File Name: depl_nodes.xml
- ID: sec-depl-ostack-cinder-ha
Both the and the role can be deployed on a cluster.
Note: Moving to a Cluster
If you need to re-deploy role from a single machine to a cluster environment, the following will happen: Volumes that are currently attached to instances will continue to work, but adding volumes to instances will not succeed.
To solve this issue, run the following script once on each node that
belongs to the cluster:
/usr/bin/cinder-migrate-volume-names-to-cluster.
The script is automatically installed by Crowbar on every machine or cluster that has a role applied to it.
In combination with Ceph or a network storage solution, deploying Cinder in a cluster minimizes the potential downtime. For to be applicable to a cluster, the role needs all Cinder backends to be configured for non-local storage. If you are using local volumes or raw devices in any of your volume backends, you cannot apply to a cluster.
12.10 Deploying Neutron #
- File Name: depl_nodes.xml
- ID: sec-depl-ostack-quantum
Neutron provides network connectivity between interface devices managed by other OpenStack components (most likely Nova). The service works by enabling users to create their own networks and then attach interfaces to them.
Neutron must be deployed on a Control Node. You first need to choose a core plug-in— or . Depending on your choice, more configuration options will become available.
The option lets you use an existing VMware installation. Using this plug-in is not a prerequisite for the VMware vSphere hypervisor support. For all other scenarios, choose .
The only global option that can be configured is . Choose whether to encrypt public communication () or not (). If choosing , refer to SSL Support: Protocol for configuration details.
(Modular Layer 2) #
Select which mechanism driver(s) shall be enabled for the ml2 plug-in. It is possible to select more than one driver by holding the Ctrl key while clicking. Choices are:
. Supports GRE, VLAN and VXLAN networks (to be configured via the setting).
. Supports VLANs only. Requires to specify the .
. Enables Neutron to dynamically adjust the VLAN settings of the ports of an existing Cisco Nexus switch when instances are launched. It also requires which will automatically be selected. With , must be added. This option also requires to specify the . See Appendix B, Using Cisco Nexus Switches with Neutron for details.
. vmware_dvs driver makes it possible to use Neutron for networking in a VMware-based environment. Choosing , automatically selects the required , , and drivers. In the view, it is also possible to configure two additional attributes: (clean up the DVS portgroups on the target vCenter Servers when neutron-server is restarted) and (create DVS portgroups corresponding to networks in advance, rather than when virtual machines are attached to these networks).
With the default setup, all intra-Compute Node traffic flows through the network Control Node. The same is true for all traffic from floating IPs. In large deployments the network Control Node can therefore quickly become a bottleneck. When this option is set to , network agents will be installed on all compute nodes. This will de-centralize the network traffic, since Compute Nodes will be able to directly “talk” to each other. Distributed Virtual Routers (DVR) require the driver and will not work with the driver. For details on DVR refer to https://wiki.openstack.org/wiki/Neutron/DVR.
This option is only available when having chosen the or the mechanism drivers. Options are , and . It is possible to select more than one driver by holding the Ctrl key while clicking.
When multiple type drivers are enabled, you need to select the , that will be used for newly created provider networks. This also includes the
nova_fixednetwork, that will be created when applying the Neutron proposal. When manually creating provider networks with theneutroncommand, the default can be overwritten with the--provider:network_type typeswitch. You will also need to set a . It is not possible to change this default when manually creating tenant networks with theneutroncommand. The non-default type driver will only be used as a fallback.Depending on your choice of the type driver, more configuration options become available.
. Having chosen , you also need to specify the start and end of the tunnel ID range.
. The option requires you to specify the .
. Having chosen , you also need to specify the start and end of the VNI range.
Important: Drivers for the VMware Compute Node
Neutron must not be deployed with the openvswitch with
gre plug-in. See Appendix A, VMware vSphere Installation Instructions for details.
- xCAT Host/IP Address
Host name or IP address of the xCAT Management Node.
- xCAT Username/Password
xCAT login credentials.
- rdev list for physnet1 vswitch uplink (if available)
List of rdev addresses that should be connected to this vswitch.
- xCAT IP Address on Management Network
IP address of the xCAT management interface.
- Net Mask of Management Network
Net mask of the xCAT management interface.
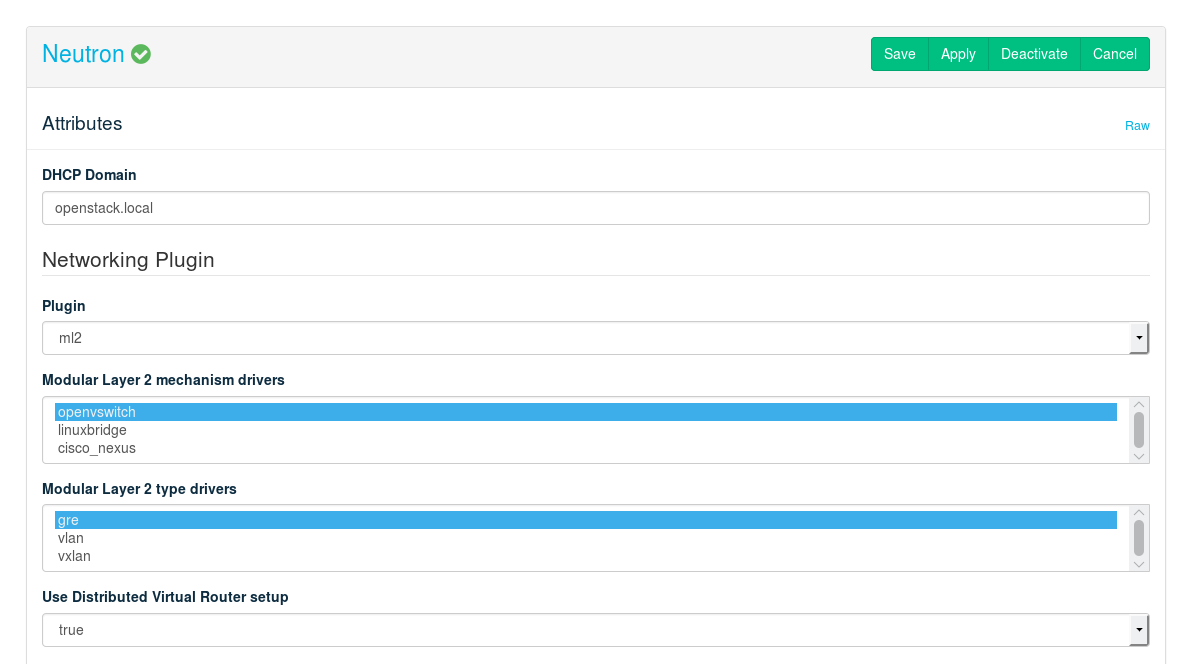
Figure 12.16: The Neutron Barclamp #
The Neutron component consists of two different roles:
provides the scheduler and the API. It needs to be installed on a Control Node.
This service runs the various agents that manage the network traffic of all the cloud instances. It acts as the DHCP and DNS server and as a gateway for all cloud instances. It is recommend to deploy this role on a dedicated node supplied with sufficient network capacity.
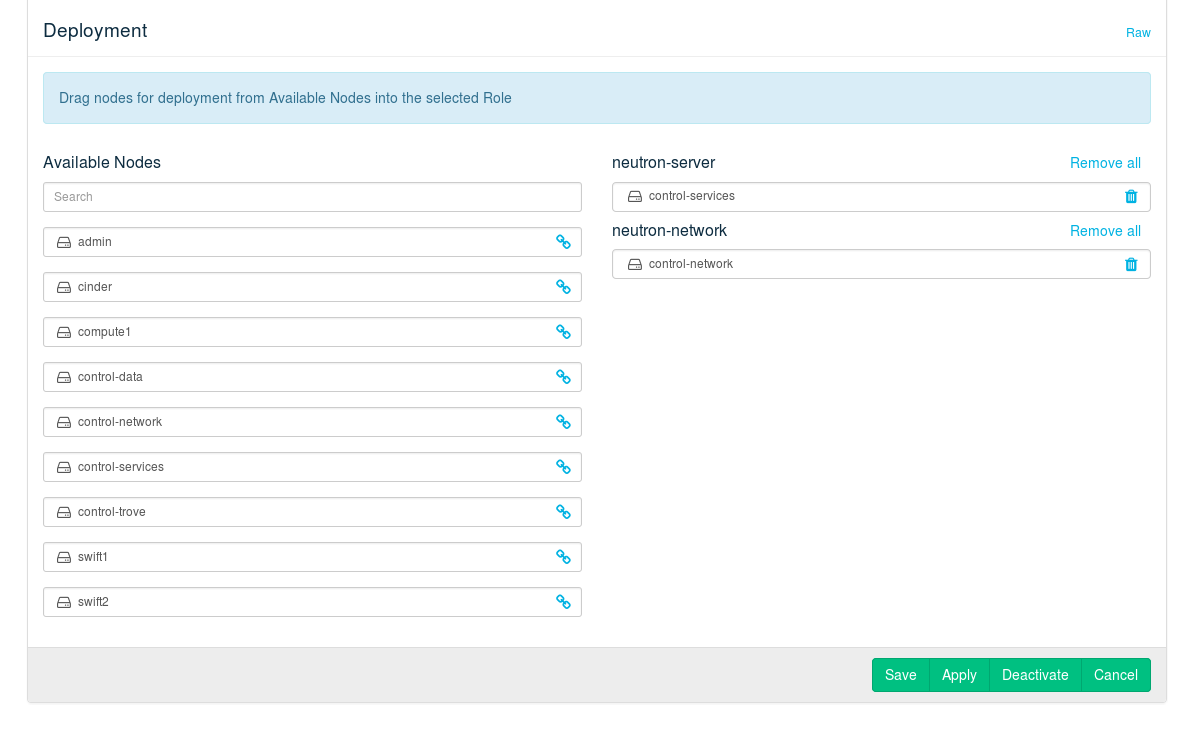
Figure 12.17: The Neutron barclamp #
12.10.1 Using Infoblox IPAM Plug-in #
- File Name: depl_nodes.xml
- ID: sec-depl-ostack-network-infoblox
In the Neutron barclamp, you can enable support for the infoblox IPAM
plug-in and configure it. For configuration, the
infoblox section contains the subsections
grids and grid_defaults.
- grids
This subsection must contain at least one entry. For each entry, the following parameters are required:
admin_user_name
admin_password
grid_master_host
grid_master_name
data_center_name
You can also add multiple entries to the
gridssection. However, the upstream infoblox agent only supports a single grid currently.- grid_defaults
This subsection contains the default settings that are used for each grid (unless you have configured specific settings within the
gridssection).
For detailed information on all infoblox-related configuration settings, see https://github.com/openstack/networking-infoblox/blob/master/doc/source/installation.rst.
Currently, all configuration options for infoblox are only available in the
raw mode of the Neutron barclamp. To enable support for
the infoblox IPAM plug-in and configure it, proceed as follows:
the Neutron barclamp proposal or create a new one.
Click and search for the following section:
"use_infoblox": false,
To enable support for the infoblox IPAM plug-in, change this entry to:
"use_infoblox": true,
In the
gridssection, configure at least one grid by replacing the example values for each parameter with real values.If you need specific settings for a grid, add some of the parameters from the
grid_defaultssection to the respective grid entry and adjust their values.Otherwise Crowbar applies the default setting to each grid when you save the barclamp proposal.
Save your changes and apply them.
12.10.2 HA Setup for Neutron #
- File Name: depl_nodes.xml
- ID: sec-depl-ostack-network-ha
Neutron can be made highly available by deploying and on a cluster. While may be deployed on a cluster shared with other services, it is strongly recommended to use a dedicated cluster solely for the role.
12.10.3 Setting Up Multiple External Networks #
- File Name: depl_nodes.xml
- ID: sec-setup-multi-ext-networks
This section shows you how to create external networks on SUSE OpenStack Cloud.
12.10.3.1 New Network Configurations #
- File Name: depl_nodes.xml
- ID: sec-config-multi-ext-networks
If you have not yet deployed Crowbar, add the following configuration to
/etc/crowbar/network.jsonto set up an external network, using the name of your new network, VLAN ID, and network addresses. If you have already deployed Crowbar, then add this configuration to the view of the Network Barclamp."public2": { "conduit": "intf1", "vlan": 600, "use_vlan": true, "add_bridge": false, "subnet": "192.168.135.128", "netmask": "255.255.255.128", "broadcast": "192.168.135.255", "ranges": { "host": { "start": "192.168.135.129", "end": "192.168.135.254" } } },Modify the additional_external_networks in the view of the Neutron Barclamp with the name of your new external network.
Apply both barclamps, and it may also be necessary to re-apply the Nova Barclamp.
Then follow the steps in the next section to create the new external network.
12.10.3.2 Create the New External Network #
- File Name: depl_nodes.xml
- ID: sec-confignet
The following steps add the network settings, including IP address pools, gateway, routing, and virtual switches to your new network.
Set up interface mapping using either Open vSwitch (OVS) or Linuxbridge. For Open vSwitch run the following command:
neutron net-create public2 --provider:network_type flat \
 --provider:physical_network public2 --router:external=True
For Linuxbridge run the following command:
neutron net-create --router:external True --provider:physical_network physnet1 \
 --provider:network_type vlan --provider:segmentation_id 600
If a different network is used then Crowbar will create a new interface mapping. Then you can use a flat network:
neutron net-create public2 --provider:network_type flat \
 --provider:physical_network public2 --router:external=True
Create a subnet:
neutron subnet-create --name public2 --allocation-pool \
 start=192.168.135.2,end=192.168.135.127 --gateway 192.168.135.1 public2 \
 192.168.135.0/24 --enable_dhcp False
Create a router, router2:
neutron router-create router2
Connect router2 to the new external network:
neutron router-gateway-set router2 public2
Create a new private network and connect it to router2
neutron net-create priv-net
neutron subnet-create priv-net --gateway 10.10.10.1 10.10.10.0/24 \
 --name priv-net-sub
neutron router-interface-add router2 priv-net-sub
Boot a VM on priv-net-sub and set a security group that allows SSH.
Assign a floating IP address to the VM, this time from network public2.
From the node verify that SSH is working by opening an SSH session to the VM.
12.10.3.3 How the Network Bridges are Created #
- File Name: depl_nodes.xml
- ID: sec-howbridges
For OVS, a new bridge will be created by Crowbar, in this case
br-public2. In the bridge mapping the new network will
be assigned to the bridge. The interface specified in
/etc/crowbar/network.json (in this case eth0.600) will
be plugged into br-public2. The new public network can
be created in Neutron using the new public network name as
provider:physical_network.
For Linuxbridge, Crowbar will check the interface associated with public2. If this is the same as physnet1 no interface mapping will be created. The new public network can be created in Neutron using physnet1 as physical network and specifying the correct VLAN ID:
neutron net-create public2 --router:external True \
 --provider:physical_network physnet1 --provider:network_type vlan \
 --provider:segmentation_id 600
A bridge named brq-NET_ID will be created and the
interface specified in /etc/crowbar/network.json will
be plugged into it. If a new interface is associated in
/etc/crowbar/network.json with
public2 then Crowbar will add a new interface
mapping and the second public network can be created using
public2 as the physical network:
neutron net-create public2 --provider:network_type flat \
 --provider:physical_network public2 --router:external=True
12.11 Deploying Nova #
- File Name: depl_nodes.xml
- ID: sec-depl-ostack-nova
Nova provides key services for managing the SUSE OpenStack Cloud, sets up the Compute Nodes. SUSE OpenStack Cloud currently supports KVM, Xen and VMware vSphere. The unsupported QEMU option is included to enable test setups with virtualized nodes. The following attributes can be configured for Nova:
Set the “overcommit ratio” for RAM for instances on the Compute Nodes. A ratio of
1.0means no overcommitment. Changing this value is not recommended.Set the “overcommit ratio” for CPUs for instances on the Compute Nodes. A ratio of
1.0means no overcommitment.Set the “overcommit ratio” for virtual disks for instances on the Compute Nodes. A ratio of
1.0means no overcommitment.Amount of reserved host memory that is not used for allocating VMs by Nova Compute.
Allows to move KVM and Xen instances to a different Compute Node running the same hypervisor (cross hypervisor migrations are not supported). Useful when a Compute Node needs to be shut down or rebooted for maintenance or when the load of the Compute Node is very high. Instances can be moved while running (Live Migration).
Warning: Libvirt Migration and Security
Enabling the libvirt migration option will open a TCP port on the Compute Nodes that allows access to all instances from all machines in the admin network. Ensure that only authorized machines have access to the admin network when enabling this option.

Tip: Specifying Network for Live Migration
It is possible to change a network to live migrate images. This is done in the raw view of the Nova barclamp. In the
migrationsection, change thenetworkattribute to the appropriate value (for example,storagefor Ceph).- Live Migration Support: Setup Shared Storage
Sets up a directory
/var/lib/nova/instanceson the Control Node on which is running. This directory is exported via NFS to all compute nodes and will host a copy of the root disk of all Xen instances. This setup is required for live migration of Xen instances (but not for KVM) and is used to provide central handling of instance data. Enabling this option is only recommended if Xen live migration is required—otherwise it should be disabled.Warning: Do Not Set Up Shared Storage When instances are Running
Setting up shared storage in a SUSE OpenStack Cloud where instances are running will result in connection losses to all running instances. It is strongly recommended to set up shared storage when deploying SUSE OpenStack Cloud. If it needs to be done at a later stage, make sure to shut down all instances prior to the change.
Kernel SamePage Merging (KSM) is a Linux Kernel feature which merges identical memory pages from multiple running processes into one memory region. Enabling it optimizes memory usage on the Compute Nodes when using the KVM hypervisor at the cost of slightly increasing CPU usage.
- VMware vCenter Settings
Setting up VMware support is described in a separate section. See Appendix A, VMware vSphere Installation Instructions.
- SSL Support: Protocol
Choose whether to encrypt public communication () or not (). If choosing ,refer to SSL Support: Protocol for configuration details.
- VNC Settings: Keymap
Change the default VNC keymap for instances. By default,
en-usis used. Enter the value in lowercase, either as a two character code (such asdeorjp) or, as a five character code such asde-choren-uk, if applicable.- VNC Settings: NoVNC Protocol
After having started an instance you can display its VNC console in the OpenStack Dashboard (Horizon) via the browser using the noVNC implementation. By default this connection is not encrypted and can potentially be eavesdropped.
Enable encrypted communication for noVNC by choosing and providing the locations for the certificate key pair files.
Shows debugging output in the log files when set to .
Note: Custom Vendor Data for Instances
You can pass custom vendor data to all VMs via Nova's metadata server. For example, information about a custom SMT server can be used by the SUSE guest images to automatically configure the repositories for the guest.
To pass custom vendor data, switch to the view of the Nova barclamp.
Search for the following section:
"metadata": {
  "vendordata": {
    "json": "{}"
  }
}
As value of the
jsonentry, enter valid JSON data. For example:"metadata": { "vendordata": { "json": "{\"CUSTOM_KEY\": \"CUSTOM_VALUE\"}" } }The string needs to be escaped because the barclamp file is in JSON format, too.
Use the following command to access the custom vendor data from inside a VM:
curl -s http://METADATA_SERVER/openstack/latest/vendor_data.json
The IP address of the metadata server is always the same from within a VM. For more details, see https://www.suse.com/communities/blog/vms-get-access-metadata-neutron/.
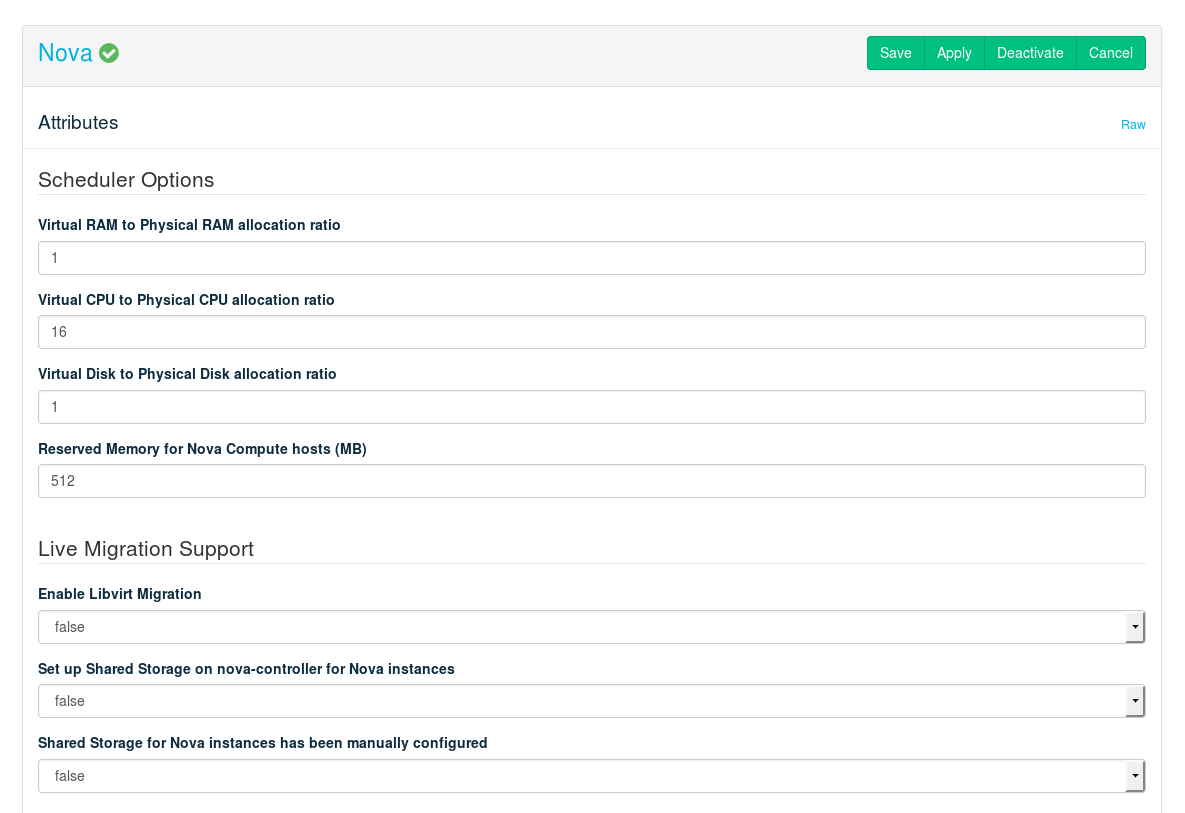
Figure 12.18: The Nova Barclamp #
The Nova component consists of eight different roles:
Distributing and scheduling the instances is managed by the . It also provides networking and messaging services. needs to be installed on a Control Node.
- / / / /
Provides the hypervisors (KVM, QEMU, VMware vSphere, Xen, and z/VM) and tools needed to manage the instances. Only one hypervisor can be deployed on a single compute node. To use different hypervisors in your cloud, deploy different hypervisors to different Compute Nodes. A
nova-compute-*role needs to be installed on every Compute Node. However, not all hypervisors need to be deployed.Each image that will be made available in SUSE OpenStack Cloud to start an instance is bound to a hypervisor. Each hypervisor can be deployed on multiple Compute Nodes (except for the VMware vSphere role, see below). In a multi-hypervisor deployment you should make sure to deploy the
nova-compute-*roles in a way, that enough compute power is available for each hypervisor.
Note: Re-assigning Hypervisors
Existing
nova-compute-*nodes can be changed in a production SUSE OpenStack Cloud without service interruption. You need to “evacuate” the node, re-assign a newnova-computerole via the Nova barclamp and the change. can only be deployed on a single node.Important: Deploying VMware vSphere (vmware)
VMware vSphere is not supported “natively” by SUSE OpenStack Cloud—it rather delegates requests to an existing vCenter. It requires preparations at the vCenter and post install adjustments of the Compute Node. See Appendix A, VMware vSphere Installation Instructions for instructions. can only be deployed on a single Compute Node.
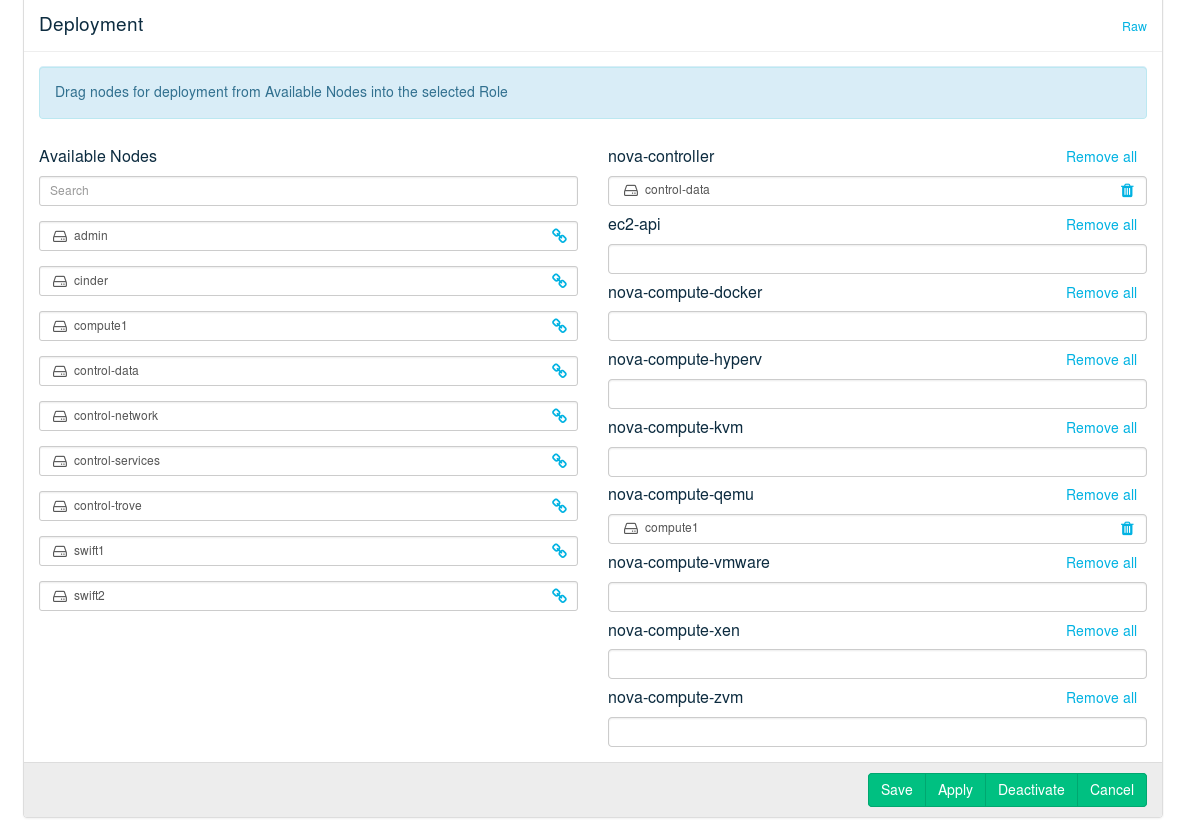
Figure 12.19: The Nova Barclamp: Node Deployment Example with Two KVM Nodes #
When deploying a node with the ML2 driver enabled in the Neutron barclamp, the following new attributes are also available in the section of the mode: (the name of the DVS switch configured on the target vCenter cluster) and (enable or disable implementing security groups through DVS traffic rules).
It is important to specify the correct he value, as the barclamp expects the DVS switch to be preconfigured on the target VMware vCenter cluster.
Warning: vmware_dvs must be enabled
Deploying nodes will not result in a functional cloud setup if the ML2 plug-in is not enabled in the Neutron barclamp.
12.11.1 HA Setup for Nova #
- File Name: depl_nodes.xml
- ID: sec-depl-ostack-nova-ha
Making highly available requires no special configuration—it is sufficient to deploy it on a cluster.
To enable High Availability for Compute Nodes, deploy the following roles to one or more clusters with remote nodes:
nova-compute-kvm
nova-compute-qemu
nova-compute-xen
ec2-api
The cluster to which you deploy the roles above can be completely
independent of the one to which the role nova-controller
is deployed.
However, the nova-controller and
ec2-api roles must be deployed the same way (either
both to a cluster or both to
individual nodes. This is due to Crowbar design limitations.
Tip: Shared Storage
It is recommended to use shared storage for the
/var/lib/nova/instances directory, to ensure that
ephemeral disks will be preserved during recovery of VMs from failed
compute nodes. Without shared storage, any ephemeral disks will be lost,
and recovery will rebuild the VM from its original image.
If an external NFS server is used, enable the following option in the Nova barclamp proposal: .
12.12 Deploying Horizon (OpenStack Dashboard) #
- File Name: depl_nodes.xml
- ID: sec-depl-ostack-dash
The last component that needs to be deployed is Horizon, the OpenStack Dashboard. It provides a Web interface for users to start and stop instances and for administrators to manage users, groups, roles, etc. Horizon should be installed on a Control Node. To make Horizon highly available, deploy it on a cluster.
The following attributes can be configured:
- Session Timeout
Timeout (in minutes) after which a user is been logged out automatically. The default value is set to four hours (240 minutes).
Note: Timeouts Larger than Four Hours
Every Horizon session requires a valid Keystone token. These tokens also have a lifetime of four hours (14400 seconds). Setting the Horizon session timeout to a value larger than 240 will therefore have no effect, and you will receive a warning when applying the barclamp.
To successfully apply a timeout larger than four hours, you first need to adjust the Keystone token expiration accordingly. To do so, open the Keystone barclamp in mode and adjust the value of the key
token_expiration. Note that the value has to be provided in seconds. When the change is successfully applied, you can adjust the Horizon session timeout (in minutes). Note that extending the Keystone token expiration may cause scalability issues in large and very busy SUSE OpenStack Cloud installations.Specify a regular expression with which to check the password. The default expression (
.{8,}) tests for a minimum length of 8 characters. The string you enter is interpreted as a Python regular expression (see http://docs.python.org/2.7/library/re.html#module-re for a reference).Error message that will be displayed in case the password validation fails.
- SSL Support: Protocol
Choose whether to encrypt public communication () or not (). If choosing , you have two choices. You can either or provide the locations for the certificate key pair files and,—optionally— the certificate chain file. Using self-signed certificates is for testing purposes only and should never be used in production environments!

Figure 12.20: The Horizon Barclamp #
12.12.1 HA Setup for Horizon #
- File Name: depl_nodes.xml
- ID: sec-depl-ostack-dash-ha
Making Horizon highly available requires no special configuration—it is sufficient to deploy it on a cluster.
12.13 Deploying Heat (Optional) #
- File Name: depl_nodes.xml
- ID: sec-depl-ostack-heat
Heat is a template-based orchestration engine that enables you to, for example, start workloads requiring multiple servers or to automatically restart instances if needed. It also brings auto-scaling to SUSE OpenStack Cloud by automatically starting additional instances if certain criteria are met. For more information about Heat refer to the OpenStack documentation at http://docs.openstack.org/developer/heat/.
Heat should be deployed on a Control Node. To make Heat highly available, deploy it on a cluster.
The following attributes can be configured for Heat:
Shows debugging output in the log files when set to .
- SSL Support: Protocol
Choose whether to encrypt public communication () or not (). If choosing , refer to SSL Support: Protocol for configuration details.
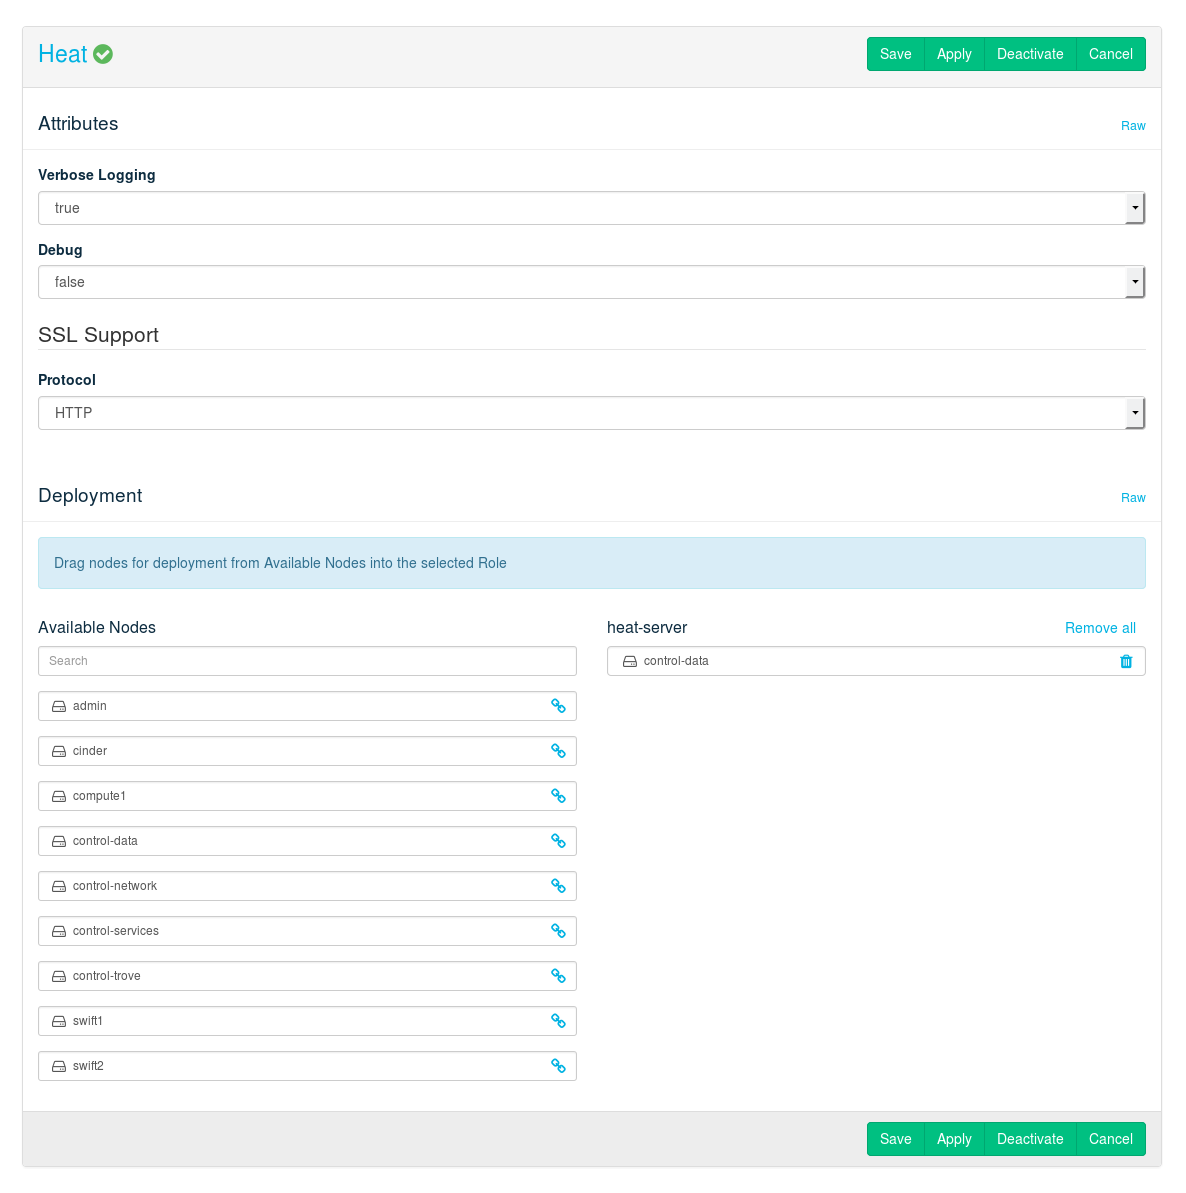
Figure 12.21: The Heat Barclamp #
12.13.1 Enabling Identity Trusts Authorization (Optional) #
- File Name: depl_nodes.xml
- ID: sec-depl-ostack-heat-delegated-roles
Heat uses Keystone Trusts to delegate a subset of user roles to the
Heat engine for deferred operations (see
Steve
Hardy's blog for details). It can either delegate all user roles or
only those specified in the trusts_delegated_roles
setting. Consequently, all roles listed in
trusts_delegated_roles need to be assigned to a user,
otherwise the user will not be able to use Heat.
The recommended setting for trusts_delegated_roles is
Member, since this is the default role most users are
likely to have. This is also the default setting when installing SUSE OpenStack Cloud
from scratch.
On installations where this setting is introduced through an upgrade,
trusts_delegated_roles will be set to
heat_stack_owner. This is a conservative choice to
prevent breakage in situations where unprivileged users may already have
been assigned the heat_stack_owner role to enable them
to use Heat but lack the Member role. As long as you can
ensure that all users who have the heat_stack_owner role
also have the Member role, it is both safe and
recommended to change trusts_delegated_roles to Member.
To view or change the trusts_delegated_role setting you need to open the
Heat barclamp and click in the
section. Search for the
trusts_delegated_roles setting and modify the list of
roles as desired.
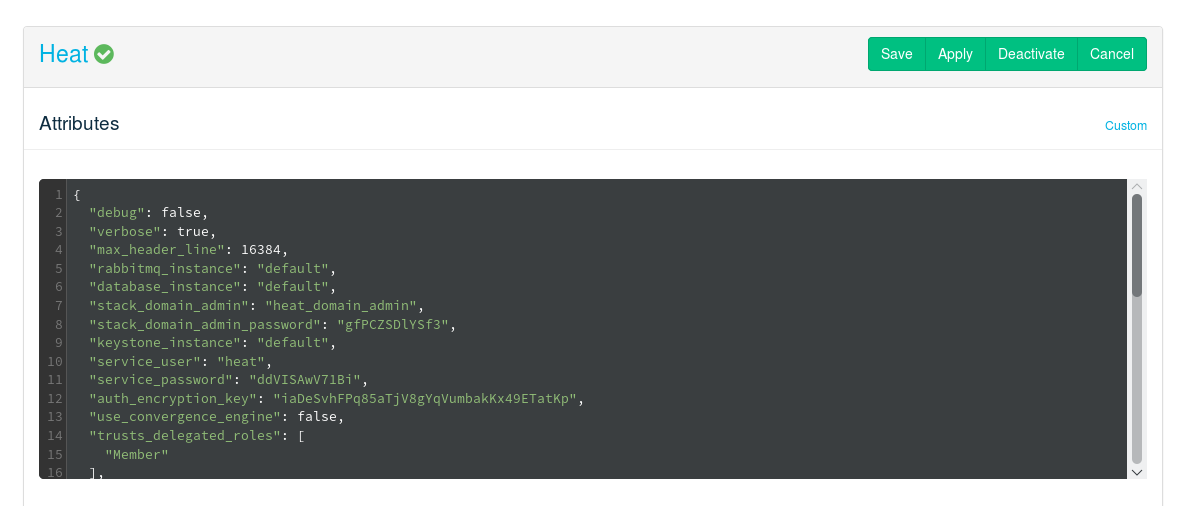
Figure 12.22: the Heat barclamp: Raw Mode #
Warning: Empty Value
An empty value for trusts_delegated_roles will delegate
all of user roles to Heat. This may create a security
risk for users who are assigned privileged roles, such as
admin, because these privileged roles will also be
delegated to the Heat engine when these users create Heat stacks.
12.13.2 HA Setup for Heat #
- File Name: depl_nodes.xml
- ID: sec-depl-ostack-heat-ha
Making Heat highly available requires no special configuration—it is sufficient to deploy it on a cluster.
12.14 Deploying Ceilometer (Optional) #
- File Name: depl_nodes.xml
- ID: sec-depl-ostack-ceilometer
Ceilometer collects CPU and networking data from SUSE OpenStack Cloud. This data can be used by a billing system to enable customer billing. Deploying Ceilometer is optional.
For more information about Ceilometer refer to the OpenStack documentation at http://docs.openstack.org/developer/ceilometer/.
Important: Ceilometer Restrictions
As of SUSE OpenStack Cloud Crowbar 8 data measuring is only supported for KVM, Xen and Windows instances. Other hypervisors and SUSE OpenStack Cloud features such as object or block storage will not be measured.
The following attributes can be configured for Ceilometer:
- Interval used for CPU/disk/network/other meter updates (in seconds)
Specify an interval in seconds after which Ceilometer performs an update of the specified meter.
- Evaluation interval for threshold alarms (in seconds)
Set the interval after which to check whether to raise an alarm because a threshold has been exceeded. For performance reasons, do not set a value lower than the default (60s).
- How long are metering/event samples kept in the database (in days)
Specify how long to keep the data. -1 means that samples are kept in the database forever.
- Verbose Logging
Shows debugging output in the log files when set to .
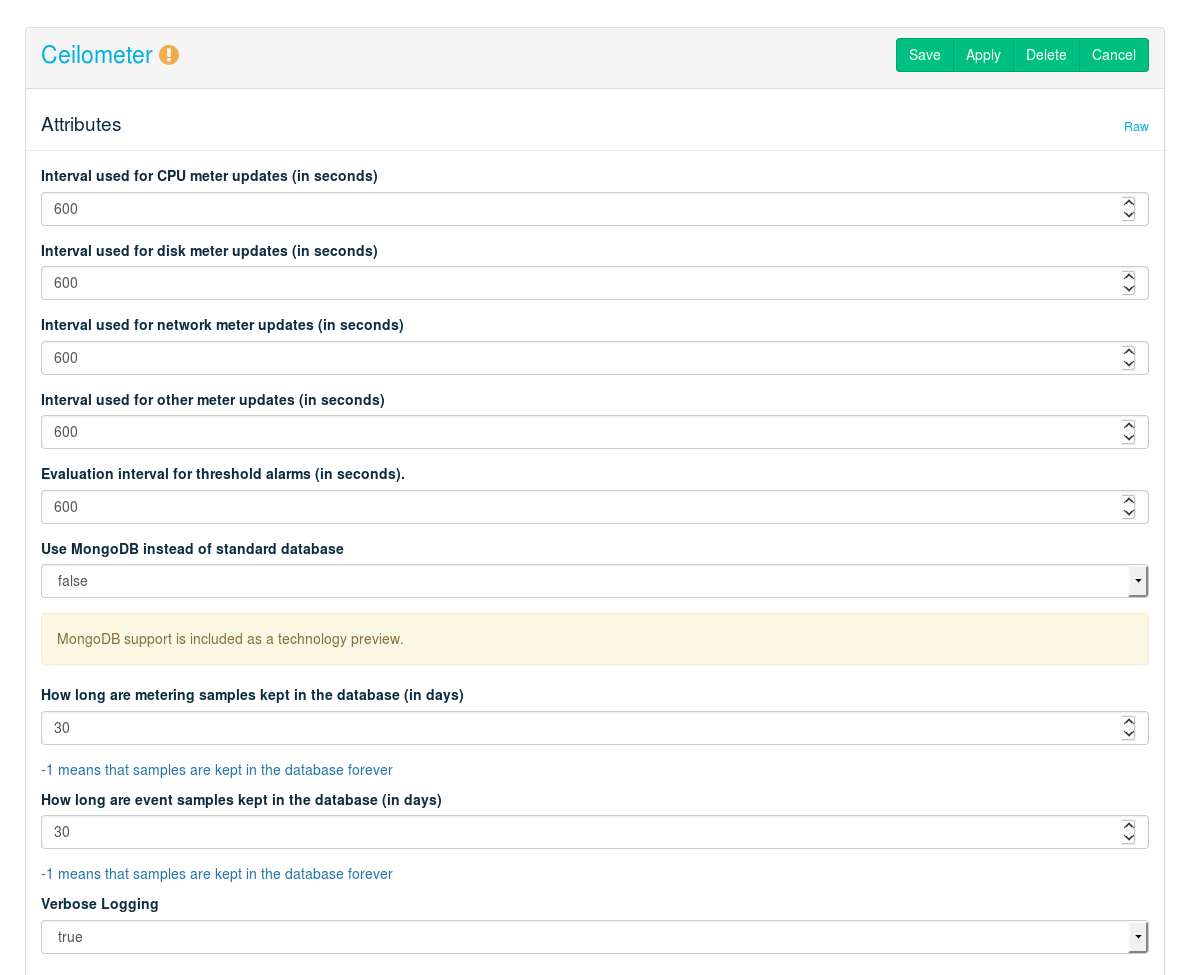
Figure 12.23: The Ceilometer Barclamp #
- SSL Support: Protocol
With the default value enabled, public communication is not be encrypted. Choose to use SSL for encryption. See Section 2.3, “SSL Encryption” for background information and Section 11.4.6, “Enabling SSL” for installation instructions. The following additional configuration options will become available when choosing :
When set to
true, self-signed certificates are automatically generated and copied to the correct locations. This setting is for testing purposes only and should never be used in production environments!- /
Location of the certificate key pair files.
Set this option to
truewhen using self-signed certificates to disable certificate checks. This setting is for testing purposes only and should never be used in production environments!Specify the absolute path to the CA certificate. This field is mandatory, and leaving it blank will cause the barclamp to fail. To fix this issue, you have to provide the absolute path to the CA certificate, restart the
apache2service, and re-deploy the barclamp.When the certificate is not already trusted by the pre-installed list of trusted root certificate authorities, you need to provide a certificate bundle that includes the root and all intermediate CAs.
The Ceilometer component consists of five different roles:
The Ceilometer API server role. This role needs to be deployed on a Control Node. Ceilometer collects approximately 200 bytes of data per hour and instance. Unless you have a very huge number of instances, there is no need to install it on a dedicated node.
The polling agent listens to the message bus to collect data. It needs to be deployed on a Control Node. It can be deployed on the same node as .
The compute agents collect data from the compute nodes. They need to be deployed on all KVM and Xen compute nodes in your cloud (other hypervisors are currently not supported).
An agent collecting data from the Swift nodes. This role needs to be deployed on the same node as swift-proxy.
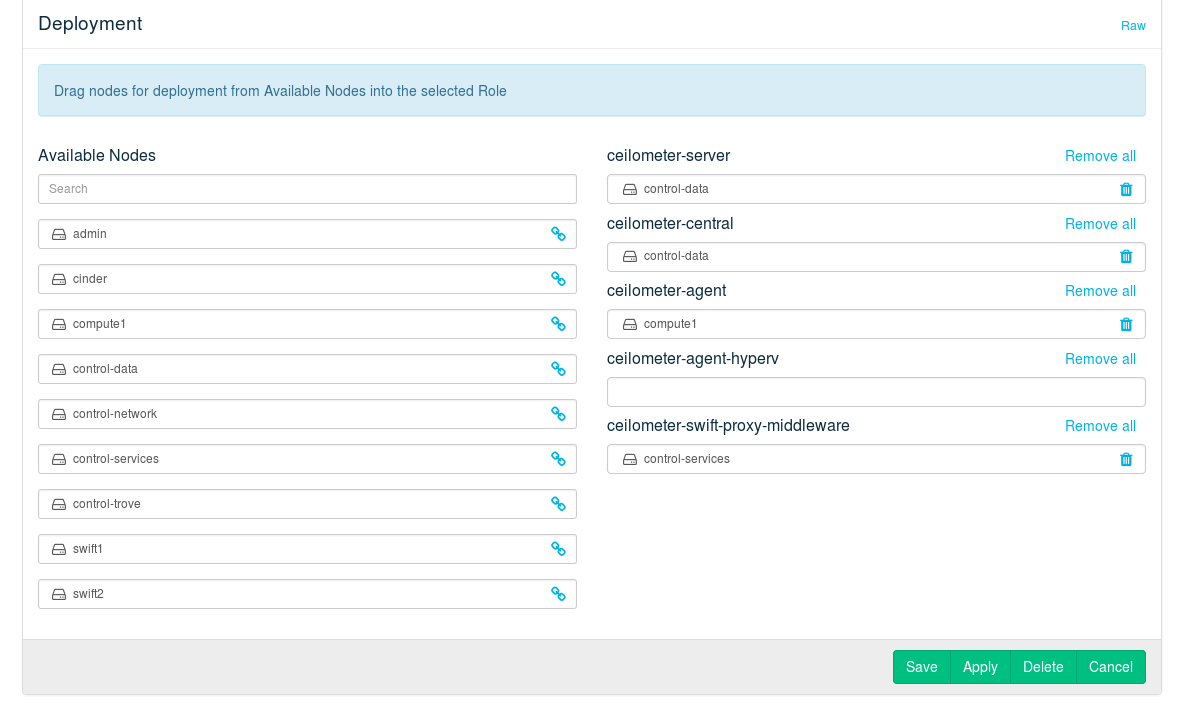
Figure 12.24: The Ceilometer Barclamp: Node Deployment #
12.14.1 HA Setup for Ceilometer #
- File Name: depl_nodes.xml
- ID: sec-depl-ostack-ceilometer-ha
Making Ceilometer highly available requires no special configuration—it is sufficient to deploy the roles and on a cluster. If you are using MySQL or PostgreSQL, you can use two nodes.
12.15 Deploying Manila #
- File Name: depl_nodes.xml
- ID: sec-depl-ostack-manila
Manila provides coordinated access to shared or distributed file systems, similar to what Cinder does for block storage. These file systems can be shared between instances in SUSE OpenStack Cloud.
Manila uses different back-ends. As of SUSE OpenStack Cloud Crowbar 8 currently supported back-ends include , , and . Two more back-end options, and are available for testing purposes and are not supported.
Note: Limitations for CephFS Back-end
Manila uses some CephFS features that are currently not supported by the SUSE Linux Enterprise Server 12 SP3 CephFS kernel client:
RADOS namespaces
MDS path restrictions
Quotas
As a result, to access CephFS shares provisioned by Manila, you must use ceph-fuse. For details, see http://docs.openstack.org/developer/manila/devref/cephfs_native_driver.html.
When first opening the Manila barclamp, the default proposal is already available for configuration. To replace it, first delete it by clicking the trashcan icon and then choose a different back-end in the section . Select a and—optionally—provide a . Activate the back-end with . Note that at least one back-end must be configured.
The attributes that can be set to configure Cinder depend on the back-end:
The generic driver is included as a technology preview and is not supported.
Provide the name of the Enterprise Virtual Server that the selected back-end is assigned to.
IP address for mounting shares.
Provide a file-system name for creating shares.
IP address of the HNAS management interface for communication between Manila controller and HNAS.
HNAS username Base64 String required to perform tasks like creating file-systems and network interfaces.
HNAS user password. Required only if private key is not provided.
RSA/DSA private key necessary for connecting to HNAS. Required only if password is not provided.
Time in seconds to wait before aborting stalled HNAS jobs.
Host name of the Virtual Storage Server.
The name or IP address for the storage controller or the cluster.
The port to use for communication. Port 80 is usually used for HTTP, 443 for HTTPS.
Login credentials.
Transport protocol for communicating with the storage controller or cluster. Supported protocols are HTTP and HTTPS. Choose the protocol your NetApp is licensed for.
- Use Ceph deployed by Crowbar
Set to
trueto use Ceph deployed with Crowbar.
Lets you manually pick and configure a driver. Only use this option for testing purposes, it is not supported.
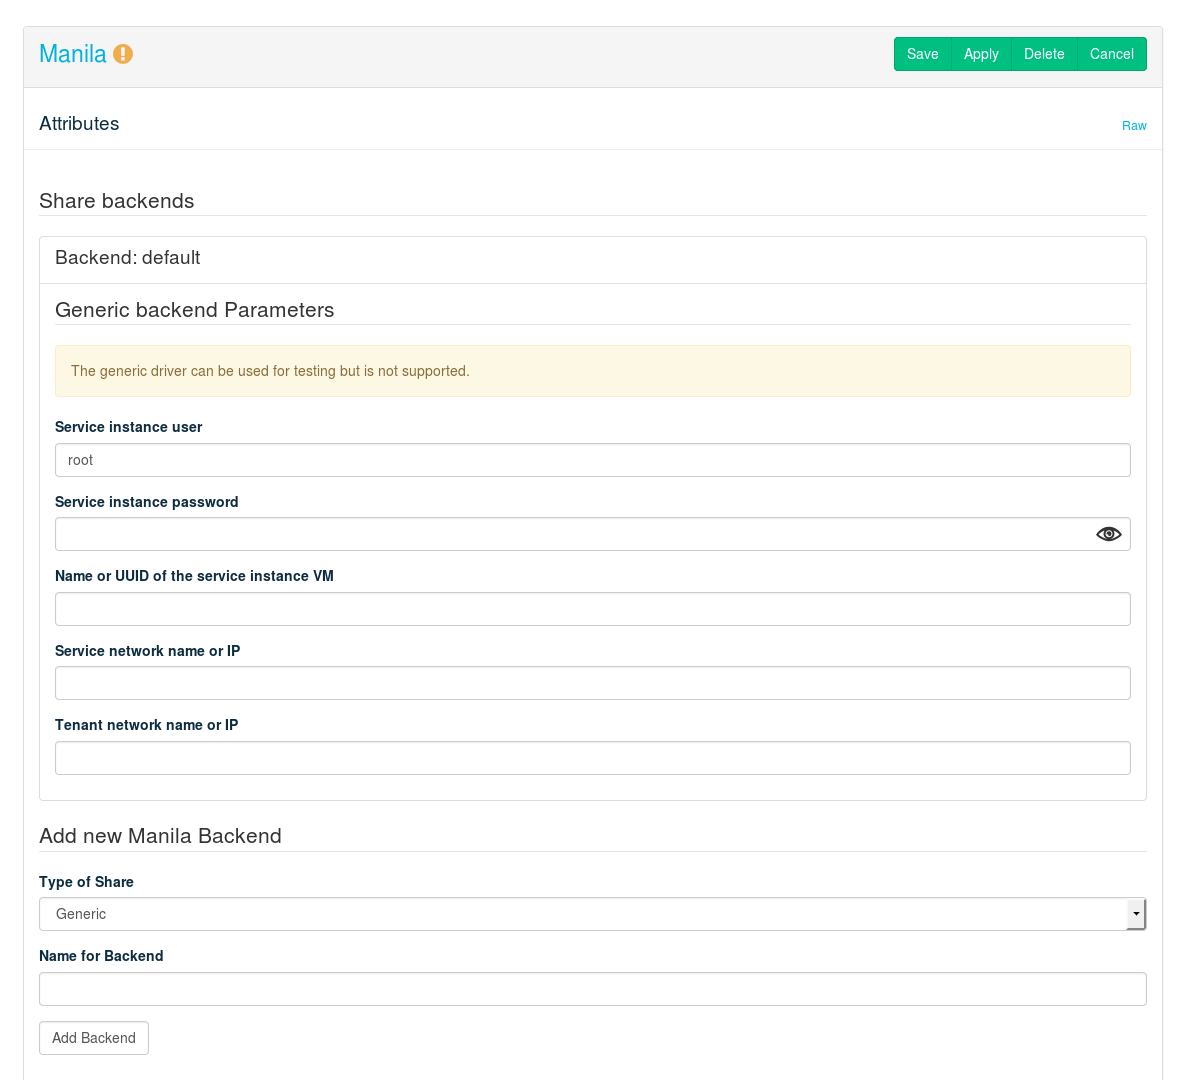
Figure 12.25: The Manila Barclamp #
The Manila component consists of two different roles:
The Manila server provides the scheduler and the API. Installing it on a Control Node is recommended.
The shared storage service. It can be installed on a Control Node, but it is recommended to deploy it on one or more dedicated nodes supplied with sufficient disk space and networking capacity, since it will generate a lot of network traffic.
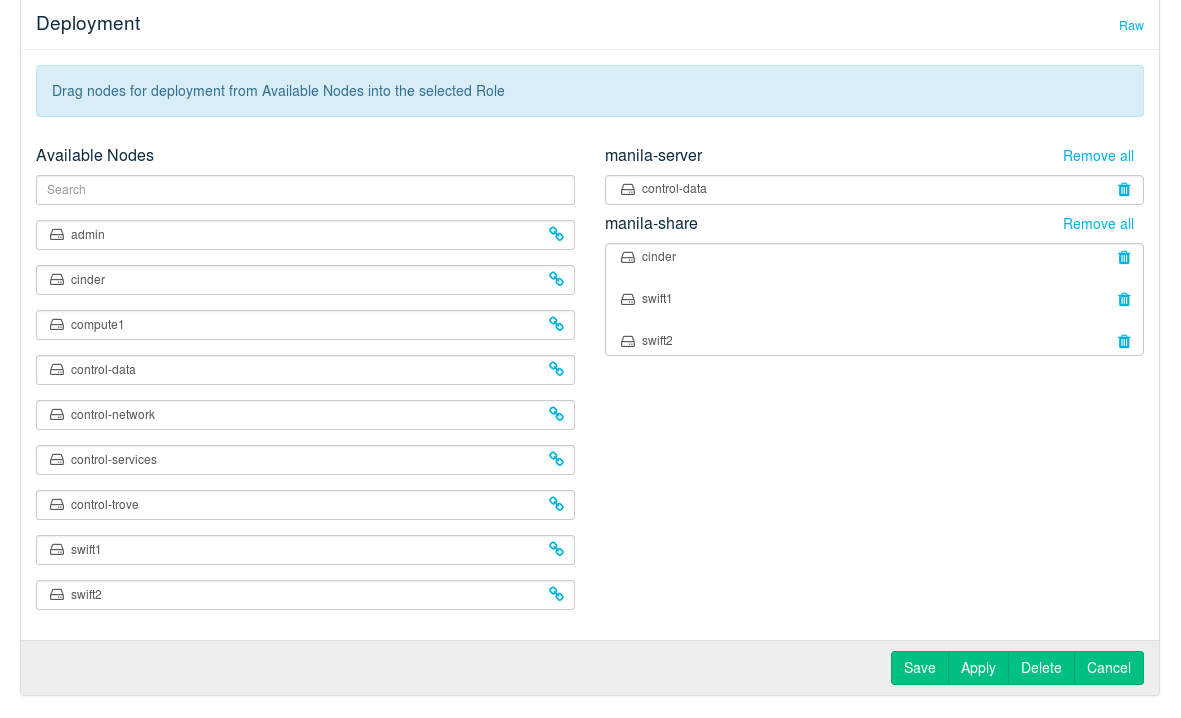
Figure 12.26: The Manila Barclamp: Node Deployment Example #
12.15.1 HA Setup for Manila #
- File Name: depl_nodes.xml
- ID: sec-depl-ostack-manila-ha
While the role can be deployed on a cluster, deploying on a cluster is not supported. Therefore it is generally recommended to deploy on several nodes—this ensures the service continues to be available even when a node fails.
12.16 Deploying Tempest (Optional) #
- File Name: depl_nodes.xml
- ID: sec-depl-ostack-tempest
Tempest is an integration test suite for SUSE OpenStack Cloud written in Python. It contains multiple integration tests for validating your SUSE OpenStack Cloud deployment. For more information about Tempest refer to the OpenStack documentation at http://docs.openstack.org/developer/tempest/.
Important: Technology Preview
Tempest is only included as a technology preview and not supported.
Tempest may be used for testing whether the intended setup will run without problems. It should not be used in a production environment.
Tempest should be deployed on a Control Node.
The following attributes can be configured for Tempest:
Credentials for a regular user. If the user does not exist, it will be created.
Tenant to be used by Tempest. If it does not exist, it will be created. It is safe to stick with the default value.
Credentials for an admin user. If the user does not exist, it will be created.
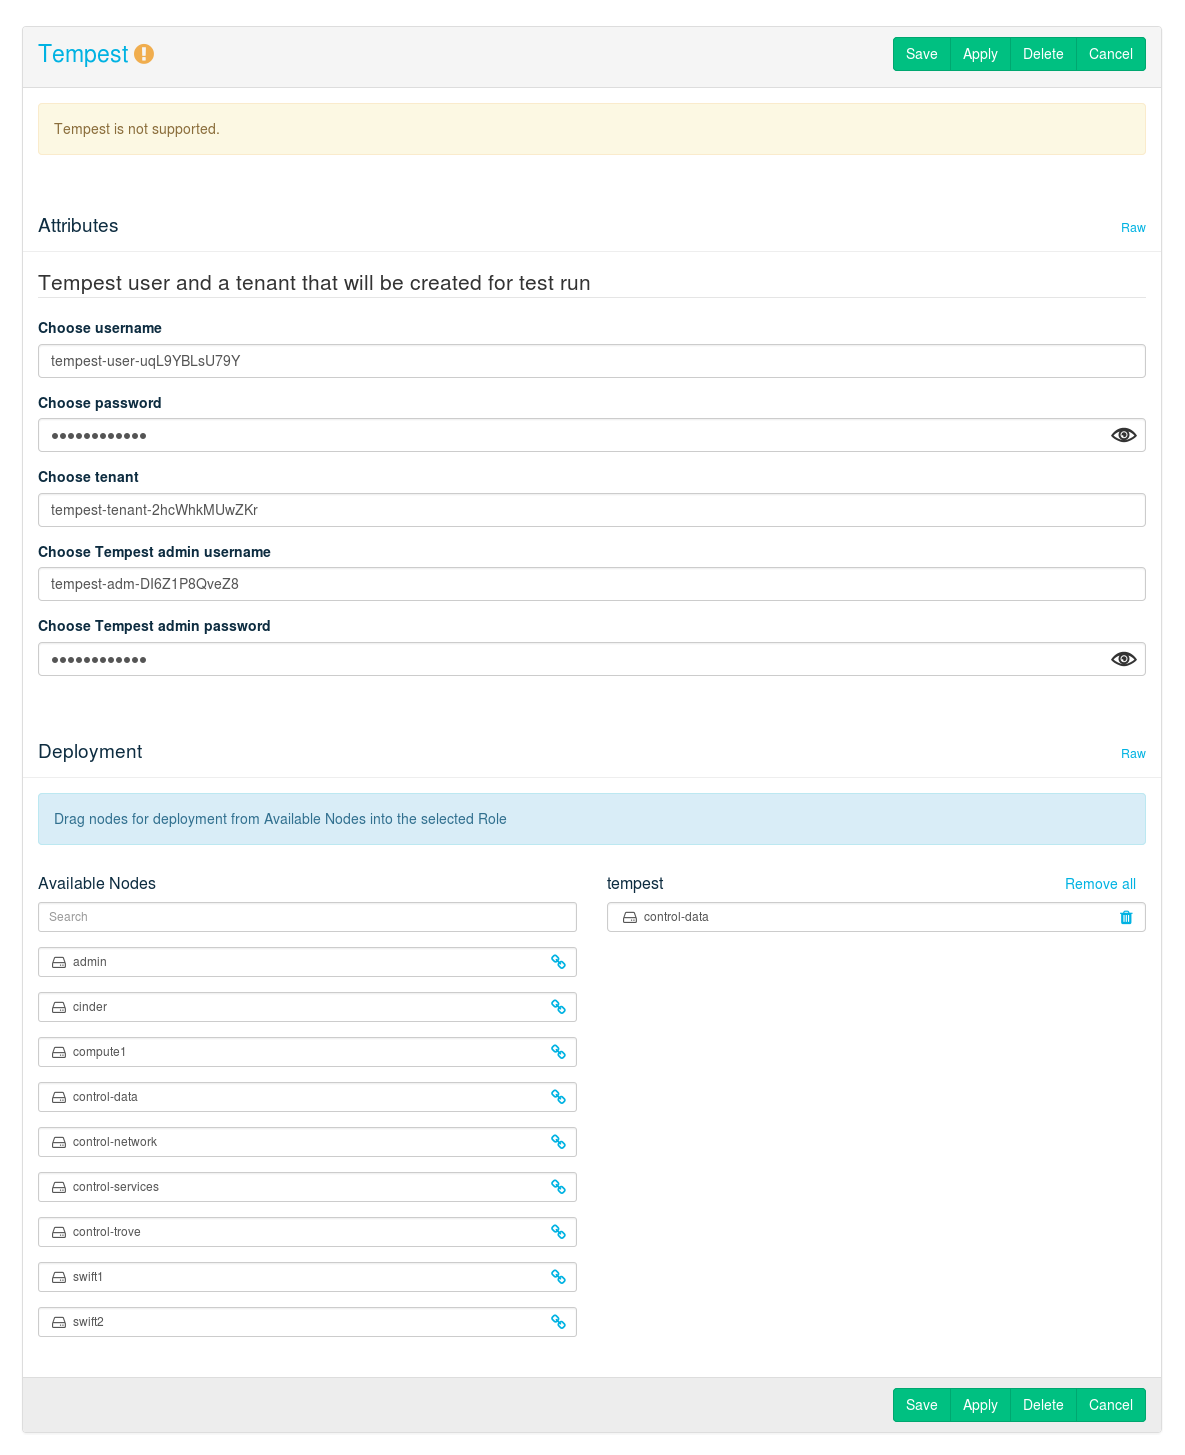
Figure 12.27: The Tempest Barclamp #
Tip: Running Tests
To run tests with Tempest, log in to the Control Node on which
Tempest was deployed. Change into the directory
/var/lib/openstack-tempest-test. To get an overview of
available commands, run:
./tempest --help
To serially invoke a subset of all tests (“the gating
smoketests”) to help validate the working functionality of your
local cloud instance, run the following command. It will save the output to
a log file
tempest_CURRENT_DATE.log.
./tempest run --smoke --serial 2>&1 \
| tee "tempest_$(date +%Y-%m-%d_%H%M%S).log"
12.16.1 HA Setup for Tempest #
- File Name: depl_nodes.xml
- ID: sec-depl-ostack-tempest-ha
Tempest cannot be made highly available.
12.17 Deploying Magnum (Optional) #
- File Name: depl_nodes.xml
- ID: sec-depl-ostack-magnum
Magnum is an OpenStack project which offers container orchestration engines for deploying and managing containers as first class resources in OpenStack.
For more information about Magnum, see the OpenStack documentation at http://docs.openstack.org/developer/magnum/.
For information on how to deploy a Kubernetes cluster (either from command line or from the Horizon Dashboard), see the Supplement to Administrator Guide and End User Guide. It is available from https://documentation.suse.com/soc/8/.
The following can be configured for Magnum:
- :
Deploying Kubernetes clusters in a cloud without an Internet connection (see also https://documentation.suse.com/soc/8/single-html/suse-openstack-cloud-supplement/#sec-deploy-kubernetes-without) requires the
registry_enabledoption in its cluster template set totrue. To make this offline scenario work, you also need to set the option totrue. This restores the old, insecure behavior for clusters with theregistry-enabledorvolume_driver=Rexrayoptions enabled.- :
Domain name to use for creating trustee for bays.
- :
Increases the amount of information that is written to the log files when set to .
- :
Shows debugging output in the log files when set to .
- :
To store certificates, either use the OpenStack service, a local directory (), or the .
Note: Barbican As Certificate Manager
If you choose to use Barbican for managing certificates, make sure that the Barbican barclamp is enabled.
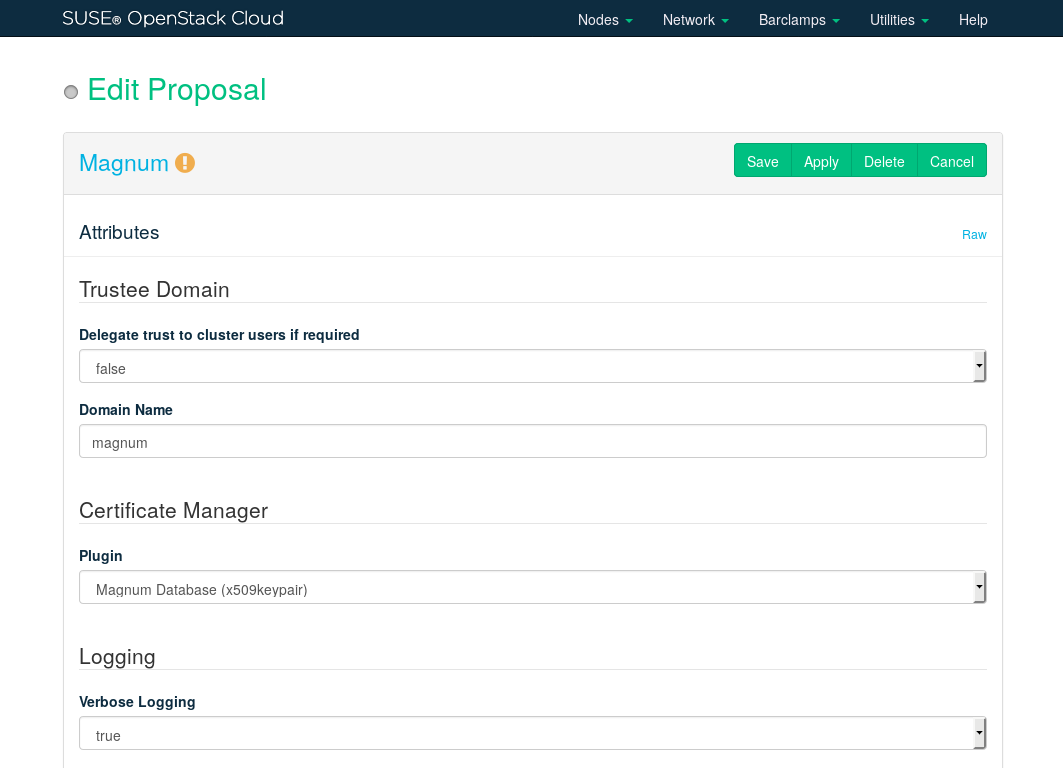
Figure 12.28: The Magnum Barclamp #
The Magnum barclamp consists of the following roles: . It can either be deployed on a Control Node or on a cluster—see Section 12.17.1, “HA Setup for Magnum”. When deploying the role onto a Control Node, additional RAM is required for the Magnum server. It is recommended to only deploy the role to a Control Node that has 16 GB RAM.
12.17.1 HA Setup for Magnum #
- File Name: depl_nodes.xml
- ID: sec-depl-ostack-magnum-ha
Making Magnum highly available requires no special configuration. It is sufficient to deploy it on a cluster.
12.18 Deploying Barbican (Optional) #
- File Name: depl_nodes.xml
- ID: sec-depl-ostack-barbican
Barbican is a component designed for storing secrets in a secure and standardized manner protected by Keystone authentication. Secrets include SSL certificates and passwords used by various OpenStack components.
Barbican settings can be configured in Raw mode
only. To do this, open the Barbican barclamp configuration in mode.

Figure 12.29: The Barbican Barclamp: Raw Mode #
When configuring Barbican, pay particular attention to the following settings:
bind_hostBind host for the Barbican API servicebind_portBind port for the Barbican API serviceprocessesNumber of API processes to run in ApachesslEnable or disable SSLthreadsNumber of API worker threadsdebugEnable or disable debug loggingenable_keystone_listenerEnable or disable the Keystone listener serviceskekAn encryption key (fixed-length 32-byte Base64-encoded value) for Barbican'ssimple_cryptoplug-in. If left unspecified, the key will be generated automatically.Note: Existing Encryption Key
If you plan to restore and use the existing Barbican database after a full reinstall (including a complete wipe of the Crowbar node), make sure to save the specified encryption key beforehand. You will need to provide it after the full reinstall in order to access the data in the restored Barbican database.
- SSL Support: Protocol
With the default value , public communication will not be encrypted. Choose to use SSL for encryption. See Section 2.3, “SSL Encryption” for background information and Section 11.4.6, “Enabling SSL” for installation instructions. The following additional configuration options will become available when choosing :
When set to
true, self-signed certificates are automatically generated and copied to the correct locations. This setting is for testing purposes only and should never be used in production environments!- /
Location of the certificate key pair files.
Set this option to
truewhen using self-signed certificates to disable certificate checks. This setting is for testing purposes only and should never be used in production environments!Specify the absolute path to the CA certificate. This field is mandatory, and leaving it blank will cause the barclamp to fail. To fix this issue, you have to provide the absolute path to the CA certificate, restart the
apache2service, and re-deploy the barclamp.When the certificate is not already trusted by the pre-installed list of trusted root certificate authorities, you need to provide a certificate bundle that includes the root and all intermediate CAs.
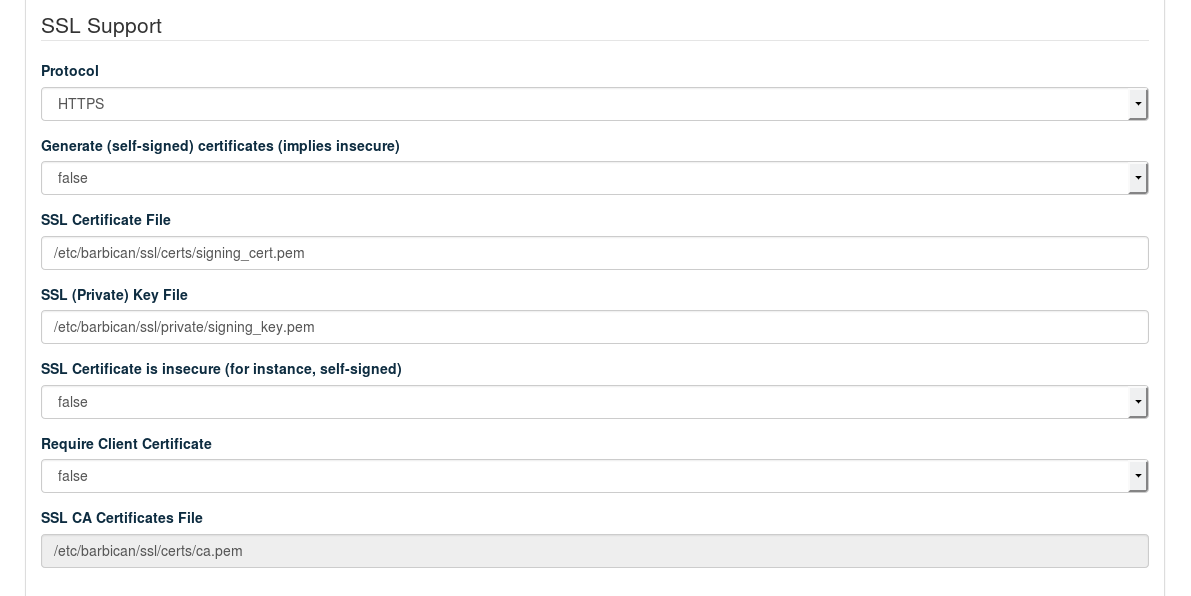
Figure 12.30: The SSL Dialog #
12.18.1 HA Setup for Barbican #
- File Name: depl_nodes.xml
- ID: sec-depl-ostack-barbican-ha
To make Barbican highly available, assign the role to the Controller Cluster.
12.19 Deploying Sahara #
- File Name: depl_nodes.xml
- ID: sec-depl-ostack-sahara
Sahara provides users with simple means to provision data processing frameworks (such as Hadoop, Spark, and Storm) on OpenStack. This is accomplished by specifying configuration parameters such as the framework version, cluster topology, node hardware details, etc.
- Logging: Verbose
Set to
trueto increase the amount of information written to the log files.

Figure 12.31: The Sahara Barclamp #
12.19.1 HA Setup for Sahara #
- File Name: depl_nodes.xml
- ID: sec-depl-ostack-sahara-ha
Making Sahara highly available requires no special configuration. It is sufficient to deploy it on a cluster.
12.20 Deploying Ironic (optional) #
- File Name: depl_nodes.xml
- ID: sec-depl-ostack-ironic
Ironic is the OpenStack bare metal service for provisioning physical machines. Refer to the OpenStack developer and admin manual for information on drivers, and administering Ironic.
Deploying the Ironic barclamp is done in five steps:
Set options in the Custom view of the barclamp.
List the
enabled_driversin the Raw view.Configure the Ironic network in
network.json.Apply the barclamp to a Control Node.
Apply the role to the same node you applied the Ironic barclamp to, in place of the other roles.
12.20.1 Custom View Options #
- File Name: depl_nodes.xml
- ID: sec-depl-ostack-ironic-custom-view
Currently, there are two options in the Custom view of the barclamp.
Node cleaning prepares the node to accept a new workload. When you set this to , Ironic collects a list of cleaning steps from the Power, Deploy, Management, and RAID interfaces of the driver assigned to the node. Ironic automatically prioritizes and executes the cleaning steps, and changes the state of the node to "cleaning". When cleaning is complete the state becomes "available". After a new workload is assigned to the machine its state changes to "active".
disables automatic cleaning, and you must configure and apply node cleaning manually. This requires the admin to create and prioritize the cleaning steps, and to set up a cleaning network. Apply manual cleaning when you have long-running or destructive tasks that you wish to monitor and control more closely. (See Node Cleaning.)
SSL support is not yet enabled, so the only option is .
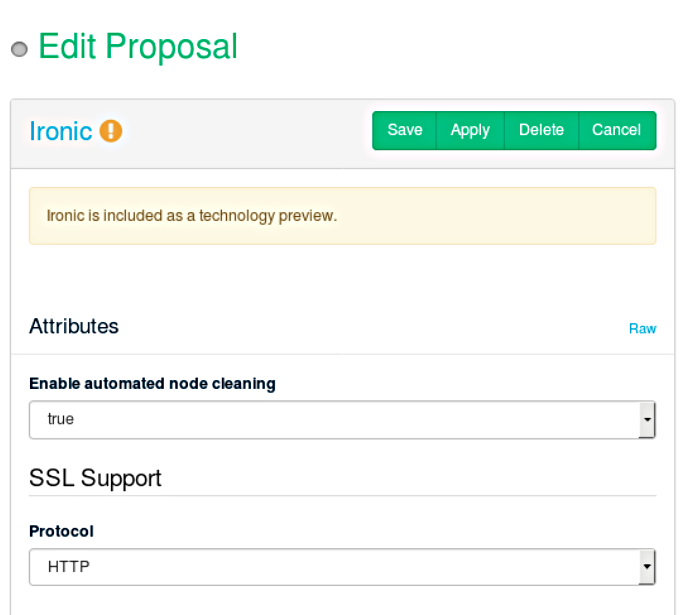
Figure 12.32: The Ironic barclamp Custom view #
12.20.2 Ironic Drivers #
- File Name: depl_nodes.xml
- ID: sec-depl-ostack-ironic-drivers
You must enter the Raw view of barclamp and specify a list of drivers to load during service initialization.
pxe_ipmitool is the recommended default Ironic driver. It uses the
Intelligent Platform Management Interface (IPMI) to control the power state
of your bare metal machines, creates the appropriate PXE configurations
to start them, and then performs the steps to provision and configure the machines.
"enabled_drivers": ["pxe_ipmitool"],
See Ironic Drivers for more information.
12.20.3 Example Ironic Network Configuration #
- File Name: depl_nodes.xml
- ID:
This is a complete Ironic network.json example, using
the default network.json, followed by a diff that shows
the Ironic-specific configurations.
Example 12.1: Example network.json #
{
  "start_up_delay": 30,
  "enable_rx_offloading": true,
  "enable_tx_offloading": true,
  "mode": "single",
  "teaming": {
    "mode": 1
  },
  "interface_map": [
    {
      "bus_order": [
        "0000:00/0000:00:01",
        "0000:00/0000:00:03"
      ],
      "pattern": "PowerEdge R610"
    },
    {
      "bus_order": [
        "0000:00/0000:00:01.1/0000:01:00.0",
        "0000:00/0000:00:01.1/0000.01:00.1",
        "0000:00/0000:00:01.0/0000:02:00.0",
        "0000:00/0000:00:01.0/0000:02:00.1"
      ],
      "pattern": "PowerEdge R620"
    },
    {
      "bus_order": [
        "0000:00/0000:00:01",
        "0000:00/0000:00:03"
      ],
      "pattern": "PowerEdge R710"
    },
    {
      "bus_order": [
        "0000:00/0000:00:04",
        "0000:00/0000:00:02"
      ],
      "pattern": "PowerEdge C6145"
    },
    {
      "bus_order": [
        "0000:00/0000:00:03.0/0000:01:00.0",
        "0000:00/0000:00:03.0/0000:01:00.1",
        "0000:00/0000:00:1c.4/0000:06:00.0",
        "0000:00/0000:00:1c.4/0000:06:00.1"
      ],
      "pattern": "PowerEdge R730xd"
    },
    {
      "bus_order": [
        "0000:00/0000:00:1c",
        "0000:00/0000:00:07",
        "0000:00/0000:00:09",
        "0000:00/0000:00:01"
      ],
      "pattern": "PowerEdge C2100"
    },
    {
      "bus_order": [
        "0000:00/0000:00:01",
        "0000:00/0000:00:03",
        "0000:00/0000:00:07"
      ],
      "pattern": "C6100"
    },
    {
      "bus_order": [
        "0000:00/0000:00:01",
        "0000:00/0000:00:02"
      ],
      "pattern": "product"
    }
  ],
  "conduit_map": [
    {
      "conduit_list": {
        "intf0": {
          "if_list": [
            "1g1",
            "1g2"
          ]
        },
        "intf1": {
          "if_list": [
            "1g1",
            "1g2"
          ]
        },
        "intf2": {
          "if_list": [
            "1g1",
            "1g2"
          ]
        },
        "intf3": {
          "if_list": [
            "1g1",
            "1g2"
          ]
        }
      },
      "pattern": "team/.*/.*"
    },
    {
      "conduit_list": {
        "intf0": {
          "if_list": [
            "?1g1"
          ]
        },
        "intf1": {
          "if_list": [
            "?1g2"
          ]
        },
        "intf2": {
          "if_list": [
            "?1g1"
          ]
        },
        "intf3": {
          "if_list": [
            "?1g2"
          ]
        }
      },
      "pattern": "dual/.*/.*"
    },
    {
      "conduit_list": {
        "intf0": {
          "if_list": [
            "?1g1"
          ]
        },
        "intf1": {
          "if_list": [
            "?1g1"
          ]
        },
        "intf2": {
          "if_list": [
            "?1g1"
          ]
        },
        "intf3": {
          "if_list": [
            "?1g2"
          ]
        }
      },
      "pattern": "single/.*/.*ironic.*"
    },
    {
      "conduit_list": {
        "intf0": {
          "if_list": [
            "?1g1"
          ]
        },
        "intf1": {
          "if_list": [
            "?1g1"
          ]
        },
        "intf2": {
          "if_list": [
            "?1g1"
          ]
        },
        "intf3": {
          "if_list": [
            "?1g1"
          ]
        }
      },
      "pattern": "single/.*/.*"
    },
    {
      "conduit_list": {
        "intf0": {
          "if_list": [
            "?1g1"
          ]
        },
        "intf1": {
          "if_list": [
            "1g1"
          ]
        },
        "intf2": {
          "if_list": [
            "1g1"
          ]
        },
        "intf3": {
          "if_list": [
            "1g1"
          ]
        }
      },
      "pattern": ".*/.*/.*"
    },
    {
      "conduit_list": {
        "intf0": {
          "if_list": [
            "1g1"
          ]
        },
        "intf1": {
          "if_list": [
            "?1g1"
          ]
        },
        "intf2": {
          "if_list": [
            "?1g1"
          ]
        },
        "intf3": {
          "if_list": [
            "?1g1"
          ]
        }
      },
      "pattern": "mode/1g_adpt_count/role"
    }
  ],
  "networks": {
    "ironic": {
      "conduit": "intf3",
      "vlan": 100,
      "use_vlan": false,
      "add_bridge": false,
      "add_ovs_bridge": false,
      "bridge_name": "br-ironic",
      "subnet": "192.168.128.0",
      "netmask": "255.255.255.0",
      "broadcast": "192.168.128.255",
      "router": "192.168.128.1",
      "router_pref": 50,
      "ranges": {
        "admin": {
          "start": "192.168.128.10",
          "end": "192.168.128.11"
        },
        "dhcp": {
          "start": "192.168.128.21",
          "end": "192.168.128.254"
        }
      },
      "mtu": 1500
    },
    "storage": {
      "conduit": "intf1",
      "vlan": 200,
      "use_vlan": true,
      "add_bridge": false,
      "mtu": 1500,
      "subnet": "192.168.125.0",
      "netmask": "255.255.255.0",
      "broadcast": "192.168.125.255",
      "ranges": {
        "host": {
          "start": "192.168.125.10",
          "end": "192.168.125.239"
        }
      }
    },
    "public": {
      "conduit": "intf1",
      "vlan": 300,
      "use_vlan": true,
      "add_bridge": false,
      "subnet": "192.168.122.0",
      "netmask": "255.255.255.0",
      "broadcast": "192.168.122.255",
      "router": "192.168.122.1",
      "router_pref": 5,
      "ranges": {
        "host": {
          "start": "192.168.122.2",
          "end": "192.168.122.127"
        }
      },
      "mtu": 1500
    },
    "nova_fixed": {
      "conduit": "intf1",
      "vlan": 500,
      "use_vlan": true,
      "add_bridge": false,
      "add_ovs_bridge": false,
      "bridge_name": "br-fixed",
      "subnet": "192.168.123.0",
      "netmask": "255.255.255.0",
      "broadcast": "192.168.123.255",
      "router": "192.168.123.1",
      "router_pref": 20,
      "ranges": {
        "dhcp": {
          "start": "192.168.123.1",
          "end": "192.168.123.254"
        }
      },
      "mtu": 1500
    },
    "nova_floating": {
      "conduit": "intf1",
      "vlan": 300,
      "use_vlan": true,
      "add_bridge": false,
      "add_ovs_bridge": false,
      "bridge_name": "br-public",
      "subnet": "192.168.122.128",
      "netmask": "255.255.255.128",
      "broadcast": "192.168.122.255",
      "ranges": {
        "host": {
          "start": "192.168.122.129",
          "end": "192.168.122.254"
        }
      },
      "mtu": 1500
    },
    "bmc": {
      "conduit": "bmc",
      "vlan": 100,
      "use_vlan": false,
      "add_bridge": false,
      "subnet": "192.168.124.0",
      "netmask": "255.255.255.0",
      "broadcast": "192.168.124.255",
      "ranges": {
        "host": {
          "start": "192.168.124.162",
          "end": "192.168.124.240"
        }
      },
      "router": "192.168.124.1"
    },
    "bmc_vlan": {
      "conduit": "intf2",
      "vlan": 100,
      "use_vlan": true,
      "add_bridge": false,
      "subnet": "192.168.124.0",
      "netmask": "255.255.255.0",
      "broadcast": "192.168.124.255",
      "ranges": {
        "host": {
          "start": "192.168.124.161",
          "end": "192.168.124.161"
        }
      }
    },
    "os_sdn": {
      "conduit": "intf1",
      "vlan": 400,
      "use_vlan": true,
      "add_bridge": false,
      "mtu": 1500,
      "subnet": "192.168.130.0",
      "netmask": "255.255.255.0",
      "broadcast": "192.168.130.255",
      "ranges": {
        "host": {
          "start": "192.168.130.10",
          "end": "192.168.130.254"
        }
      }
    },
    "admin": {
      "conduit": "intf0",
      "vlan": 100,
      "use_vlan": false,
      "add_bridge": false,
      "mtu": 1500,
      "subnet": "192.168.124.0",
      "netmask": "255.255.255.0",
      "broadcast": "192.168.124.255",
      "router": "192.168.124.1",
      "router_pref": 10,
      "ranges": {
        "admin": {
          "start": "192.168.124.10",
          "end": "192.168.124.11"
        },
        "dhcp": {
          "start": "192.168.124.21",
          "end": "192.168.124.80"
        },
        "host": {
          "start": "192.168.124.81",
          "end": "192.168.124.160"
        },
        "switch": {
          "start": "192.168.124.241",
          "end": "192.168.124.250"
        }
      }
    }
  }
}
Example 12.2: Diff of Ironic Configuration #
This diff should help you separate the Ironic items from the default
network.json.
--- network.json        2017-06-07 09:22:38.614557114 +0200
+++ ironic_network.json 2017-06-05 12:01:15.927028019 +0200
@@ -91,6 +91,12 @@
             "1g1",
             "1g2"
           ]
+        },
+        "intf3": {
+          "if_list": [
+            "1g1",
+            "1g2"
+          ]
         }
       },
       "pattern": "team/.*/.*"
@@ -111,6 +117,11 @@
           "if_list": [
             "?1g1"
           ]
+        },
+        "intf3": {
+          "if_list": [
+            "?1g2"
+          ]
         }
       },
       "pattern": "dual/.*/.*"
@@ -131,6 +142,36 @@
           "if_list": [
             "?1g1"
           ]
+        },
+        "intf3": {
+          "if_list": [
+            "?1g2"
+          ]
+        }
+      },
+      "pattern": "single/.*/.*ironic.*"
+    },
+    {
+      "conduit_list": {
+        "intf0": {
+          "if_list": [
+            "?1g1"
+          ]
+        },
+        "intf1": {
+          "if_list": [
+            "?1g1"
+          ]
+        },
+        "intf2": {
+          "if_list": [
+            "?1g1"
+          ]
+        },
+        "intf3": {
+          "if_list": [
+            "?1g1"
+          ]
         }
       },
       "pattern": "single/.*/.*"
@@ -151,6 +192,11 @@
           "if_list": [
             "1g1"
           ]
+        },
+        "intf3": {
+          "if_list": [
+            "1g1"
+          ]
         }
       },
       "pattern": ".*/.*/.*"
@@ -171,12 +217,41 @@
           "if_list": [
             "?1g1"
           ]
+        },
+        "intf3": {
+          "if_list": [
+            "?1g1"
+          ]
         }
       },
       "pattern": "mode/1g_adpt_count/role"
     }
   ],
   "networks": {
+    "ironic": {
+      "conduit": "intf3",
+      "vlan": 100,
+      "use_vlan": false,
+      "add_bridge": false,
+      "add_ovs_bridge": false,
+      "bridge_name": "br-ironic",
+      "subnet": "192.168.128.0",
+      "netmask": "255.255.255.0",
+      "broadcast": "192.168.128.255",
+      "router": "192.168.128.1",
+      "router_pref": 50,
+      "ranges": {
+        "admin": {
+          "start": "192.168.128.10",
+          "end": "192.168.128.11"
+        },
+        "dhcp": {
+          "start": "192.168.128.21",
+          "end": "192.168.128.254"
+        }
+      },
+      "mtu": 1500
+    },
     "storage": {
       "conduit": "intf1",
       "vlan": 200,
12.21 How to Proceed #
- File Name: depl_nodes.xml
- ID: sec-depl-ostack-final
With a successful deployment of the OpenStack Dashboard, the SUSE OpenStack Cloud Crowbar installation is finished. To be able to test your setup by starting an instance one last step remains to be done—uploading an image to the Glance component. Refer to the Supplement to Administrator Guide and End User Guide, chapter Manage images for instructions.
Now you can hand over to the cloud administrator to set up users, roles,
flavors, etc.—refer to the Administrator Guide for details. The default
credentials for the OpenStack Dashboard are user name admin
and password crowbar.
12.22 SUSE Enterprise Storage integration #
- File Name: depl_nodes.xml
- ID: crow-ses-integration
SUSE OpenStack Cloud Crowbar supports integration with SUSE Enterprise Storage (SES), enabling Ceph block storage as well as image storage services in SUSE OpenStack Cloud.
Enabling SES Integration #
To enable SES integration on Crowbar, an SES configuration file must be
uploaded to Crowbar. SES integration functionality is included in the
crowbar-core package and can be used with the Crowbar UI
or CLI (crowbarctl). The SES configuration file
describes various aspects of the Ceph environment, and keyrings for each
user and pool created in the Ceph environment for SUSE OpenStack Cloud Crowbar services.
SES Configuration #
For SES deployments that are version 5.5 and higher, a Salt runner is used to create all the users and pools. It also generates a YAML configuration that is needed to integrate with SUSE OpenStack Cloud. The integration runner creates separate users for Cinder, Cinder backup (not used by Crowbar currently) and Glance. Both the Cinder and Nova services have the same user, because Cinder needs access to create objects that Nova uses.
Configure SES with the following steps:
Login as
rootand run the SES 5.5 Salt runner on the Salt admin host.root #salt-run --out=yaml openstack.integrate prefix=mycloudThe prefix parameter allows pools to be created with the specified prefix. By using different prefix parameters, multiple cloud deployments can support different users and pools on the same SES deployment.
A YAML file is created with content similar to the following example:
ceph_conf:
    cluster_network: 10.84.56.0/21
    fsid: d5d7c7cb-5858-3218-a36f-d028df7b0673
    mon_host: 10.84.56.8, 10.84.56.9, 10.84.56.7
    mon_initial_members: ses-osd1, ses-osd2, ses-osd3
    public_network: 10.84.56.0/21
cinder:
    key: ABCDEFGaxefEMxAAW4zp2My/5HjoST2Y87654321==
    rbd_store_pool: mycloud-cinder
    rbd_store_user: cinder
cinder-backup:
    key: AQBb8hdbrY2bNRAAqJC2ZzR5Q4yrionh7V5PkQ==
    rbd_store_pool: mycloud-backups
    rbd_store_user: cinder-backup
glance:
    key: AQD9eYRachg1NxAAiT6Hw/xYDA1vwSWLItLpgA==
    rbd_store_pool: mycloud-glance
    rbd_store_user: glance
nova:
    rbd_store_pool: mycloud-nova
radosgw_urls:
    - http://10.84.56.7:80/swift/v1
    - http://10.84.56.8:80/swift/v1
Upload the generated YAML file to Crowbar using the UI or
crowbarctlCLI.If the Salt runner is not available, you must manually create pools and users to allow SUSE OpenStack Cloud services to use the SES/Ceph cluster. Pools and users must be created for Cinder, Nova, and Glance. Instructions for creating and managing pools, users and keyrings can be found in the SUSE Enterprise Storage Administration Guide in the Key Management section.
After the required pools and users are set up on the SUSE Enterprise Storage/Ceph cluster, create an SES configuration file in YAML format (using the example template above). Upload this file to Crowbar using the UI or
crowbarctlCLI.As indicated above, the SES configuration file can be uploaded to Crowbar using the UI or
crowbarctlCLI.From the main Crowbar UI, the upload page is under › .
If a configuration is already stored in Crowbar, it will be visible in the upload page. A newly uploaded configuration will replace existing one. The new configuration will be applied to the cloud on the next
chef-clientrun. There is no need to reapply proposals.Configurations can also be deleted from Crowbar. After deleting a configuration, you must manually update and reapply all proposals that used SES integration.
With the
crowbarctlCLI, the commandcrowbarctl ses upload FILEaccepts a path to the SES configuration file.
Cloud Service Configuration#
SES integration with SUSE OpenStack Cloud services is implemented with relevant Barclamps
and installed with the crowbar-openstack package.
- Glance
Set
Use SES ConfigurationtotrueunderRADOS Store Parameters. The Glance barclamp pulls the uploaded SES configuration from Crowbar when applying the Glance proposal and onchef-clientruns. If the SES configuration is uploaded before the Glance proposal is created,Use SES Configurationis enabled automatically upon proposal creation.- Cinder
Create a new RADOS backend and set
Use SES Configurationtotrue. The Cinder barclamp pulls the uploaded SES configuration from Crowbar when applying the Cinder proposal and onchef-clientruns. If the SES configuration was uploaded before the Cinder proposal was created, ases-cephRADOS backend is created automatically on proposal creation withUse SES Configurationalready enabled.- Nova
To connect with volumes stores in SES, Nova uses the configuration from the Cinder barclamp. For ephemeral storage, Nova re-uses the
rbd_store_userandkeyfrom Cinder but has a separaterbd_store_pooldefined in the SES configuration. Ephemeral storage on SES can be enabled or disabled by settingUse Ceph RBD Ephemeral Backendin Nova proposal. In new deployments it is enabled by default. In existing ones it is disabled for compatibility reasons.
RADOS Gateway Integration#
Besides block storage, the SES cluster can also be used as a Swift
replacement for object storage. If radosgw_urls section is present
in uploaded SES configuration, first of the URLs is registered
in the Keystone catalog as the "Swift"/"object-store" service. Some
configuration is needed on SES side to fully integrate with Keystone
auth.
If SES integration is enabled on a cloud with Swift deployed,
SES object storage service will get higher priority by default. To
override this and use Swift for object storage instead, remove
radosgw_urls section from the SES configuration file and re-upload it
to Crowbar. Re-apply Swift proposal or wait for next periodic
chef-client run to make changes effective.
12.23 Roles and Services in SUSE OpenStack Cloud Crowbar #
- File Name: depl_nodes.xml
- ID: sec-depl-services
The following table lists all roles (as defined in the barclamps), and their
associated services. As of SUSE OpenStack Cloud Crowbar 8 this list is work
in progress. Services can be manually started and stopped with the commands
systemctl start SERVICE and
systemctl stop SERVICE.
|
Role |
Service |
|---|---|
|
ceilometer-agent |
openstack-ceilometer-agent-compute
|
|
ceilometer-polling ceilometer-server ceilometer-swift-proxy-middleware |
|
|
| |
|
| |
|
| |
|
| |
|
| |
|
cinder-controller |
|
|
| |
|
cinder-volume |
|
|
database-server |
|
|
glance-server |
|
|
| |
|
heat-server |
|
|
| |
|
| |
|
| |
|
horizon |
|
|
keystone-server |
|
|
manila-server |
|
|
| |
|
manila-share |
|
|
neutron-server |
|
|
nova-compute-* |
|
|
| |
|
nova-controller |
|
|
| |
|
| |
|
| |
|
| |
|
| |
|
| |
|
rabbitmq-server |
|
|
swift-dispersion |
none |
|
swift-proxy |
|
|
swift-ring-compute |
none |
|
swift-storage |
|
|
| |
|
| |
|
| |
|
| |
|
| |
|
| |
|
| |
|
| |
|
| |
|
| |
|
| |
|
| |
|
|
12.24 Crowbar Batch Command #
- File Name: depl_nodes.xml
- ID: sec-deploy-crowbatch-description
This is the documentation for the crowbar batch
subcommand.
crowbar batch provides a quick way of creating, updating,
and applying Crowbar proposals. It can be used to:
Accurately capture the configuration of an existing Crowbar environment.
Drive Crowbar to build a complete new environment from scratch.
Capture one SUSE OpenStack Cloud environment and then reproduce it on another set of hardware (provided hardware and network configuration match to an appropriate extent).
Automatically update existing proposals.
As the name suggests, crowbar batch is intended to be run
in “batch mode” that is mostly unattended. It has two modes of
operation:
- crowbar batch export
Exports a YAML file which describes existing proposals and how their parameters deviate from the default proposal values for that barclamp.
- crowbar batch build
Imports a YAML file in the same format as above. Uses it to build new proposals if they do not yet exist. Updates the existing proposals so that their parameters match those given in the YAML file.
12.24.1 YAML file format #
- File Name: depl_nodes.xml
- ID: sec-deploy-crowbatch-yaml
Here is an example YAML file. At the top-level there is a proposals array, each entry of which is a hash representing a proposal:
proposals:
- barclamp: provisioner
  # Proposal name defaults to 'default'.
  attributes:
    shell_prompt: USER@ALIAS:CWD SUFFIX
- barclamp: database
  # Default attributes are good enough, so we just need to assign
  # nodes to roles:
  deployment:
    elements:
      database-server:
        - "@@controller1@@"
- barclamp: rabbitmq
  deployment:
    elements:
      rabbitmq-server:
        - "@@controller1@@"
Note: Reserved Indicators in YAML
Note that the characters @ and ` are
reserved indicators in YAML. They can appear anywhere in a string
except at the beginning. Therefore a string such as
@@controller1@@ needs to be quoted using double quotes.
12.24.2 Top-level proposal attributes #
- File Name: depl_nodes.xml
- ID: sec-deploy-crowbatch-yaml-attributes
- barclamp
Name of the barclamp for this proposal (required).
- name
Name of this proposal (optional; default is
default). Inbuildmode, if the proposal does not already exist, it will be created.- attributes
An optional nested hash containing any attributes for this proposal which deviate from the defaults for the barclamp.
In
exportmode, any attributes set to the default values are excluded to keep the YAML as short and readable as possible.In
buildmode, these attributes are deep-merged with the current values for the proposal. If the proposal did not already exist, batch build will create it first. The attributes are merged with the default values for the barclamp's proposal.- wipe_attributes
An optional array of paths to nested attributes which should be removed from the proposal.
Each path is a period-delimited sequence of attributes; for example
pacemaker.stonith.sbd.nodeswould remove all SBD nodes from the proposal if it already exists. If a path segment contains a period, it should be escaped with a backslash, for examplesegment-one.segment\.two.segment_three.This removal occurs before the deep merge described above. For example, think of a YAML file which includes a Pacemaker barclamp proposal where the
wipe_attributesentry containspacemaker.stonith.sbd.nodes. A batch build with this YAML file ensures that only SBD nodes listed in theattributes siblinghash are used at the end of the run. In contrast, without thewipe_attributesentry, the given SBD nodes would be appended to any SBD nodes already defined in the proposal.- deployment
A nested hash defining how and where this proposal should be deployed.
In
buildmode, this hash is deep-merged in the same way as the attributes hash, except that the array of elements for each Chef role is reset to the empty list before the deep merge. This behavior may change in the future.
12.24.3 Node Alias Substitutions #
- File Name: depl_nodes.xml
- ID: sec-deploy-crowbatch-yaml-subst
A string like @@node@@ (where
node is a node alias) will be substituted for
the name of that node, no matter where the string appears in the YAML file.
For example, if controller1 is a Crowbar alias for node
d52-54-02-77-77-02.mycloud.com, then
@@controller1@@ will be substituted for that host name.
This allows YAML files to be reused across environments.
12.24.4 Options #
- File Name: depl_nodes.xml
- ID: sec-deploy-crowbatch-options
In addition to the standard options available to every
crowbar subcommand (run crowbar batch
--help for a full list), there are some extra options
specifically for crowbar batch:
- --include <barclamp[.proposal]>
Only include the barclamp / proposals given.
This option can be repeated multiple times. The inclusion value can either be the name of a barclamp (for example,
pacemaker) or a specifically named proposal within the barclamp (for example,pacemaker.network_cluster).If it is specified, then only the barclamp / proposals specified are included in the build or export operation, and all others are ignored.
- --exclude <barclamp[.proposal]>
This option can be repeated multiple times. The exclusion value is the same format as for
--include. The barclamps / proposals specified are excluded from the build or export operation.- --timeout <seconds>
Change the timeout for Crowbar API calls.
As Chef's run lists grow, some of the later OpenStack barclamp proposals (for example Nova, Horizon, or Heat) can take over 5 or even 10 minutes to apply. Therefore you may need to increase this timeout to 900 seconds in some circumstances.