Reference
- About this guide
- I Advanced administration
- II System
- 8 32-bit and 64-bit applications in a 64-bit system environment
- 9 Introduction to the boot process
- 10 The
systemddaemon - 11
journalctl: query thesystemdjournal - 12 The boot loader GRUB 2
- 13 Basic networking
- 14 UEFI (Unified Extensible Firmware Interface)
- 15 Special system features
- 16 Dynamic kernel device management with
udev
- III Services
- IV Mobile computers
- A An example network
- B GNU licenses
18 Time synchronization with NTP #Edit source
- File Name: chrony.xml
- ID: cha-ntp
| Revision History | |
|---|---|
| 2025-04-25 | |
Abstract#
The NTP (network time protocol) mechanism is a protocol for synchronizing the system time over the network. First, a machine can obtain the time from a server that is a reliable time source. Second, a machine can itself act as a time source for other computers in the network. The goal is twofold—maintaining the absolute time and synchronizing the system time of all machines within a network.
Maintaining an exact system time is important in many situations. The built-in hardware clock does often not meet the requirements of applications such as databases or clusters. Manual correction of the system time would lead to severe problems because, for example, a backward leap can cause malfunction of critical applications. Within a network, it is usually necessary to synchronize the system time of all machines, but manual time adjustment is a bad approach. NTP provides a mechanism to solve these problems. The NTP service continuously adjusts the system time with reliable time servers in the network. It further enables the management of local reference clocks, such as radio-controlled clocks.
Since openSUSE Leap 15, chrony is the default implementation of NTP.
chrony includes two parts; chronyd is a daemon that can be started at
boot time and chronyc is a command line interface program to monitor the
performance of chronyd, and to change operating parameters at runtime.
Starting with openSUSE Leap 15.2, the YaST module for NTP client
configuration configures the systemd-timer instead of the cron daemon to
execute chrony, when it is not configured to run as a daemon.
Note
To enable time synchronization via active directory, follow the instructions found at Book “Security and Hardening Guide”, Chapter 8 “Active Directory support”, Section 8.3.3 “Joining Active Directory using ”, Joining an Active Directory domain using .
18.1 Configuring an NTP client with YaST #Edit source
- File Name: chrony.xml
- ID: sec-ntp-yast
The NTP daemon (chronyd) coming with the chrony
package is preset to use the local computer hardware clock as a time
reference. The precision of the hardware clock heavily depends on its time
source. For example, an atomic clock or GPS receiver is a precise time
source, while a common RTC chip is not a reliable time source. YaST
simplifies the configuration of an NTP client.
In the YaST NTP client configuration ( › ) window, you can specify when to start the NTP daemon, the type of the configuration source, and add custom time servers.
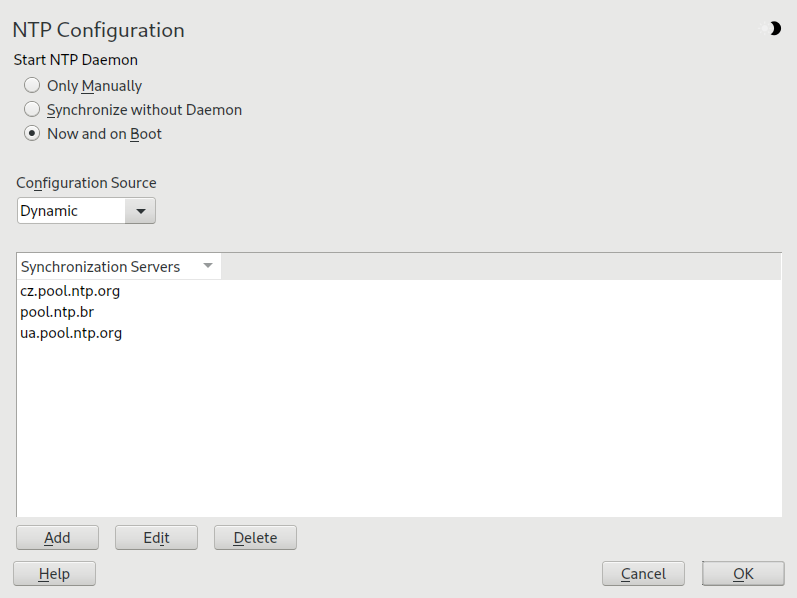
Figure 18.1: NTP configuration window #
18.1.1 NTP daemon start #Edit source
- File Name: chrony.xml
- ID:
You can choose from three options for when to start the NTP daemon:
Select to manually start the
chronydaemon.Select to set the system time periodically without a permanently running
chrony. You can set the .Select to start
chronydautomatically when the system is booted. This setting is recommended.
18.1.2 Type of the configuration source #Edit source
- File Name: chrony.xml
- ID:
In the drop-down box, select either or . Set if your server uses only a fixed set of (public) NTP servers, while is better if your internal network offers NTP servers via DHCP.
18.1.3 Configure time servers #Edit source
- File Name: chrony.xml
- ID: sec-net-ntp-yast-new-sync
Time servers for the client to query are listed in the lower part of the window. Modify this list as needed with , , and .
Click to add a new time server:
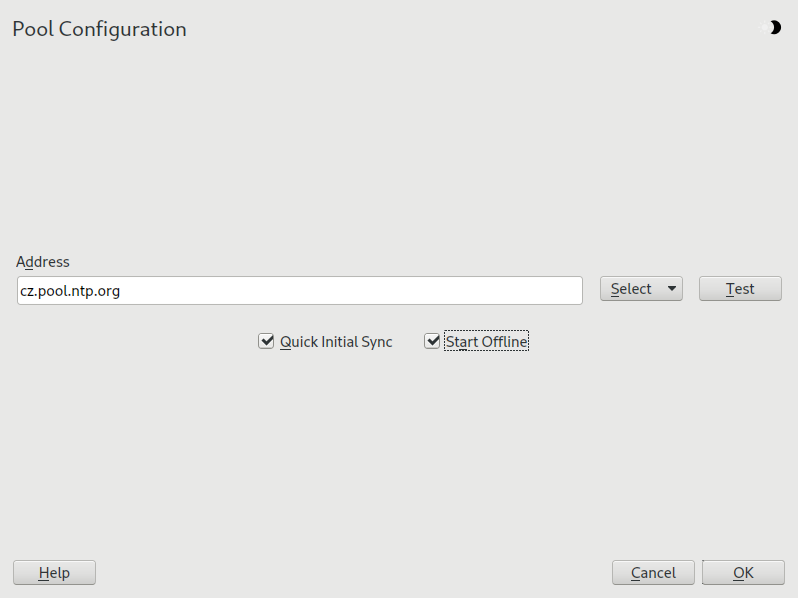
Figure 18.2: Adding a time server #
In the field, type the URL of the time server or pool of time servers with which you want to synchronize the machine time. After the URL is complete, click to verify that it points to a valid time source.
Activate to speed up the time synchronization by sending more requests at the
chronyddaemon start.Activate to speed up the boot time on systems that start the
chronyddaemon automatically and may not have an Internet connection at boot time. This option is useful, for example, for laptops with network connections managed by NetworkManager.Confirm with .
18.2 Manually configuring NTP in the network #Edit source
- File Name: chrony.xml
- ID: sec-net-xntp-netconf
chrony reads its configuration from the
/etc/chrony.conf file. To keep the computer clock
synchronized, you need to tell chrony what time servers to use. You can
use specific server names or IP addresses, for example:
0.suse.pool.ntp.org
1.suse.pool.ntp.org
2.suse.pool.ntp.org
3.suse.pool.ntp.org
You can also specify a pool name. Pool name resolves to several IP addresses:
pool pool.ntp.org
Tip: Computers on the same network
To synchronize time on multiple computers on the same network, we do not
recommend to synchronize them all with an external server. A good
practice is to make one computer the time server which is synchronized
with an external time server, and the other computers act as its
clients. Add a local directive to the server's
/etc/chrony.conf to distinguish it from an
authoritative time server:
local stratum 10
To start chrony, run:
systemctl start chronyd.service
After initializing chronyd, it takes a while before the time is
stabilized and the drift file for correcting the local computer clock is
created. With the drift file, the systematic error of the hardware clock
can be computed when the computer is powered on. The correction is used
immediately, resulting in a higher stability of the system time.
To enable the service so that chrony starts automatically at boot time,
run:
systemctl enable chronyd.service
Warning: Conflicting yast-timesync.service service
Besides the chronyd.service
service, openSUSE Leap includes
yast-timesync.service.
yast-timesync.service is
triggered by a timer every 5 minutes and runs chronyd with the
-q option to set the system time and exit. Because only
one instance of chronyd can be running at any given time, do not
enable or start both chronyd-related services at the same time.
18.3 Configuring NTS #Edit source
- File Name: chrony.xml
- ID: ntp-configure-nts
Network Time Protocol (NTP) is a protocol used to synchronize and keep accurate the system time of one or more hosts in the network. This article describes how to secure NTP using Network Time Security (NTS).
NTP protocol does not introduce any security mechanism to make the
communication between the time server and client authenticated and
encrypted. Network Time Security (NTS) is an extension that improves the security of NTP.
chrony supports NTS and can authenticate time sources and protect
against certain network attacks.
The following procedures outline how to configure the time server and client machine for secure time synchronization.
Procedure 18.1: Configuring NTS time server #
(Optional) It is a good idea to configure the time server to update its time via NTS. This ensures secure time synchronization from the very beginning of the synchronization chain. Comment out any existing time sources in
/etc/chrony.confthat do not support NTS and add at least one that supports NTS, for example:server time.cloudflare.com iburst nts

Tip
The
ntsoption requests NTS connection if it is available, otherwise it falls back to NTP if NTS is not available.Restart the
chronydservice.>sudosystemctl restart chronyd.srviceVerify the configured time sources.
>chronyc sources -vMS Name/IP address Stratum Poll Reach LastRx Last sample =============================================================================== ^? time.cloudflare.com 3 6 1 2 -947ms[ -947ms] +/- 12ms ^? pyrrha.fi.muni.cz 2 6 1 1 -948ms[ -948ms] +/- 39ms ^* whitesoft-intex16.c.cbsn> 1 6 1 2 -948ms[ -948ms] +/- 5444us ^? mail.combatostrich.dev 2 6 1 1 -948ms[ -948ms] +/- 28ms
Note
The line that starts with
^*includes the time source that was selected as best.Verify that the configured time source uses the NTS mode.
>chronyc -N authdataName/IP address Mode KeyID Type KLen Last Atmp NAK Cook CLen ========================================================================= [...] time.cloudflare.com NTS 1 15 256 3 0 0 8 96Verify that the server configuration includes the
allowoption that specifies which clients can synchronize time with the time server, for example:allow 192.168.1.0/24
(Optional) If the time server is running behind a firewall, allow communication on ports for both NTP and NTS. They are 123 and 4460 by default.
Obtain a TLS certificate and a corresponding private key and copy them to
/var/lib/chrony/. Verify that they are readable bychrony, for example:>sudoinstall -m 0440 -o chrony -g chrony nts.key /var/lib/chrony/>sudoinstall -m 0440 -o chrony -g chrony nts.crt /var/lib/chrony/Edit
/etc/chrony.confand verify that thentsdumpdir /var/lib/chronyoption is active. Then append the paths to the TLS key and certificate.ntsdumpdir /var/lib/chrony ntsserverkey /var/lib/chrony/nts.key ntsservercert /var/lib/chrony/nts.crt
Restart the
chronydservice.>sudosystemctl restart chronyd.service
Procedure 18.2: Configuring NTS clients #
Disable existing NTP sources, for example:
#server 192.168.1.1 iburst
The sources configurations are included in
/etc/chrony.confor in files under/etc/chrony.d/.The client host needs to trust the Root CA that signed the TLS certificate. Find details on how to manage the CA certificate store in a dedicated article.
Add the NTS time server source that you configured in Procedure 18.1, “Configuring NTS time server” to the client
chronyconfiguration in/etc/chrony.conf, for example:server nts1.example.com iburst nts
Restart the
chronydservice.>sudosystemctl restart chronyd.serviceVerify configured time sources on the client and confirm that the connection is authenticated.
>sudochronyc sources -v>sudochronyc -N authdataOn the NTS time server, verify per client statistics about NTS connections.
>sudochronyc -N clients -k
18.4 Configure chronyd at runtime using chronyc #Edit source
- File Name: chrony.xml
- ID: ntp-chronyc
You can use chronyc to change the behavior of chronyd at runtime. It
also generates status reports about the operation of chronyd.
You can run chronyc either in interactive or non-interactive mode. To
run chronyc interactively, enter chronyc on the command line. It
displays a prompt and waits for your command input. For example, to check
how many NTP sources are online or offline, run:
#chronycchronyc> activity 200 OK 4 sources online 2 sources offline 1 sources doing burst (return to online) 1 sources doing burst (return to offline) 0 sources with unknown address
To exit chronyc's prompt, enter quit or
exit.
If you do not need to use the interactive prompt, enter the command directly:
#chronycactivity
Note: Temporary changes
Changes made using chronyc are not permanent. They will be lost after
the next chronyd restart. For permanent changes, modify
/etc/chrony.conf.
For a complete list of chronyc commands, see its man page (man
1 chronyc).
18.5 Dynamic time synchronization at runtime #Edit source
- File Name: chrony.xml
- ID: sec-net-xntp-dynamic
Although chronyd starts up normally on a system that boots without a
network connection, the tool cannot resolve the DNS names of the time
servers specified in the configuration file.
chronyd keeps trying to resolve the time server names specified by the
server, pool, and peer
directives in an increasing time interval until it succeeds.
If the time server will not be reachable when chronyd is started, you
can specify the offline option:
server server_address offline
chronyd does not try to poll the server until it is enabled using the
following command:
# chronyc online server_address
When the auto_offline option is set, chronyd assumes
that the time server has gone offline when two requests have been sent to
it without receiving a response. This option avoids the need to run the
offline command from chronyc when disconnecting the
network link.
18.6 Setting up a local reference clock #Edit source
- File Name: chrony.xml
- ID: sec-net-xntp-normal
The software package chrony relies on other programs (such as
gpsd) to access the timing data via the SHM or
SOCK driver. Use the refclock directive in
/etc/chrony.conf to specify a hardware reference
clock to be used as a time source. It has two mandatory parameters: a
driver name and a driver-specific parameter. The two parameters are
followed by zero or more refclock options. chronyd
includes the following drivers:
PPS - driver for the kernel
pulse per secondAPI. For example:refclock PPS /dev/pps0 lock NMEA refid GPS
SHM - NTP shared memory driver. For example:
refclock SHM 0 poll 3 refid GPS1
refclock SHM 1:perm=0644 refid GPS2
SOCK - Unix domain socket driver. For example:
refclock SOCK /var/run/chrony.ttyS0.sock
PHC - PTP hardware clock driver. For example:
refclock PHC /dev/ptp0 poll 0 dpoll -2 offset -37
refclock PHC /dev/ptp1:nocrossts poll 3 pps
For more information on individual drivers' options, see man 8
chrony.conf.