5 Deploying with DeepSea/Salt #
Salt along with DeepSea is a stack of components that help you deploy and manage server infrastructure. It is very scalable, fast, and relatively easy to get running. Read the following considerations before you start deploying the cluster with Salt:
Salt minions are the nodes controlled by a dedicated node called Salt master. Salt minions have roles, for example Ceph OSD, Ceph Monitor, Ceph Manager, Object Gateway, iSCSI Gateway, or NFS Ganesha.
A Salt master runs its own Salt minion. It is required for running privileged tasks—for example creating, authorizing, and copying keys to minions—so that remote minions never need to run privileged tasks.

Tip: Sharing Multiple Roles per Server
You will get the best performance from your Ceph cluster when each role is deployed on a separate node. But real deployments sometimes require sharing one node for multiple roles. To avoid trouble with performance and the upgrade procedure, do not deploy the Ceph OSD, Metadata Server, or Ceph Monitor role to the Admin Node.
Salt minions need to correctly resolve the Salt master's host name over the network. By default, they look for the
salthost name, but you can specify any other network-reachable host name in the/etc/salt/minionfile, see Section 5.3, “Cluster Deployment”.
5.1 Read the Release Notes #
In the release notes you can find additional information on changes since the previous release of SUSE Enterprise Storage. Check the release notes to see whether:
your hardware needs special considerations.
any used software packages have changed significantly.
special precautions are necessary for your installation.
The release notes also provide information that could not make it into the manual on time. They also contain notes about known issues.
After having installed the package release-notes-ses,
find the release notes locally in the directory
/usr/share/doc/release-notes or online at
https://www.suse.com/releasenotes/.
5.2 Introduction to DeepSea #
The goal of DeepSea is to save the administrator time and confidently perform complex operations on a Ceph cluster.
Ceph is a very configurable software solution. It increases both the freedom and responsibility of system administrators.
The minimal Ceph setup is good for demonstration purposes, but does not show interesting features of Ceph that you can see with a big number of nodes.
DeepSea collects and stores data about individual servers, such as addresses and device names. For a distributed storage system such as Ceph, there can be hundreds of such items to collect and store. Collecting the information and entering the data manually into a configuration management tool is exhausting and error prone.
The steps necessary to prepare the servers, collect the configuration, and configure and deploy Ceph are mostly the same. However, this does not address managing the separate functions. For day to day operations, the ability to trivially add hardware to a given function and remove it gracefully is a requirement.
DeepSea addresses these observations with the following strategy: DeepSea consolidates the administrator's decisions in a single file. The decisions include cluster assignment, role assignment and profile assignment. And DeepSea collects each set of tasks into a simple goal. Each goal is a stage:
DeepSea Stages Description #
Stage 0—the preparation— during this stage, all required updates are applied and your system may be rebooted.

Important: Re-run Stage 0 after the Admin Node Reboot
If the Admin Node reboots during stage 0 to load the new kernel version, you need to run stage 0 again, otherwise minions will not be targeted.
Stage 1—the discovery—here all hardware in your cluster is being detected and necessary information for the Ceph configuration is being collected. For details about configuration, refer to Section 5.5, “Configuration and Customization”.
Stage 2—the configuration—you need to prepare configuration data in a particular format.
Stage 3—the deployment—creates a basic Ceph cluster with mandatory Ceph services. See Section 1.2.3, “Ceph Nodes and Daemons” for their list.
Stage 4—the services—additional features of Ceph like iSCSI, Object Gateway and CephFS can be installed in this stage. Each is optional.
Stage 5—the removal stage. This stage is not mandatory and during the initial setup it is usually not needed. In this stage the roles of minions and also the cluster configuration are removed. You need to run this stage when you need to remove a storage node from your cluster. For details refer to Book “Administration Guide”, Chapter 2 “Salt Cluster Administration”, Section 2.3 “Removing and Reinstalling Cluster Nodes”.
5.2.1 Organization and Important Locations #
Salt has several standard locations and several naming conventions used on your master node:
/srv/pillarThe directory stores configuration data for your cluster minions. Pillar is an interface for providing global configuration values to all your cluster minions.
/srv/salt/The directory stores Salt state files (also called sls files). State files are formatted descriptions of states in which the cluster should be.
/srv/module/runnersThe directory stores Python scripts known as runners. Runners are executed on the master node.
/srv/salt/_modulesThe directory stores Python scripts that are called modules. The modules are applied to all minions in your cluster.
/srv/pillar/cephThe directory is used by DeepSea. Collected configuration data are stored here.
/srv/salt/cephA directory used by DeepSea. It stores sls files that can be in different formats, but each subdirectory contains sls files. Each subdirectory contains only one type of sls file. For example,
/srv/salt/ceph/stagecontains orchestration files that are executed bysalt-run state.orchestrate.
5.2.2 Targeting the Minions #
DeepSea commands are executed via the Salt infrastructure. When using
the salt command, you need to specify a set of
Salt minions that the command will affect. We describe the set of the minions
as a target for the salt command.
The following sections describe possible methods to target the minions.
5.2.2.1 Matching the Minion Name #
You can target a minion or a group of minions by matching their names. A minion's name is usually the short host name of the node where the minion runs. This is a general Salt targeting method, not related to DeepSea. You can use globbing, regular expressions, or lists to limit the range of minion names. The general syntax follows:
root@master # salt target example.moduleTip: Ceph-only Cluster
If all Salt minions in your environment belong to your Ceph cluster, you
can safely substitute target with
'*' to include all registered
minions.
Match all minions in the example.net domain (assuming the minion names are identical to their "full" host names):
root@master # salt '*.example.net' test.pingMatch the 'web1' to 'web5' minions:
root@master # salt 'web[1-5]' test.pingMatch both 'web1-prod' and 'web1-devel' minions using a regular expression:
root@master # salt -E 'web1-(prod|devel)' test.pingMatch a simple list of minions:
root@master # salt -L 'web1,web2,web3' test.pingMatch all minions in the cluster:
root@master # salt '*' test.ping5.2.2.2 Targeting with a DeepSea Grain #
In a heterogeneous Salt-managed environment where SUSE Enterprise Storage 6 is deployed on a subset of nodes alongside other cluster solutions, you need to mark the relevant minions by applying a 'deepsea' grain to them before running DeepSea stage 0. This way, you can easily target DeepSea minions in environments where matching by the minion name is problematic.
To apply the 'deepsea' grain to a group of minions, run:
root@master # salt target grains.append deepsea defaultTo remove the 'deepsea' grain from a group of minions, run:
root@master # salt target grains.delval deepsea destructive=TrueAfter applying the 'deepsea' grain to the relevant minions, you can target them as follows:
root@master # salt -G 'deepsea:*' test.pingThe following command is an equivalent:
root@master # salt -C 'G@deepsea:*' test.ping5.2.2.3 Set the deepsea_minions Option #
Setting the deepsea_minions option's target is a
requirement for DeepSea deployments. DeepSea uses it to instruct
minions during the execution of stages (refer to
DeepSea Stages Description for details.
To set or change the deepsea_minions option, edit the
/srv/pillar/ceph/deepsea_minions.sls file on the
Salt master and add or replace the following line:
deepsea_minions: target
Tip: deepsea_minions Target
As the target for the
deepsea_minions option, you can use any targeting
method: both
Matching the Minion Name and
Targeting with a DeepSea Grain.
Match all Salt minions in the cluster:
deepsea_minions: '*'
Match all minions with the 'deepsea' grain:
deepsea_minions: 'G@deepsea:*'
5.2.2.4 For More Information #
You can use more advanced ways to target minions using the Salt
infrastructure. The 'deepsea-minions' manual page gives you more details
about DeepSea targeting (man 7 deepsea_minions).
5.3 Cluster Deployment #
The cluster deployment process has several phases. First, you need to prepare all nodes of the cluster by configuring Salt and then deploy and configure Ceph.
Tip: Deploying Monitor Nodes without Defining OSD Profiles
If you need to skip defining storage roles for OSD as described in
Section 5.5.1.2, “Role Assignment” and deploy Ceph Monitor nodes first, you
can do so by setting the DEV_ENV variable.
This allows deploying monitors without the presence of the
role-storage/ directory, as well as deploying a Ceph
cluster with at least one storage, monitor, and
manager role.
To set the environment variable, either enable it globally by setting it in
the /srv/pillar/ceph/stack/global.yml file, or set it
for the current shell session only:
root@master # export DEV_ENV=true
As an example, /srv/pillar/ceph/stack/global.yml can
be created with the following contents:
DEV_ENV: True
The following procedure describes the cluster preparation in detail.
Install and register SUSE Linux Enterprise Server 15 SP1 together with the SUSE Enterprise Storage 6 extension on each node of the cluster.
Verify that proper products are installed and registered by listing existing software repositories. Run
zypper lr -Eand compare the output with the following list:SLE-Product-SLES15-SP1-Pool SLE-Product-SLES15-SP1-Updates SLE-Module-Server-Applications15-SP1-Pool SLE-Module-Server-Applications15-SP1-Updates SLE-Module-Basesystem15-SP1-Pool SLE-Module-Basesystem15-SP1-Updates SUSE-Enterprise-Storage-6-Pool SUSE-Enterprise-Storage-6-Updates
Configure network settings including proper DNS name resolution on each node. The Salt master and all the Salt minions need to resolve each other by their host names. For more information on configuring a network, see https://documentation.suse.com/sles/15-SP1/html/SLES-all/cha-network.html#sec-network-yast For more information on configuring a DNS server, see https://documentation.suse.com/sles/15-SP1/html/SLES-all/cha-dns.html.
Important
If cluster nodes are configured for multiple networks, DeepSea will use the network to which their host names (or FQDN) resolves. Consider the following example
/etc/hosts:192.168.100.1 ses1.example.com ses1 172.16.100.1 ses1clus.cluster.lan ses1clus
In the above example, the
ses1minion will resolve to the192.168.100.xnetwork and DeepSea will use this network as the public network. If the desired public network is172.16.100.x, then host name should be changed toses1clus.Install the
salt-masterandsalt-minionpackages on the Salt master node:root@master #zypper in salt-master salt-minionCheck that the
salt-masterservice is enabled and started, and enable and start it if needed:root@master #systemctl enable salt-master.serviceroot@master #systemctl start salt-master.serviceIf you intend to use firewall, verify that the Salt master node has ports 4505 and 4506 open to all Salt minion nodes. If the ports are closed, you can open them using the
yast2 firewallcommand by allowing the service.
Warning: DeepSea Stages Fail with Firewall
DeepSea deployment stages fail when firewall is active (and even configured). To pass the stages correctly, you need to either turn the firewall off by running
root #systemctl stop firewalld.serviceor set the
FAIL_ON_WARNINGoption to 'False' in/srv/pillar/ceph/stack/global.yml:FAIL_ON_WARNING: False
Install the package
salt-minionon all minion nodes.root@minion >zypper in salt-minionMake sure that the fully qualified domain name of each node can be resolved to the public network IP address by all other nodes.
Configure all minions (including the master minion) to connect to the master. If your Salt master is not reachable by the host name
salt, edit the file/etc/salt/minionor create a new file/etc/salt/minion.d/master.confwith the following content:master: host_name_of_salt_master
If you performed any changes to the configuration files mentioned above, restart the Salt service on all Salt minions:
root@minion >systemctl restart salt-minion.serviceCheck that the
salt-minionservice is enabled and started on all nodes. Enable and start it if needed:root #systemctl enable salt-minion.serviceroot #systemctl start salt-minion.serviceVerify each Salt minion's fingerprint and accept all salt keys on the Salt master if the fingerprints match.

Note
If the Salt minion fingerprint comes back empty, make sure the Salt minion has a Salt master configuration and it can communicate with the Salt master.
View each minion's fingerprint:
root@master #salt-call --local key.finger local: 3f:a3:2f:3f:b4:d3:d9:24:49:ca:6b:2c:e1:6c:3f:c3:83:37:f0:aa:87:42:e8:ff...After gathering fingerprints of all the Salt minions, list fingerprints of all unaccepted minion keys on the Salt master:
root@master #salt-key -F [...] Unaccepted Keys: minion1: 3f:a3:2f:3f:b4:d3:d9:24:49:ca:6b:2c:e1:6c:3f:c3:83:37:f0:aa:87:42:e8:ff...If the minions' fingerprints match, accept them:
root@master #salt-key --accept-allVerify that the keys have been accepted:
root@master #salt-key --list-allBy default, DeepSea uses the Admin Node as the time server for other cluster nodes. Therefore, if the Admin Node is not virtualized, select one or more time servers or pools, and synchronize the local time against them. Verify that the time synchronization service is enabled on each system start-up. Find more information on setting up time synchronization in https://documentation.suse.com/sles/15-SP1/html/SLES-all/cha-ntp.html#sec-ntp-yast.
If the Admin Node is a virtual machine, provide better time sources for the cluster nodes by overriding the default NTP client configuration:
Edit
/srv/pillar/ceph/stack/global.ymlon the Salt master node and add the following line:time_server: CUSTOM_NTP_SERVER
To add multiple time servers, the format is as follows:
time_server:
  - CUSTOM_NTP_SERVER1
  - CUSTOM_NTP_SERVER2
  - CUSTOM_NTP_SERVER3
[...]
Refresh the Salt pillar:
root@master #salt '*' saltutil.pillar_refreshVerify the changed value:
root@master #salt '*' pillar.itemsApply the new setting:
root@master #salt '*' state.apply ceph.time
Prior to deploying SUSE Enterprise Storage 6, manually zap all the disks. Remember to replace 'X' with the correct disk letter:
Stop all processes that are using the specific disk.
Verify whether any partition on the disk is mounted, and unmount if needed.
If the disk is managed by LVM, deactivate and delete the whole LVM infrastructure. Refer to https://documentation.suse.com/sles/15-SP1/html/SLES-all/cha-lvm.html for more details.
If the disk is part of MD RAID, deactivate the RAID. Refer to https://documentation.suse.com/sles/15-SP1/html/SLES-all/part-software-raid.html for more details.
Tip: Rebooting the Server
If you get error messages such as 'partition in use' or 'kernel cannot be updated with the new partition table' during the following steps, reboot the server.
Wipe data and partitions on the disk:
cephadm@adm >ceph-volume lvm zap /dev/sdX --destroyVerify that the drive is empty (with no GPT structures) using:
root #parted -s /dev/sdX print freeor
root #dd if=/dev/sdX bs=512 count=34 | hexdump -Croot #dd if=/dev/sdX bs=512 count=33 \ skip=$((`blockdev --getsz /dev/sdX` - 33)) | hexdump -C
Optionally, if you need to preconfigure the cluster's network settings before the deepsea package is installed, create
/srv/pillar/ceph/stack/ceph/cluster.ymlmanually and set thecluster_network:andpublic_network:options. Note that the file will not be overwritten after you install deepsea. Then, run:chown -R salt:salt /srv/pillar/ceph/stack
Tip: Enabling IPv6
If you need to enable IPv6 network addressing, refer to Section 7.2.1, “Enabling IPv6 for Ceph Cluster Deployment”
Install DeepSea on the Salt master node:
root@master #zypper in deepseaThe value of the
master_minionparameter is dynamically derived from the/etc/salt/minion_idfile on the Salt master. If you need to override the discovered value, edit the file/srv/pillar/ceph/stack/global.ymland set a relevant value:master_minion: MASTER_MINION_NAME
If your Salt master is reachable via more host names, use the Salt minion name for the storage cluster as returned by the
salt-key -Lcommand. If you used the default host name for your Salt master—salt—in the ses domain, then the file looks as follows:master_minion: salt.ses
Now you deploy and configure Ceph. Unless specified otherwise, all steps are mandatory.
Note: Salt Command Conventions
There are two possible ways to run salt-run
state.orch—one is with
'stage.STAGE_NUMBER', the other is with the name
of the stage. Both notations have the same impact and it is fully your
preference which command you use.
Procedure 5.1: Running Deployment Stages #
Ensure the Salt minions belonging to the Ceph cluster are correctly targeted through the
deepsea_minionsoption in/srv/pillar/ceph/deepsea_minions.sls. Refer to Section 5.2.2.3, “Set thedeepsea_minionsOption” for more information.By default, DeepSea deploys Ceph clusters with tuned profiles active on Ceph Monitor, Ceph Manager, and Ceph OSD nodes. In some cases, you may need to deploy without tuned profiles. To do so, put the following lines in
/srv/pillar/ceph/stack/global.ymlbefore running DeepSea stages:alternative_defaults: tuned_mgr_init: default-off tuned_mon_init: default-off tuned_osd_init: default-off
Optional: create Btrfs sub-volumes for
/var/lib/ceph/. This step needs to be executed before DeepSea stage.0. To migrate existing directories or for more details, see Book “Administration Guide”, Chapter 33 “Hints and Tips”, Section 33.6 “Btrfs Subvolume for/var/lib/cephon Ceph Monitor Nodes”.Apply the following commands to each of the Salt minions:
root@master #salt 'MONITOR_NODES' saltutil.sync_allroot@master #salt 'MONITOR_NODES' state.apply ceph.subvolumeNote
The Ceph.subvolume command creates
/var/lib/cephas a@/var/lib/cephBtrfs subvolume.The new subvolume is now mounted and
/etc/fstabis updated.Prepare your cluster. Refer to DeepSea Stages Description for more details.
root@master #salt-run state.orch ceph.stage.0or
root@master #salt-run state.orch ceph.stage.prepNote: Run or Monitor Stages using DeepSea CLI
Using the DeepSea CLI, you can follow the stage execution progress in real-time, either by running the DeepSea CLI in the monitoring mode, or by running the stage directly through DeepSea CLI. For details refer to Section 5.4, “DeepSea CLI”.
The discovery stage collects data from all minions and creates configuration fragments that are stored in the directory
/srv/pillar/ceph/proposals. The data are stored in the YAML format in *.sls or *.yml files.Run the following command to trigger the discovery stage:
root@master #salt-run state.orch ceph.stage.1or
root@master #salt-run state.orch ceph.stage.discoveryAfter the previous command finishes successfully, create a
policy.cfgfile in/srv/pillar/ceph/proposals. For details refer to Section 5.5.1, “Thepolicy.cfgFile”.Tip
If you need to change the cluster's network setting, edit
/srv/pillar/ceph/stack/ceph/cluster.ymland adjust the lines starting withcluster_network:andpublic_network:.The configuration stage parses the
policy.cfgfile and merges the included files into their final form. Cluster and role related content are placed in/srv/pillar/ceph/cluster, while Ceph specific content is placed in/srv/pillar/ceph/stack/default.Run the following command to trigger the configuration stage:
root@master #salt-run state.orch ceph.stage.2or
root@master #salt-run state.orch ceph.stage.configureThe configuration step may take several seconds. After the command finishes, you can view the pillar data for the specified minions (for example, named
ceph_minion1,ceph_minion2, etc.) by running:root@master #salt 'ceph_minion*' pillar.itemsTip: Modifying OSD's Layout
If you want to modify the default OSD's layout and change the drive groups configuration, follow the procedure described in Section 5.5.2, “DriveGroups”.
Note: Overwriting Defaults
As soon as the command finishes, you can view the default configuration and change it to suit your needs. For details refer to Chapter 7, Customizing the Default Configuration.
Now you run the deployment stage. In this stage, the pillar is validated, and the Ceph Monitor and Ceph OSD daemons are started:
root@master #salt-run state.orch ceph.stage.3or
root@master #salt-run state.orch ceph.stage.deployThe command may take several minutes. If it fails, you need to fix the issue and run the previous stages again. After the command succeeds, run the following to check the status:
cephadm@adm >ceph -sThe last step of the Ceph cluster deployment is the services stage. Here you instantiate any of the currently supported services: iSCSI Gateway, CephFS, Object Gateway, and NFS Ganesha. In this stage, the necessary pools, authorizing keyrings, and starting services are created. To start the stage, run the following:
root@master #salt-run state.orch ceph.stage.4or
root@master #salt-run state.orch ceph.stage.servicesDepending on the setup, the command may run for several minutes.
Disable insecure clients. Since Nautilus v14.2.20, a new health warning was introduced that informs you that insecure clients are allowed to join the cluster. This warning is on by default. The Ceph Dashboard will show the cluster in the
HEALTH_WARNstatus and verifying the cluster status on the command line informs you as follows:cephadm@adm >ceph status cluster: id: 3fe8b35a-689f-4970-819d-0e6b11f6707c health: HEALTH_WARN mons are allowing insecure global_id reclaim [...]This warning means that the Ceph Monitors are still allowing old, unpatched clients to connect to the cluster. This ensures existing clients can still connect while the cluster is being upgraded, but warns you that there is a problem that needs to be addressed. When the cluster and all clients are upgraded to the latest version of Ceph, disallow unpatched clients by running the following command:
cephadm@adm >ceph config set mon auth_allow_insecure_global_id_reclaim falseBefore you continue, we strongly recommend enabling the Ceph telemetry module. For more information, see Book “Administration Guide”, Chapter 21 “Ceph Manager Modules”, Section 21.2 “Telemetry Module” for information and instructions.
5.4 DeepSea CLI #
DeepSea also provides a command line interface (CLI) tool that allows the
user to monitor or run stages while visualizing the execution progress in
real-time. Verify that the deepsea-cli package is
installed before you run the deepsea executable.
Two modes are supported for visualizing a stage's execution progress:
DeepSea CLI Modes #
Monitoring mode: visualizes the execution progress of a DeepSea stage triggered by the
salt-runcommand issued in another terminal session.Stand-alone mode: runs a DeepSea stage while providing real-time visualization of its component steps as they are executed.
Important: DeepSea CLI Commands
The DeepSea CLI commands can only be run on the Salt master node with the
root privileges.
5.4.1 DeepSea CLI: Monitor Mode #
The progress monitor provides a detailed, real-time visualization of what
is happening during execution of stages using salt-run
state.orch commands in other terminal sessions.
Tip: Start Monitor in a New Terminal Session
You need to start the monitor in a new terminal window
before running any salt-run
state.orch so that the monitor can detect the start of the
stage's execution.
If you start the monitor after issuing the salt-run
state.orch command, then no execution progress will be shown.
You can start the monitor mode by running the following command:
root@master # deepsea monitor
For more information about the available command line options of the
deepsea monitor command, check its manual page:
root@master # man deepsea-monitor5.4.2 DeepSea CLI: Stand-alone Mode #
In the stand-alone mode, DeepSea CLI can be used to run a DeepSea stage, showing its execution in real-time.
The command to run a DeepSea stage from the DeepSea CLI has the following form:
root@master # deepsea stage run stage-name
where stage-name corresponds to the way Salt
orchestration state files are referenced. For example, stage
deploy, which corresponds to the directory
located in /srv/salt/ceph/stage/deploy, is referenced
as ceph.stage.deploy.
This command is an alternative to the Salt-based commands for running DeepSea stages (or any DeepSea orchestration state file).
The command deepsea stage run ceph.stage.0 is equivalent
to salt-run state.orch ceph.stage.0.
For more information about the available command line options accepted by
the deepsea stage run command, check its manual page:
root@master # man deepsea-stage runIn the following figure shows an example of the output of the DeepSea CLI when running Stage 2:
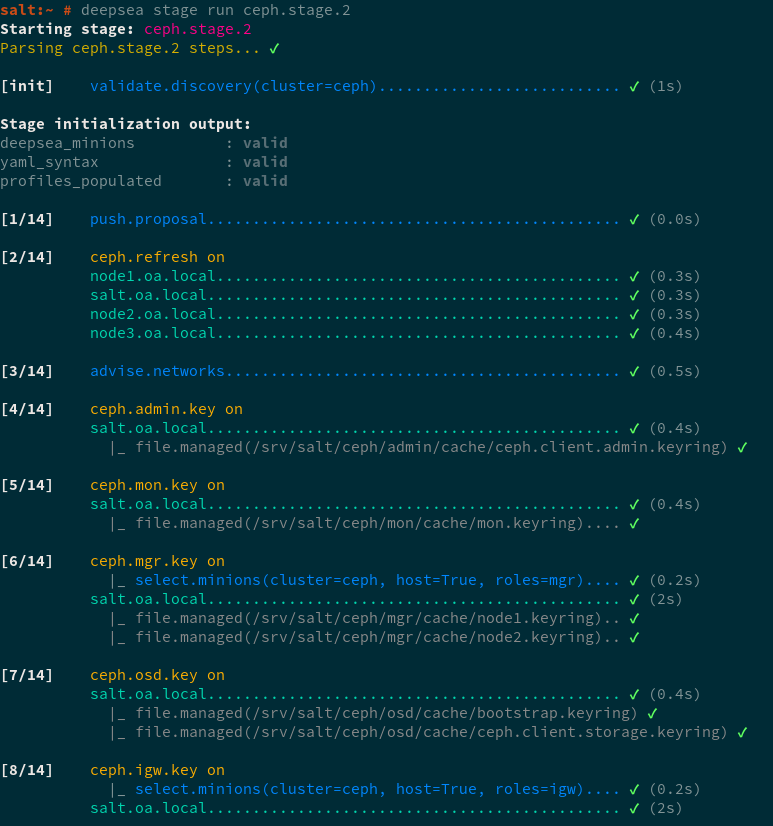
Figure 5.1: DeepSea CLI stage execution progress output #
5.4.2.1 DeepSea CLI stage run Alias #
For advanced users of Salt, we also support an alias for running a
DeepSea stage that takes the Salt command used to run a stage, for
example, salt-run state.orch
stage-name, as a command of the
DeepSea CLI.
Example:
root@master # deepsea salt-run state.orch stage-name5.5 Configuration and Customization #
5.5.1 The policy.cfg File #
The /srv/pillar/ceph/proposals/policy.cfg
configuration file is used to determine roles of individual cluster nodes.
For example, which nodes act as Ceph OSDs or Ceph Monitors. Edit
policy.cfg in order to reflect your desired cluster
setup. The order of the sections is arbitrary, but the content of included
lines overwrites matching keys from the content of previous lines.
Tip: Examples of policy.cfg
You can find several examples of complete policy files in the
/usr/share/doc/packages/deepsea/examples/ directory.
5.5.1.1 Cluster Assignment #
In the cluster section you select minions for your cluster. You can select all minions, or you can blacklist or whitelist minions. Examples for a cluster called ceph follow.
To include all minions, add the following lines:
cluster-ceph/cluster/*.sls
To whitelist a particular minion:
cluster-ceph/cluster/abc.domain.sls
or a group of minions—you can shell glob matching:
cluster-ceph/cluster/mon*.sls
To blacklist minions, set the them to
unassigned:
cluster-unassigned/cluster/client*.sls
5.5.1.2 Role Assignment #
This section provides you with details on assigning 'roles' to your
cluster nodes. A 'role' in this context means the service you need to run
on the node, such as Ceph Monitor, Object Gateway, or iSCSI Gateway. No role is assigned
automatically, only roles added to policy.cfg will be
deployed.
The assignment follows this pattern:
role-ROLE_NAME/PATH/FILES_TO_INCLUDE
Where the items have the following meaning and values:
ROLE_NAME is any of the following: 'master', 'admin', 'mon', 'mgr', 'storage', 'mds', 'igw', 'rgw', 'ganesha', 'grafana', or 'prometheus'.
PATH is a relative directory path to .sls or .yml files. In case of .sls files, it usually is
cluster, while .yml files are located atstack/default/ceph/minions.FILES_TO_INCLUDE are the Salt state files or YAML configuration files. They normally consist of Salt minions' host names, for example
ses5min2.yml. Shell globbing can be used for more specific matching.
An example for each role follows:
master - the node has admin keyrings to all Ceph clusters. Currently, only a single Ceph cluster is supported. As the master role is mandatory, always add a similar line to the following:
role-master/cluster/master*.sls
admin - the minion will have an admin keyring. You define the role as follows:
role-admin/cluster/abc*.sls
mon - the minion will provide the monitor service to the Ceph cluster. This role requires addresses of the assigned minions. From SUSE Enterprise Storage 5, the public addresses are calculated dynamically and are no longer needed in the Salt pillar.
role-mon/cluster/mon*.sls
The example assigns the monitor role to a group of minions.
mgr - the Ceph manager daemon which collects all the state information from the whole cluster. Deploy it on all minions where you plan to deploy the Ceph monitor role.
role-mgr/cluster/mgr*.sls
storage - use this role to specify storage nodes.
role-storage/cluster/data*.sls
mds - the minion will provide the metadata service to support CephFS.
role-mds/cluster/mds*.sls
igw - the minion will act as an iSCSI Gateway. This role requires addresses of the assigned minions, thus you need to also include the files from the
stackdirectory:role-igw/cluster/*.sls
rgw - the minion will act as an Object Gateway:
role-rgw/cluster/rgw*.sls
ganesha - the minion will act as an NFS Ganesha server. The 'ganesha' role requires either an 'rgw' or 'mds' role in cluster, otherwise the validation will fail in Stage 3.
role-ganesha/cluster/ganesha*.sls
To successfully install NFS Ganesha, additional configuration is required. If you want to use NFS Ganesha, read Chapter 12, Installation of NFS Ganesha before executing stages 2 and 4. However, it is possible to install NFS Ganesha later.
In some cases it can be useful to define custom roles for NFS Ganesha nodes. For details, see Book “Administration Guide”, Chapter 30 “NFS Ganesha: Export Ceph Data via NFS”, Section 30.3 “Custom NFS Ganesha Roles”.
grafana, prometheus - this node adds Grafana charts based on Prometheus alerting to the Ceph Dashboard. Refer to Book “Administration Guide” for its detailed description.
role-grafana/cluster/grafana*.sls
role-prometheus/cluster/prometheus*.sls
Note: Multiple Roles of Cluster Nodes
You can assign several roles to a single node. For example, you can assign the 'mds' roles to the monitor nodes:
role-mds/cluster/mon[1,2]*.sls
5.5.1.3 Common Configuration #
The common configuration section includes configuration files generated
during the discovery (Stage 1). These configuration
files store parameters like fsid or
public_network. To include the required Ceph common
configuration, add the following lines:
config/stack/default/global.yml
config/stack/default/ceph/cluster.yml
5.5.1.4 Item Filtering #
Sometimes it is not practical to include all files from a given directory
with *.sls globbing. The policy.cfg file parser
understands the following filters:
Warning: Advanced Techniques
This section describes filtering techniques for advanced users. When not used correctly, filtering can cause problems for example in case your node numbering changes.
- slice=[start:end]
Use the slice filter to include only items start through end-1. Note that items in the given directory are sorted alphanumerically. The following line includes the third to fifth files from the
role-mon/cluster/subdirectory:role-mon/cluster/*.sls slice[3:6]
- re=regexp
Use the regular expression filter to include only items matching the given expressions. For example:
role-mon/cluster/mon*.sls re=.*1[135]\.subdomainX\.sls$
5.5.1.5 Example policy.cfg File #
Following is an example of a basic policy.cfg file:
## Cluster Assignment
cluster-ceph/cluster/*.sls 1

## Roles
# ADMIN
role-master/cluster/examplesesadmin.sls 2
role-admin/cluster/sesclient*.sls 3

# MON
role-mon/cluster/ses-example-[123].sls 4

# MGR
role-mgr/cluster/ses-example-[123].sls 5

# STORAGE
role-storage/cluster/ses-example-[5678].sls 6

# MDS
role-mds/cluster/ses-example-4.sls 7

# IGW
role-igw/cluster/ses-example-4.sls 8

# RGW
role-rgw/cluster/ses-example-4.sls 9

# COMMON
config/stack/default/global.yml 10
config/stack/default/ceph/cluster.yml 11
Indicates that all minions are included in the Ceph cluster. If you have minions you do not want to include in the Ceph cluster, use: cluster-unassigned/cluster/*.sls cluster-ceph/cluster/ses-example-*.sls The first line marks all minions as unassigned. The second line overrides minions matching 'ses-example-*.sls', and assigns them to the Ceph cluster. | |
The minion called 'examplesesadmin' has the 'master' role. This, by the way, means it will get admin keys to the cluster. | |
All minions matching 'sesclient*' will get admin keys as well. | |
All minions matching 'ses-example-[123]' (presumably three minions: ses-example-1, ses-example-2, and ses-example-3) will be set up as MON nodes. | |
All minions matching 'ses-example-[123]' (all MON nodes in the example) will be set up as MGR nodes. | |
All minions matching 'ses-example-[5678]' will be set up as storage nodes. | |
Minion 'ses-example-4' will have the MDS role. | |
Minion 'ses-example-4' will have the IGW role. | |
Minion 'ses-example-4' will have the RGW role. | |
Means that we accept the default values for common configuration
parameters such as | |
Means that we accept the default values for common configuration
parameters such as |
5.5.2 DriveGroups #
DriveGroups specify the layouts of OSDs in the Ceph
cluster. They are defined in a single file
/srv/salt/ceph/configuration/files/drive_groups.yml.
An administrator should manually specify a group of OSDs that are
interrelated (hybrid OSDs that are deployed on solid state and spinners) or
share the same deployment options (identical, for example same object
store, same encryption option, stand-alone OSDs). To avoid explicitly
listing devices, DriveGroups use a list of filter items that correspond to a
few selected fields of ceph-volume's inventory reports.
In the simplest case this could be the 'rotational' flag (all solid-state
drives are to be db_devices, all rotating ones data devices) or something
more involved such as 'model' strings, or sizes. DeepSea will provide
code that translates these DriveGroups into actual device lists for
inspection by the user.
Note
Note that the filters use an OR gate to match against
the drives.
Following is a simple procedure that demonstrates the basic workflow when configuring DriveGroups:
Inspect your disks' properties as seen by the
ceph-volumecommand. Only these properties are accepted by DriveGroups:root@master #salt-run disks.detailsOpen the
/srv/salt/ceph/configuration/files/drive_groups.ymlYAML file and adjust to your needs. Refer to Section 5.5.2.1, “Specification”. Remember to use spaces instead of tabs. Find more advanced examples in Section 5.5.2.4, “Examples”. The following example includes all drives available to Ceph as OSDs:default_drive_group_name: target: '*' data_devices: all: trueVerify new layouts:
root@master #salt-run disks.listThis runner returns you a structure of matching disks based on your DriveGroups. If you are not happy with the result, repeat the previous step.
Tip: Detailed Report
In addition to the
disks.listrunner, there is adisks.reportrunner that prints out a detailed report of what will happen in the next DeepSea stage 3 invocation.root@master #salt-run disks.reportDeploy OSDs. On the next DeepSea stage 3 invocation, the OSD disks will be deployed according to your DriveGroups specification.
5.5.2.1 Specification #
/srv/salt/ceph/configuration/files/drive_groups.yml
can take one of two basic forms, depending on whether BlueStore or
FileStore is to be used. For BlueStore setups,
drive_groups.yml can be as follows:
drive_group_default_name:
  target: *
  data_devices:
    drive_spec: DEVICE_SPECIFICATION
  db_devices:
    drive_spec: DEVICE_SPECIFICATION
  wal_devices:
    drive_spec: DEVICE_SPECIFICATION
  block_wal_size: '5G'  # (optional, unit suffixes permitted)
  block_db_size: '5G'   # (optional, unit suffixes permitted)
  osds_per_device: 1   # number of osd daemons per device
  format:              # 'bluestore' or 'filestore' (defaults to 'bluestore')
  encryption:           # 'True' or 'False' (defaults to 'False')
For FileStore setups, drive_groups.yml can be as
follows:
drive_group_default_name:
  target: *
  data_devices:
    drive_spec: DEVICE_SPECIFICATION
  journal_devices:
    drive_spec: DEVICE_SPECIFICATION
  format: filestore
  encryption: True
Note
If you are unsure if your OSD is encrypted, see Book “Administration Guide”, Chapter 2 “Salt Cluster Administration”, Section 2.5 “Verify an Encrypted OSD”.
5.5.2.2 Matching Disk Devices #
You can describe the specification using the following filters:
By a disk model:
model: DISK_MODEL_STRING
By a disk vendor:
vendor: DISK_VENDOR_STRING
Tip: Lowercase Vendor String
Always lowercase the DISK_VENDOR_STRING.
Whether a disk is rotational or not. SSDs and NVME drives are not rotational.
rotational: 0
Deploy a node using all available drives for OSDs:
data_devices:
  all: true
Additionally, by limiting the number of matching disks:
limit: 10
5.5.2.3 Filtering Devices by Size #
You can filter disk devices by their size—either by an exact size,
or a size range. The size: parameter accepts arguments in
the following form:
'10G' - Includes disks of an exact size.
'10G:40G' - Includes disks whose size is within the range.
':10G' - Includes disks less than or equal to 10 GB in size.
'40G:' - Includes disks equal to or greater than 40 GB in size.
Example 5.1: Matching by Disk Size #
drive_group_default:
  target: '*'
  data_devices:
    size: '40TB:'
  db_devices:
    size: ':2TB'
Note: Quotes Required
When using the ':' delimiter, you need to enclose the size in quotes, otherwise the ':' sign will be interpreted as a new configuration hash.
Tip: Unit Shortcuts
Instead of (G)igabytes, you can specify the sizes in (M)egabytes or (T)erabytes as well.
5.5.2.4 Examples #
This section includes examples of different OSD setups.
Example 5.2: Simple Setup #
This example describes two nodes with the same setup:
20 HDDs
Vendor: Intel
Model: SSD-123-foo
Size: 4 TB
2 SSDs
Vendor: Micron
Model: MC-55-44-ZX
Size: 512 GB
The corresponding drive_groups.yml file will be as
follows:
drive_group_default:
  target: '*'
  data_devices:
    model: SSD-123-foo
  db_devices:
    model: MC-55-44-XZ
Such a configuration is simple and valid. The problem is that an administrator may add disks from different vendors in the future, and these will not be included. You can improve it by reducing the filters on core properties of the drives:
drive_group_default:
  target: '*'
  data_devices:
    rotational: 1
  db_devices:
    rotational: 0
In the previous example, we are enforcing all rotating devices to be declared as 'data devices' and all non-rotating devices will be used as 'shared devices' (wal, db).
If you know that drives with more than 2 TB will always be the slower data devices, you can filter by size:
drive_group_default:
  target: '*'
  data_devices:
    size: '2TB:'
  db_devices:
    size: ':2TB'
Example 5.3: Advanced Setup #
This example describes two distinct setups: 20 HDDs should share 2 SSDs, while 10 SSDs should share 2 NVMes.
20 HDDs
Vendor: Intel
Model: SSD-123-foo
Size: 4 TB
12 SSDs
Vendor: Micron
Model: MC-55-44-ZX
Size: 512 GB
2 NVMes
Vendor: Samsung
Model: NVME-QQQQ-987
Size: 256 GB
Such a setup can be defined with two layouts as follows:
drive_group:
  target: '*'
  data_devices:
    rotational: 0
  db_devices:
    model: MC-55-44-XZ
drive_group_default:
target: '*'
data_devices:
model: MC-55-44-XZ
db_devices:
vendor: samsung
size: 256GBNote that any drive of the size 256 GB and any drive from Samsung will match as a DB device with this example.
Example 5.4: Advanced Setup with Non-uniform Nodes #
The previous examples assumed that all nodes have the same drives. However, that is not always the case:
Nodes 1-5:
20 HDDs
Vendor: Intel
Model: SSD-123-foo
Size: 4 TB
2 SSDs
Vendor: Micron
Model: MC-55-44-ZX
Size: 512 GB
Nodes 6-10:
5 NVMes
Vendor: Intel
Model: SSD-123-foo
Size: 4 TB
20 SSDs
Vendor: Micron
Model: MC-55-44-ZX
Size: 512 GB
You can use the 'target' key in the layout to target specific nodes. Salt target notation helps to keep things simple:
drive_group_node_one_to_five:
  target: 'node[1-5]'
  data_devices:
    rotational: 1
  db_devices:
    rotational: 0
followed by
drive_group_the_rest:
  target: 'node[6-10]'
  data_devices:
    model: MC-55-44-XZ
  db_devices:
    model: SSD-123-foo
Example 5.5: Expert Setup #
All previous cases assumed that the WALs and DBs use the same device. It is however possible to deploy the WAL on a dedicated device as well:
20 HDDs
Vendor: Intel
Model: SSD-123-foo
Size: 4 TB
2 SSDs
Vendor: Micron
Model: MC-55-44-ZX
Size: 512 GB
2 NVMes
Vendor: Samsung
Model: NVME-QQQQ-987
Size: 256 GB
drive_group_default:
  target: '*'
  data_devices:
    model: MC-55-44-XZ
  db_devices:
    model: SSD-123-foo
  wal_devices:
    model: NVME-QQQQ-987
Example 5.6: Complex (and Unlikely) Setup #
In the following setup, we are trying to define:
20 HDDs backed by 1 NVMe
2 HDDs backed by 1 SSD(db) and 1 NVMe(wal)
8 SSDs backed by 1 NVMe
2 SSDs stand-alone (encrypted)
1 HDD is spare and should not be deployed
The summary of used drives follows:
23 HDDs
Vendor: Intel
Model: SSD-123-foo
Size: 4 TB
10 SSDs
Vendor: Micron
Model: MC-55-44-ZX
Size: 512 GB
1 NVMe
Vendor: Samsung
Model: NVME-QQQQ-987
Size: 256 GB
The DriveGroups definition will be the following:
drive_group_hdd_nvme:
  target: '*'
  data_devices:
    rotational: 0
  db_devices:
    model: NVME-QQQQ-987
drive_group_hdd_ssd_nvme:
target: '*'
data_devices:
rotational: 0
db_devices:
model: MC-55-44-XZ
wal_devices:
model: NVME-QQQQ-987drive_group_ssd_nvme:
target: '*'
data_devices:
model: SSD-123-foo
db_devices:
model: NVME-QQQQ-987drive_group_ssd_standalone_encrypted:
target: '*'
data_devices:
model: SSD-123-foo
encryption: TrueOne HDD will remain as the file is being parsed from top to bottom.
5.5.3 Adjusting ceph.conf with Custom Settings #
If you need to put custom settings into the ceph.conf
configuration file, see Book “Administration Guide”, Chapter 2 “Salt Cluster Administration”, Section 2.14 “Adjusting ceph.conf with Custom Settings” for more
details.