4 Deploying with DeepSea/Salt #
Note: ceph-deploy Removed in SUSE Enterprise Storage 5.5
The ceph-deploy cluster deployment tool was deprecated in
SUSE Enterprise Storage 4 and is completely removed in favor of DeepSea as of
SUSE Enterprise Storage 5.
Salt along with DeepSea is a stack of components that help you deploy and manage server infrastructure. It is very scalable, fast, and relatively easy to get running. Read the following considerations before you start deploying the cluster with Salt:
Salt minions are the nodes controlled by a dedicated node called Salt master. Salt minions have roles, for example Ceph OSD, Ceph Monitor, Ceph Manager, Object Gateway, iSCSI Gateway, or NFS Ganesha.
A Salt master runs its own Salt minion. It is required for running privileged tasks—for example creating, authorizing, and copying keys to minions—so that remote minions never need to run privileged tasks.

Tip: Sharing Multiple Roles per Server
You will get the best performance from your Ceph cluster when each role is deployed on a separate node. But real deployments sometimes require sharing one node for multiple roles. To avoid troubles with performance and upgrade procedure, do not deploy the Ceph OSD, Metadata Server, or Ceph Monitor role to the Salt master.
Salt minions need to correctly resolve the Salt master's host name over the network. By default, they look for the
salthost name, but you can specify any other network-reachable host name in the/etc/salt/minionfile, see Section 4.3, “Cluster Deployment”.
4.1 Read the Release Notes #
In the release notes you can find additional information on changes since the previous release of SUSE Enterprise Storage. Check the release notes to see whether:
your hardware needs special considerations.
any used software packages have changed significantly.
special precautions are necessary for your installation.
The release notes also provide information that could not make it into the manual on time. They also contain notes about known issues.
After having installed the package release-notes-ses,
find the release notes locally in the directory
/usr/share/doc/release-notes or online at
https://www.suse.com/releasenotes/.
4.2 Introduction to DeepSea #
The goal of DeepSea is to save the administrator time and confidently perform complex operations on a Ceph cluster.
Ceph is a very configurable software solution. It increases both the freedom and responsibility of system administrators.
The minimal Ceph setup is good for demonstration purposes, but does not show interesting features of Ceph that you can see with a big number of nodes.
DeepSea collects and stores data about individual servers, such as addresses and device names. For a distributed storage system such as Ceph, there can be hundreds of such items to collect and store. Collecting the information and entering the data manually into a configuration management tool is exhausting and error prone.
The steps necessary to prepare the servers, collect the configuration, and configure and deploy Ceph are mostly the same. However, this does not address managing the separate functions. For day to day operations, the ability to trivially add hardware to a given function and remove it gracefully is a requirement.
DeepSea addresses these observations with the following strategy: DeepSea consolidates the administrator's decisions in a single file. The decisions include cluster assignment, role assignment and profile assignment. And DeepSea collects each set of tasks into a simple goal. Each goal is a stage:
DeepSea Stages Description #
Stage 0—the preparation— during this stage, all required updates are applied and your system may be rebooted.

Important: Re-run Stage 0 after Salt master Reboot
If, during Stage 0, the Salt master reboots to load the new kernel version, you need to run Stage 0 again, otherwise minions will not be targeted.
Stage 1—the discovery—here you detect all hardware in your cluster and collect necessary information for the Ceph configuration. For details about configuration, refer to Section 4.5, “Configuration and Customization”.
Stage 2—the configuration—you need to prepare configuration data in a particular format.
Stage 3—the deployment—creates a basic Ceph cluster with mandatory Ceph services. See Section 1.2.3, “Ceph Nodes and Daemons” for their list.
Stage 4—the services—additional features of Ceph like iSCSI, Object Gateway and CephFS can be installed in this stage. Each is optional.
Stage 5—the removal stage. This stage is not mandatory and during the initial setup it is usually not needed. In this stage the roles of minions and also the cluster configuration are removed. You need to run this stage when you need to remove a storage node from your cluster. For details refer to Book “Administration Guide”, Chapter 1 “Salt Cluster Administration”, Section 1.3 “Removing and Reinstalling Cluster Nodes”.
You can find a more detailed introduction into DeepSea at https://github.com/suse/deepsea/wiki.
4.2.1 Organization and Important Locations #
Salt has several standard locations and several naming conventions used on your master node:
/srv/pillarThe directory stores configuration data for your cluster minions. Pillar is an interface for providing global configuration values to all your cluster minions.
/srv/salt/The directory stores Salt state files (also called sls files). State files are formatted descriptions of states in which the cluster should be. For more information, refer to the Salt documentation.
/srv/module/runnersThe directory stores Python scripts known as runners. Runners are executed on the master node.
/srv/salt/_modulesThe directory stores Python scripts that are called modules. The modules are applied to all minions in your cluster.
/srv/pillar/cephThe directory is used by DeepSea. Collected configuration data are stored here.
/srv/salt/cephA directory used by DeepSea. It stores sls files that can be in different formats, but each subdirectory contains sls files. Each subdirectory contains only one type of sls file. For example,
/srv/salt/ceph/stagecontains orchestration files that are executed bysalt-run state.orchestrate.
4.2.2 Targeting the Minions #
DeepSea commands are executed via the Salt infrastructure. When using
the salt command, you need to specify a set of
Salt minions that the command will affect. We describe the set of the minions
as a target for the salt command.
The following sections describe possible methods to target the minions.
4.2.2.1 Matching the Minion Name #
You can target a minion or a group of minions by matching their names. A minion's name is usually the short host name of the node where the minion runs. This is a general Salt targeting method, not related to DeepSea. You can use globbing, regular expressions, or lists to limit the range of minion names. The general syntax follows:
root@master # salt target example.moduleTip: Ceph-only Cluster
If all Salt minions in your environment belong to your Ceph cluster, you
can safely substitute target with
'*' to include all registered
minions.
Match all minions in the example.net domain (assuming the minion names are identical to their "full" host names):
root@master # salt '*.example.net' test.pingMatch the 'web1' to 'web5' minions:
root@master # salt 'web[1-5]' test.pingMatch both 'web1-prod' and 'web1-devel' minions using a regular expression:
root@master # salt -E 'web1-(prod|devel)' test.pingMatch a simple list of minions:
root@master # salt -L 'web1,web2,web3' test.pingMatch all minions in the cluster:
root@master # salt '*' test.ping4.2.2.2 Targeting with a 'deepsea' Grain #
In a heterogeneous Salt-managed environment where SUSE Enterprise Storage 5.5 is deployed on a subset of nodes alongside other cluster solution(s), it is a good idea to 'mark' the relevant minions by applying a 'deepsea' grain to them. This way you can easily target DeepSea minions in environments where matching by the minion name is problematic.
To apply the 'deepsea' grain to a group of minions, run:
root@master # salt target grains.append deepsea defaultTo remove the 'deepsea' grain from a group of minions, run:
root@master # salt target grains.delval deepsea destructive=TrueAfter applying the 'deepsea' grain to the relevant minions, you can target them as follows:
root@master # salt -G 'deepsea:*' test.pingThe following command is an equivalent:
root@master # salt -C 'G@deepsea:*' test.ping4.2.2.3 Set the deepsea_minions Option #
Setting the deepsea_minions option's target is a
requirement for DeepSea deployments. DeepSea uses it to instruct
minions during stages execution (refer to
DeepSea Stages Description for details.
To set or change the deepsea_minions option, edit the
/srv/pillar/ceph/deepsea_minions.sls file on the
Salt master and add or replace the following line:
deepsea_minions: target
Tip: deepsea_minions Target
As the target for the
deepsea_minions option, you can use any targeting
method: both
Matching the Minion Name and
Targeting with a 'deepsea' Grain.
Match all Salt minions in the cluster:
deepsea_minions: '*'
Match all minions with the 'deepsea' grain:
deepsea_minions: 'G@deepsea:*'
4.2.2.4 For More Information #
You can use more advanced ways to target minions using the Salt infrastructure. Refer to https://docs.saltstack.com/en/latest/topics/targeting/ for a description of all targeting techniques.
Also, the 'deepsea-minions' manual page gives you more detail about
DeepSea targeting (man 7 deepsea_minions).
4.3 Cluster Deployment #
The cluster deployment process has several phases. First, you need to prepare all nodes of the cluster by configuring Salt and then deploy and configure Ceph.
Tip: Deploying Monitor Nodes without Defining OSD Profiles
If you need to skip defining OSD profiles and deploy the monitor nodes
first, you can do so by setting the DEV_ENV variable. It
allows deploying monitors without the presence of the
profile/ directory, as well as deploying a cluster
with at least one storage, monitor, and manager node.
To set the environment variable, either enable it globally by setting it in
the /srv/pillar/ceph/stack/global.yml file, or set it
for the current shell session only:
root@master # export DEV_ENV=trueThe following procedure describes the cluster preparation in detail.
Install and register SUSE Linux Enterprise Server 12 SP3 together with SUSE Enterprise Storage 5.5 extension on each node of the cluster.
Important: SUSE Linux Enterprise Server 12 SP4 Not Supported
SUSE Linux Enterprise Server 12 SP4 is not a supported base operating system for SUSE Enterprise Storage 5.5.
Verify that proper products are installed and registered by listing existing software repositories. The list will be similar to this output:
root #zypper lr -E # | Alias | Name | Enabled | GPG Check | Refresh ---+---------+-----------------------------------+---------+-----------+-------- 4 | [...] | SUSE-Enterprise-Storage-5-Pool | Yes | (r ) Yes | No 6 | [...] | SUSE-Enterprise-Storage-5-Updates | Yes | (r ) Yes | Yes 9 | [...] | SLES12-SP3-Pool | Yes | (r ) Yes | No 11 | [...] | SLES12-SP3-Updates | Yes | (r ) Yes | YesTip: LTSS Repositories Are Not Required
LTSS updates for SUSE Linux Enterprise Server are delivered as part of the SUSE Enterprise Storage 5.5 repositories. Therefore, no LTSS repositories need to be added.
Configure network settings including proper DNS name resolution on each node. The Salt master and all the Salt minions need to resolve each other by their host names. For more information on configuring a network, see https://documentation.suse.com/sles/12-SP5/single-html/SLES-admin/#sec-basicnet-yast For more information on configuring a DNS server, see https://documentation.suse.com/sles/12-SP5/single-html/SLES-admin/#cha-dns.
Select one or more time servers/pools, and synchronize the local time against them. Verify that the time synchronization service is enabled on each system start-up. You can use the
yast ntp-clientcommand found in a yast2-ntp-client package to configure time synchronization.Tip
Virtual machines are not reliable NTP sources.
Find more information on setting up NTP in https://documentation.suse.com/sles/12-SP5/single-html/SLES-admin/#sec-ntp-yast.
Install the
salt-masterandsalt-minionpackages on the Salt master node:root@master #zypper in salt-master salt-minionCheck that the
salt-masterservice is enabled and started, and enable and start it if needed:root@master #systemctl enable salt-master.serviceroot@master #systemctl start salt-master.serviceIf you intend to use firewall, verify that the Salt master node has ports 4505 and 4506 open to all Salt minion nodes. If the ports are closed, you can open them using the
yast2 firewallcommand by allowing the service.
Warning: DeepSea Stages Fail with Firewall
DeepSea deployment stages fail when firewall is active (and even configured). To pass the stages correctly, you need to either turn the firewall off by running
root #systemctl stop SuSEfirewall2.serviceor set the
FAIL_ON_WARNINGoption to 'False' in/srv/pillar/ceph/stack/global.yml:FAIL_ON_WARNING: False
Install the package
salt-minionon all minion nodes.root #zypper in salt-minionMake sure that the fully qualified domain name of each node can be resolved to the public network IP address by all other nodes.
Configure all minions (including the master minion) to connect to the master. If your Salt master is not reachable by the host name
salt, edit the file/etc/salt/minionor create a new file/etc/salt/minion.d/master.confwith the following content:master: host_name_of_salt_master
If you performed any changes to the configuration files mentioned above, restart the Salt service on all Salt minions:
root@minion >systemctl restart salt-minion.serviceCheck that the
salt-minionservice is enabled and started on all nodes. Enable and start it if needed:root #systemctl enable salt-minion.serviceroot #systemctl start salt-minion.serviceVerify each Salt minion's fingerprint and accept all salt keys on the Salt master if the fingerprints match.
View each minion's fingerprint:
root@minion >salt-call --local key.finger local: 3f:a3:2f:3f:b4:d3:d9:24:49:ca:6b:2c:e1:6c:3f:c3:83:37:f0:aa:87:42:e8:ff...After gathering fingerprints of all the Salt minions, list fingerprints of all unaccepted minion keys on the Salt master:
root@master #salt-key -F [...] Unaccepted Keys: minion1: 3f:a3:2f:3f:b4:d3:d9:24:49:ca:6b:2c:e1:6c:3f:c3:83:37:f0:aa:87:42:e8:ff...If the minions' fingerprint match, accept them:
root@master #salt-key --accept-allVerify that the keys have been accepted:
root@master #salt-key --list-allPrior to deploying SUSE Enterprise Storage 5.5, manually zap all the disks. Remember to replace 'X' with the correct disk letter:
Stop all processes that are using the specific disk.
Verify whether any partition on the disk is mounted, and unmount if needed.
If the disk is managed by LVM, deactivate and delete the whole LVM infrastructure. Refer to https://documentation.suse.com/sles/12-SP5/single-html/SLES-storage/#cha-lvm for more details.
If the disk is part of MD RAID, deactivate the RAID. Refer to https://documentation.suse.com/sles/12-SP5/single-html/SLES-storage/#part-software-raid for more details.
Tip: Rebooting the Server
If you get error messages such as 'partition in use' or 'kernel can not be updated with the new partition table' during the following steps, reboot the server.
Wipe the beginning of each partition (as
root):for partition in /dev/sdX[0-9]* do dd if=/dev/zero of=$partition bs=4096 count=1 oflag=direct done
Wipe the beginning of the drive:
root #dd if=/dev/zero of=/dev/sdX bs=512 count=34 oflag=directWipe the end of the drive:
root #dd if=/dev/zero of=/dev/sdX bs=512 count=33 \ seek=$((`blockdev --getsz /dev/sdX` - 33)) oflag=directCreate a new GPT partition table:
root #sgdisk -Z --clear -g /dev/sdXVerify the result with:
root #parted -s /dev/sdX print freeor
root #dd if=/dev/sdX bs=512 count=34 | hexdump -Croot #dd if=/dev/sdX bs=512 count=33 \ skip=$((`blockdev --getsz /dev/sdX` - 33)) | hexdump -C
Optionally, if you need to preconfigure the cluster's network settings before the deepsea package is installed, create
/srv/pillar/ceph/stack/ceph/cluster.ymlmanually and set thecluster_network:andpublic_network:options. Note that the file will not be overwritten after you install deepsea.Install DeepSea on the Salt master node:
root@master #zypper in deepseaCheck that the file
/srv/pillar/ceph/master_minion.slson the Salt master points to your Salt master. If your Salt master is reachable via more host names, use the one suitable for the storage cluster. If you used the default host name for your Salt master—salt—in the ses domain, then the file looks as follows:master_minion: salt.ses
Now you deploy and configure Ceph. Unless specified otherwise, all steps are mandatory.
Note: Salt Command Conventions
There are two possible ways how to run salt-run
state.orch—one is with stage.<stage
number>, the other is with the name of the stage. Both
notations have the same impact and it is fully your preference which
command you use.
Procedure 4.1: Running Deployment Stages #
Include the Salt minions belonging to the Ceph cluster that you are currently deploying. Refer to Section 4.2.2.1, “Matching the Minion Name” for more information on targeting the minions.
Prepare your cluster. Refer to DeepSea Stages Description for more details.
root@master #salt-run state.orch ceph.stage.0or
root@master #salt-run state.orch ceph.stage.prep
Note: Run or Monitor Stages using DeepSea CLI
Using the DeepSea CLI, you can follow the stage execution progress in real-time, either by running the DeepSea CLI in the monitoring mode, or by running the stage directly through DeepSea CLI. For details refer to Section 4.4, “DeepSea CLI”.
Optional: create Btrfs sub-volumes for
/var/lib/ceph/. This step should only be executed before the next stages of DeepSea have been executed. To migrate existing directories or for more details, see Book “Administration Guide”, Chapter 20 “Hints and Tips”, Section 20.6 “Btrfs Sub-volume for /var/lib/ceph”.root@master #salt-run state.orch ceph.migrate.subvolumeThe discovery stage collects data from all minions and creates configuration fragments that are stored in the directory
/srv/pillar/ceph/proposals. The data are stored in the YAML format in *.sls or *.yml files.root@master #salt-run state.orch ceph.stage.1or
root@master #salt-run state.orch ceph.stage.discoveryAfter the previous command finishes successfully, create a
policy.cfgfile in/srv/pillar/ceph/proposals. For details refer to Section 4.5.1, “Thepolicy.cfgFile”.Tip
If you need to change the cluster's network setting, edit
/srv/pillar/ceph/stack/ceph/cluster.ymland adjust the lines starting withcluster_network:andpublic_network:.The configuration stage parses the
policy.cfgfile and merges the included files into their final form. Cluster and role related content are placed in/srv/pillar/ceph/cluster, while Ceph specific content is placed in/srv/pillar/ceph/stack/default.Run the following command to trigger the configuration stage:
root@master #salt-run state.orch ceph.stage.2or
root@master #salt-run state.orch ceph.stage.configureThe configuration step may take several seconds. After the command finishes, you can view the pillar data for the specified minions (for example, named
ceph_minion1,ceph_minion2, etc.) by running:root@master #salt 'ceph_minion*' pillar.itemsNote: Overwriting Defaults
As soon as the command finishes, you can view the default configuration and change it to suit your needs. For details refer to Chapter 7, Customizing the Default Configuration.
Now you run the deployment stage. In this stage, the pillar is validated, and monitors and ODS daemons are started on the storage nodes. Run the following to start the stage:
root@master #salt-run state.orch ceph.stage.3or
root@master #salt-run state.orch ceph.stage.deployThe command may take several minutes. If it fails, you need to fix the issue and run the previous stages again. After the command succeeds, run the following to check the status:
cephadm >ceph -sThe last step of the Ceph cluster deployment is the services stage. Here you instantiate any of the currently supported services: iSCSI Gateway, CephFS, Object Gateway, openATTIC, and NFS Ganesha. In this stage, the necessary pools, authorizing keyrings, and starting services are created. To start the stage, run the following:
root@master #salt-run state.orch ceph.stage.4or
root@master #salt-run state.orch ceph.stage.servicesDepending on the setup, the command may run for several minutes.
4.4 DeepSea CLI #
DeepSea also provides a CLI tool that allows the user to monitor or run stages while visualizing the execution progress in real-time.
Two modes are supported for visualizing a stage's execution progress:
DeepSea CLI Modes #
Monitoring mode: visualizes the execution progress of a DeepSea stage triggered by the
salt-runcommand issued in another terminal session.Stand-alone mode: runs a DeepSea stage while providing real-time visualization of its component steps as they are executed.
Important: DeepSea CLI Commands
The DeepSea CLI commands can only be run on the Salt master node with the
root privileges.
4.4.1 DeepSea CLI: Monitor Mode #
The progress monitor provides a detailed, real-time visualization of what
is happening during execution of stages using salt-run
state.orch commands in other terminal sessions.
Tip: Start Monitor in a New Terminal Session
You need to start the monitor in a new terminal window
before running any salt-run
state.orch so that the monitor can detect the start of the
stage's execution.
If you start the monitor after issuing the salt-run
state.orch command, then no execution progress will be shown.
You can start the monitor mode by running the following command:
root@master # deepsea monitor
For more information about the available command line options of the
deepsea monitor command check its manual page:
cephadm > man deepsea-monitor4.4.2 DeepSea CLI: Stand-alone Mode #
In the stand-alone mode, DeepSea CLI can be used to run a DeepSea stage, showing its execution in real-time.
The command to run a DeepSea stage from the DeepSea CLI has the following form:
root@master # deepsea stage run stage-name
where stage-name corresponds to the way Salt
orchestration state files are referenced. For example, stage
deploy, which corresponds to the directory
located in /srv/salt/ceph/stage/deploy, is referenced
as ceph.stage.deploy.
This command is an alternative to the Salt-based commands for running DeepSea stages (or any DeepSea orchestration state file).
The command deepsea stage run ceph.stage.0 is equivalent
to salt-run state.orch ceph.stage.0.
For more information about the available command line options accepted by
the deepsea stage run command check its manual page:
root@master # man deepsea-stage runIn the following figure shows an example of the output of the DeepSea CLI when running Stage 2:
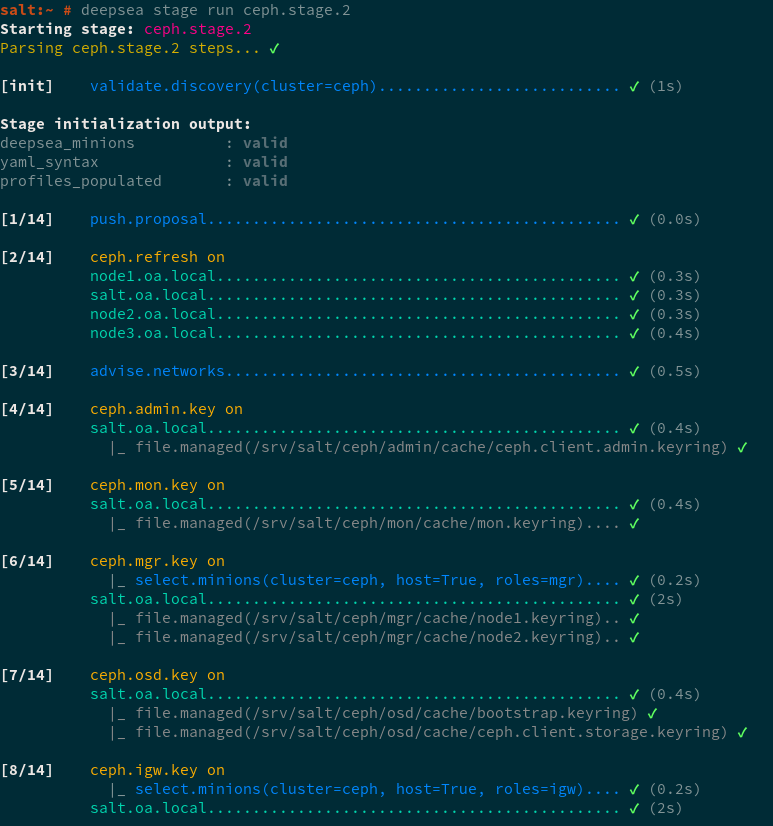
Figure 4.1: DeepSea CLI stage execution progress output #
4.4.2.1 DeepSea CLI stage run Alias #
For advanced users of Salt, we also support an alias for running a
DeepSea stage that takes the Salt command used to run a stage, for
example, salt-run state.orch
stage-name, as a command of the
DeepSea CLI.
Example:
root@master # deepsea salt-run state.orch stage-name4.5 Configuration and Customization #
4.5.1 The policy.cfg File #
The /srv/pillar/ceph/proposals/policy.cfg
configuration file is used to determine roles of individual cluster nodes.
For example, which node acts as an OSD or which as a monitor node. Edit
policy.cfg in order to reflect your desired cluster
setup. The order of the sections is arbitrary, but the content of included
lines overwrites matching keys from the content of previous lines.
Tip: Examples of policy.cfg
You can find several examples of complete policy files in the
/usr/share/doc/packages/deepsea/examples/ directory.
4.5.1.1 Cluster Assignment #
In the cluster section you select minions for your cluster. You can select all minions, or you can blacklist or whitelist minions. Examples for a cluster called ceph follow.
To include all minions, add the following lines:
cluster-ceph/cluster/*.sls
To whitelist a particular minion:
cluster-ceph/cluster/abc.domain.sls
or a group of minions—you can shell glob matching:
cluster-ceph/cluster/mon*.sls
To blacklist minions, set the them to
unassigned:
cluster-unassigned/cluster/client*.sls
4.5.1.2 Role Assignment #
This section provides you with details on assigning 'roles' to your
cluster nodes. A 'role' in this context means the service you need to run
on the node, such as Ceph Monitor, Object Gateway, iSCSI Gateway, or openATTIC. No role is assigned
automatically, only roles added to policy.cfg will be
deployed.
The assignment follows this pattern:
role-ROLE_NAME/PATH/FILES_TO_INCLUDE
Where the items have the following meaning and values:
ROLE_NAME is any of the following: 'master', 'admin', 'mon', 'mgr', 'mds', 'igw', 'rgw', 'ganesha', or 'openattic'.
PATH is a relative directory path to .sls or .yml files. In case of .sls files, it usually is
cluster, while .yml files are located atstack/default/ceph/minions.FILES_TO_INCLUDE are the Salt state files or YAML configuration files. They normally consist of Salt minions host names, for example
ses5min2.yml. Shell globbing can be used for more specific matching.
An example for each role follows:
master - the node has admin keyrings to all Ceph clusters. Currently, only a single Ceph cluster is supported. As the master role is mandatory, always add a similar line to the following:
role-master/cluster/master*.sls
admin - the minion will have an admin keyring. You define the role as follows:
role-admin/cluster/abc*.sls
mon - the minion will provide the monitoring service to the Ceph cluster. This role requires addresses of the assigned minions. As of SUSE Enterprise Storage 5.5, the public address are calculated dynamically and are no longer needed in the Salt pillar.
role-mon/cluster/mon*.sls
The example assigns the monitoring role to a group of minions.
mgr - the Ceph manager daemon which collects all the state information from the whole cluster. Deploy it on all minions where you plan to deploy the Ceph monitor role.
role-mgr/cluster/mgr*.sls
mds - the minion will provide the metadata service to support CephFS.
role-mds/cluster/mds*.sls
igw - the minion will act as an iSCSI Gateway. This role requires addresses of the assigned minions, thus you need to also include the files from the
stackdirectory:role-igw/cluster/*.sls
rgw - the minion will act as an Object Gateway:
role-rgw/cluster/rgw*.sls
openattic - the minion will act as an openATTIC server:
role-openattic/cluster/openattic*.sls
For more information, see Book “Administration Guide”, Chapter 17 “openATTIC”.
ganesha - the minion will act as an NFS Ganesha server. The 'ganesha' role requires either an 'rgw' or 'mds' role in cluster, otherwise the validation will fail in Stage 3.
To successfully install NFS Ganesha, additional configuration is required. If you want to use NFS Ganesha, read Chapter 12, Installation of NFS Ganesha before executing stages 2 and 4. However, it is possible to install NFS Ganesha later.
In some cases it can be useful to define custom roles for NFS Ganesha nodes. For details, see Book “Administration Guide”, Chapter 16 “NFS Ganesha: Export Ceph Data via NFS”, Section 16.3 “Custom NFS Ganesha Roles”.
Note: Multiple Roles of Cluster Nodes
You can assign several roles to a single node. For example, you can assign the mds roles to the monitor nodes:
role-mds/cluster/mon[1,2]*.sls
4.5.1.3 Common Configuration #
The common configuration section includes configuration files generated
during the discovery (Stage 1). These configuration
files store parameters like fsid or
public_network. To include the required Ceph common
configuration, add the following lines:
config/stack/default/global.yml
config/stack/default/ceph/cluster.yml
4.5.1.4 Profile Assignment #
In Ceph, a single storage role would be insufficient to describe the
many disk configurations available with the same hardware. DeepSea stage
1 will generate a default storage profile proposal. By default this
proposal will be a bluestore profile and will try to
propose the highest performing configuration for the given hardware setup.
For example, external journals will be preferred over a single disk
containing objects and metadata. Solid state storage will be prioritized
over spinning disks. Profiles are assigned in the
policy.cfg similar to roles.
The default proposal can be found in the profile-default directory tree.
To include this add the following two lines to your
policy.cfg.
profile-default/cluster/*.sls
profile-default/stack/default/ceph/minions/*.yml
You can also create a customized storage profile to your liking by using the proposal runner. This runner offers three methods: help, peek, and populate.
salt-run proposal.help prints the runner help text
about the various arguments it accepts.
salt-run proposal.peek shows the generated proposal
according to the arguments passed.
salt-run proposal.populate writes the proposal to the
/srv/pillar/ceph/proposals subdirectory. Pass
name=myprofile to name the storage profile. This will
result in a profile-myprofile subdirectory.
For all other arguments, consult the output of salt-run
proposal.help.
4.5.1.5 Overriding Default Search for Disk Devices #
If you have a Salt minion with multiple disk devices assigned and the device
names do not seem to be consistent or persistent, you can override the
default search behavior by editing
/srv/pillar/ceph/stack/global.yml:
Edit
global.ymland make the necessary changes:To override the default match expression of
-name ata* -o -name
       scsi* -o -name nvme*
for thefindcommand with for example-name wwn*, add the following:ceph: modules: cephdisks: device: match: '-name wwn*'To override the default pathname of
/dev/disk/by-idwith for example/dev/disk/by-label, add the following:ceph: modules: cephdisks: device: pathname: '/dev/disk/by-label'Refresh the Pillar:
root@master #salt 'DEEPSEA_MINIONS' saltutil.pillar_refreshTry a query for a device that was previously wrongly assigned:
root@master #salt 'SPECIFIC_MINION' cephdisks.device PATH_TO_DEVICEIf the command returns 'module not found', be sure to synchronize:
root@master #salt '*' saltutil.sync_all
4.5.1.6 Deploying Encrypted OSDs #
Since SUSE Enterprise Storage 5.5, OSDs are by default deployed using BlueStore instead of FileStore. Although BlueStore supports encryption, Ceph OSDs are deployed unencrypted by default. The following procedure describes steps to encrypt OSDs during the upgrade process. Let us assume that both data and WAL/DB disks to be used for OSD deployment are clean with no partitions. If the disk were previously used, wipe them following the procedure described in Step 12.
To use encrypted OSDs for your new deployment, first wipe the disks
following the procedure described in Step 12,
then use the proposal.populate runner with the
encryption=dmcrypt argument:
root@master # salt-run proposal.populate encryption=dmcryptImportant: Slow Boots
Encrypted OSDs require longer boot and activation times compared to the default unencrypted ones.
Determine the
bluestore block db sizeandbluestore block wal sizevalues for your deployment and add them to the/srv/salt/ceph/configuration/files/ceph.conf.d/global.conffile on the Salt master. The values need to be specified in bytes.[global] bluestore block db size = 48318382080 bluestore block wal size = 2147483648
For more information on customizing the
ceph.conffile, refer to Book “Administration Guide”, Chapter 1 “Salt Cluster Administration”, Section 1.12 “Adjustingceph.confwith Custom Settings”.Run DeepSea Stage 3 to distribute the changes:
root@master #salt-run state.orch ceph.stage.3Verify that the
ceph.conffile is updated on the relevant OSD nodes:root@minion >cat /etc/ceph/ceph.confEdit the *.yml files in the
/srv/pillar/ceph/proposals/profile-default/stack/default/ceph/minionsdirectory that are relevant to the OSDs you are encrypting. Double check their path with the one defined in the/srv/pillar/ceph/proposals/policy.cfgfile to ensure that you modify the correct *.yml files.Important: Long Disk Identifiers
When identifying OSD disks in the
/srv/pillar/ceph/proposals/profile-default/stack/default/ceph/minions/*.ymlfiles, use long disk identifiers.An example of an OSD configuration follows. Note that because we need encryption, the
db_sizeandwal_sizeoptions are removed:ceph: storage: osds: /dev/disk/by-id/scsi-SDELL_PERC_H730_Mini_007027b1065faa972100d34d7aa06d86: format: bluestore encryption: dmcrypt db: /dev/disk/by-id/nvme-INTEL_SSDPEDMD020T4D_HHHL_NVMe_2000GB_PHFT642400HV2P0EGN wal: /dev/disk/by-id/nvme-INTEL_SSDPEDMD020T4D_HHHL_NVMe_2000GB_PHFT642400HV2P0EGN /dev/disk/by-id/scsi-SDELL_PERC_H730_Mini_00d146b1065faa972100d34d7aa06d86: format: bluestore encryption: dmcrypt db: /dev/disk/by-id/nvme-INTEL_SSDPEDMD020T4D_HHHL_NVMe_2000GB_PHFT642400HV2P0EGN wal: /dev/disk/by-id/nvme-INTEL_SSDPEDMD020T4D_HHHL_NVMe_2000GB_PHFT642400HV2P0EGNDeploy the new Block Storage OSDs with encryption by running DeepSea Stages 2 and 3:
root@master #salt-run state.orch ceph.stage.2root@master #salt-run state.orch ceph.stage.3You can watch the progress with
ceph -sorceph osd tree. It is critical that you let the cluster rebalance before repeating the process on the next OSD node.
4.5.1.7 Item Filtering #
Sometimes it is not practical to include all files from a given directory
with *.sls globbing. The policy.cfg file parser
understands the following filters:
Warning: Advanced Techniques
This section describes filtering techniques for advanced users. When not used correctly, filtering can cause problems for example in case your node numbering changes.
- slice=[start:end]
Use the slice filter to include only items start through end-1. Note that items in the given directory are sorted alphanumerically. The following line includes the third to fifth files from the
role-mon/cluster/subdirectory:role-mon/cluster/*.sls slice[3:6]
- re=regexp
Use the regular expression filter to include only items matching the given expressions. For example:
role-mon/cluster/mon*.sls re=.*1[135]\.subdomainX\.sls$
4.5.1.8 Example policy.cfg File #
Following is an example of a basic policy.cfg file:
## Cluster Assignment
cluster-ceph/cluster/*.sls 1

## Roles
# ADMIN
role-master/cluster/examplesesadmin.sls 2
role-admin/cluster/sesclient*.sls 3

# MON
role-mon/cluster/ses-example-[123].sls 4

# MGR
role-mgr/cluster/ses-example-[123].sls 5

# MDS
role-mds/cluster/ses-example-4.sls 6

# IGW
role-igw/cluster/ses-example-4.sls 7

# RGW
role-rgw/cluster/ses-example-4.sls 8

# openATTIC
role-openattic/cluster/openattic*.sls 9

# COMMON
config/stack/default/global.yml 10
config/stack/default/ceph/cluster.yml 11

## Profiles
profile-default/cluster/*.sls 12
profile-default/stack/default/ceph/minions/*.yml 13
Indicates that all minions are included in the Ceph cluster. If you have minions you do not want to include in the Ceph cluster, use: cluster-unassigned/cluster/*.sls cluster-ceph/cluster/ses-example-*.sls The first line marks all minions as unassigned. The second line overrides minions matching 'ses-example-*.sls', and assigns them to the Ceph cluster. | |
The minion called 'examplesesadmin' has the 'master' role. This, by the way, means it will get admin keys to the cluster. | |
All minions matching 'sesclient*' will get admin keys as well. | |
All minions matching 'ses-example-[123]' (presumably three minions: ses-example-1, ses-example-2, and ses-example-3) will be set up as MON nodes. | |
All minions matching 'ses-example-[123]' (all MON nodes in the example) will be set up as MGR nodes. | |
Minion 'ses-example-4' will have the MDS role. | |
Minion 'ses-example-4' will have the IGW role. | |
Minion 'ses-example-4' will have the RGW role. | |
Specifies to deploy the openATTIC user interface to administer the Ceph cluster. See Book “Administration Guide”, Chapter 17 “openATTIC” for more details. | |
Means that we accept the default values for common configuration
parameters such as | |
Means that we accept the default values for common configuration
parameters such as | |
We are telling DeepSea to use the default hardware profile for each minion. Choosing the default hardware profile means that we want all additional disks (other than the root disk) as OSDs. | |
We are telling DeepSea to use the default hardware profile for each minion. Choosing the default hardware profile means that we want all additional disks (other than the root disk) as OSDs. |
4.5.2 Adjusting ceph.conf with Custom Settings #
If you need to put custom settings into the ceph.conf
configuration file, see Book “Administration Guide”, Chapter 1 “Salt Cluster Administration”, Section 1.12 “Adjusting ceph.conf with Custom Settings” for more
details.