14 Ceph iSCSI Gateway #
The chapter focuses on administration tasks related to the iSCSI Gateway. For a procedure of deployment refer to Book “Deployment Guide”, Chapter 10 “Installation of iSCSI Gateway”.
14.1 Connecting to lrbd-managed Targets #
This chapter describes how to connect to lrdb-managed targets from clients running Linux, Microsoft Windows, or VMware.
14.1.1 Linux (open-iscsi) #
Connecting to lrbd-backed iSCSI targets with
open-iscsi is a two-step process. First the
initiator must discover the iSCSI targets available on the gateway host,
then it must log in and map the available Logical Units (LUs).
Both steps require that the open-iscsi daemon is
running. The way you start the open-iscsi daemon
is dependent on your Linux distribution:
On SUSE Linux Enterprise Server (SLES); and Red Hat Enterprise Linux (RHEL) hosts, run
systemctl start iscsid(orservice iscsid startifsystemctlis not available).On Debian and Ubuntu hosts, run
systemctl start open-iscsi(orservice open-iscsi start).
If your initiator host runs SUSE Linux Enterprise Server, refer to https://documentation.suse.com/sles/12-SP5/single-html/SLES-storage/#sec-iscsi-initiator for details on how to connect to an iSCSI target.
For any other Linux distribution supporting
open-iscsi, proceed to discover targets on your
lrbd gateway (this example uses iscsi1.example.com
as the portal address; for multipath access repeat these steps with
iscsi2.example.com):
root # iscsiadm -m discovery -t sendtargets -p iscsi1.example.com
192.168.124.104:3260,1 iqn.2003-01.org.linux-iscsi.iscsi.x86:testvol
Then, log in to the portal. If the login completes successfully, any RBD-backed logical units on the portal will immediately become available on the system SCSI bus:
root # iscsiadm -m node -p iscsi1.example.com --login
Logging in to [iface: default, target: iqn.2003-01.org.linux-iscsi.iscsi.x86:testvol, portal: 192.168.124.104,3260] (multiple)
Login to [iface: default, target: iqn.2003-01.org.linux-iscsi.iscsi.x86:testvol, portal: 192.168.124.104,3260] successful.
Repeat this process for other portal IP addresses or hosts.
If your system has the lsscsi utility installed,
you use it to enumerate available SCSI devices on your system:
lsscsi
[8:0:0:0]    disk    SUSE     RBD              4.0   /dev/sde
[9:0:0:0]    disk    SUSE     RBD              4.0   /dev/sdf
In a multipath configuration (where two connected iSCSI devices represent
one and the same LU), you can also examine the multipath device state with
the multipath utility:
root # multipath -ll
360014050cf9dcfcb2603933ac3298dca dm-9 SUSE,RBD
size=49G features='0' hwhandler='0' wp=rw
|-+- policy='service-time 0' prio=1 status=active
| `- 8:0:0:0 sde 8:64 active ready running
`-+- policy='service-time 0' prio=1 status=enabled
`- 9:0:0:0 sdf 8:80 active ready running
You can now use this multipath device as you would any block device. For example, you can use the device as a Physical Volume for Linux Logical Volume Management (LVM), or you can simply create a file system on it. The example below demonstrates how to create an XFS file system on the newly connected multipath iSCSI volume:
root # mkfs -t xfs /dev/mapper/360014050cf9dcfcb2603933ac3298dca
log stripe unit (4194304 bytes) is too large (maximum is 256KiB)
log stripe unit adjusted to 32KiB
meta-data=/dev/mapper/360014050cf9dcfcb2603933ac3298dca isize=256    agcount=17, agsize=799744 blks
         =                       sectsz=512   attr=2, projid32bit=1
         =                       crc=0        finobt=0
data     =                       bsize=4096   blocks=12800000, imaxpct=25
         =                       sunit=1024   swidth=1024 blks
naming   =version 2              bsize=4096   ascii-ci=0 ftype=0
log      =internal log           bsize=4096   blocks=6256, version=2
         =                       sectsz=512   sunit=8 blks, lazy-count=1
realtime =none                   extsz=4096   blocks=0, rtextents=0
Note that XFS being a non-clustered file system, you may only ever mount it on a single iSCSI initiator node at any given time.
If at any time you want to discontinue using the iSCSI LUs associated with a particular target, run the following command:
root # iscsiadm -m node -p iscsi1.example.com --logout
Logging out of session [sid: 18, iqn.2003-01.org.linux-iscsi.iscsi.x86:testvol, portal: 192.168.124.104,3260]
Logout of [sid: 18, target: iqn.2003-01.org.linux-iscsi.iscsi.x86:testvol, portal: 192.168.124.104,3260] successful.
As with discovery and login, you must repeat the logout steps for all portal IP addresses or host names.
14.1.1.1 Multipath Configuration #
The multipath configuration is maintained on the clients or initiators and
is independent of any lrbd configuration. Select
a strategy prior to using block storage. After editing the
/etc/multipath.conf, restart
multipathd with
root # systemctl restart multipathdFor an active-passive configuration with friendly names, add
defaults {
  user_friendly_names yes
}
to your /etc/multipath.conf. After connecting to your
targets successfully, run
root # multipath -ll
mpathd (36001405dbb561b2b5e439f0aed2f8e1e) dm-0 SUSE,RBD
size=2.0G features='0' hwhandler='0' wp=rw
|-+- policy='service-time 0' prio=1 status=active
| `- 2:0:0:3 sdl 8:176 active ready running
|-+- policy='service-time 0' prio=1 status=enabled
| `- 3:0:0:3 sdj 8:144 active ready running
`-+- policy='service-time 0' prio=1 status=enabled
  `- 4:0:0:3 sdk 8:160 active ready running
Note the status of each link. For an active-active configuration, add
defaults {
  user_friendly_names yes
}

devices {
  device {
    vendor "(LIO-ORG|SUSE)"
    product "RBD"
    path_grouping_policy "multibus"
    path_checker "tur"
    features "0"
    hardware_handler "1 alua"
    prio "alua"
    failback "immediate"
    rr_weight "uniform"
    no_path_retry 12
    rr_min_io 100
  }
}
to your /etc/multipath.conf. Restart
multipathd and run
root # multipath -ll
mpathd (36001405dbb561b2b5e439f0aed2f8e1e) dm-3 SUSE,RBD
size=2.0G features='1 queue_if_no_path' hwhandler='1 alua' wp=rw
`-+- policy='service-time 0' prio=50 status=active
  |- 4:0:0:3 sdj 8:144 active ready running
  |- 3:0:0:3 sdk 8:160 active ready running
  `- 2:0:0:3 sdl 8:176 active ready running
14.1.2 Microsoft Windows (Microsoft iSCSI initiator) #
To connect to a SUSE Enterprise Storage 5.5 iSCSI target from a Windows 2012 server, follow these steps:
Open Windows Server Manager. From the Dashboard, select / . The dialog appears. Select the tab:
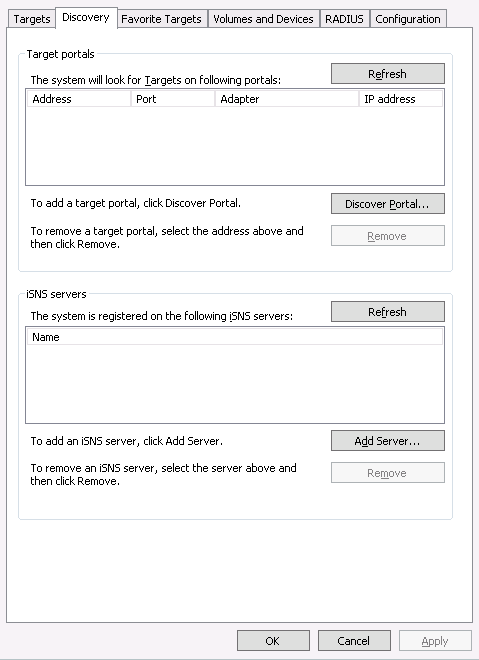
Figure 14.1: iSCSI Initiator Properties #
In the dialog, enter the target's host name or IP address in the field and click :
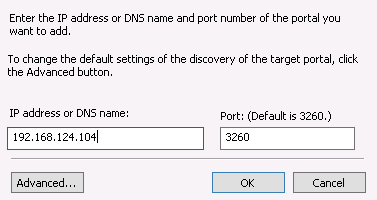
Figure 14.2: Discover Target Portal #
Repeat this process for all other gateway host names or IP addresses. When completed, review the list:
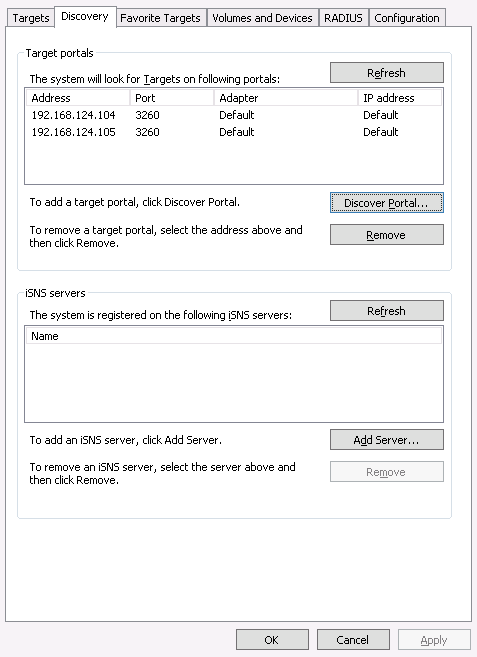
Figure 14.3: Target Portals #
Next, switch to the tab and review your discovered target(s).
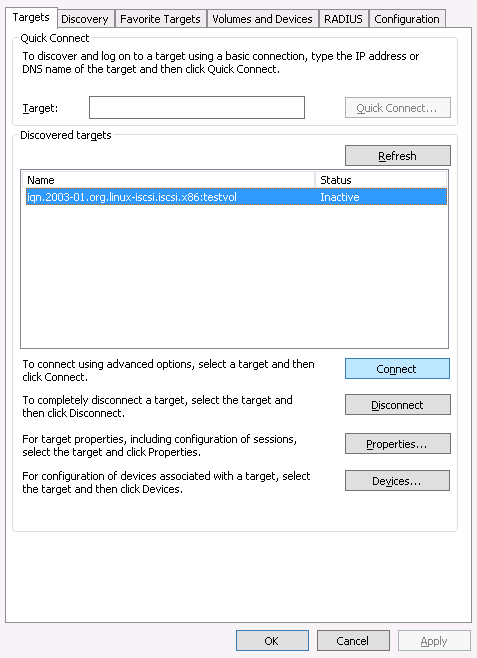
Figure 14.4: Targets #
Click in the tab. The dialog appears. Select the check box to enable multipath I/O (MPIO), then click :
When the dialog closes, select to review the target's properties:
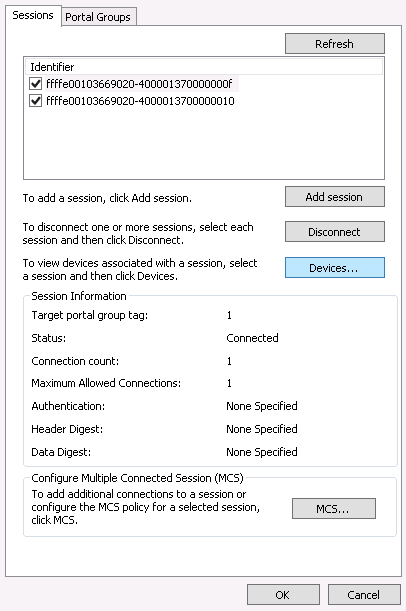
Figure 14.5: iSCSI Target Properties #
Select , and click to review the multipath I/O configuration:
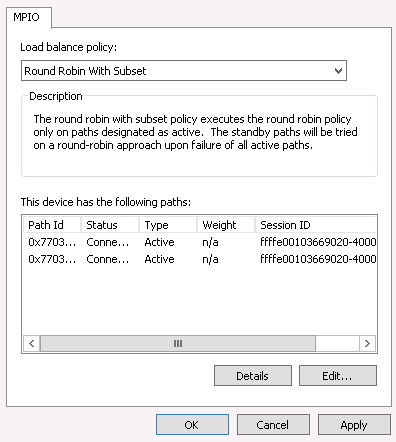
Figure 14.6: Device Details #
The default is . If you prefer a pure fail-over configuration, change it to .
This concludes the iSCSI initiator configuration. The iSCSI volumes are now available like any other SCSI devices, and may be initialized for use as volumes and drives. Click to close the dialog, and proceed with the role from the dashboard.
Observe the newly connected volume. It identifies as SUSE RBD SCSI Multi-Path Drive on the iSCSI bus, and is initially marked with an Offline status and a partition table type of Unknown. If the new volume does not appear immediately, select from the drop-down box to rescan the iSCSI bus.
Right-click on the iSCSI volume and select from the context menu. The appears. Click , highlight the newly connected iSCSI volume and click to begin.

Figure 14.7: New Volume Wizard #
Initially, the device is empty and does not contain a partition table. When prompted, confirm the dialog indicating that the volume will be initialized with a GPT partition table:
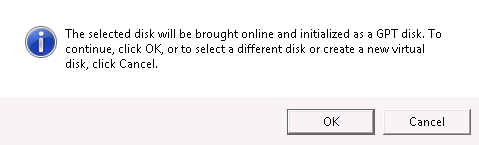
Figure 14.8: Offline Disk Prompt #
Select the volume size. Typically, you would use the device's full capacity. Then assign a drive letter or directory name where the newly created volume will become available. Then select a file system to create on the new volume, and finally confirm your selections with to finish creating the volume:
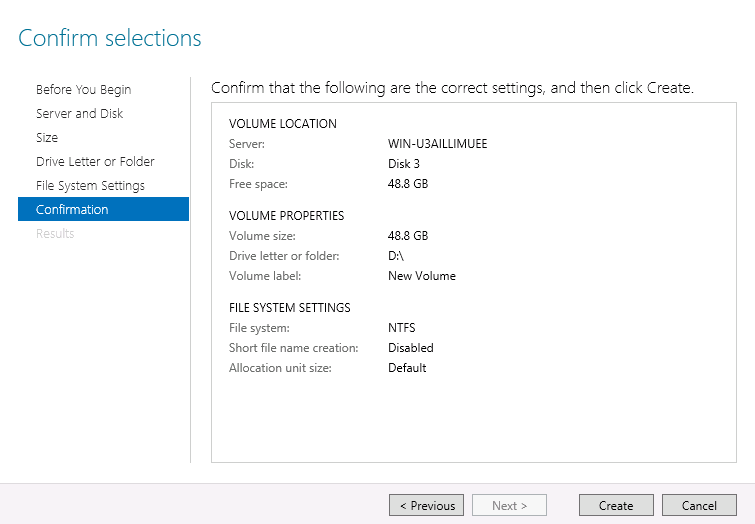
Figure 14.9: Confirm Volume Selections #
When the process finishes, review the results, then to conclude the drive initialization. Once initialization completes, the volume (and its NTFS file system) becomes available like a newly initialized local drive.
14.1.3 VMware #
To connect to
lrbdmanaged iSCSI volumes you need a configured iSCSI software adapter. If no such adapter is available in your vSphere configuration, create one by selecting / / / .When available, select the adapter's properties by right-clicking the adapter and selecting from the context menu:
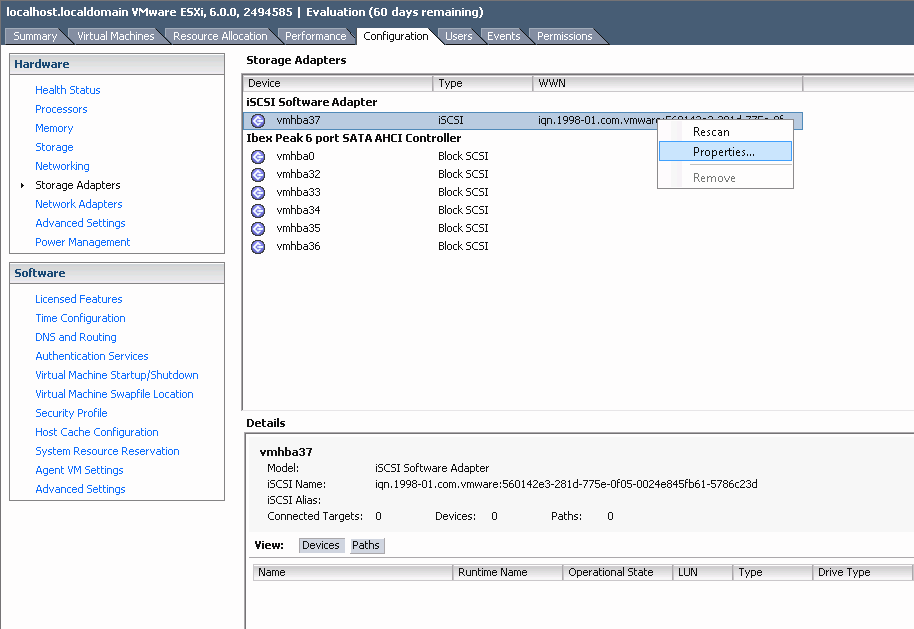
Figure 14.10: iSCSI Initiator Properties #
In the dialog, click the button. Then go to the tab and select .
Enter the IP address or host name of your
lrbdiSCSI gateway. If you run multiple iSCSI gateways in a failover configuration, repeat this step for as many gateways as you operate.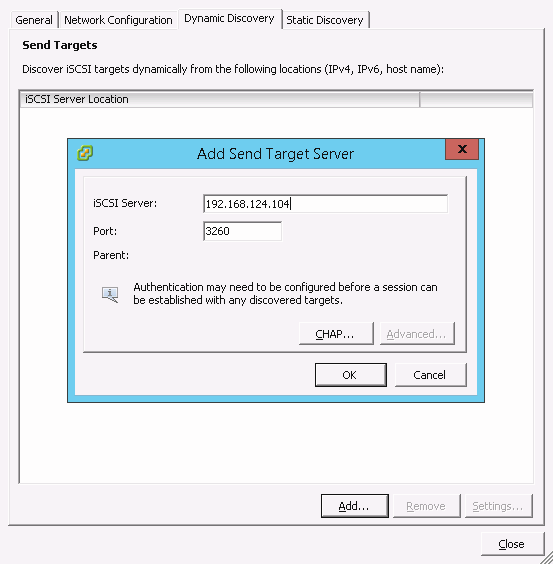
Figure 14.11: Add Target Server #
When you have entered all iSCSI gateways, click in the dialog to initiate a rescan of the iSCSI adapter.
When the rescan completes, the new iSCSI device appears below the list in the pane. For multipath devices, you can now right-click on the adapter and select from the context menu:
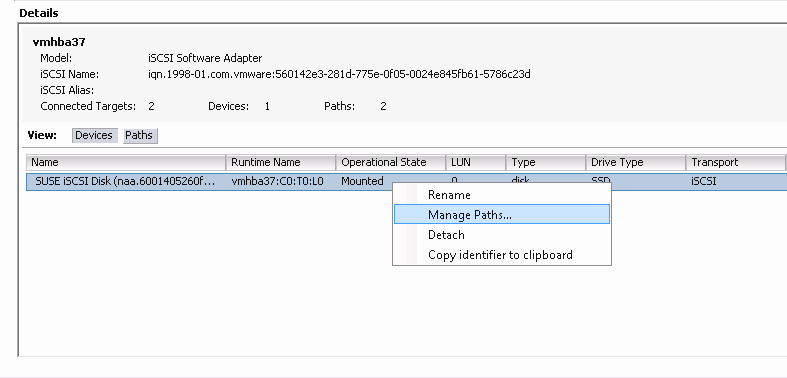
Figure 14.12: Manage Multipath Devices #
You should now see all paths with a green light under . One of your paths should be marked and all others simply :
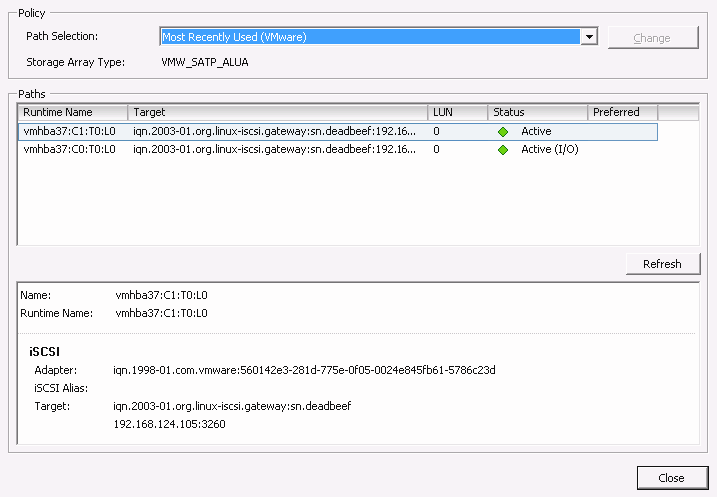
Figure 14.13: Paths Listing for Multipath #
You can now switch from to the item labeled . Select in the top-right corner of the pane to bring up the dialog. Then, select and click . The newly added iSCSI device appears in the list. Select it, then click to proceed:
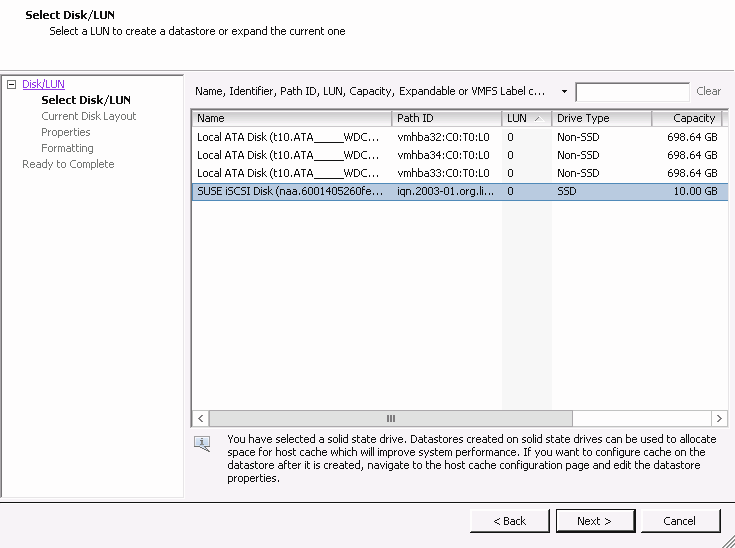
Figure 14.14: Add Storage Dialog #
Click to accept the default disk layout.
In the pane, assign a name to the new datastore, and click . Accept the default setting to use the volume's entire space for the datastore, or select for a smaller datastore:
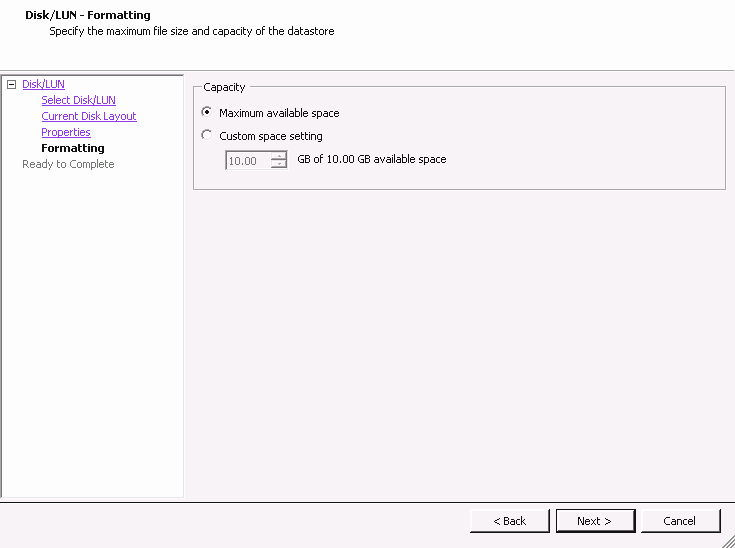
Figure 14.15: Custom Space Setting #
Click to complete the datastore creation.
The new datastore now appears in the datastore list and you can select it to retrieve details. You are now able to use the
lrbd-backed iSCSI volume like any other vSphere datastore.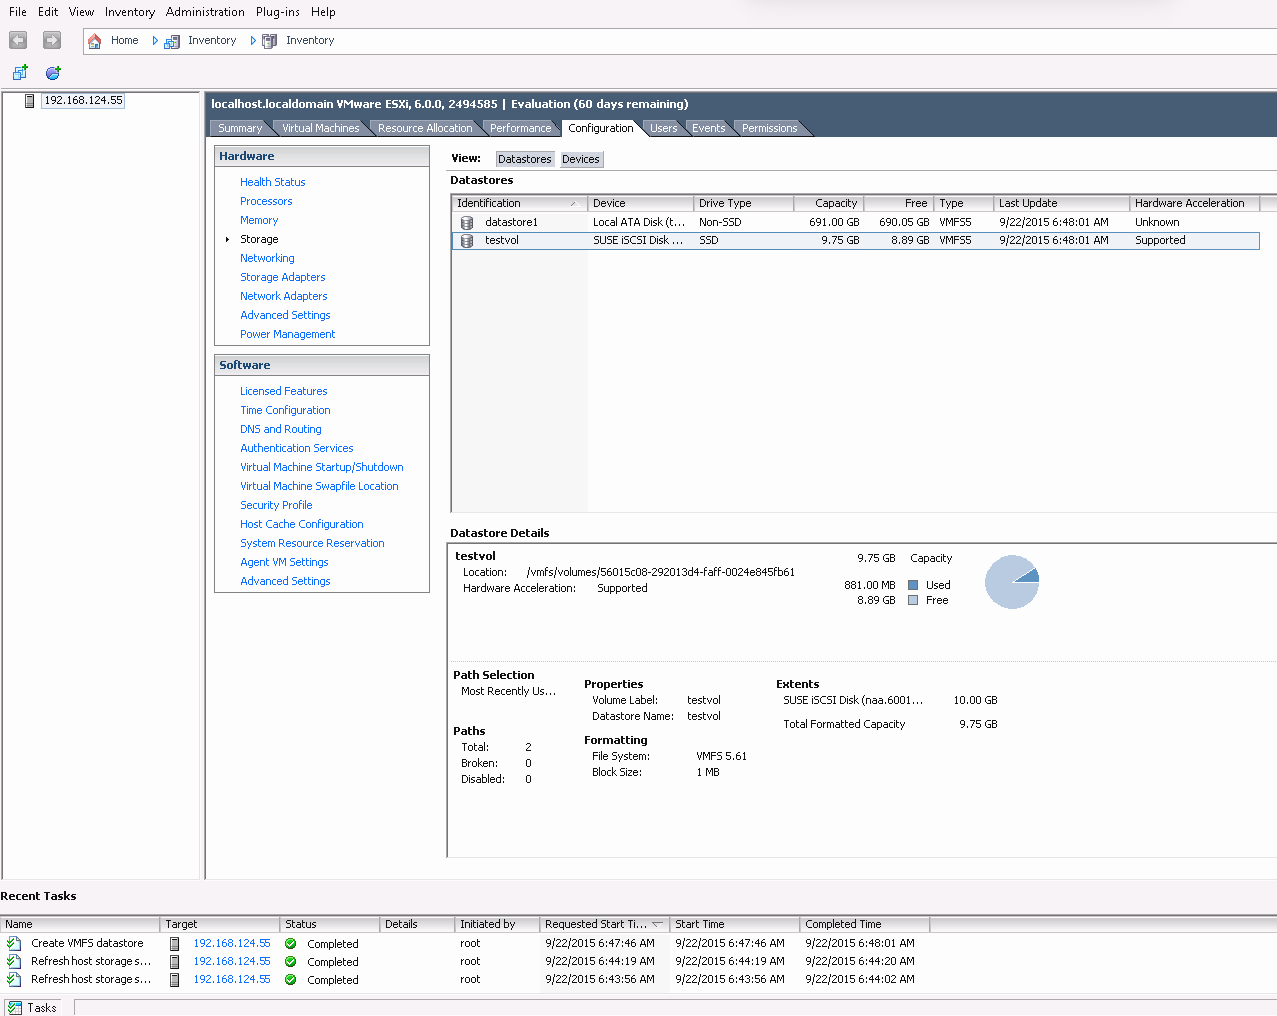
Figure 14.16: iSCSI Datastore Overview #
14.2 Conclusion #
lrbd is a key component of SUSE Enterprise Storage 5.5 that enables
access to distributed, highly available block storage from any server or
client capable of speaking the iSCSI protocol. By using
lrbd on one or more iSCSI gateway hosts, Ceph RBD
images become available as Logical Units (LUs) associated with iSCSI
targets, which can be accessed in an optionally load-balanced, highly
available fashion.
Since all of lrbd's configuration is stored in the
Ceph RADOS object store, lrbd gateway hosts are
inherently without persistent state and thus can be replaced, augmented, or
reduced at will. As a result, SUSE Enterprise Storage 5.5 enables SUSE customers to run a
truly distributed, highly-available, resilient, and self-healing enterprise
storage technology on commodity hardware and an entirely open source
platform.