
Arm:Deploying SUSE Linux Enterprise Server Using Network PXE Boot
SUSE Linux Enterprise Server network PXE boot enables remote, automated operating system deployment across target Arm devices over a local area network. By loading the kernel, initrd and Agama installer directly from network infrastructure, administrators can efficiently provision standard or immutable system configurations at scale without physical media, reducing deployment time and ensuring consistent baseline installations.
Prerequisites
A properly configured DHCP server.
A properly configured PXE boot server. For details, refer to: PXE server installation.
1 Booting the machine #
To begin the remote installation of SLES, boot the target system over the network to load the installer environment. Follow these steps to initiate the network boot sequence and launch Agama.
The following procedure describes how to boot the client machine to start the remote deployment of SLES using the PXE client.
Power on the target machine or create a virtual machine. Make sure to use bridged networking.
Enter the boot menu and select booting using PXE or HTTP. Continue to boot the machine.
The machine should start the deployment. Kernel and
initrdare downloaded from the PXE boot server. Boot loader is started.In the GRUB 2 menu, select the installation target. You can pass kernel boot parameters if needed.
initrdconfigures the network and starts the SUSE Linux Enterprise Server deployment using Agama.
2 Selecting a product and installation mode #
In this step, you select the product and its installation mode.
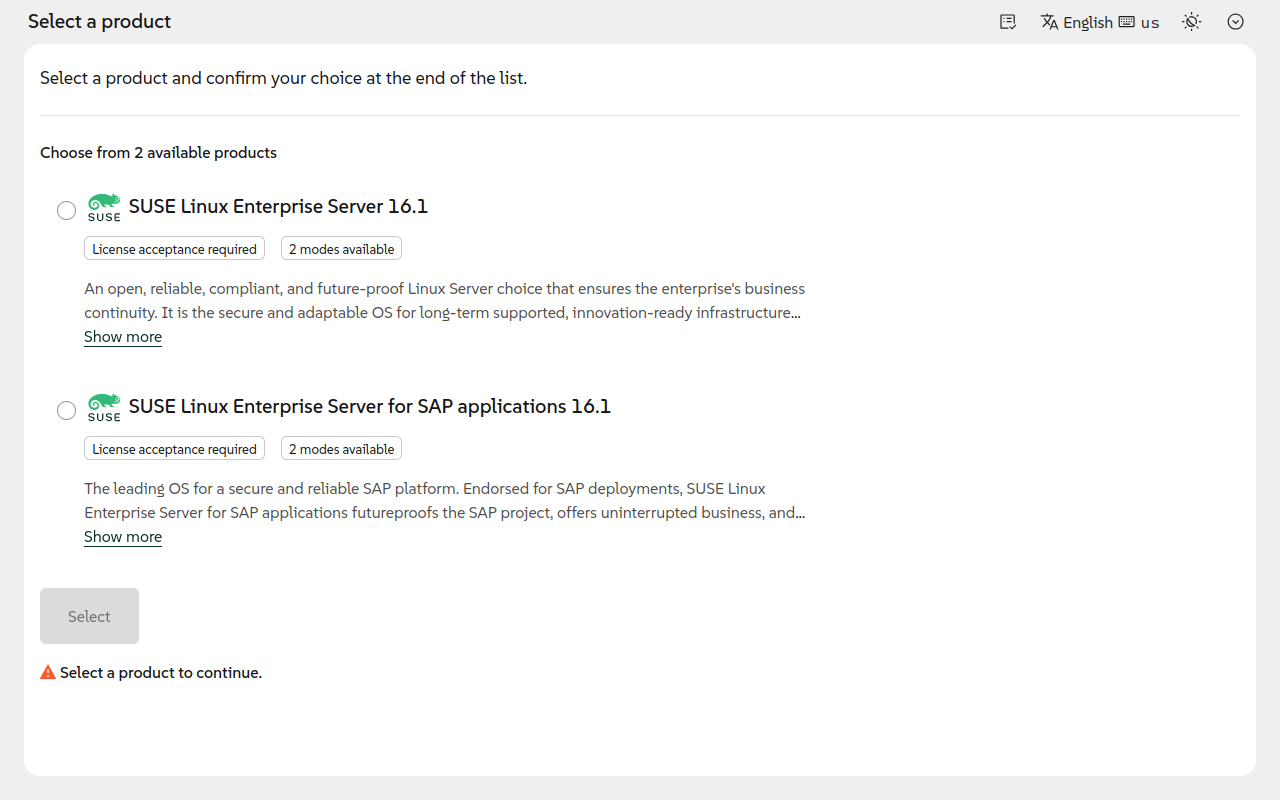
Select SUSE Linux Enterprise Server 16.1 for installation and choose its installation mode:
- Standard
The file system is writable. This mode offers maximum flexibility.
- Immutable
The root file system is write-protected. Updates are applied atomically to a new snapshot. The snapshot becomes active after a reboot.
Read and accept the license to continue.

At the top right of the installer, there is a tool bar with icons to access additional installer features:
- Status icon
Shows the status of the installer.
Idlemeans the installer is waiting for input.- Language and keyboard icons
Allows changing the language and keyboard layout of the installer. This affects only the installer interface, not the product to be installed. You can adjust the localization of the product later in Section 6, “Setting language and region”.
- Appearance icon
Allows changing the color scheme and contrast of the installer.
- More
Allows downloading the configuration in the JSON format and the installation logs.
3 Reviewing the installation overview #
The installation overview shows the most relevant settings. Each category displays a summary of its settings. Categories with invalid settings are marked. Configure them before you start the installation.
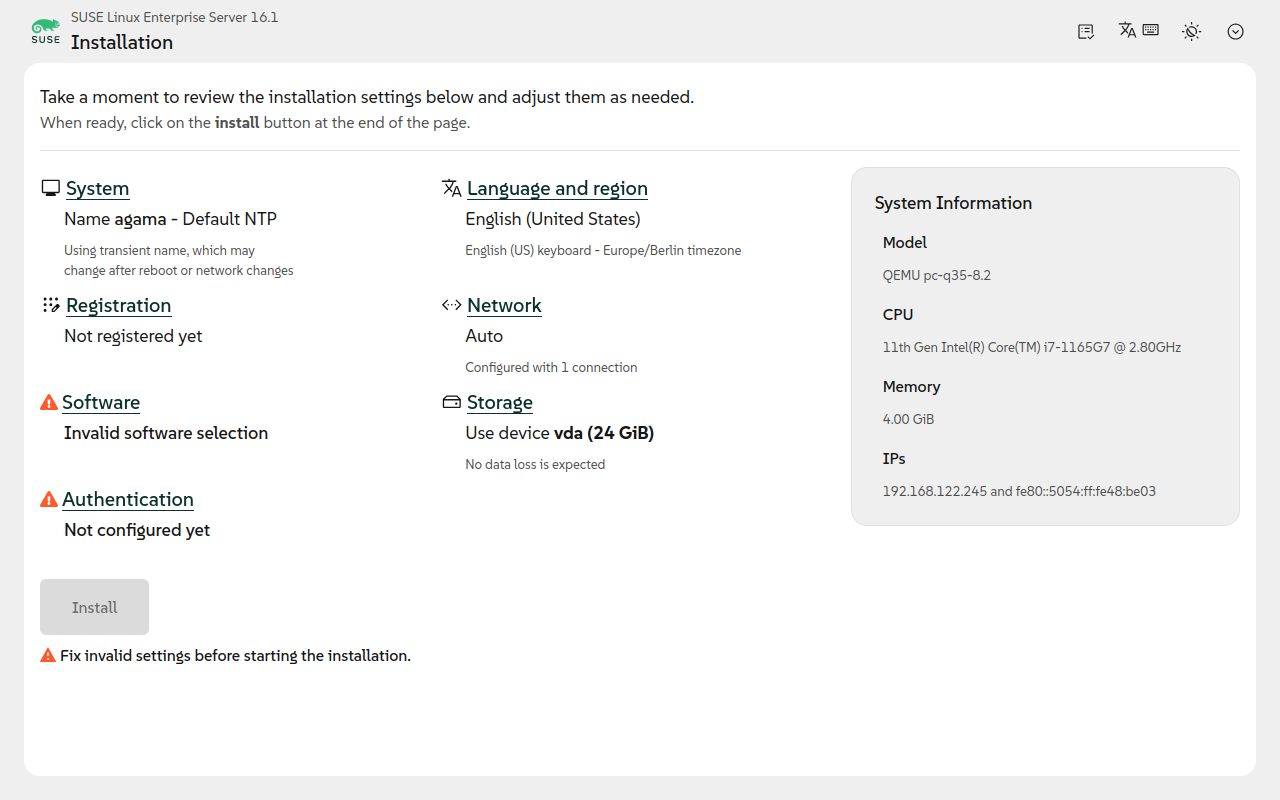
Select a category to adjust its settings.
There is no particular order for the configuration, but it is recommended to start with the settings and continue with the . Categories with pending or invalid settings must be resolved before proceeding with the installation.
4 Registering the system #
Register the product in the Registration screen.
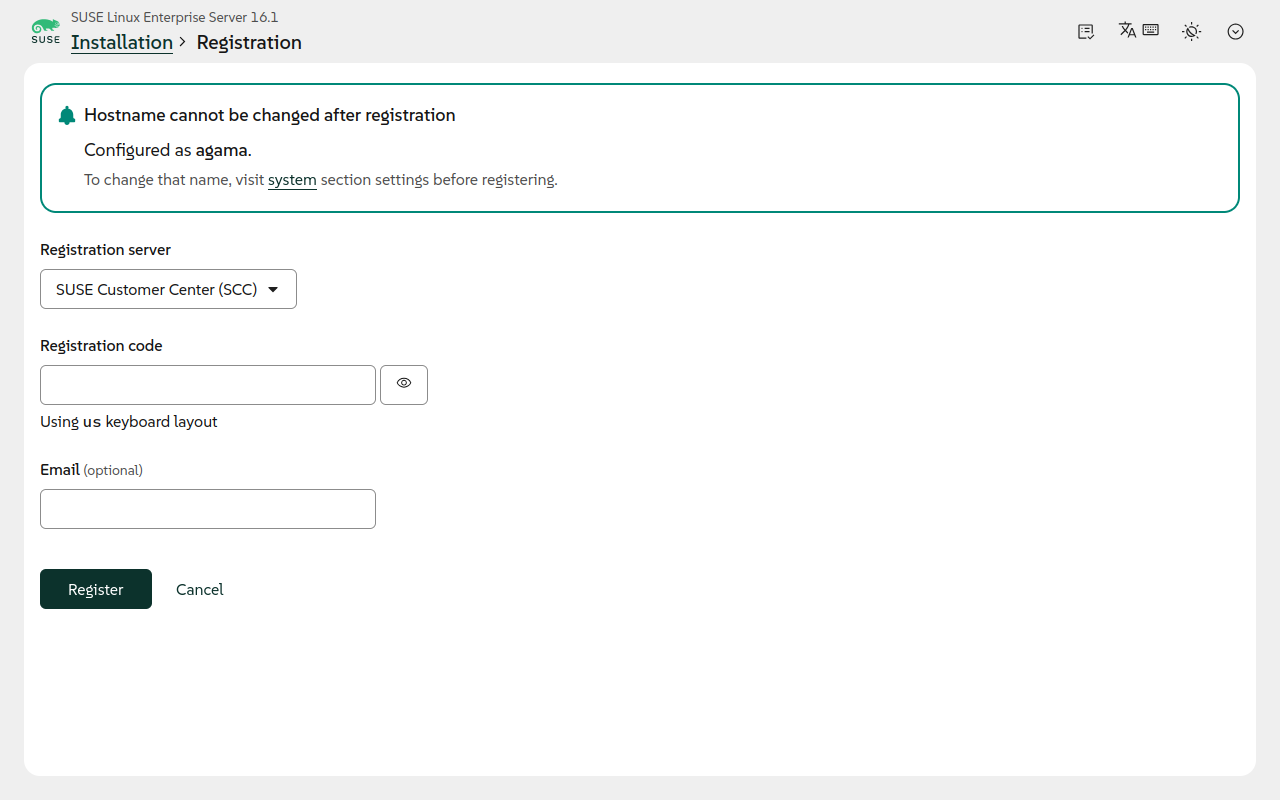
Choose a registration server and enter the details:
- Registration server
- SUSE Customer Center (SCC)
Register with the SUSE Customer Center. If your system is behind a firewall, make sure https://scc.suse.com/ is reachable from your network.
- Custom
Register with your own SUSE Multi-Linux Manager or RMT infrastructure and provide the Server URL. Use this option for air-gapped environments.
- Registration code
Enter a valid registration code for SUSE Linux Enterprise Server. The code is hidden by default but can be shown by clicking on the eye icon.
- Email (optional)
Optionally, enter a valid e-mail address. For organizations, we recommend using the address assigned to the registration code.
Click to register the system.
4.1 Registering extensions #
After successfully registering the base system, you can register additional extensions. The following extensions are available for SUSE Linux Enterprise Server 16.1:
- SUSE Linux Enterprise High Availability Extension 16.1
The SUSE Linux Enterprise High Availability extension provides mature, industry-leading open source high-availability clustering technologies that are easy to set up and use. You can deploy it in physical environments, virtual environments or both. It clusters physical servers, virtual servers or any combination of the two to suit the needs of your business.
To register your SUSE Linux Enterprise High Availability extension, enter its registration code and click Register.
- SUSE Package Hub 16.1
SUSE Package Hub is a free module providing access to community-maintained packages built to run on SUSE Linux Enterprise Server. Built from the same sources used in openSUSE distributions, these quality packages provide additional software to what is found in SUSE Linux Enterprise Server. The packages in this module are delivered without L3 support but do not interfere with the supportability of SUSE Linux Enterprise Server.
To register with the SUSE Package Hub, click . When the installer asks whether to trust the signing key of the SUSE Package Hub repository, click .
5 Configuring the system #
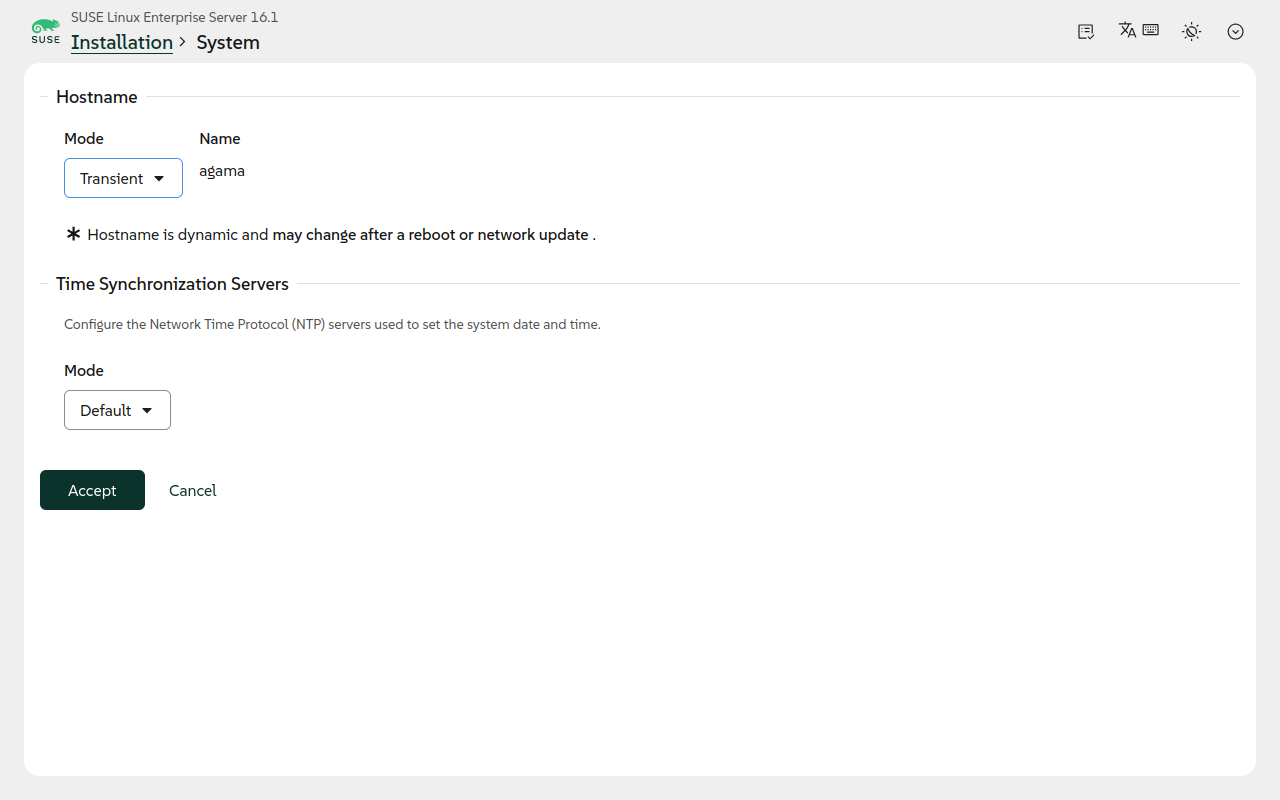
In the System screen, configure the host name and the time synchronization servers.
5.1 Setting the host name #
Set the host name of the system in one of the following modes.
- Transient (default)
The host name is assigned with DHCP and may change after a reboot or network change. The transient host name
agamais used for the installation.- Static
Set a static host name. You can either use a fully qualified domain name (FQDN) or the host name part only.

The host name is used for the registration with the SUSE Customer Center. If you do not set a host name,
your system will be registered with the transient host name agama.
Even if the system is assigned a new host name later, it will not automatically get
updated in the SUSE Customer Center. Therefore setting host name is recommended.
To update the host name in the SUSE Customer Center after registration, first change the system's
host name. Then use SUSEConnect to deregister the system and register it again under the new host name.
If you have multiple systems registered with the same host name in the SUSE Customer Center, it is difficult
to tell them apart. To identify a system, use its UUID. You can find it under
in the SUSE Customer Center and on the system by running
dmidecode -s system-uuid.
5.2 Setting time synchronization servers #
The system time is set with the Network Time Protocol (NTP) to ensure the system time is always correct. Choose one of the following modes:
- Default
The system uses one of the default SUSE NTP servers
1.suse.pool.ntp.orgto3.suse.pool.ntp.org. If your system is behind a firewall, make sure that these servers are reachable from your network.- Custom
In the custom mode, you can configure the NTP servers to use. Use this option for air-gapped environments. Specify servers by host name, IP address or FQDN. Separate multiple entries with colons.
Click to save your changes.
6 Setting language and region #
Adjust the localization settings, such as language, keyboard layout and time zone, in the Language and region screen.
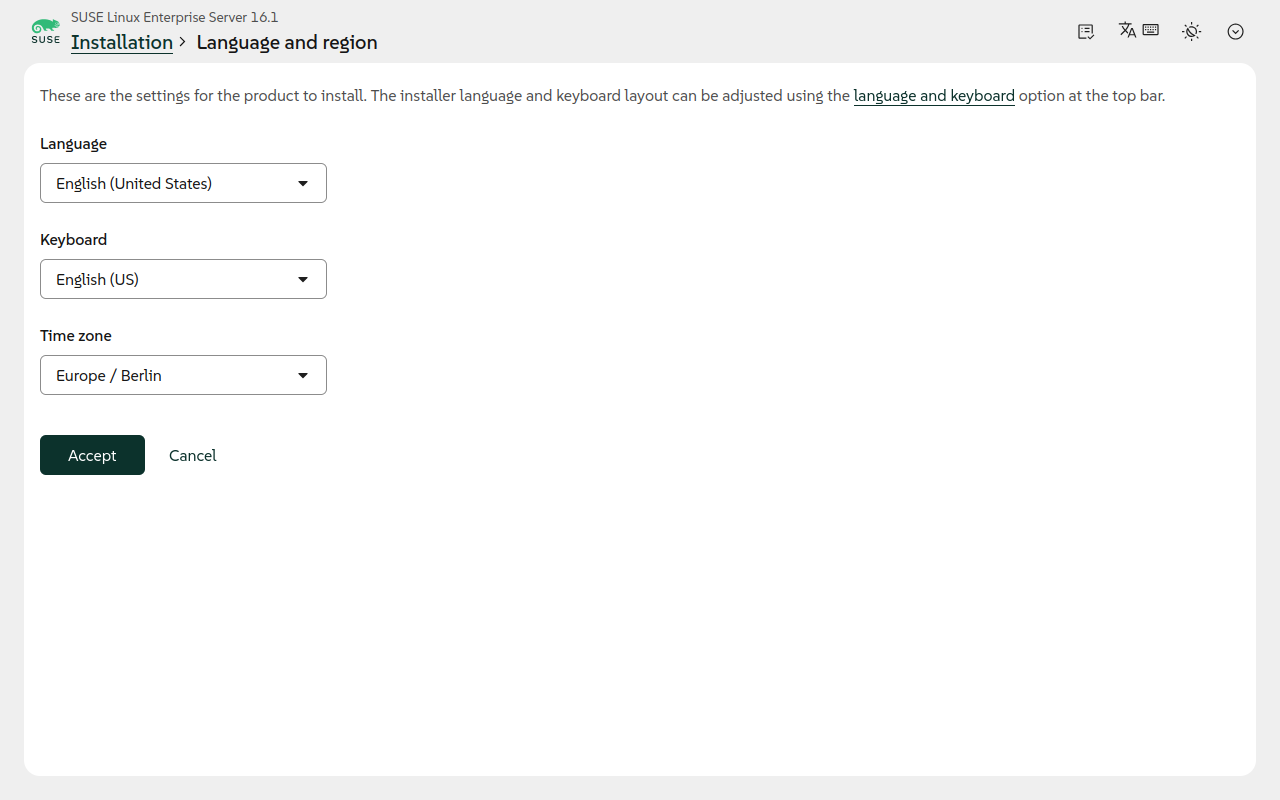
- Language
The language used for the system. It can be different from the language used during installation. Default value:
English (United States).- Keyboard
The keyboard used for the system. It can be different from the keyboard used during installation. Default value:
English (US).- Time Zone
The time zone of the system. The default value is determined automatically based on your network location.
Click to save your changes.
7 Configuring the network #
Manage network connections in the Network screen.
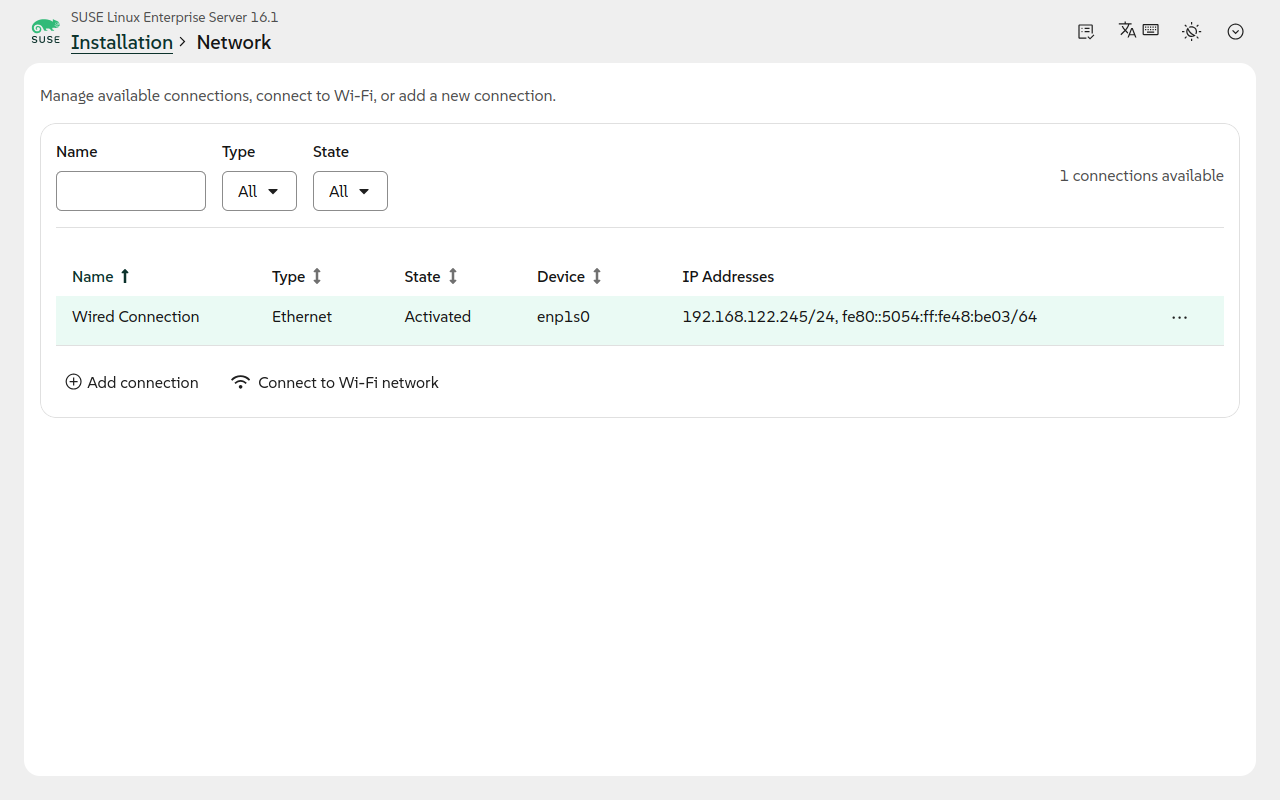
The overview shows the configured network connections in a table. Click the headers to sort the connections by name, type, state, device, or IP address. You can also filter by name (with wildcards), type and state.
7.1 Editing a connection #
By default, Agama configures a connection with DHCP. To edit a connection, click the three dots at the end or the line. The following options are available:
- Details
Shows the connection details, both the current status and the configuration.
- Edit connection
Edits the connection. For details, refer to Section 7.2, “Adding a new connection”.
- Disconnect
Temporarily disconnects the connection.
- Delete
Deletes the connection and frees the device for a different connection.
7.2 Adding a new connection #
Click to configure a new network connection. The following types are supported:
- Ethernet
- Bonding
- Bridge
- VLAN
- Name
Name of the connection. Meaningful names can use the destination (Internet), the connection type (Ethernet) or the device (eth0, if device binding is enabled). Free text, but it is recommended to avoid special characters.
- Device Binding
- None
The connection is available for all devices. After a reboot or relocatation the system, the device may change.
- Chosen by name
The connection is identified by its name in the system.
- Chosen by MAC
The connection is identified by its physical address.
One of None
- IPv4 settings
- Automatic
IP address and gateway are assigned from the network with DHCP.
- Manual
Static IP address, netmask and gateway. Enter an IPv4 address such as 192.168.1.1. or 192.168.1.1/24 The prefix is added automatically if omitted.
- Automatic + Manual
DHCP configuration from the network plus static addresses and gateway.
- IPv6 settings
- Automatic
IP address and gateway are assigned from the network with DHCP.
- Manual
Static IP address, netmask and gateway. Enter an IPv6 address such as 2001:db8::1 or 2001:db8::1/64. The prefix is added automatically if omitted.
- Automatic + Manual
DHCP configuration from the network plus static addresses and gateway.
- Use custom DNS servers
Enable and specify the addresses of the DNS servers.
- Use custom DNS search domains
Enable and specify the DNS search domain such as example.com.
8 Selecting software #
Add additional software to install, such as the KVM hypervisor or the Cockpit system management service.
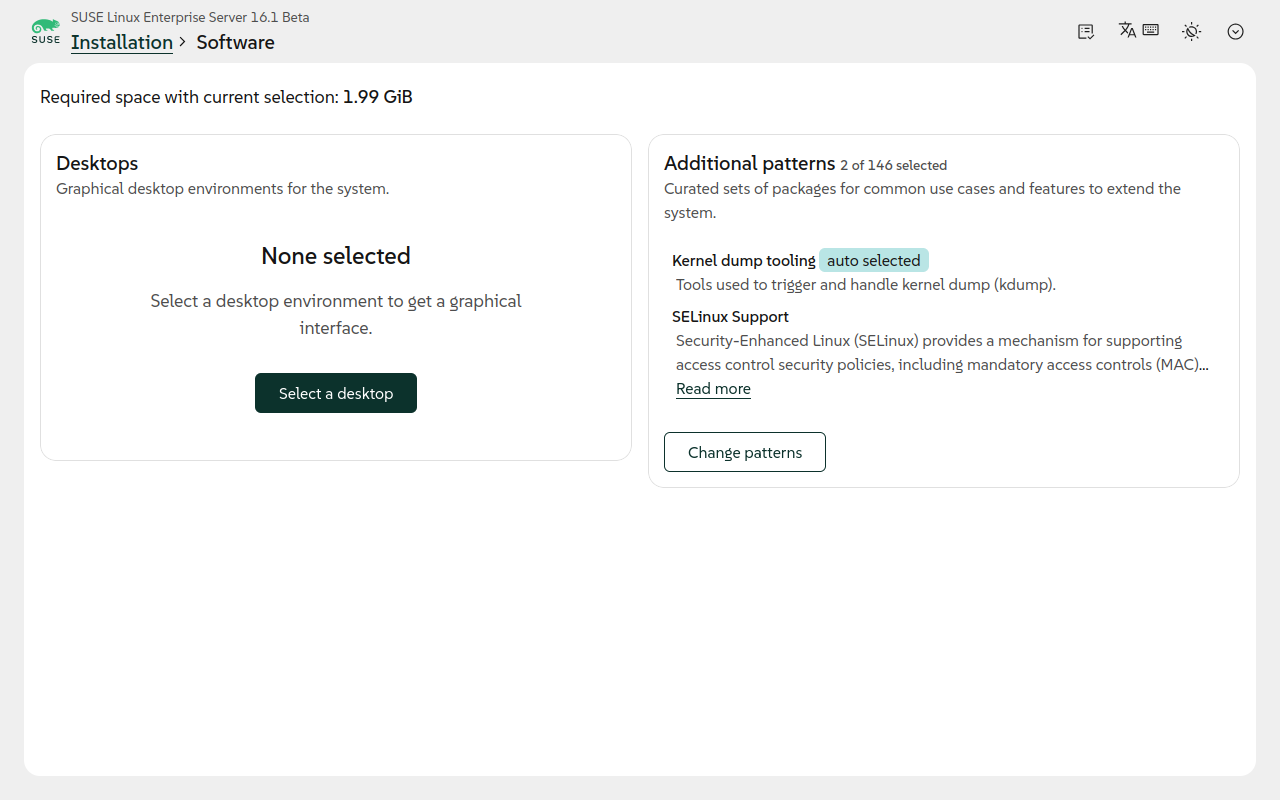

If you select the Package Hub add-on and see a popup, trust the GPG key for that repository.
8.1 Selecting a desktop #
Select a desktop environment to get a graphical interface. SUSE Linux Enterprise Server ships with the GNOME desktop.
8.2 Selecting additional software patterns #
Patterns are curated sets of packages for common use cases and features to extend the system.
The default installation includes Kernel dump tooling and
SELinux support. To remove them or install additional patterns, click
.
9 Configuring storage #
Select a storage device for the installation in the Storage screen.
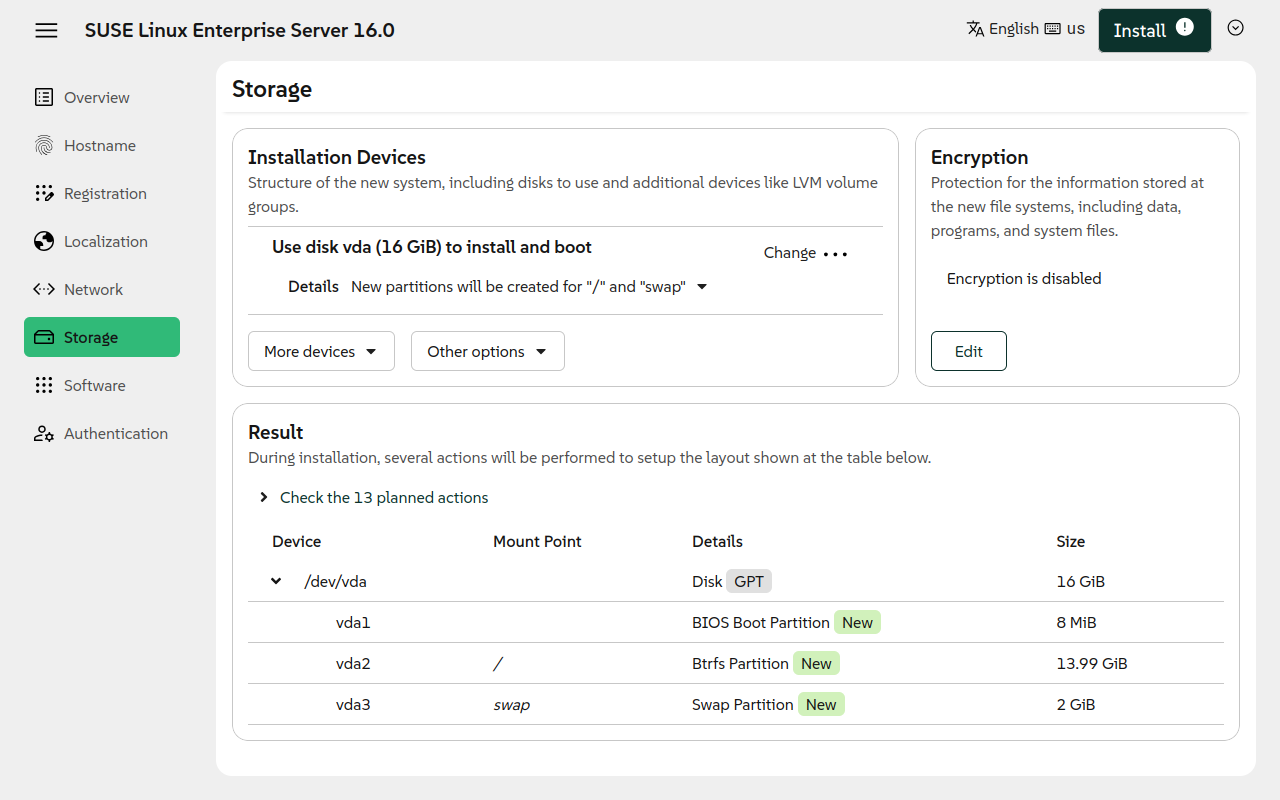
Currently installations on single discs or LVM are supported. To change the disk or use LVM, click the device name button in the section.
To detect an iSCSI disk, select the iSCSI initiator and click .
By default, the file systems are allocated as new partitions on the selected device. You can change this behavior in the drop-down list labeled in the section. The following space policies are available:
- Delete current content
All partitions are removed, and any data on the disks is lost.
- Shrink existing partitions
The data is kept, but Agama shrinks the current partitions as needed.
- Use available space
The data is kept. Only the space not assigned to any partition is used.
- Custom
Select what to do with each partition.
The current Agama user interface does not expose all the options supported by Agama's storage configuration. Complex configurations such as RAID can be applied through Agama profiles. For more information, refer to the article Automated Installation Using Agama.
If the selected storage already has a RAID configuration
—either from a previous installation or created by an Agama profile—the RAID
devices can be used for installation. In this case, you may see a message like
Use RAID 0 (60.00 GiB) to host LVM in the user interface. Please note in
this context, the term RAID 0 refers to the RAID device
(/dev/md/0), not the RAID level.
To edit individual partitions, expand the section by clicking . Optionally, you can configure Btrfs snapshots, boot options and enable full disk encryption (FDE).
10 Configuring authentication #
Before you continue, create an administrator account or configure authentication
for the root user.
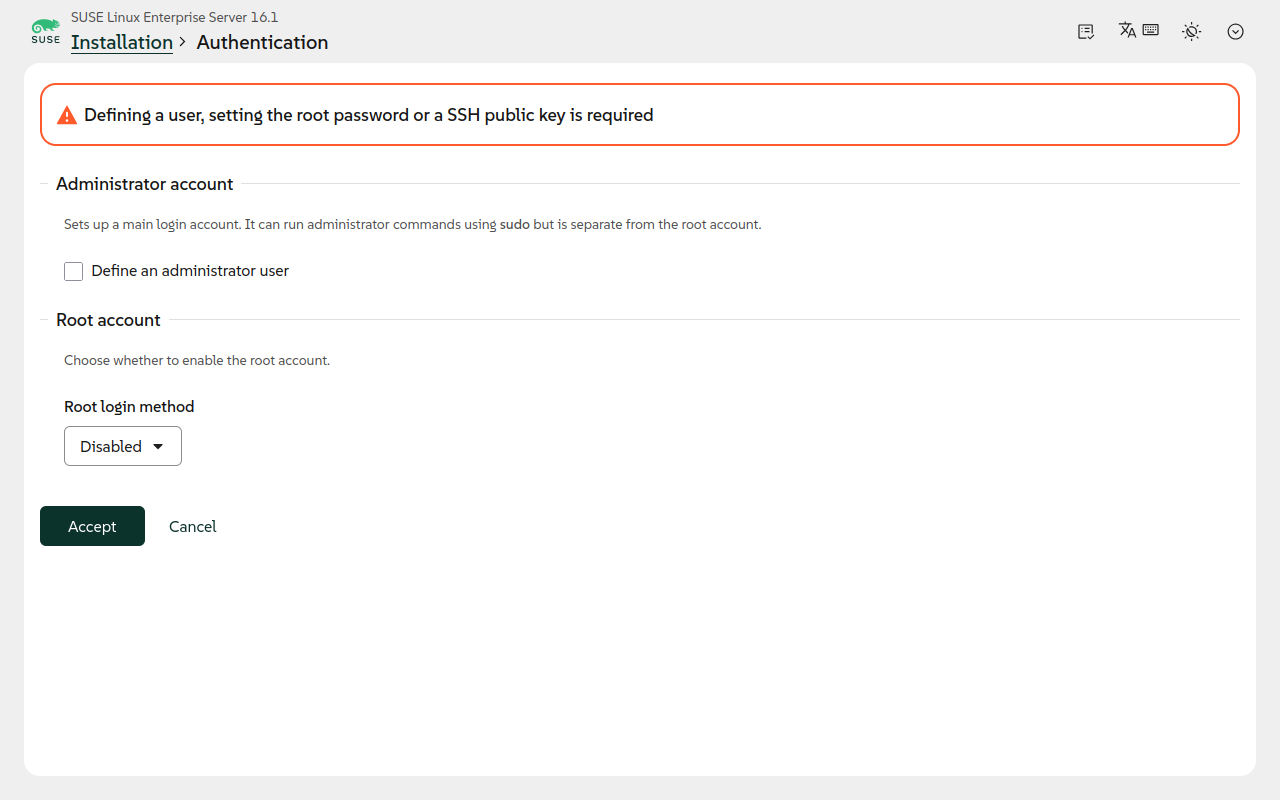
Before you can continue with the installation, you need to create an administrator account or
configure the authentication for the root user.
10.1 Creating an administrator account #
To improve security, root login is disabled in SUSE Linux Enterprise Server by default. Instead, an
administrator user is used as main login account. This administrator can run administrative
commands with sudo.
To create an administrator account, tick the checkbox and enter the necessary user details.
- Full name
Full name of the administrator user.
- Username
A user name. Only use lowercase letters (a-z), digits (0-9) and the characters
.(dot),-(hyphen) and_(underscore). Avoid other special characters and accented characters.- SSH Public Key (optional)
Paste one or more public SSH keys to enable passwordless login with SSH. To add a key, press Enter or →|. To remove a key, press <— or Del. To navigate between keys, use the ↑ and ↓ arrows.
root access
SSH access for root is disabled by default. Therefore it is strongly recommended to
create a system user. The first system user is granted sudo privileges automatically and
can also be used for accessing Cockpit.
10.2 Configuring the root user #
Configure the authentication methods for the root. You can use a secure
password, an SSH public key or both.
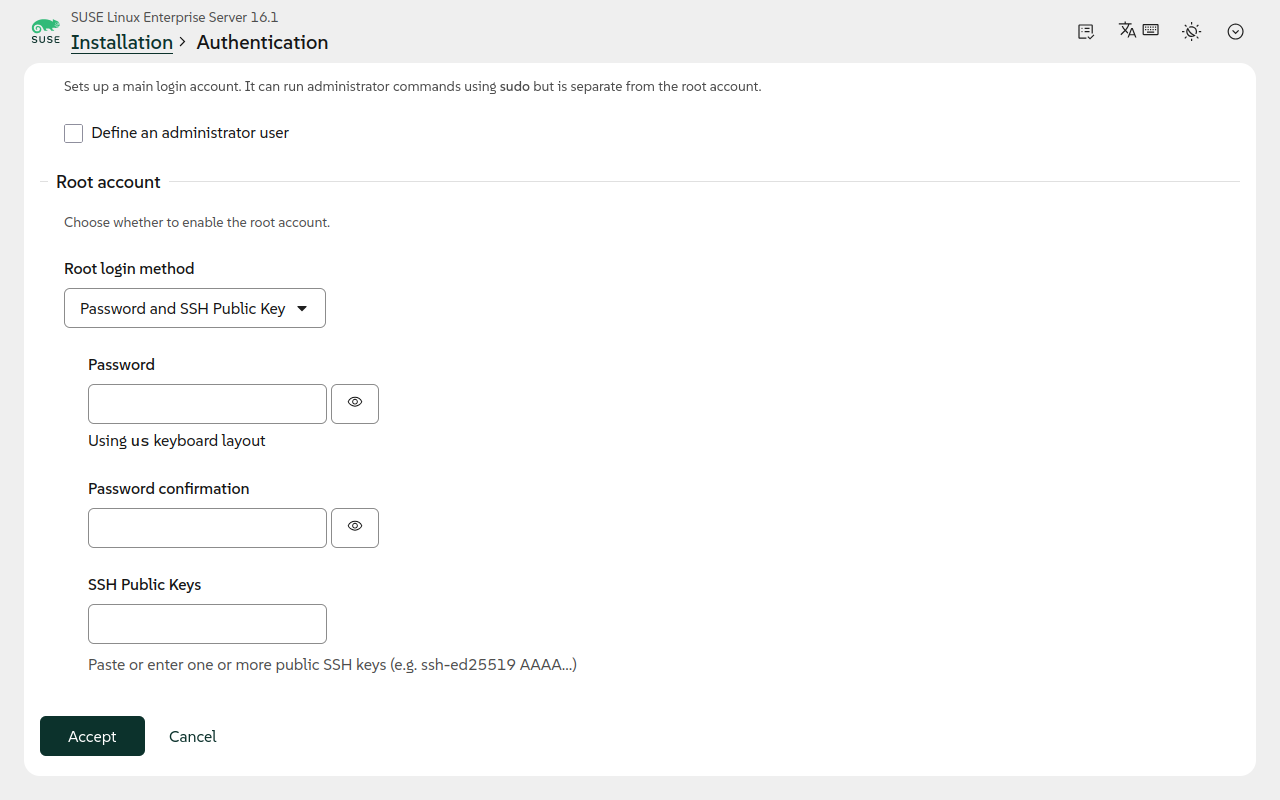
root authentication configuration #- Disabled
The
rootlogin is disabled and the administrator usessudofor all administrative tasks.- Password
The
rootcan log in with a password. Configure a strong password.- SSH Public Key
The
rootcan log in with an SSH public key. Paste one or more public SSH keys. To add a key, press Enter or →|. To remove a key, press <— or Del. To navigate between different keys, use the ↑ and ↓ arrows.- Password and SSH Public Key
The
rootuser can log in both with a password and SSH key(s). Configure both as described above.
11 Starting the installation #
Review the configuration in the installation overview.
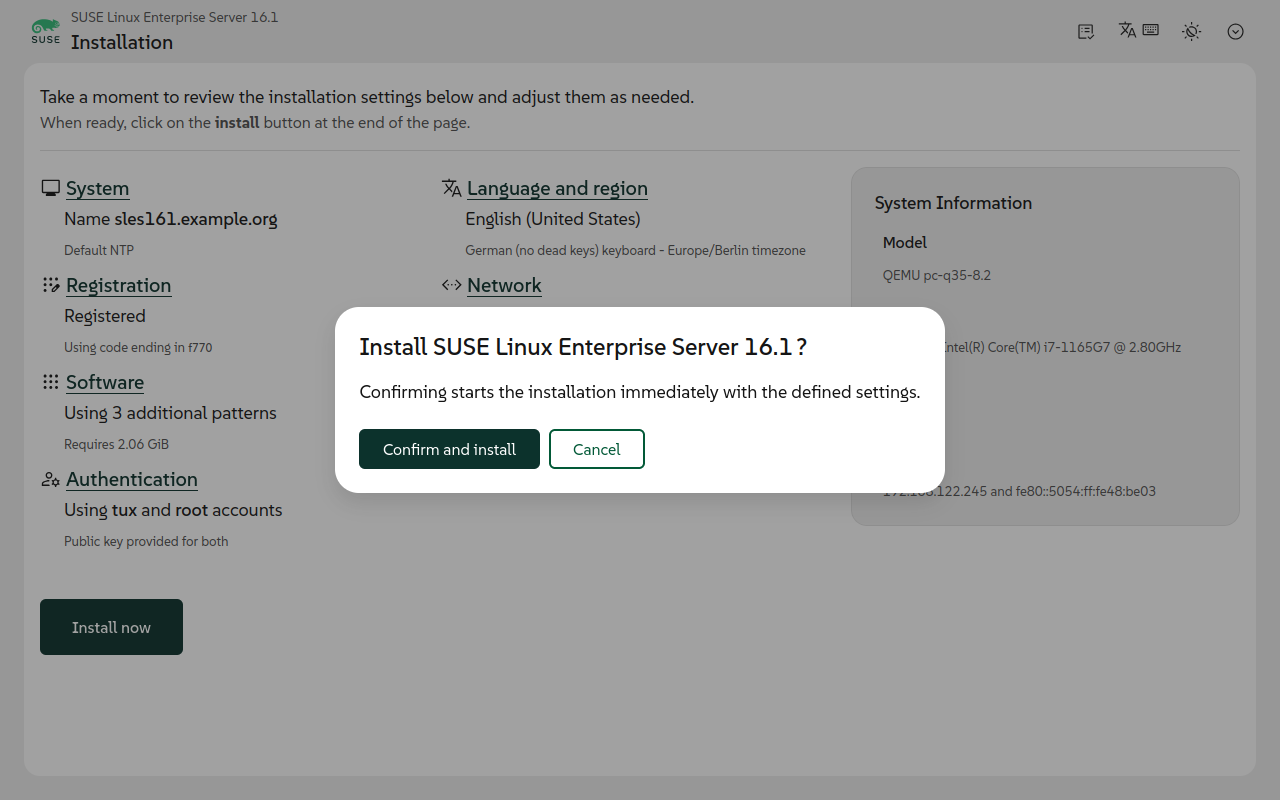
Click to start the installation.
Wait for the system installation to complete. The time of the installation depends on the system's performance, the installation size and your network connection speed.
You can use the arrow menu in the top right corner of the window to view the logs and system messages.
12 Rebooting the system #
When the installation completes, click .
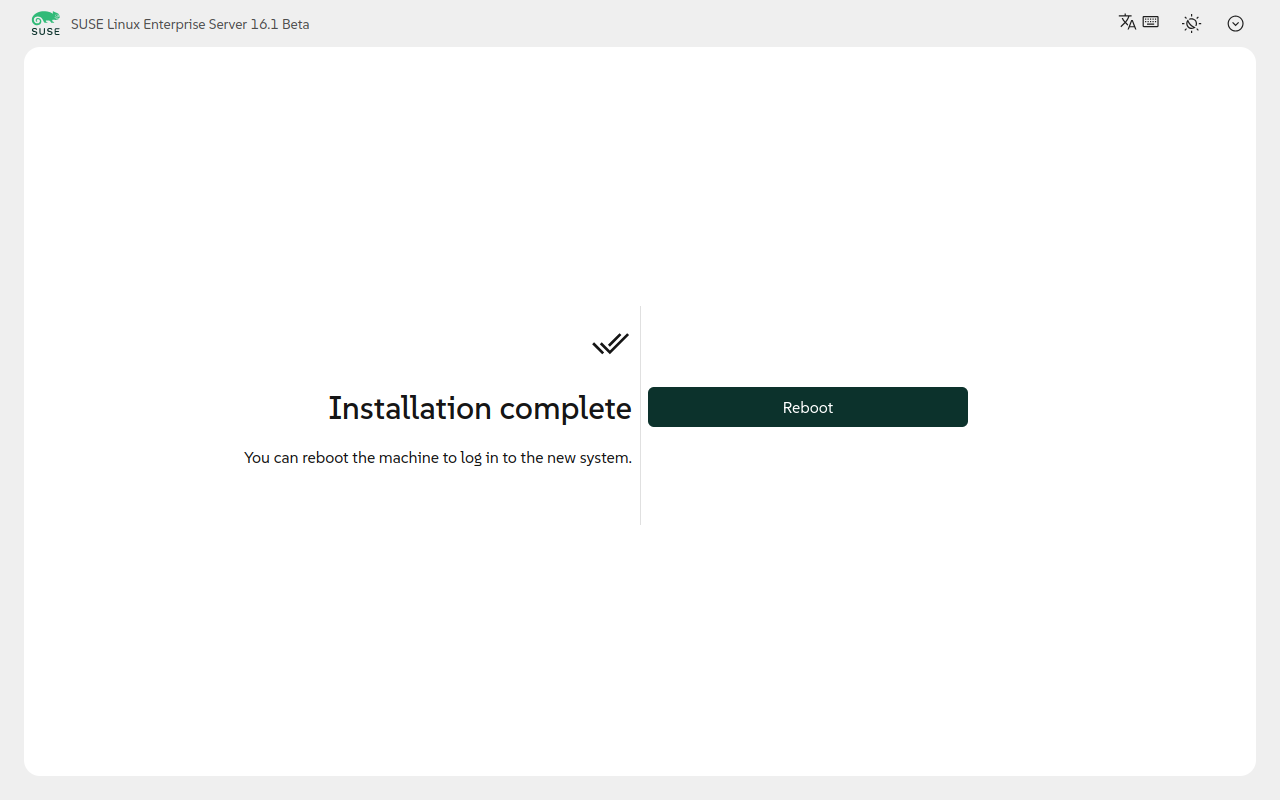
Once the installation is complete, select .
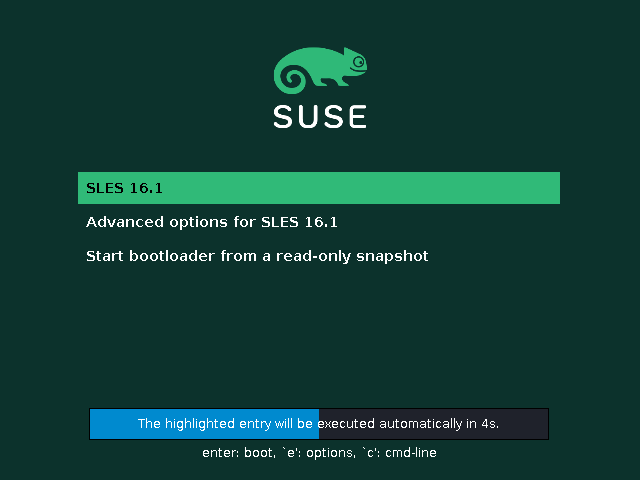
In the GRUB 2 boot menu, start the newly installed system.
13 Legal Notice #
Copyright© 2006– 2026 SUSE LLC and contributors. All rights reserved.
Permission is granted to copy, distribute and/or modify this document under the terms of the GNU Free Documentation License, Version 1.2 or (at your option) version 1.3; with the Invariant Section being this copyright notice and license. A copy of the license version 1.2 is included in the section entitled “GNU Free Documentation License”.
For SUSE trademarks, see https://www.suse.com/company/legal/. All other third-party trademarks are the property of their respective owners. Trademark symbols (®, ™ etc.) denote trademarks of SUSE and its affiliates. Asterisks (*) denote third-party trademarks.
All information found in this book has been compiled with utmost attention to detail. However, this does not guarantee complete accuracy. Neither SUSE LLC, its affiliates, the authors, nor the translators shall be held liable for possible errors or the consequences thereof.