You have to define alarms to monitor your cloud resources. An alarm definition specifies the metrics to be collected and the threshold at which an alarm is to be triggered for a cloud resource. If the specified threshold is reached or exceeded, the alarm is triggered and notifications can be sent to inform users. By default, an alarm definition is evaluated every minute.
To handle a large variety of monitoring requirements, you can create either simple alarm definitions that refer to one metrics only, or compound alarm definitions that combine multiple metrics and allow you to track and process more complex events.
Example for a simple alarm definition that checks whether the system-level load of the CPU exceeds a threshold of 90 percent:
cpu.system_perc{hostname=monasca} > 90Example for a simple alarm definition that checks the average time of the system-level load of the CPU over a period of 480 seconds. The alarm is triggered only if this average is greater than 95 percent:
avg(cpu.system_perc{hostname=monasca}, 120) > 95 times 4Example for a compound alarm definition that evaluates two metrics. The alarm is triggered if either the system-level load of the CPU exceeds a threshold of 90 percent, or if the disk space that is used by the specified service exceeds a threshold of 90 percent:
avg(cpu.system_perc{hostname=monasca}) > 90 OR
max(disk.space_used_perc{service=monitoring}) > 90
To create, edit, and delete alarms, use .
The elements that define an alarm are grouped into , , and . They are described in the following sections.
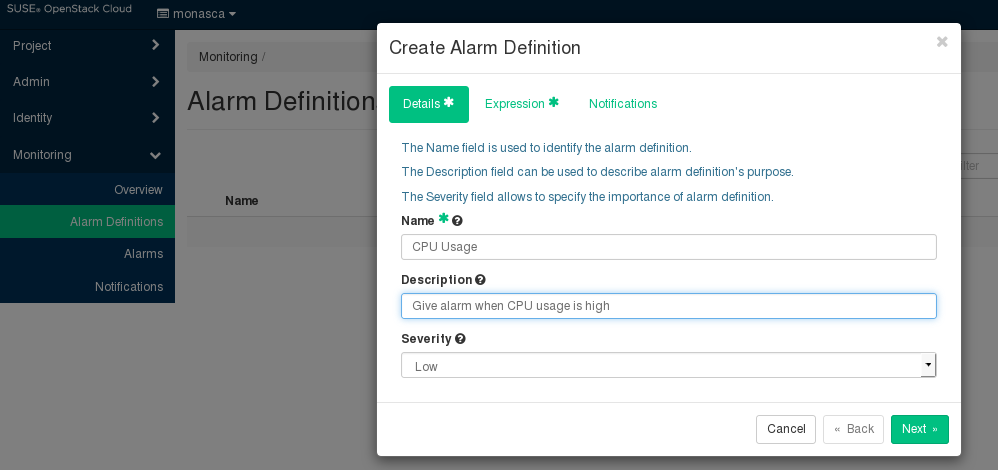
For an alarm definition, you specify the following details:
. Mandatory identifier of the alarm. The name must be unique within the project for which you define the alarm.
. Optional. A short description that depicts the purpose of the alarm.
. The following severities for an alarm are supported: (default), , , or .
The severity affects the status information on the page. If an alarm that is defined as is triggered, the corresponding resource is displayed in a red box. If an alarm that is defined as , , or is triggered, the corresponding resource is displayed in a yellow box only.
The severity level is subjective. Choose a level that is appropriate for prioritizing the alarms in your environment.
Expression
The expression defines how to evaluate a metrics. The expression syntax is based on a simple expressive grammar. For details, refer to the monasca API documentation.
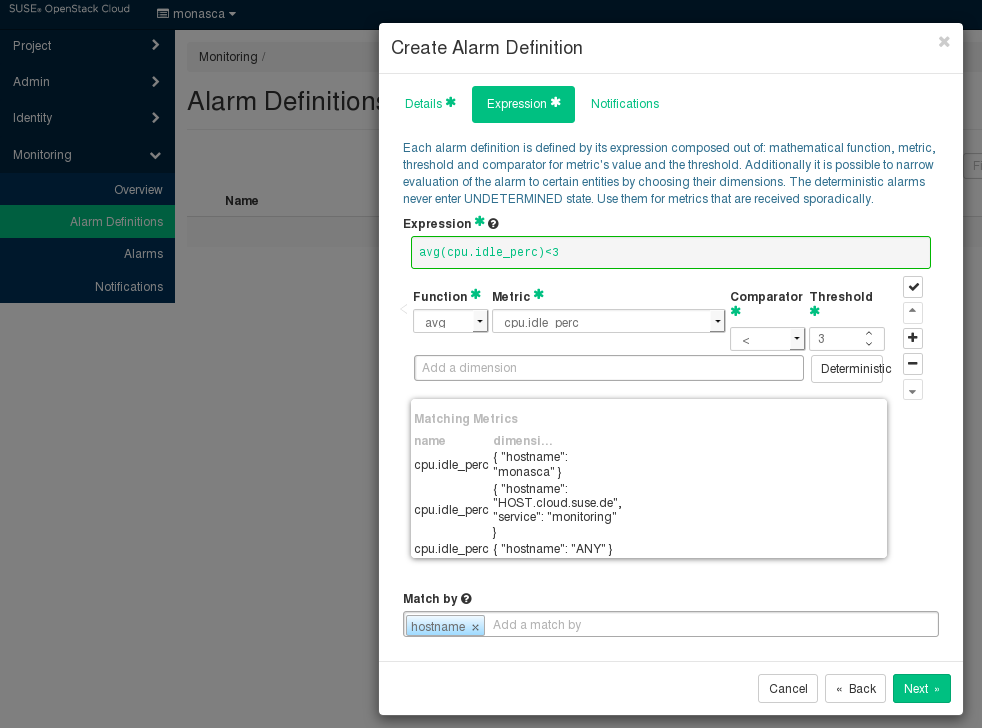 |
To define an alarm expression, proceed as follows:
Select the metrics to be evaluated.
Select a statistical function for the metrics:
minto monitor the minimum values,maxto monitor the maximum values,sumto monitor the sum of the values,countfor the monitored number, oravgfor the arithmetic average.Enter one or multiple dimensions in the field to further qualify the metrics.
Dimensions filter the data to be monitored. They narrow down the evaluation to specific entities. Each dimension consists of a key/value pair that allows for a flexible and concise description of the data to be monitored, for example, region, availability zone, service tier, or resource ID.
The dimensions available for the selected metrics are displayed in the section. Type the name of the key you want to associate with the metrics in the field. You are offered a select list for adding the required key/value pair.
Enter the threshold value at which an alarm is to be triggered, and combine it with a relational operator
<,>,<=, or>=.The unit of the threshold value is related to the metrics for which you define the threshold, for example, the unit is percentage for
cpu.idle_percor MB fordisk.total_used_space_mb.Switch on the option if you evaluate a metrics for which data is received only sporadically. The option should be switched on, for example, for all log metrics. This ensures that the alarm status is
OKand displayed as a green box on the page although metrics data has not yet been received.Do not switch on the option if you evaluate a metrics for which data is received regularly. This ensures that you instantly notice, for example, that a host machine is offline and that there is no metrics data for the agent to collect. On the page, the alarm status therefore changes from
OKtoUNDETERMINEDand is displayed as a gray box.Enter one or multiple dimensions in the field if you want these dimensions to be taken into account for triggering alarms.
Example: If you enter
hostnameas dimension, individual alarms will be created for each host machine on which metrics data is collected. The expression you have defined is not evaluated as a whole but individually for each host machine in your environment.If is set to a dimension, the number of alarms depends on the number of dimension values on which metrics data is received. An empty field results in exactly one alarm.
To enter a dimension, you can simply type the name of the dimension in the field. The dimensions you enter cannot be changed once the alarm definition is saved.
Build a compound alarm definition to combine multiple metrics in one expression. Using the logical operators
ANDorOR, any number of sub-expressions can be combined.Use the button to create a second expression, and choose either
ANDorORas to connect it to the one you have already defined. Proceed with the second expression as described in Step 1 to Step 6 above.The following options are provided for creating and organizing compound alarm definitions:
Create additional sub-expressions using the button.
Finish editing a sub-expression using the button.
Delete a sub-expression using the button.
Change the position of a sub-expression using the or button.
Note
You can also edit the expression syntax directly. For this purpose, save your alarm definition and update it using the option.
By default, an alarm definition is evaluated every minute. When updating the alarm definition, you can change this interval. For syntax details, refer to the monasca API documentation on Alarm Definition Expressions.
You can enable notifications for an alarm definition. As soon as an alarm is triggered, the enabled notifications will be sent.
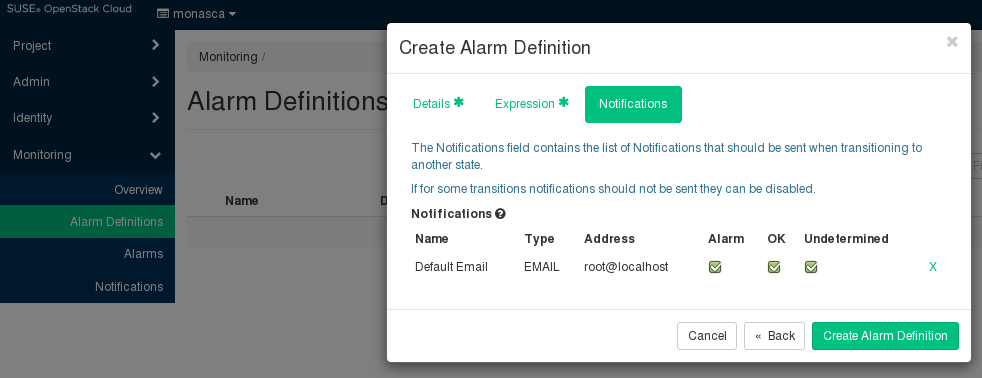 |
The tab allows you to select the notifications from the ones that are predefined in your environment. For a selected notification, you specify whether you want to send it for a status transition to , , and/or .