5 Compute #
The OpenStack Compute service allows you to control an Infrastructure-as-a-Service (IaaS) cloud computing platform. It gives you control over instances and networks, and allows you to manage access to the cloud through users and projects.
Compute does not include virtualization software. Instead, it defines drivers that interact with underlying virtualization mechanisms that run on your host operating system, and exposes functionality over a web-based API.
5.1 System architecture #
OpenStack Compute contains several main components.
The cloud controller represents the global state and interacts with the other components. The
API serveracts as the web services front end for the cloud controller. Thecompute controllerprovides compute server resources and usually also contains the Compute service.The
object storeis an optional component that provides storage services; you can also use OpenStack Object Storage instead.An
auth managerprovides authentication and authorization services when used with the Compute system; you can also use OpenStack Identity as a separate authentication service instead.A
volume controllerprovides fast and permanent block-level storage for the compute servers.The
network controllerprovides virtual networks to enable compute servers to interact with each other and with the public network. You can also use OpenStack Networking instead.The
scheduleris used to select the most suitable compute controller to host an instance.
Compute uses a messaging-based, shared nothing architecture. All
major components exist on multiple servers, including the compute,
volume, and network controllers, and the Object Storage or Image service.
The state of the entire system is stored in a database. The cloud
controller communicates with the internal object store using HTTP, but
it communicates with the scheduler, network controller, and volume
controller using Advanced Message Queuing Protocol (AMQP). To avoid
blocking a component while waiting for a response, Compute uses
asynchronous calls, with a callback that is triggered when a response is
received.
5.1.1 Hypervisors #
Compute controls hypervisors through an API server. Selecting the best hypervisor to use can be difficult, and you must take budget, resource constraints, supported features, and required technical specifications into account. However, the majority of OpenStack development is done on systems using KVM and Xen-based hypervisors. For a detailed list of features and support across different hypervisors, see the Feature Support Matrix.
You can also orchestrate clouds using multiple hypervisors in different availability zones. Compute supports the following hypervisors:
For more information about hypervisors, see the Hypervisors section in the OpenStack Configuration Reference.
5.1.2 Projects, users, and roles #
The Compute system is designed to be used by different consumers in the form of projects on a shared system, and role-based access assignments. Roles control the actions that a user is allowed to perform.
Projects are isolated resource containers that form the principal
organizational structure within the Compute service. They consist of an
individual VLAN, and volumes, instances, images, keys, and users. A user
can specify the project by appending project_id to their access key.
If no project is specified in the API request, Compute attempts to use a
project with the same ID as the user.
For projects, you can use quota controls to limit the:
Number of volumes that can be launched.
Number of processor cores and the amount of RAM that can be allocated.
Floating IP addresses assigned to any instance when it launches. This allows instances to have the same publicly accessible IP addresses.
Fixed IP addresses assigned to the same instance when it launches. This allows instances to have the same publicly or privately accessible IP addresses.
Roles control the actions a user is allowed to perform. By default, most
actions do not require a particular role, but you can configure them by
editing the policy.json file for user roles. For example, a rule can
be defined so that a user must have the admin role in order to be
able to allocate a public IP address.
A project limits users' access to particular images. Each user is assigned a user name and password. Keypairs granting access to an instance are enabled for each user, but quotas are set, so that each project can control resource consumption across available hardware resources.
Earlier versions of OpenStack used the term tenant instead of
project. Because of this legacy terminology, some command-line tools
use --tenant_id where you would normally expect to enter a
project ID.
5.1.3 Block storage #
OpenStack provides two classes of block storage: ephemeral storage and persistent volume.
Ephemeral storage
Ephemeral storage includes a root ephemeral volume and an additional ephemeral volume.
The root disk is associated with an instance, and exists only for the life of this very instance. Generally, it is used to store an instance's root file system, persists across the guest operating system reboots, and is removed on an instance deletion. The amount of the root ephemeral volume is defined by the flavor of an instance.
In addition to the ephemeral root volume, all default types of flavors,
except m1.tiny, which is the smallest one, provide an additional
ephemeral block device sized between 20 and 160 GB (a configurable value
to suit an environment). It is represented as a raw block device with no
partition table or file system. A cloud-aware operating system can
discover, format, and mount such a storage device. OpenStack Compute
defines the default file system for different operating systems as Ext4
for Linux distributions, VFAT for non-Linux and non-Windows operating
systems, and NTFS for Windows. However, it is possible to specify any
other filesystem type by using virt_mkfs or
default_ephemeral_format configuration options.
For example, the cloud-init package included into an Ubuntu's stock
cloud image, by default, formats this space as an Ext4 file system
and mounts it on /mnt. This is a cloud-init feature, and is not
an OpenStack mechanism. OpenStack only provisions the raw storage.
Persistent volume
A persistent volume is represented by a persistent virtualized block device independent of any particular instance, and provided by OpenStack Block Storage.
Only a single configured instance can access a persistent volume. Multiple instances cannot access a persistent volume. This type of configuration requires a traditional network file system to allow multiple instances accessing the persistent volume. It also requires a traditional network file system like NFS, CIFS, or a cluster file system such as GlusterFS. These systems can be built within an OpenStack cluster, or provisioned outside of it, but OpenStack software does not provide these features.
You can configure a persistent volume as bootable and use it to provide a persistent virtual instance similar to the traditional non-cloud-based virtualization system. It is still possible for the resulting instance to keep ephemeral storage, depending on the flavor selected. In this case, the root file system can be on the persistent volume, and its state is maintained, even if the instance is shut down. For more information about this type of configuration, see Introduction to the Block Storage service in the OpenStack Configuration Reference.
A persistent volume does not provide concurrent access from multiple instances. That type of configuration requires a traditional network file system like NFS, or CIFS, or a cluster file system such as GlusterFS. These systems can be built within an OpenStack cluster, or provisioned outside of it, but OpenStack software does not provide these features.
5.1.4 EC2 compatibility API #
In addition to the native compute API, OpenStack provides an EC2-compatible API. This API allows EC2 legacy workflows built for EC2 to work with OpenStack.
Nova in tree EC2-compatible API is deprecated. The ec2-api project is working to implement the EC2 API.
You can use numerous third-party tools and language-specific SDKs to interact with OpenStack clouds. You can use both native and compatibility APIs. Some of the more popular third-party tools are:
- Euca2ools
A popular open source command-line tool for interacting with the EC2 API. This is convenient for multi-cloud environments where EC2 is the common API, or for transitioning from EC2-based clouds to OpenStack. For more information, see the Eucalyptus Documentation.
- Hybridfox
A Firefox browser add-on that provides a graphical interface to many popular public and private cloud technologies, including OpenStack. For more information, see the hybridfox site.
- boto
Python library for interacting with Amazon Web Services. You can use this library to access OpenStack through the EC2 compatibility API. For more information, see the boto project page on GitHub.
- fog
A Ruby cloud services library. It provides methods to interact with a large number of cloud and virtualization platforms, including OpenStack. For more information, see the fog site.
- php-opencloud
A PHP SDK designed to work with most OpenStack-based cloud deployments, as well as Rackspace public cloud. For more information, see the php-opencloud site.
5.1.5 Building blocks #
In OpenStack the base operating system is usually copied from an image stored in the OpenStack Image service. This is the most common case and results in an ephemeral instance that starts from a known template state and loses all accumulated states on virtual machine deletion. It is also possible to put an operating system on a persistent volume in the OpenStack Block Storage volume system. This gives a more traditional persistent system that accumulates states which are preserved on the OpenStack Block Storage volume across the deletion and re-creation of the virtual machine. To get a list of available images on your system, run:
$ openstack image list
+--------------------------------------+-----------------------------+--------+
| ID                                   | Name                        | Status |
+--------------------------------------+-----------------------------+--------+
| aee1d242-730f-431f-88c1-87630c0f07ba | Ubuntu 14.04 cloudimg amd64 | active |
| 0b27baa1-0ca6-49a7-b3f4-48388e440245 | Ubuntu 14.10 cloudimg amd64 | active |
| df8d56fc-9cea-4dfd-a8d3-28764de3cb08 | jenkins                     | active |
+--------------------------------------+-----------------------------+--------+
The displayed image attributes are:
-
ID Automatically generated UUID of the image
-
Name Free form, human-readable name for image
-
Status The status of the image. Images marked
ACTIVEare available for use.-
Server For images that are created as snapshots of running instances, this is the UUID of the instance the snapshot derives from. For uploaded images, this field is blank.
Virtual hardware templates are called flavors. The default
installation provides five flavors. By default, these are configurable
by admin users, however that behavior can be changed by redefining the
access controls for compute_extension:flavormanage in
/etc/nova/policy.json on the compute-api server.
For a list of flavors that are available on your system:
$ openstack flavor list
+-----+-----------+-------+------+-----------+-------+-----------+
| ID  | Name      |   RAM | Disk | Ephemeral | VCPUs | Is_Public |
+-----+-----------+-------+------+-----------+-------+-----------+
| 1   | m1.tiny   |   512 |    1 |         0 |     1 | True      |
| 2   | m1.small  |  2048 |   20 |         0 |     1 | True      |
| 3   | m1.medium |  4096 |   40 |         0 |     2 | True      |
| 4   | m1.large  |  8192 |   80 |         0 |     4 | True      |
| 5   | m1.xlarge | 16384 |  160 |         0 |     8 | True      |
+-----+-----------+-------+------+-----------+-------+-----------+
5.1.6 Compute service architecture #
These basic categories describe the service architecture and information about the cloud controller.
API server
At the heart of the cloud framework is an API server, which makes command and control of the hypervisor, storage, and networking programmatically available to users.
The API endpoints are basic HTTP web services which handle authentication, authorization, and basic command and control functions using various API interfaces under the Amazon, Rackspace, and related models. This enables API compatibility with multiple existing tool sets created for interaction with offerings from other vendors. This broad compatibility prevents vendor lock-in.
Message queue
A messaging queue brokers the interaction between compute nodes (processing), the networking controllers (software which controls network infrastructure), API endpoints, the scheduler (determines which physical hardware to allocate to a virtual resource), and similar components. Communication to and from the cloud controller is handled by HTTP requests through multiple API endpoints.
A typical message passing event begins with the API server receiving a request from a user. The API server authenticates the user and ensures that they are permitted to issue the subject command. The availability of objects implicated in the request is evaluated and, if available, the request is routed to the queuing engine for the relevant workers. Workers continually listen to the queue based on their role, and occasionally their type host name. When an applicable work request arrives on the queue, the worker takes assignment of the task and begins executing it. Upon completion, a response is dispatched to the queue which is received by the API server and relayed to the originating user. Database entries are queried, added, or removed as necessary during the process.
Compute worker
Compute workers manage computing instances on host machines. The API dispatches commands to compute workers to complete these tasks:
Run instances
Delete instances (Terminate instances)
Reboot instances
Attach volumes
Detach volumes
Get console output
Network Controller
The Network Controller manages the networking resources on host machines. The API server dispatches commands through the message queue, which are subsequently processed by Network Controllers. Specific operations include:
Allocating fixed IP addresses
Configuring VLANs for projects
Configuring networks for compute nodes
5.2 Images and instances #
Virtual machine images contain a virtual disk that holds a bootable operating system on it. Disk images provide templates for virtual machine file systems. The Image service controls image storage and management.
Instances are the individual virtual machines that run on physical compute nodes inside the cloud. Users can launch any number of instances from the same image. Each launched instance runs from a copy of the base image. Any changes made to the instance do not affect the base image. Snapshots capture the state of an instances running disk. Users can create a snapshot, and build a new image based on these snapshots. The Compute service controls instance, image, and snapshot storage and management.
When you launch an instance, you must choose a flavor, which
represents a set of virtual resources. Flavors define virtual
CPU number, RAM amount available, and ephemeral disks size. Users
must select from the set of available flavors
defined on their cloud. OpenStack provides a number of predefined
flavors that you can edit or add to.
For more information about creating and troubleshooting images, see the OpenStack Virtual Machine Image Guide.
For more information about image configuration options, see the Image services section of the OpenStack Configuration Reference.
For more information about flavors, see Section 5.4.3, “Flavors”.
You can add and remove additional resources from running instances, such
as persistent volume storage, or public IP addresses. The example used
in this chapter is of a typical virtual system within an OpenStack
cloud. It uses the cinder-volume service, which provides persistent
block storage, instead of the ephemeral storage provided by the selected
instance flavor.
This diagram shows the system state prior to launching an instance. The
image store has a number of predefined images, supported by the Image
service. Inside the cloud, a compute node contains the
available vCPU, memory, and local disk resources. Additionally, the
cinder-volume service stores predefined volumes.
The base image state with no running instances

5.2.1 Instance Launch #
To launch an instance, select an image, flavor, and any optional
attributes. The selected flavor provides a root volume, labeled vda
in this diagram, and additional ephemeral storage, labeled vdb. In
this example, the cinder-volume store is mapped to the third virtual
disk on this instance, vdc.
Instance creation from an image
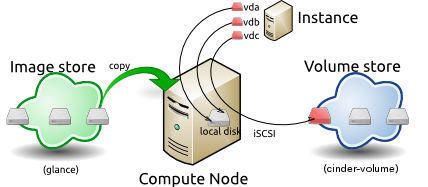
The Image service copies the base image from the image store to the
local disk. The local disk is the first disk that the instance
accesses, which is the root volume labeled vda. Smaller
instances start faster. Less data needs to be copied across
the network.
The new empty ephemeral disk is also created, labeled vdb.
This disk is deleted when you delete the instance.
The compute node connects to the attached cinder-volume using iSCSI. The
cinder-volume is mapped to the third disk, labeled vdc in this
diagram. After the compute node provisions the vCPU and memory
resources, the instance boots up from root volume vda. The instance
runs and changes data on the disks (highlighted in red on the diagram).
If the volume store is located on a separate network, the
my_block_storage_ip option specified in the storage node
configuration file directs image traffic to the compute node.
Some details in this example scenario might be different in your
environment. For example, you might use a different type of back-end
storage, or different network protocols. One common variant is that
the ephemeral storage used for volumes vda and vdb could be
backed by network storage rather than a local disk.
When you delete an instance, the state is reclaimed with the exception of the persistent volume. The ephemeral storage, whether encrypted or not, is purged. Memory and vCPU resources are released. The image remains unchanged throughout this process.

5.2.2 Image properties and property protection #
An image property is a key and value pair that the administrator or the image owner attaches to an OpenStack Image service image, as follows:
The administrator defines core properties, such as the image name.
The administrator and the image owner can define additional properties, such as licensing and billing information.
The administrator can configure any property as protected, which limits which policies or user roles can perform CRUD operations on that property. Protected properties are generally additional properties to which only administrators have access.
For unprotected image properties, the administrator can manage core properties and the image owner can manage additional properties.
To configure property protection
To configure property protection, edit the policy.json file. This file
can also be used to set policies for Image service actions.
Define roles or policies in the
policy.jsonfile:{ "context_is_admin": "role:admin", "default": "", "add_image": "", "delete_image": "", "get_image": "", "get_images": "", "modify_image": "", "publicize_image": "role:admin", "copy_from": "", "download_image": "", "upload_image": "", "delete_image_location": "", "get_image_location": "", "set_image_location": "", "add_member": "", "delete_member": "", "get_member": "", "get_members": "", "modify_member": "", "manage_image_cache": "role:admin", "get_task": "", "get_tasks": "", "add_task": "", "modify_task": "", "deactivate": "", "reactivate": "", "get_metadef_namespace": "", "get_metadef_namespaces":"", "modify_metadef_namespace":"", "add_metadef_namespace":"", "delete_metadef_namespace":"", "get_metadef_object":"", "get_metadef_objects":"", "modify_metadef_object":"", "add_metadef_object":"", "list_metadef_resource_types":"", "get_metadef_resource_type":"", "add_metadef_resource_type_association":"", "get_metadef_property":"", "get_metadef_properties":"", "modify_metadef_property":"", "add_metadef_property":"", "get_metadef_tag":"", "get_metadef_tags":"", "modify_metadef_tag":"", "add_metadef_tag":"", "add_metadef_tags":"" }For each parameter, use
"rule:restricted"to restrict access to all users or"role:admin"to limit access to administrator roles. For example:"download_image": "upload_image":
Define which roles or policies can manage which properties in a property protections configuration file. For example:
[x_none_read]
create = context_is_admin
read = !
update = !
delete = !

[x_none_update]
create = context_is_admin
read = context_is_admin
update = !
delete = context_is_admin

[x_none_delete]
create = context_is_admin
read = context_is_admin
update = context_is_admin
delete = !
A value of
@allows the corresponding operation for a property.A value of
!disallows the corresponding operation for a property.
In the
glance-api.conffile, define the location of a property protections configuration file.property_protection_file = {file_name}This file contains the rules for property protections and the roles and policies associated with it.
By default, property protections are not enforced.
If you specify a file name value and the file is not found, the
glance-apiservice does not start.To view a sample configuration file, see glance-api.conf.
Optionally, in the
glance-api.conffile, specify whether roles or policies are used in the property protections configuration fileproperty_protection_rule_format = roles
The default is
roles.To view a sample configuration file, see glance-api.conf.
5.2.3 Image download: how it works #
Prior to starting a virtual machine, transfer the virtual machine image to the compute node from the Image service. How this works can change depending on the settings chosen for the compute node and the Image service.
Typically, the Compute service will use the image identifier passed to it by the scheduler service and request the image from the Image API. Though images are not stored in glance—rather in a back end, which could be Object Storage, a filesystem or any other supported method—the connection is made from the compute node to the Image service and the image is transferred over this connection. The Image service streams the image from the back end to the compute node.
It is possible to set up the Object Storage node on a separate network,
and still allow image traffic to flow between the compute and object
storage nodes. Configure the my_block_storage_ip option in the
storage node configuration file to allow block storage traffic to reach
the compute node.
Certain back ends support a more direct method, where on request the
Image service will return a URL that links directly to the back-end store.
You can download the image using this approach. Currently, the only store
to support the direct download approach is the filesystem store.
Configured the approach using the filesystems option in
the image_file_url section of the nova.conf file on
compute nodes.
Compute nodes also implement caching of images, meaning that if an image has been used before it won't necessarily be downloaded every time. Information on the configuration options for caching on compute nodes can be found in the Configuration Reference.
5.2.4 Instance building blocks #
In OpenStack, the base operating system is usually copied from an image stored in the OpenStack Image service. This results in an ephemeral instance that starts from a known template state and loses all accumulated states on shutdown.
You can also put an operating system on a persistent volume in Compute or the Block Storage volume system. This gives a more traditional, persistent system that accumulates states that are preserved across restarts. To get a list of available images on your system, run:
$ openstack image list
+--------------------------------------+-----------------------------+--------+
| ID                                   | Name                        | Status |
+--------------------------------------+-----------------------------+--------+
| aee1d242-730f-431f-88c1-87630c0f07ba | Ubuntu 14.04 cloudimg amd64 | active |
+--------------------------------------+-----------------------------+--------+
| 0b27baa1-0ca6-49a7-b3f4-48388e440245 | Ubuntu 14.10 cloudimg amd64 | active |
+--------------------------------------+-----------------------------+--------+
| df8d56fc-9cea-4dfd-a8d3-28764de3cb08 | jenkins                     | active |
+--------------------------------------+-----------------------------+--------+
The displayed image attributes are:
-
ID Automatically generated UUID of the image.
-
Name Free form, human-readable name for the image.
-
Status The status of the image. Images marked
ACTIVEare available for use.-
Server For images that are created as snapshots of running instances, this is the UUID of the instance the snapshot derives from. For uploaded images, this field is blank.
Virtual hardware templates are called flavors. The default
installation provides five predefined flavors.
For a list of flavors that are available on your system, run:
$ openstack flavor list
+-----+-----------+-------+------+-----------+-------+-----------+
| ID  | Name      |   RAM | Disk | Ephemeral | VCPUs | Is_Public |
+-----+-----------+-------+------+-----------+-------+-----------+
| 1   | m1.tiny   |   512 |    1 |         0 |     1 | True      |
| 2   | m1.small  |  2048 |   20 |         0 |     1 | True      |
| 3   | m1.medium |  4096 |   40 |         0 |     2 | True      |
| 4   | m1.large  |  8192 |   80 |         0 |     4 | True      |
| 5   | m1.xlarge | 16384 |  160 |         0 |     8 | True      |
+-----+-----------+-------+------+-----------+-------+-----------+
By default, administrative users can configure the flavors. You can
change this behavior by redefining the access controls for
compute_extension:flavormanage in /etc/nova/policy.json on the
compute-api server.
5.2.5 Instance management tools #
OpenStack provides command-line, web interface, and API-based instance management tools. Third-party management tools are also available, using either the native API or the provided EC2-compatible API.
The OpenStack python-novaclient package provides a basic command-line
utility, which uses the nova command. This is available as a native
package for most Linux distributions, or you can install the latest
version using the pip python package installer:
# pip install python-novaclient
For more information about python-novaclient and other command-line tools, see the OpenStack End User Guide.
5.2.6 Control where instances run #
The Scheduling section of OpenStack Configuration Reference provides detailed information on controlling where your instances run, including ensuring a set of instances run on different compute nodes for service resiliency or on the same node for high performance inter-instance communications.
Administrative users can specify which compute node their instances
run on. To do this, specify the --availability-zone
AVAILABILITY_ZONE:COMPUTE_HOST parameter.
5.2.7 Launch instances with UEFI #
Unified Extensible Firmware Interface (UEFI) is a standard firmware designed to replace legacy BIOS. There is a slow but steady trend for operating systems to move to the UEFI format and, in some cases, make it their only format.
To configure UEFI environment
To successfully launch an instance from an UEFI image in QEMU/KVM environment, the administrator has to install the following packages on compute node:
OVMF, a port of Intel's tianocore firmware to QEMU virtual machine.
libvirt, which has been supporting UEFI boot since version 1.2.9.
Because default UEFI loader path is /usr/share/OVMF/OVMF_CODE.fd, the
administrator must create one link to this location after UEFI package
is installed.
To upload UEFI images
To launch instances from a UEFI image, the administrator first has to
upload one UEFI image. To do so, hw_firmware_type property must
be set to uefi when the image is created. For example:
$ openstack image create --container-format bare --disk-format qcow2 \
  --property hw_firmware_type=uefi --file /tmp/cloud-uefi.qcow --name uefi
After that, you can launch instances from this UEFI image.
5.3 Networking with nova-network #
Understanding the networking configuration options helps you design the best configuration for your Compute instances.
You can choose to either install and configure nova-network or use the
OpenStack Networking service (neutron). This section contains a brief
overview of nova-network. For more information about OpenStack
Networking, see Chapter 9, Networking.
5.3.1 Networking concepts #
Compute assigns a private IP address to each VM instance. Compute makes a distinction between fixed IPs and floating IP. Fixed IPs are IP addresses that are assigned to an instance on creation and stay the same until the instance is explicitly terminated. Floating IPs are addresses that can be dynamically associated with an instance. A floating IP address can be disassociated and associated with another instance at any time. A user can reserve a floating IP for their project.
Currently, Compute with nova-network only supports Linux bridge
networking that allows virtual interfaces to connect to the outside
network through the physical interface.
The network controller with nova-network provides virtual networks to
enable compute servers to interact with each other and with the public
network. Compute with nova-network supports the following network modes,
which are implemented as Network Manager types:
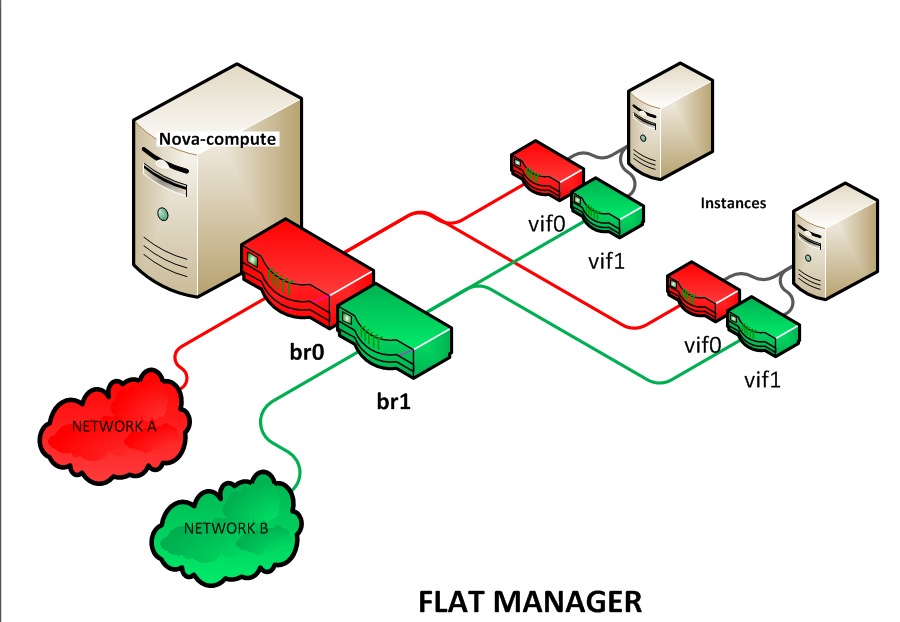
- Flat Network Manager
In this mode, a network administrator specifies a subnet. IP addresses for VM instances are assigned from the subnet, and then injected into the image on launch. Each instance receives a fixed IP address from the pool of available addresses. A system administrator must create the Linux networking bridge (typically named
br100, although this is configurable) on the systems running thenova-networkservice. All instances of the system are attached to the same bridge, which is configured manually by the network administrator.
Configuration injection currently only works on Linux-style
systems that keep networking configuration in
/etc/network/interfaces.
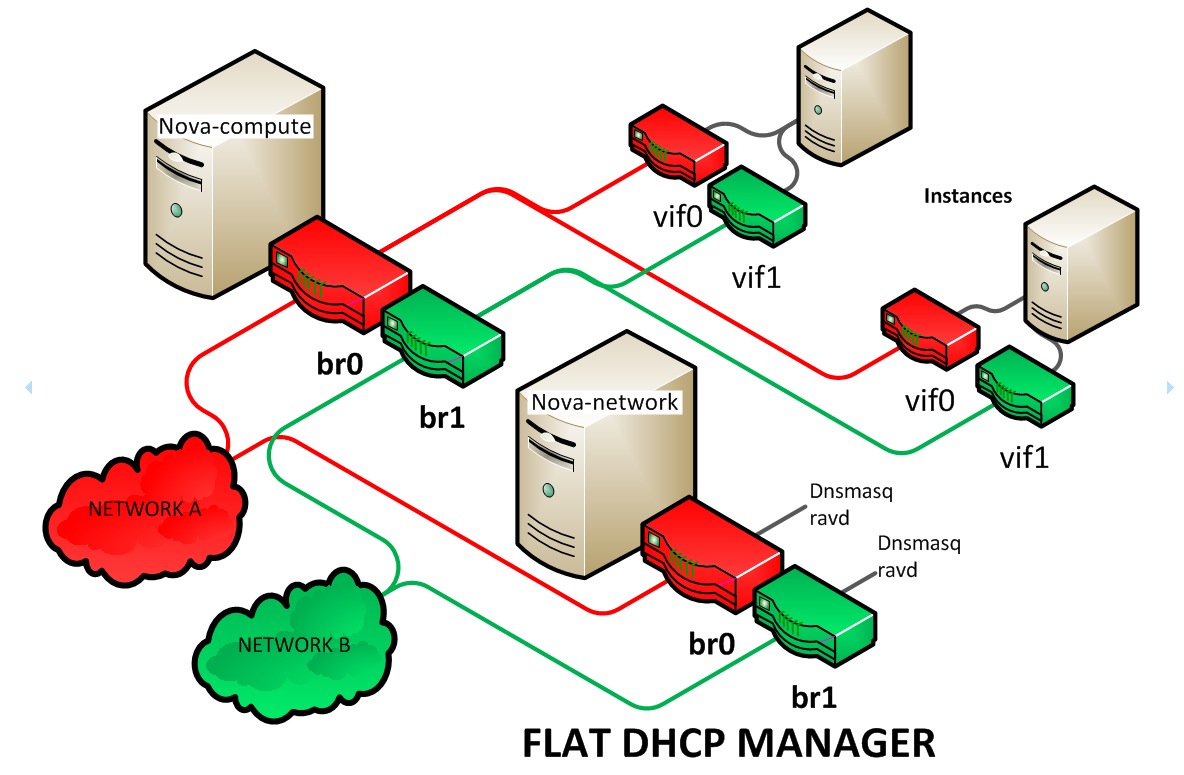
- Flat DHCP Network Manager
In this mode, OpenStack starts a DHCP server (dnsmasq) to allocate IP addresses to VM instances from the specified subnet, in addition to manually configuring the networking bridge. IP addresses for VM instances are assigned from a subnet specified by the network administrator.
Like flat mode, all instances are attached to a single bridge on the compute node. Additionally, a DHCP server configures instances depending on single-/multi-host mode, alongside each
nova-network. In this mode, Compute does a bit more configuration. It attempts to bridge into an Ethernet device (flat_interface, eth0 by default). For every instance, Compute allocates a fixed IP address and configures dnsmasq with the MAC ID and IP address for the VM. Dnsmasq does not take part in the IP address allocation process, it only hands out IPs according to the mapping done by Compute. Instances receive their fixed IPs with thedhcpdiscovercommand. These IPs are not assigned to any of the host's network interfaces, only to the guest-side interface for the VM.In any setup with flat networking, the hosts providing the
nova-networkservice are responsible for forwarding traffic from the private network. They also run and configure dnsmasq as a DHCP server listening on this bridge, usually on IP address 10.0.0.1 (see Section 5.3.2, “DHCP server: dnsmasq”). Compute can determine the NAT entries for each network, although sometimes NAT is not used, such as when the network has been configured with all public IPs, or if a hardware router is used (which is a high availability option). In this case, hosts need to havebr100configured and physically connected to any other nodes that are hosting VMs. You must set theflat_network_bridgeoption or create networks with the bridge parameter in order to avoid raising an error. Compute nodes have iptables or ebtables entries created for each project and instance to protect against MAC ID or IP address spoofing and ARP poisoning.
In single-host Flat DHCP mode you will be able to ping VMs
through their fixed IP from the nova-network node, but you
cannot ping them from the compute nodes. This is expected
behavior.
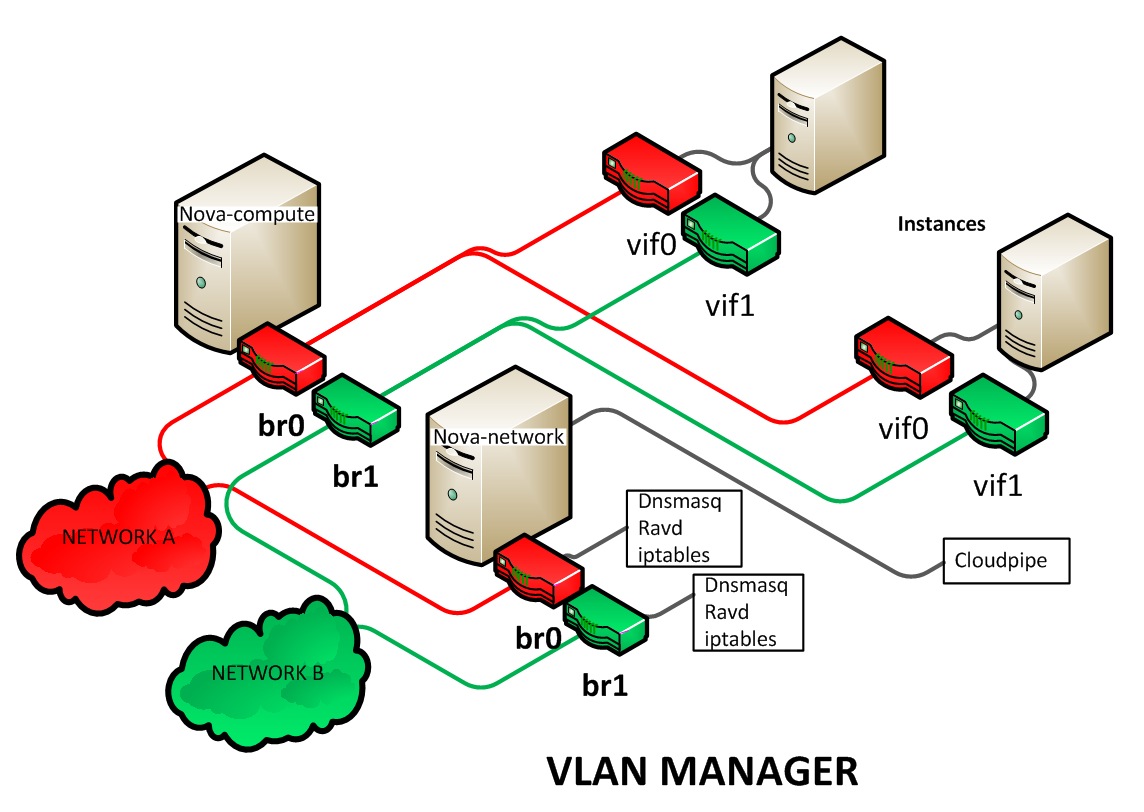
- VLAN Network Manager
This is the default mode for OpenStack Compute. In this mode, Compute creates a VLAN and bridge for each project. For multiple-machine installations, the VLAN Network Mode requires a switch that supports VLAN tagging (IEEE 802.1Q). The project gets a range of private IPs that are only accessible from inside the VLAN. In order for a user to access the instances in their project, a special VPN instance (code named
cloudpipe) needs to be created. Compute generates a certificate and key for the user to access the VPN and starts the VPN automatically. It provides a private network segment for each project's instances that can be accessed through a dedicated VPN connection from the internet. In this mode, each project gets its own VLAN, Linux networking bridge, and subnet.The subnets are specified by the network administrator, and are assigned dynamically to a project when required. A DHCP server is started for each VLAN to pass out IP addresses to VM instances from the subnet assigned to the project. All instances belonging to one project are bridged into the same VLAN for that project. OpenStack Compute creates the Linux networking bridges and VLANs when required.
These network managers can co-exist in a cloud system. However, because you cannot select the type of network for a given project, you cannot configure multiple network types in a single Compute installation.
All network managers configure the network using network drivers. For
example, the Linux L3 driver (l3.py and linux_net.py), which
makes use of iptables, route and other network management
facilities, and the libvirt network filtering
facilities. The driver is
not tied to any particular network manager; all network managers use the
same driver. The driver usually initializes only when the first VM lands
on this host node.
All network managers operate in either single-host or multi-host mode.
This choice greatly influences the network configuration. In single-host
mode, a single nova-network service provides a default gateway for VMs
and hosts a single DHCP server (dnsmasq). In multi-host mode, each
compute node runs its own nova-network service. In both cases, all
traffic between VMs and the internet flows through nova-network. Each
mode has benefits and drawbacks. For more on this, see the Network
Topology section in the OpenStack Operations Guide.
All networking options require network connectivity to be already set up
between OpenStack physical nodes. OpenStack does not configure any
physical network interfaces. All network managers automatically create
VM virtual interfaces. Some network managers can also create network
bridges such as br100.
The internal network interface is used for communication with VMs. The
interface should not have an IP address attached to it before OpenStack
installation, it serves only as a fabric where the actual endpoints are
VMs and dnsmasq. Additionally, the internal network interface must be in
promiscuous mode, so that it can receive packets whose target MAC
address is the guest VM, not the host.
All machines must have a public and internal network interface
(controlled by these options: public_interface for the public
interface, and flat_interface and vlan_interface for the
internal interface with flat or VLAN managers). This guide refers to the
public network as the external network and the private network as the
internal or project network.
For flat and flat DHCP modes, use the nova network-create command
to create a network:
$ nova network-create vmnet \
  --fixed-range-v4 10.0.0.0/16 --fixed-cidr 10.0.20.0/24 --bridge br100
- This example uses the following parameters:
-
--fixed-range-v4 specifies the network subnet.
-
--fixed-cidr specifies a range of fixed IP addresses to allocate, and can be a subset of the
--fixed-range-v4argument.-
--bridge specifies the bridge device to which this network is connected on every compute node.
-
5.3.2 DHCP server: dnsmasq #
The Compute service uses
dnsmasq as the DHCP
server when using either Flat DHCP Network Manager or VLAN Network
Manager. For Compute to operate in IPv4/IPv6 dual-stack mode, use at
least dnsmasq v2.63. The nova-network service is responsible for
starting dnsmasq processes.
The behavior of dnsmasq can be customized by creating a dnsmasq
configuration file. Specify the configuration file using the
dnsmasq_config_file configuration option:
dnsmasq_config_file=/etc/dnsmasq-nova.confFor more information about creating a dnsmasq configuration file, see the OpenStack Configuration Reference, and the dnsmasq documentation.
Dnsmasq also acts as a caching DNS server for instances. You can specify
the DNS server that dnsmasq uses by setting the dns_server
configuration option in /etc/nova/nova.conf. This example configures
dnsmasq to use Google's public DNS server:
dns_server=8.8.8.8Dnsmasq logs to syslog (typically /var/log/syslog or
/var/log/messages, depending on Linux distribution). Logs can be
useful for troubleshooting, especially in a situation where VM instances
boot successfully but are not reachable over the network.
Administrators can specify the starting point IP address to reserve with the DHCP server (in the format n.n.n.n) with this command:
$ nova-manage fixed reserve --address IP_ADDRESS
This reservation only affects which IP address the VMs start at, not the
fixed IP addresses that nova-network places on the bridges.
5.3.3 Configure Compute to use IPv6 addresses #
If you are using OpenStack Compute with nova-network, you can put
Compute into dual-stack mode, so that it uses both IPv4 and IPv6
addresses for communication. In dual-stack mode, instances can acquire
their IPv6 global unicast addresses by using a stateless address
auto-configuration mechanism [RFC 4862/2462]. IPv4/IPv6 dual-stack mode
works with both VlanManager and FlatDHCPManager networking
modes.
In VlanManager networking mode, each project uses a different 64-bit
global routing prefix. In FlatDHCPManager mode, all instances use
one 64-bit global routing prefix.
This configuration was tested with virtual machine images that have an
IPv6 stateless address auto-configuration capability. This capability is
required for any VM to run with an IPv6 address. You must use an EUI-64
address for stateless address auto-configuration. Each node that
executes a nova-* service must have python-netaddr and radvd
installed.
Switch into IPv4/IPv6 dual-stack mode
For every node running a
nova-*service, install python-netaddr:# apt-get install python-netaddr
For every node running
nova-network, installradvdand configure IPv6 networking:# apt-get install radvd # echo 1 > /proc/sys/net/ipv6/conf/all/forwarding # echo 0 > /proc/sys/net/ipv6/conf/all/accept_ra
On all nodes, edit the
nova.conffile and specifyuse_ipv6 = True.Restart all
nova-*services.
IPv6 configuration options
You can use the following options with the nova network-create
command:
Add a fixed range for IPv6 addresses to the
nova network-createcommand. Specifypublicorprivateafter thenetwork-createparameter.$ nova network-create public --fixed-range-v4 FIXED_RANGE_V4 \ --vlan VLAN_ID --vpn VPN_START --fixed-range-v6 FIXED_RANGE_V6
Set the IPv6 global routing prefix by using the
--fixed_range_v6parameter. The default value for the parameter isfd00::/48.When you use
FlatDHCPManager, the command uses the original--fixed_range_v6value. For example:$ nova network-create public --fixed-range-v4 10.0.2.0/24 \ --fixed-range-v6 fd00:1::/48
When you use
VlanManager, the command increments the subnet ID to create subnet prefixes. Guest VMs use this prefix to generate their IPv6 global unicast addresses. For example:$ nova network-create public --fixed-range-v4 10.0.1.0/24 --vlan 100 \ --vpn 1000 --fixed-range-v6 fd00:1::/48
|
Configuration option = Default value |
Description |
|---|---|
|
[DEFAULT] | |
|
fixed_range_v6 = fd00::/48 |
(StrOpt) Fixed IPv6 address block |
|
gateway_v6 = None |
(StrOpt) Default IPv6 gateway |
|
ipv6_backend = rfc2462 |
(StrOpt) Backend to use for IPv6 generation |
|
use_ipv6 = False |
(BoolOpt) Use IPv6 |
5.3.4 Metadata service #
Compute uses a metadata service for virtual machine instances to
retrieve instance-specific data. Instances access the metadata service
at http://169.254.169.254. The metadata service supports two sets of
APIs: an OpenStack metadata API and an EC2-compatible API. Both APIs are
versioned by date.
To retrieve a list of supported versions for the OpenStack metadata API,
make a GET request to http://169.254.169.254/openstack:
$ curl http://169.254.169.254/openstack
2012-08-10
2013-04-04
2013-10-17
latest
To list supported versions for the EC2-compatible metadata API, make a
GET request to http://169.254.169.254:
$ curl http://169.254.169.254
1.0
2007-01-19
2007-03-01
2007-08-29
2007-10-10
2007-12-15
2008-02-01
2008-09-01
2009-04-04
latest
If you write a consumer for one of these APIs, always attempt to access the most recent API version supported by your consumer first, then fall back to an earlier version if the most recent one is not available.
Metadata from the OpenStack API is distributed in JSON format. To
retrieve the metadata, make a GET request to
http://169.254.169.254/openstack/2012-08-10/meta_data.json:
$ curl http://169.254.169.254/openstack/2012-08-10/meta_data.json
{
   "uuid": "d8e02d56-2648-49a3-bf97-6be8f1204f38",
   "availability_zone": "nova",
   "hostname": "test.novalocal",
   "launch_index": 0,
   "meta": {
      "priority": "low",
      "role": "webserver"
   },
   "project_id": "f7ac731cc11f40efbc03a9f9e1d1d21f",
   "public_keys": {
       "mykey": "ssh-rsa AAAAB3NzaC1yc2EAAAADAQABAAAAgQDYVEprvtYJXVOBN0XNKV\
                 VRNCRX6BlnNbI+USLGais1sUWPwtSg7z9K9vhbYAPUZcq8c/s5S9dg5vTH\
                 bsiyPCIDOKyeHba4MUJq8Oh5b2i71/3BISpyxTBH/uZDHdslW2a+SrPDCe\
                 uMMoss9NFhBdKtDkdG9zyi0ibmCP6yMdEX8Q== Generated by Nova\n"
   },
   "name": "test"
}
Instances also retrieve user data (passed as the user_data parameter
in the API call or by the --user_data flag in the
openstack server create command) through the metadata service, by making a
GET request to http://169.254.169.254/openstack/2012-08-10/user_data:
$ curl http://169.254.169.254/openstack/2012-08-10/user_data
#!/bin/bash
echo 'Extra user data here'
The metadata service has an API that is compatible with version 2009-04-04 of the Amazon EC2 metadata service. This means that virtual machine images designed for EC2 will work properly with OpenStack.
The EC2 API exposes a separate URL for each metadata element. Retrieve a
listing of these elements by making a GET query to
http://169.254.169.254/2009-04-04/meta-data/:
$ curl http://169.254.169.254/2009-04-04/meta-data/
ami-id
ami-launch-index
ami-manifest-path
block-device-mapping/
hostname
instance-action
instance-id
instance-type
kernel-id
local-hostname
local-ipv4
placement/
public-hostname
public-ipv4
public-keys/
ramdisk-id
reservation-id
security-groups
$ curl http://169.254.169.254/2009-04-04/meta-data/block-device-mapping/
ami
$ curl http://169.254.169.254/2009-04-04/meta-data/placement/
availability-zone
$ curl http://169.254.169.254/2009-04-04/meta-data/public-keys/
0=mykey
Instances can retrieve the public SSH key (identified by keypair name
when a user requests a new instance) by making a GET request to
http://169.254.169.254/2009-04-04/meta-data/public-keys/0/openssh-key:
$ curl http://169.254.169.254/2009-04-04/meta-data/public-keys/0/openssh-key
ssh-rsa AAAAB3NzaC1yc2EAAAADAQABAAAAgQDYVEprvtYJXVOBN0XNKVVRNCRX6BlnNbI+US\
LGais1sUWPwtSg7z9K9vhbYAPUZcq8c/s5S9dg5vTHbsiyPCIDOKyeHba4MUJq8Oh5b2i71/3B\
ISpyxTBH/uZDHdslW2a+SrPDCeuMMoss9NFhBdKtDkdG9zyi0ibmCP6yMdEX8Q== Generated\
by Nova
Instances can retrieve user data by making a GET request to
http://169.254.169.254/2009-04-04/user-data:
$ curl http://169.254.169.254/2009-04-04/user-data
#!/bin/bash
echo 'Extra user data here'
The metadata service is implemented by either the nova-api service or
the nova-api-metadata service. Note that the nova-api-metadata service
is generally only used when running in multi-host mode, as it retrieves
instance-specific metadata. If you are running the nova-api service, you
must have metadata as one of the elements listed in the
enabled_apis configuration option in /etc/nova/nova.conf. The
default enabled_apis configuration setting includes the metadata
service, so you do not need to modify it.
Hosts access the service at 169.254.169.254:80, and this is
translated to metadata_host:metadata_port by an iptables rule
established by the nova-network service. In multi-host mode, you can set
metadata_host to 127.0.0.1.
For instances to reach the metadata service, the nova-network service
must configure iptables to NAT port 80 of the 169.254.169.254
address to the IP address specified in metadata_host (this defaults
to $my_ip, which is the IP address of the nova-network service) and
port specified in metadata_port (which defaults to 8775) in
/etc/nova/nova.conf.
The metadata_host configuration option must be an IP address,
not a host name.
The default Compute service settings assume that nova-network and
nova-api are running on the same host. If this is not the case, in the
/etc/nova/nova.conf file on the host running nova-network, set the
metadata_host configuration option to the IP address of the host
where nova-api is running.
|
Configuration option = Default value |
Description |
|---|---|
|
[DEFAULT] | |
|
metadata_cache_expiration = 15 |
(IntOpt) Time in seconds to cache metadata; 0 to disable metadata caching entirely (not recommended). Increasing this should improve response times of the metadata API when under heavy load. Higher values may increase memory usage and result in longer times for host metadata changes to take effect. |
|
metadata_host = $my_ip |
(StrOpt) The IP address for the metadata API server |
|
metadata_listen = 0.0.0.0 |
(StrOpt) The IP address on which the metadata API will listen. |
|
metadata_listen_port = 8775 |
(IntOpt) The port on which the metadata API will listen. |
|
metadata_manager = nova.api.manager.MetadataManager |
(StrOpt) OpenStack metadata service manager |
|
metadata_port = 8775 |
(IntOpt) The port for the metadata API port |
|
metadata_workers = None |
(IntOpt) Number of workers for metadata service. The default will be the number of CPUs available. |
|
vendordata_driver = nova.api.metadata.vendordata_json.JsonFileVendorData |
(StrOpt) Driver to use for vendor data |
|
vendordata_jsonfile_path = None |
(StrOpt) File to load JSON formatted vendor data from |
5.3.5 Enable ping and SSH on VMs #
You need to enable ping and ssh on your VMs for network access.
This can be done with either the nova or euca2ools
commands.
Run these commands as root only if the credentials used to interact
with nova-api are in /root/.bashrc. If the EC2 credentials in
the .bashrc file are for an unprivileged user, you must run
these commands as that user instead.
Enable ping and SSH with openstack security group rule create
commands:
$ openstack security group rule create default --protocol icmp --dst-port -1:-1 --remote-ip 0.0.0.0/0
$ openstack security group rule create default --protocol tcp --dst-port 22:22 --remote-ip 0.0.0.0/0
Enable ping and SSH with euca2ools:
$ euca-authorize -P icmp -t -1:-1 -s 0.0.0.0/0 default
$ euca-authorize -P tcp -p 22 -s 0.0.0.0/0 default
If you have run these commands and still cannot ping or SSH your
instances, check the number of running dnsmasq processes, there
should be two. If not, kill the processes and restart the service with
these commands:
# killall dnsmasq
# service nova-network restart
5.3.6 Configure public (floating) IP addresses #
This section describes how to configure floating IP addresses with
nova-network. For information about doing this with OpenStack
Networking, see Section 9.9.2, “L3 routing and NAT”.
5.3.6.1 Private and public IP addresses #
In this section, the term floating IP address is used to refer to an IP address, usually public, that you can dynamically add to a running virtual instance.
Every virtual instance is automatically assigned a private IP address. You can choose to assign a public (or floating) IP address instead. OpenStack Compute uses network address translation (NAT) to assign floating IPs to virtual instances.
To be able to assign a floating IP address, edit the
/etc/nova/nova.conf file to specify which interface the
nova-network service should bind public IP addresses to:
public_interface=VLAN100If you make changes to the /etc/nova/nova.conf file while the
nova-network service is running, you will need to restart the service to
pick up the changes.
Floating IPs are implemented by using a source NAT (SNAT rule in iptables), so security groups can sometimes display inconsistent behavior if VMs use their floating IP to communicate with other VMs, particularly on the same physical host. Traffic from VM to VM across the fixed network does not have this issue, and so this is the recommended setup. To ensure that traffic does not get SNATed to the floating range, explicitly set:
dmz_cidr=x.x.x.x/yThe x.x.x.x/y value specifies the range of floating IPs for each
pool of floating IPs that you define. This configuration is also
required if the VMs in the source group have floating IPs.
5.3.6.2 Enable IP forwarding #
IP forwarding is disabled by default on most Linux distributions. You will need to enable it in order to use floating IPs.
IP forwarding only needs to be enabled on the nodes that run
nova-network. However, you will need to enable it on all compute
nodes if you use multi_host mode.
To check if IP forwarding is enabled, run:
$ cat /proc/sys/net/ipv4/ip_forward
0
Alternatively, run:
$ sysctl net.ipv4.ip_forward
net.ipv4.ip_forward = 0
In these examples, IP forwarding is disabled.
To enable IP forwarding dynamically, run:
# sysctl -w net.ipv4.ip_forward=1
Alternatively, run:
# echo 1 > /proc/sys/net/ipv4/ip_forward
To make the changes permanent, edit the /etc/sysctl.conf file and
update the IP forwarding setting:
net.ipv4.ip_forward = 1Save the file and run this command to apply the changes:
# sysctl -p
You can also apply the changes by restarting the network service:
on Ubuntu, Debian:
# /etc/init.d/networking restart
on RHEL, Fedora, CentOS, openSUSE and SLES:
# service network restart
5.3.6.3 Create a list of available floating IP addresses #
Compute maintains a list of floating IP addresses that are available for
assigning to instances. Use the nova-manage floating commands
to perform floating IP operations:
Add entries to the list:
# nova-manage floating create --pool nova --ip_range 68.99.26.170/31
List the floating IP addresses in the pool:
# openstack floating ip list
Create specific floating IPs for either a single address or a subnet:
# nova-manage floating create --pool POOL_NAME --ip_range CIDR
Remove floating IP addresses using the same parameters as the create command:
# openstack floating ip delete CIDR
For more information about how administrators can associate floating IPs with instances, see Manage IP addresses in the OpenStack Administrator Guide.
5.3.6.4 Automatically add floating IPs #
You can configure nova-network to automatically allocate and assign a
floating IP address to virtual instances when they are launched. Add
this line to the /etc/nova/nova.conf file:
auto_assign_floating_ip=TrueSave the file, and restart nova-network
If this option is enabled, but all floating IP addresses have
already been allocated, the openstack server create
command will fail.
5.3.7 Remove a network from a project #
You cannot delete a network that has been associated to a project. This section describes the procedure for dissociating it so that it can be deleted.
In order to disassociate the network, you will need the ID of the project it has been associated to. To get the project ID, you will need to be an administrator.
Disassociate the network from the project using the
nova-manage project scrub command,
with the project ID as the final parameter:
# nova-manage project scrub --project ID
5.3.8 Multiple interfaces for instances (multinic) #
The multinic feature allows you to use more than one interface with your instances. This is useful in several scenarios:
SSL Configurations (VIPs)
Services failover/HA
Bandwidth Allocation
Administrative/Public access to your instances
Each VIP represents a separate network with its own IP block. Every network mode has its own set of changes regarding multinic usage:
5.3.8.1 Using multinic #
In order to use multinic, create two networks, and attach them to the
project (named project on the command line):
$ nova network-create first-net --fixed-range-v4 20.20.0.0/24 --project-id $your-project
$ nova network-create second-net --fixed-range-v4 20.20.10.0/24 --project-id $your-project
Each new instance will now receive two IP addresses from their respective DHCP servers:
$ openstack server list
+---------+----------+--------+-----------------------------------------+------------+
|ID       | Name     | Status | Networks                                | Image Name |
+---------+----------+--------+-----------------------------------------+------------+
| 1234... | MyServer | ACTIVE | network2=20.20.0.3; private=20.20.10.14 | cirros     |
+---------+----------+--------+-----------------------------------------+------------+
Make sure you start the second interface on the instance, or it won't be reachable through the second IP.
This example demonstrates how to set up the interfaces within the instance. This is the configuration that needs to be applied inside the image.
Edit the /etc/network/interfaces file:
# The loopback network interface
auto lo
iface lo inet loopback

auto eth0
iface eth0 inet dhcp

auto eth1
iface eth1 inet dhcp
If the Virtual Network Service Neutron is installed, you can specify the
networks to attach to the interfaces by using the --nic flag with
the openstack server create command:
$ openstack server create --image ed8b2a37-5535-4a5f-a615-443513036d71 \
  --flavor 1 --nic net-id=NETWORK1_ID --nic net-id=NETWORK2_ID test-vm1
5.3.9 Troubleshooting Networking #
5.3.9.1 Cannot reach floating IPs #
Problem#
You cannot reach your instances through the floating IP address.
Solution#
Check that the default security group allows ICMP (ping) and SSH (port 22), so that you can reach the instances:
$ openstack security group rule list default
+--------------------------------------+-------------+-----------+-----------------+-----------------------+
| ID                                   | IP Protocol | IP Range  | Port Range      | Remote Security Group |
+--------------------------------------+-------------+-----------+-----------------+-----------------------+
| 63536865-e5b6-4df1-bac5-ca6d97d8f54d | tcp         | 0.0.0.0/0 | 22:22           | None                  |
| e9d3200f-647a-4293-a9fc-e65ceee189ae | icmp        | 0.0.0.0/0 | type=1:code=-1  | None                  |
+--------------------------------------+-------------+-----------+-----------------+-----------------------+
Check the NAT rules have been added to iptables on the node that is running
nova-network:# iptables -L -nv -t nat -A nova-network-PREROUTING -d 68.99.26.170/32 -j DNAT --to-destination 10.0.0.3 -A nova-network-floating-snat -s 10.0.0.3/32 -j SNAT --to-source 68.99.26.170
Check that the public address (
68.99.26.170in this example), has been added to your public interface. You should see the address in the listing when you use theip addrcommand:$ ip addr 2: eth0: <BROADCAST,MULTICAST,UP,LOWER_UP> mtu 1500 qdisc mq state UP qlen 1000 link/ether xx:xx:xx:17:4b:c2 brd ff:ff:ff:ff:ff:ff inet 13.22.194.80/24 brd 13.22.194.255 scope global eth0 inet 68.99.26.170/32 scope global eth0 inet6 fe80::82b:2bf:fe1:4b2/64 scope link valid_lft forever preferred_lft forever
 Note
NoteYou cannot use
SSHto access an instance with a public IP from within the same server because the routing configuration does not allow it.Use
tcpdumpto identify if packets are being routed to the inbound interface on the compute host. If the packets are reaching the compute hosts but the connection is failing, the issue may be that the packet is being dropped by reverse path filtering. Try disabling reverse-path filtering on the inbound interface. For example, if the inbound interface iseth2, run:# sysctl -w net.ipv4.conf.ETH2.rp_filter=0
If this solves the problem, add the following line to
/etc/sysctl.confso that the reverse-path filter is persistent:net.ipv4.conf.rp_filter=0
5.3.9.2 Temporarily disable firewall #
Problem#
Networking issues prevent administrators accessing or reaching VM's through various pathways.
Solution#
You can disable the firewall by setting this option
in /etc/nova/nova.conf:
firewall_driver=nova.virt.firewall.NoopFirewallDriver5.3.9.3 Packet loss from instances to nova-network server (VLANManager mode) #
Problem#
If you can access your instances with SSH but the network to your instance
is slow, or if you find that running certain operations are slower than
they should be (for example, sudo), packet loss could be occurring
on the connection to the instance.
Packet loss can be caused by Linux networking configuration settings
related to bridges. Certain settings can cause packets to be dropped
between the VLAN interface (for example, vlan100) and the associated
bridge interface (for example, br100) on the host running
nova-network.
Solution#
One way to check whether this is the problem is to open three terminals and run the following commands:
In the first terminal, on the host running
nova-network, usetcpdumpon the VLAN interface to monitor DNS-related traffic (UDP, port 53). As root, run:# tcpdump -K -p -i vlan100 -v -vv udp port 53
In the second terminal, also on the host running
nova-network, usetcpdumpto monitor DNS-related traffic on the bridge interface. As root, run:# tcpdump -K -p -i br100 -v -vv udp port 53
In the third terminal, use
SSHto access the instance and generate DNS requests by using thenslookupcommand:$ nslookup www.google.com
The symptoms may be intermittent, so try running
nslookupmultiple times. If the network configuration is correct, the command should return immediately each time. If it is not correct, the command hangs for several seconds before returning.If the
nslookupcommand sometimes hangs, and there are packets that appear in the first terminal but not the second, then the problem may be due to filtering done on the bridges. Try disabling filtering, and running these commands as root:# sysctl -w net.bridge.bridge-nf-call-arptables=0 # sysctl -w net.bridge.bridge-nf-call-iptables=0 # sysctl -w net.bridge.bridge-nf-call-ip6tables=0
If this solves your issue, add the following line to
/etc/sysctl.confso that the changes are persistent:net.bridge.bridge-nf-call-arptables=0 net.bridge.bridge-nf-call-iptables=0 net.bridge.bridge-nf-call-ip6tables=0
5.3.9.4 KVM: Network connectivity works initially, then fails #
Problem#
With KVM hypervisors, instances running Ubuntu 12.04 sometimes lose network connectivity after functioning properly for a period of time.
Solution#
Try loading the vhost_net kernel module as a workaround for this
issue (see bug
#997978)
. This kernel module may also improve network
performance on KVM. To load
the kernel module:
# modprobe vhost_net
Loading the module has no effect on running instances.
5.4 System administration #
To effectively administer compute, you must understand how the different installed nodes interact with each other. Compute can be installed in many different ways using multiple servers, but generally multiple compute nodes control the virtual servers and a cloud controller node contains the remaining Compute services.
The Compute cloud works using a series of daemon processes named nova-*
that exist persistently on the host machine. These binaries can all run
on the same machine or be spread out on multiple boxes in a large
deployment. The responsibilities of services and drivers are:
Services
-
nova-api receives XML requests and sends them to the rest of the system. A WSGI app routes and authenticates requests. Supports the EC2 and OpenStack APIs. A
nova.confconfiguration file is created when Compute is installed.-
nova-cert manages certificates.
-
nova-compute manages virtual machines. Loads a Service object, and exposes the public methods on ComputeManager through a Remote Procedure Call (RPC).
-
nova-conductor provides database-access support for compute nodes (thereby reducing security risks).
-
nova-consoleauth manages console authentication.
-
nova-objectstore a simple file-based storage system for images that replicates most of the S3 API. It can be replaced with OpenStack Image service and either a simple image manager or OpenStack Object Storage as the virtual machine image storage facility. It must exist on the same node as
nova-compute.-
nova-network manages floating and fixed IPs, DHCP, bridging and VLANs. Loads a Service object which exposes the public methods on one of the subclasses of NetworkManager. Different networking strategies are available by changing the
network_managerconfiguration option toFlatManager,FlatDHCPManager, orVLANManager(defaults toVLANManagerif nothing is specified).-
nova-scheduler dispatches requests for new virtual machines to the correct node.
-
nova-novncproxy provides a VNC proxy for browsers, allowing VNC consoles to access virtual machines.
Some services have drivers that change how the service implements
its core functionality. For example, the nova-compute service
supports drivers that let you choose which hypervisor type it can
use. nova-network and nova-scheduler also have drivers.
5.4.1 Manage Compute users #
Access to the Euca2ools (ec2) API is controlled by an access key and a secret key. The user's access key needs to be included in the request, and the request must be signed with the secret key. Upon receipt of API requests, Compute verifies the signature and runs commands on behalf of the user.
To begin using Compute, you must create a user with the Identity service.
5.4.2 Manage volumes #
Depending on the setup of your cloud provider, they may give you an
endpoint to use to manage volumes, or there may be an extension under
the covers. In either case, you can use the openstack CLI to manage
volumes.
|
Command |
Description |
|---|---|
|
server add volume |
Attach a volume to a server. |
|
volume create |
Add a new volume. |
|
volume delete |
Remove or delete a volume. |
|
server remove volume |
Detach or remove a volume from a server. |
|
volume list |
List all the volumes. |
|
volume show |
Show details about a volume. |
|
snapshot create |
Add a new snapshot. |
|
snapshot delete |
Remove a snapshot. |
|
snapshot list |
List all the snapshots. |
|
snapshot show |
Show details about a snapshot. |
|
volume type create |
Create a new volume type. |
|
volume type delete |
Delete a specific flavor |
|
volume type list |
Print a list of available 'volume types'. |
For example, to list IDs and names of volumes, run:
$ openstack volume list
+--------+--------------+-----------+------+-------------+
| ID     | Display Name | Status    | Size | Attached to |
+--------+--------------+-----------+------+-------------+
| 86e6cb | testnfs      | available |    1 |             |
| e389f7 | demo         | available |    1 |             |
+--------+--------------+-----------+------+-------------+
5.4.3 Flavors #
Admin users can use the openstack flavor command to customize and
manage flavors. To see information for this command, run:
$ openstack flavor --help
Command "flavor" matches:
  flavor create
  flavor delete
  flavor list
  flavor set
  flavor show
  flavor unset
Configuration rights can be delegated to additional users by redefining the access controls for
compute_extension:flavormanagein/etc/nova/policy.jsonon thenova-apiserver.The Dashboard simulates the ability to modify a flavor by deleting an existing flavor and creating a new one with the same name.
Flavors define these elements:
|
Element |
Description |
|---|---|
|
Name |
A descriptive name. XX.SIZE_NAME is typically not required, though some third party tools may rely on it. |
|
Memory MB |
Instance memory in megabytes. |
|
Disk |
Virtual root disk size in gigabytes. This is an ephemeral disk that the base image is copied into. When booting from a persistent volume it is not used. The "0" size is a special case which uses the native base image size as the size of the ephemeral root volume. |
|
Ephemeral |
Specifies the size of a secondary ephemeral data disk. This
is an empty, unformatted disk and exists only for the life of the instance. Default value is |
|
Swap |
Optional swap space allocation for the instance. Default
value is |
|
VCPUs |
Number of virtual CPUs presented to the instance. |
|
RXTX Factor |
Optional property allows created servers to have a different
bandwidth cap than that defined in the network they are attached to. This factor is multiplied by the rxtx_base property of the network. Default value is |
|
Is Public |
Boolean value, whether flavor is available to all users or private to the project it was created in. Defaults to |
|
Extra Specs |
Key and value pairs that define on which compute nodes a flavor can run. These pairs must match corresponding pairs on the compute nodes. Use to implement special resources, such as flavors that run on only compute nodes with GPU hardware. |
Flavor customization can be limited by the hypervisor in use. For example the libvirt driver enables quotas on CPUs available to a VM, disk tuning, bandwidth I/O, watchdog behavior, random number generator device control, and instance VIF traffic control.
5.4.3.1 Is Public #
Flavors can be assigned to particular projects. By default, a flavor is public and available to all projects. Private flavors are only accessible to those on the access list and are invisible to other projects. To create and assign a private flavor to a project, run this command:
$ openstack flavor create --private p1.medium --id auto --ram 512 --disk 40 --vcpus 4
5.4.3.2 Extra Specs #
- CPU limits
You can configure the CPU limits with control parameters with the
novaclient. For example, to configure the I/O limit, use:$ openstack flavor set FLAVOR-NAME \ --property quota:read_bytes_sec=10240000 \ --property quota:write_bytes_sec=10240000Use these optional parameters to control weight shares, enforcement intervals for runtime quotas, and a quota for maximum allowed bandwidth:
cpu_shares: Specifies the proportional weighted share for the domain. If this element is omitted, the service defaults to the OS provided defaults. There is no unit for the value; it is a relative measure based on the setting of other VMs. For example, a VM configured with value 2048 gets twice as much CPU time as a VM configured with value 1024.cpu_shares_level: On VMware, specifies the allocation level. Can becustom,high,normal, orlow. If you choosecustom, set the number of shares usingcpu_shares_share.cpu_period: Specifies the enforcement interval (unit: microseconds) for QEMU and LXC hypervisors. Within a period, each VCPU of the domain is not allowed to consume more than the quota worth of runtime. The value should be in range[1000, 1000000]. A period with value 0 means no value.cpu_limit: Specifies the upper limit for VMware machine CPU allocation in MHz. This parameter ensures that a machine never uses more than the defined amount of CPU time. It can be used to enforce a limit on the machine's CPU performance.cpu_reservation: Specifies the guaranteed minimum CPU reservation in MHz for VMware. This means that if needed, the machine will definitely get allocated the reserved amount of CPU cycles.cpu_quota: Specifies the maximum allowed bandwidth (unit: microseconds). A domain with a negative-value quota indicates that the domain has infinite bandwidth, which means that it is not bandwidth controlled. The value should be in range[1000, 18446744073709551]or less than 0. A quota with value 0 means no value. You can use this feature to ensure that all vCPUs run at the same speed. For example:$ openstack flavor set FLAVOR-NAME \ --property quota:cpu_quota=10000 \ --property quota:cpu_period=20000In this example, an instance of
FLAVOR-NAMEcan only consume a maximum of 50% CPU of a physical CPU computing capability.
- Memory limits
For VMware, you can configure the memory limits with control parameters.
Use these optional parameters to limit the memory allocation, guarantee minimum memory reservation, and to specify shares used in case of resource contention:
memory_limit: Specifies the upper limit for VMware machine memory allocation in MB. The utilization of a virtual machine will not exceed this limit, even if there are available resources. This is typically used to ensure a consistent performance of virtual machines independent of available resources.memory_reservation: Specifies the guaranteed minimum memory reservation in MB for VMware. This means the specified amount of memory will definitely be allocated to the machine.memory_shares_level: On VMware, specifies the allocation level. This can becustom,high,normalorlow. If you choosecustom, set the number of shares usingmemory_shares_share.memory_shares_share: Specifies the number of shares allocated in the event thatcustomis used. There is no unit for this value. It is a relative measure based on the settings for other VMs. For example:$ openstack flavor set FLAVOR-NAME \ --property quota:memory_shares_level=custom \ --property quota:memory_shares_share=15
- Disk I/O limits
For VMware, you can configure the resource limits for disk with control parameters.
Use these optional parameters to limit the disk utilization, guarantee disk allocation, and to specify shares used in case of resource contention. This allows the VMware driver to enable disk allocations for the running instance.
disk_io_limit: Specifies the upper limit for disk utilization in I/O per second. The utilization of a virtual machine will not exceed this limit, even if there are available resources. The default value is -1 which indicates unlimited usage.disk_io_reservation: Specifies the guaranteed minimum disk allocation in terms of Input/Output Operations Per Second (IOPS).disk_io_shares_level: Specifies the allocation level. This can becustom,high,normalorlow. If you choose custom, set the number of shares usingdisk_io_shares_share.disk_io_shares_share: Specifies the number of shares allocated in the event thatcustomis used. When there is resource contention, this value is used to determine the resource allocation.The example below sets the
disk_io_reservationto 2000 IOPS.$ openstack flavor set FLAVOR-NAME \ --property quota:disk_io_reservation=2000
- Disk tuning
Using disk I/O quotas, you can set maximum disk write to 10 MB per second for a VM user. For example:
$ openstack flavor set FLAVOR-NAME \
    --property quota:disk_write_bytes_sec=10485760
The disk I/O options are:
disk_read_bytes_secdisk_read_iops_secdisk_write_bytes_secdisk_write_iops_secdisk_total_bytes_secdisk_total_iops_sec
- Bandwidth I/O
The vif I/O options are:
vif_inbound_averagevif_inbound_burstvif_inbound_peakvif_outbound_averagevif_outbound_burstvif_outbound_peak
Incoming and outgoing traffic can be shaped independently. The bandwidth element can have at most, one inbound and at most, one outbound child element. If you leave any of these child elements out, no Quality of Service (QoS) is applied on that traffic direction. So, if you want to shape only the network's incoming traffic, use inbound only (and vice versa). Each element has one mandatory attribute average, which specifies the average bit rate on the interface being shaped.
There are also two optional attributes (integer):
peak, which specifies the maximum rate at which a bridge can send data (kilobytes/second), andburst, the amount of bytes that can be burst at peak speed (kilobytes). The rate is shared equally within domains connected to the network.The example below sets network traffic bandwidth limits for existing flavor as follows:
Outbound traffic:
average: 262 Mbps (32768 kilobytes/second)
peak: 524 Mbps (65536 kilobytes/second)
burst: 65536 kilobytes
Inbound traffic:
average: 262 Mbps (32768 kilobytes/second)
peak: 524 Mbps (65536 kilobytes/second)
burst: 65536 kilobytes
$ openstack flavor set FLAVOR-NAME \ --property quota:vif_outbound_average=32768 \ --property quota:vif_outbound_peak=65536 \ --property quota:vif_outbound_burst=65536 \ --property quota:vif_inbound_average=32768 \ --property quota:vif_inbound_peak=65536 \ --property quota:vif_inbound_burst=65536NoteAll the speed limit values in above example are specified in kilobytes/second. And burst values are in kilobytes. Values were converted using 'Data rate units on Wikipedia <https://en.wikipedia.org/wiki/Data_rate_units>`_.
- Watchdog behavior
For the libvirt driver, you can enable and set the behavior of a virtual hardware watchdog device for each flavor. Watchdog devices keep an eye on the guest server, and carry out the configured action, if the server hangs. The watchdog uses the i6300esb device (emulating a PCI Intel 6300ESB). If
hw:watchdog_actionis not specified, the watchdog is disabled.To set the behavior, use:
$ openstack flavor set FLAVOR-NAME --property hw:watchdog_action=ACTION
Valid ACTION values are:
disabled: (default) The device is not attached.reset: Forcefully reset the guest.poweroff: Forcefully power off the guest.pause: Pause the guest.none: Only enable the watchdog; do nothing if the server hangs.
NoteWatchdog behavior set using a specific image's properties will override behavior set using flavors.
- Random-number generator
If a random-number generator device has been added to the instance through its image properties, the device can be enabled and configured using:
$ openstack flavor set FLAVOR-NAME \
    --property hw_rng:allowed=True \
    --property hw_rng:rate_bytes=RATE-BYTES \
    --property hw_rng:rate_period=RATE-PERIOD
Where:
RATE-BYTES: (integer) Allowed amount of bytes that the guest can read from the host's entropy per period.
RATE-PERIOD: (integer) Duration of the read period in seconds.
- CPU topology
For the libvirt driver, you can define the topology of the processors in the virtual machine using properties. The properties with
maxlimit the number that can be selected by the user with image properties.$ openstack flavor set FLAVOR-NAME \ --property hw:cpu_sockets=FLAVOR-SOCKETS \ --property hw:cpu_cores=FLAVOR-CORES \ --property hw:cpu_threads=FLAVOR-THREADS \ --property hw:cpu_max_sockets=FLAVOR-SOCKETS \ --property hw:cpu_max_cores=FLAVOR-CORES \ --property hw:cpu_max_threads=FLAVOR-THREADSWhere:
FLAVOR-SOCKETS: (integer) The number of sockets for the guest VM. By default, this is set to the number of vCPUs requested.
FLAVOR-CORES: (integer) The number of cores per socket for the guest VM. By default, this is set to
1.FLAVOR-THREADS: (integer) The number of threads per core for the guest VM. By default, this is set to
1.
- CPU pinning policy
For the libvirt driver, you can pin the virtual CPUs (vCPUs) of instances to the host's physical CPU cores (pCPUs) using properties. You can further refine this by stating how hardware CPU threads in a simultaneous multithreading-based (SMT) architecture be used. These configurations will result in improved per-instance determinism and performance.
NoteSMT-based architectures include Intel processors with Hyper-Threading technology. In these architectures, processor cores share a number of components with one or more other cores. Cores in such architectures are commonly referred to as hardware threads, while the cores that a given core share components with are known as thread siblings.
NoteHost aggregates should be used to separate these pinned instances from unpinned instances as the latter will not respect the resourcing requirements of the former.
$ openstack flavor set FLAVOR-NAME \
    --property hw:cpu_policy=CPU-POLICY \
    --property hw:cpu_thread_policy=CPU-THREAD-POLICY
Valid CPU-POLICY values are:
shared: (default) The guest vCPUs will be allowed to freely float across host pCPUs, albeit potentially constrained by NUMA policy.dedicated: The guest vCPUs will be strictly pinned to a set of host pCPUs. In the absence of an explicit vCPU topology request, the drivers typically expose all vCPUs as sockets with one core and one thread. When strict CPU pinning is in effect the guest CPU topology will be setup to match the topology of the CPUs to which it is pinned. This option implies an overcommit ratio of 1.0. For example, if a two vCPU guest is pinned to a single host core with two threads, then the guest will get a topology of one socket, one core, two threads.
Valid CPU-THREAD-POLICY values are:
prefer: (default) The host may or may not have an SMT architecture. Where an SMT architecture is present, thread siblings are preferred.isolate: The host must not have an SMT architecture or must emulate a non-SMT architecture. If the host does not have an SMT architecture, each vCPU is placed on a different core as expected. If the host does have an SMT architecture - that is, one or more cores have thread siblings - then each vCPU is placed on a different physical core. No vCPUs from other guests are placed on the same core. All but one thread sibling on each utilized core is therefore guaranteed to be unusable.require: The host must have an SMT architecture. Each vCPU is allocated on thread siblings. If the host does not have an SMT architecture, then it is not used. If the host has an SMT architecture, but not enough cores with free thread siblings are available, then scheduling fails.
NoteThe
hw:cpu_thread_policyoption is only valid ifhw:cpu_policyis set todedicated.- NUMA topology
For the libvirt driver, you can define the host NUMA placement for the instance vCPU threads as well as the allocation of instance vCPUs and memory from the host NUMA nodes. For flavors whose memory and vCPU allocations are larger than the size of NUMA nodes in the compute hosts, the definition of a NUMA topology allows hosts to better utilize NUMA and improve performance of the instance OS.
$ openstack flavor set FLAVOR-NAME \
    --property hw:numa_nodes=FLAVOR-NODES \
    --property hw:numa_cpus.N=FLAVOR-CORES \
    --property hw:numa_mem.N=FLAVOR-MEMORY
Where:
FLAVOR-NODES: (integer) The number of host NUMA nodes to restrict execution of instance vCPU threads to. If not specified, the vCPU threads can run on any number of the host NUMA nodes available.
N: (integer) The instance NUMA node to apply a given CPU or memory configuration to, where N is in the range
0toFLAVOR-NODES-1.FLAVOR-CORES: (comma-separated list of integers) A list of instance vCPUs to map to instance NUMA node N. If not specified, vCPUs are evenly divided among available NUMA nodes.
FLAVOR-MEMORY: (integer) The number of MB of instance memory to map to instance NUMA node N. If not specified, memory is evenly divided among available NUMA nodes.
Notehw:numa_cpus.Nandhw:numa_mem.Nare only valid ifhw:numa_nodesis set. Additionally, they are only required if the instance's NUMA nodes have an asymmetrical allocation of CPUs and RAM (important for some NFV workloads).NoteThe
Nparameter is an index of guest NUMA nodes and may not correspond to host NUMA nodes. For example, on a platform with two NUMA nodes, the scheduler may opt to place guest NUMA node 0, as referenced inhw:numa_mem.0on host NUMA node 1 and vice versa. Similarly, the integers used forFLAVOR-CORESare indexes of guest vCPUs and may not correspond to host CPUs. As such, this feature cannot be used to constrain instances to specific host CPUs or NUMA nodes. Warning
If the combined values of
hw:numa_cpus.Norhw:numa_mem.Nare greater than the available number of CPUs or memory respectively, an exception is raised.- Large pages allocation
You can configure the size of large pages used to back the VMs.
$ openstack flavor set FLAVOR-NAME \
    --property hw:mem_page_size=PAGE_SIZE
Valid
PAGE_SIZEvalues are:small: (default) The smallest page size is used. Example: 4 KB on x86.large: Only use larger page sizes for guest RAM. Example: either 2 MB or 1 GB on x86.any: It is left up to the compute driver to decide. In this case, the libvirt driver might try to find large pages, but fall back to small pages. Other drivers may choose alternate policies forany.pagesize: (string) An explicit page size can be set if the workload has specific requirements. This value can be an integer value for the page size in KB, or can use any standard suffix. Example:
4KB,2MB,2048,1GB.
NoteLarge pages can be enabled for guest RAM without any regard to whether the guest OS will use them or not. If the guest OS chooses not to use huge pages, it will merely see small pages as before. Conversely, if a guest OS does intend to use huge pages, it is very important that the guest RAM be backed by huge pages. Otherwise, the guest OS will not be getting the performance benefit it is expecting.
- PCI passthrough
You can assign PCI devices to a guest by specifying them in the flavor.
$ openstack flavor set FLAVOR-NAME \
    --property pci_passthrough:alias=ALIAS:COUNT
Where:
ALIAS: (string) The alias which correspond to a particular PCI device class as configured in the nova configuration file (see nova.conf configuration options).
COUNT: (integer) The amount of PCI devices of type ALIAS to be assigned to a guest.
5.4.4 Compute service node firewall requirements #
Console connections for virtual machines, whether direct or through a
proxy, are received on ports 5900 to 5999. The firewall on each
Compute service node must allow network traffic on these ports.
This procedure modifies the iptables firewall to allow incoming connections to the Compute services.
Configuring the service-node firewall
Log in to the server that hosts the Compute service, as root.
Edit the
/etc/sysconfig/iptablesfile, to add an INPUT rule that allows TCP traffic on ports from5900to5999. Make sure the new rule appears before any INPUT rules that REJECT traffic:-A INPUT -p tcp -m multiport --dports 5900:5999 -j ACCEPT
Save the changes to the
/etc/sysconfig/iptablesfile, and restart theiptablesservice to pick up the changes:$ service iptables restart
Repeat this process for each Compute service node.
5.4.5 Injecting the administrator password #
Compute can generate a random administrator (root) password and inject
that password into an instance. If this feature is enabled, users can
run ssh to an instance without an ssh keypair.
The random password appears in the output of the
openstack server create command.
You can also view and set the admin password from the dashboard.
Password injection using the dashboard
By default, the dashboard will display the admin password and allow
the user to modify it.
If you do not want to support password injection, disable the password
fields by editing the dashboard's local_settings.py file.
OPENSTACK_HYPERVISOR_FEATURES = {
...
    'can_set_password': False,
}
Password injection on libvirt-based hypervisors
For hypervisors that use the libvirt back end (such as KVM, QEMU, and
LXC), admin password injection is disabled by default. To enable it, set
this option in /etc/nova/nova.conf:
[libvirt]
inject_password=true
When enabled, Compute will modify the password of the admin account by
editing the /etc/shadow file inside the virtual machine instance.
Users can only use ssh to access the instance by using the admin
password if the virtual machine image is a Linux distribution, and it has
been configured to allow users to use ssh as the root user. This
is not the case for Ubuntu cloud images
which, by default, does not allow users to use ssh to access the
root account.
Password injection and XenAPI (XenServer/XCP)
When using the XenAPI hypervisor back end, Compute uses the XenAPI agent to inject passwords into guests. The virtual machine image must be configured with the agent for password injection to work.
Password injection and Windows images (all hypervisors)
For Windows virtual machines, configure the Windows image to retrieve the admin password on boot by installing an agent such as cloudbase-init.
5.4.6 Manage the cloud #
System administrators can use the openstack and
euca2ools commands to manage their clouds.
The openstack client and euca2ools can be used by all users, though
specific commands might be restricted by the Identity service.
Managing the cloud with the openstack client
The
python-openstackclientpackage provides anopenstackshell that enables Compute API interactions from the command line. Install the client, and provide your user name and password (which can be set as environment variables for convenience), for the ability to administer the cloud from the command line.To install python-openstackclient, follow the instructions in the OpenStack User Guide.
Confirm the installation was successful:
$ openstack help
              usage: openstack [--version] [-v | -q] [--log-file LOG_FILE] [-h] [--debug]
              [--os-cloud <cloud-config-name>]
              [--os-region-name <auth-region-name>]
              [--os-cacert <ca-bundle-file>] [--verify | --insecure]
              [--os-default-domain <auth-domain>]
              ...
Running
openstack helpreturns a list ofopenstackcommands and parameters. To get help for a subcommand, run:$ openstack help SUBCOMMAND
For a complete list of
openstackcommands and parameters, see the OpenStack Command-Line Reference.Set the required parameters as environment variables to make running commands easier. For example, you can add
--os-usernameas anopenstackoption, or set it as an environment variable. To set the user name, password, and project as environment variables, use:$ export OS_USERNAME=joecool $ export OS_PASSWORD=coolword $ export OS_TENANT_NAME=cooluThe Identity service gives you an authentication endpoint, which Compute recognizes as
OS_AUTH_URL:$ export OS_AUTH_URL=http://hostname:5000/v2.0
5.4.6.1 Managing the cloud with euca2ools #
The euca2ools command-line tool provides a command line interface to
EC2 API calls. For more information, see the Official Eucalyptus Documentation.
5.4.6.2 Show usage statistics for hosts and instances #
You can show basic statistics on resource usage for hosts and instances.
For more sophisticated monitoring, see the ceilometer project. You can also use tools, such as Ganglia or Graphite, to gather more detailed data.
5.4.6.2.1 Show host usage statistics #
The following examples show the host usage statistics for a host called
devstack.
List the hosts and the nova-related services that run on them:
$ openstack host list
+-----------+-------------+----------+
| Host Name | Service     | Zone     |
+-----------+-------------+----------+
| devstack  | conductor   | internal |
| devstack  | compute     | nova     |
| devstack  | cert        | internal |
| devstack  | network     | internal |
| devstack  | scheduler   | internal |
| devstack  | consoleauth | internal |
+-----------+-------------+----------+
Get a summary of resource usage of all of the instances running on the host:
$ openstack host show devstack
+----------+----------------------------------+-----+-----------+---------+
| Host     | Project                          | CPU | MEMORY MB | DISK GB |
+----------+----------------------------------+-----+-----------+---------+
| devstack | (total)                          | 2   | 4003      | 157     |
| devstack | (used_now)                       | 3   | 5120      | 40      |
| devstack | (used_max)                       | 3   | 4608      | 40      |
| devstack | b70d90d65e464582b6b2161cf3603ced | 1   | 512       | 0       |
| devstack | 66265572db174a7aa66eba661f58eb9e | 2   | 4096      | 40      |
+----------+----------------------------------+-----+-----------+---------+
The
CPUcolumn shows the sum of the virtual CPUs for instances running on the host.The
MEMORY MBcolumn shows the sum of the memory (in MB) allocated to the instances that run on the host.The
DISK GBcolumn shows the sum of the root and ephemeral disk sizes (in GB) of the instances that run on the host.The row that has the value
used_nowin thePROJECTcolumn shows the sum of the resources allocated to the instances that run on the host, plus the resources allocated to the virtual machine of the host itself.The row that has the value
used_maxin thePROJECTcolumn shows the sum of the resources allocated to the instances that run on the host.NoteThese values are computed by using information about the flavors of the instances that run on the hosts. This command does not query the CPU usage, memory usage, or hard disk usage of the physical host.
5.4.6.2.2 Show instance usage statistics #
Get CPU, memory, I/O, and network statistics for an instance.
List instances:
$ openstack server list
+----------+----------------------+--------+------------+-------------+------------------+------------+
| ID       | Name                 | Status | Task State | Power State | Networks         | Image Name |
+----------+----------------------+--------+------------+-------------+------------------+------------+
| 84c6e... | myCirrosServer       | ACTIVE | None       | Running     | private=10.0.0.3 | cirros     |
| 8a995... | myInstanceFromVolume | ACTIVE | None       | Running     | private=10.0.0.4 | ubuntu     |
+----------+----------------------+--------+------------+-------------+------------------+------------+
Get diagnostic statistics:
$ nova diagnostics myCirrosServer
+---------------------------+--------+
| Property                  | Value  |
+---------------------------+--------+
| memory                    | 524288 |
| memory-actual             | 524288 |
| memory-rss                | 6444   |
| tap1fec8fb8-7a_rx         | 22137  |
| tap1fec8fb8-7a_rx_drop    | 0      |
| tap1fec8fb8-7a_rx_errors  | 0      |
| tap1fec8fb8-7a_rx_packets | 166    |
| tap1fec8fb8-7a_tx         | 18032  |
| tap1fec8fb8-7a_tx_drop    | 0      |
| tap1fec8fb8-7a_tx_errors  | 0      |
| tap1fec8fb8-7a_tx_packets | 130    |
| vda_errors                | -1     |
| vda_read                  | 2048   |
| vda_read_req              | 2      |
| vda_write                 | 182272 |
| vda_write_req             | 74     |
+---------------------------+--------+
Get summary statistics for each tenant:
$ openstack usage list
Usage from 2013-06-25 to 2013-07-24:
+---------+---------+--------------+-----------+---------------+
| Project | Servers | RAM MB-Hours | CPU Hours | Disk GB-Hours |
+---------+---------+--------------+-----------+---------------+
| demo    | 1       | 344064.44    | 672.00    | 0.00          |
| stack   | 3       | 671626.76    | 327.94    | 6558.86       |
+---------+---------+--------------+-----------+---------------+
5.4.7 Logging #
5.4.7.1 Logging module #
Logging behavior can be changed by creating a configuration file. To
specify the configuration file, add this line to the
/etc/nova/nova.conf file:
log-config=/etc/nova/logging.confTo change the logging level, add DEBUG, INFO, WARNING, or
ERROR as a parameter.
The logging configuration file is an INI-style configuration file, which
must contain a section called logger_nova. This controls the
behavior of the logging facility in the nova-* services. For
example:
[logger_nova]
level = INFO
handlers = stderr
qualname = nova
This example sets the debugging level to INFO (which is less verbose
than the default DEBUG setting).
For more about the logging configuration syntax, including the
handlers and quaname variables, see the
Python documentation
on logging configuration files.
For an example of the logging.conf file with various defined handlers, see
the OpenStack Configuration Reference.
5.4.7.2 Syslog #
OpenStack Compute services can send logging information to syslog. This is useful if you want to use rsyslog to forward logs to a remote machine. Separately configure the Compute service (nova), the Identity service (keystone), the Image service (glance), and, if you are using it, the Block Storage service (cinder) to send log messages to syslog. Open these configuration files:
/etc/nova/nova.conf/etc/keystone/keystone.conf/etc/glance/glance-api.conf/etc/glance/glance-registry.conf/etc/cinder/cinder.conf
In each configuration file, add these lines:
debug = False
use_syslog = True
syslog_log_facility = LOG_LOCAL0
In addition to enabling syslog, these settings also turn off debugging output from the log.
Although this example uses the same local facility for each service
(LOG_LOCAL0, which corresponds to syslog facility LOCAL0),
we recommend that you configure a separate local facility for each
service, as this provides better isolation and more flexibility. For
example, you can capture logging information at different severity
levels for different services. syslog allows you to define up to
eight local facilities, LOCAL0, LOCAL1, ..., LOCAL7. For more
information, see the syslog documentation.
5.4.7.3 Rsyslog #
rsyslog is useful for setting up a centralized log server across multiple machines. This section briefly describe the configuration to set up an rsyslog server. A full treatment of rsyslog is beyond the scope of this book. This section assumes rsyslog has already been installed on your hosts (it is installed by default on most Linux distributions).
This example provides a minimal configuration for /etc/rsyslog.conf
on the log server host, which receives the log files
# provides TCP syslog reception
$ModLoad imtcp
$InputTCPServerRun 1024
Add a filter rule to /etc/rsyslog.conf which looks for a host name.
This example uses COMPUTE_01 as the compute host name:
:hostname, isequal, "COMPUTE_01" /mnt/rsyslog/logs/compute-01.logOn each compute host, create a file named
/etc/rsyslog.d/60-nova.conf, with the following content:
# prevent debug from dnsmasq with the daemon.none parameter
*.*;auth,authpriv.none,daemon.none,local0.none -/var/log/syslog
# Specify a log level of ERROR
local0.error    @@172.20.1.43:1024
Once you have created the file, restart the rsyslog service. Error-level
log messages on the compute hosts should now be sent to the log server.
5.4.7.4 Serial console #
The serial console provides a way to examine kernel output and other system messages during troubleshooting if the instance lacks network connectivity.
Read-only access from server serial console is possible
using the os-GetSerialOutput server action. Most
cloud images enable this feature by default. For more information, see
Section 5.5.3, “Common errors and fixes for Compute”.
OpenStack Juno and later supports read-write access using the serial
console using the os-GetSerialConsole server action. This feature
also requires a websocket client to access the serial console.
Configuring read-write serial console access
On a compute node, edit the
/etc/nova/nova.conffile:In the
[serial_console]section, enable the serial console:[serial_console] ... enabled = true
In the
[serial_console]section, configure the serial console proxy similar to graphical console proxies:[serial_console] ... base_url = ws://controller:6083/ listen = 0.0.0.0 proxyclient_address = MANAGEMENT_INTERFACE_IP_ADDRESS
The
base_urloption specifies the base URL that clients receive from the API upon requesting a serial console. Typically, this refers to the host name of the controller node.The
listenoption specifies the network interface nova-compute should listen on for virtual console connections. Typically, 0.0.0.0 will enable listening on all interfaces.The
proxyclient_addressoption specifies which network interface the proxy should connect to. Typically, this refers to the IP address of the management interface.When you enable read-write serial console access, Compute will add serial console information to the Libvirt XML file for the instance. For example:
<console type='tcp'>
  <source mode='bind' host='127.0.0.1' service='10000'/>
  <protocol type='raw'/>
  <target type='serial' port='0'/>
  <alias name='serial0'/>
</console>
Accessing the serial console on an instance
Use the
nova get-serial-proxycommand to retrieve the websocket URL for the serial console on the instance:$ nova get-serial-proxy INSTANCE_NAME
Type
Url
serial
ws://127.0.0.1:6083/?token=18510769-71ad-4e5a-8348-4218b5613b3d
Alternatively, use the API directly:
$ curl -i 'http://<controller>:8774/v2.1/<tenant_uuid>/servers/
  <instance_uuid>/action' \
  -X POST \
  -H "Accept: application/json" \
  -H "Content-Type: application/json" \
  -H "X-Auth-Project-Id: <project_id>" \
  -H "X-Auth-Token: <auth_token>" \
  -d '{"os-getSerialConsole": {"type": "serial"}}'
Use Python websocket with the URL to generate
.send,.recv, and.filenomethods for serial console access. For example:import websocket ws = websocket.create_connection( 'ws://127.0.0.1:6083/?token=18510769-71ad-4e5a-8348-4218b5613b3d', subprotocols=['binary', 'base64'])
Alternatively, use a Python websocket client.
When you enable the serial console, typical instance logging using
the nova console-log command is disabled. Kernel output
and other system messages will not be visible unless you are
actively viewing the serial console.
5.4.8 Secure with rootwrap #
Rootwrap allows unprivileged users to safely run Compute actions as the
root user. Compute previously used sudo for this purpose, but this
was difficult to maintain, and did not allow advanced filters. The
rootwrap command replaces sudo for Compute.
To use rootwrap, prefix the Compute command with nova-rootwrap. For
example:
$ sudo nova-rootwrap /etc/nova/rootwrap.conf command
A generic sudoers entry lets the Compute user run nova-rootwrap
as root. The nova-rootwrap code looks for filter definition
directories in its configuration file, and loads command filters from
them. It then checks if the command requested by Compute matches one of
those filters and, if so, executes the command (as root). If no filter
matches, it denies the request.
Be aware of issues with using NFS and root-owned files. The NFS
share must be configured with the no_root_squash option enabled,
in order for rootwrap to work correctly.
Rootwrap is fully controlled by the root user. The root user
owns the sudoers entry which allows Compute to run a specific
rootwrap executable as root, and only with a specific
configuration file (which should also be owned by root).
The nova-rootwrap command imports the Python
modules it needs from a cleaned, system-default PYTHONPATH.
The root-owned configuration file points to root-owned
filter definition directories, which contain root-owned
filters definition files. This chain ensures that the Compute
user itself is not in control of the configuration or modules
used by the nova-rootwrap executable.
5.4.8.1 Configure rootwrap #
Configure rootwrap in the rootwrap.conf file. Because
it is in the trusted security path, it must be owned and writable
by only the root user. The rootwrap_config=entry parameter
specifies the file's location in the sudoers entry and in the
nova.conf configuration file.
The rootwrap.conf file uses an INI file format with these
sections and parameters:
|
Configuration option=Default value |
(Type) Description |
|
[DEFAULT] filters_path=/etc/nova/rootwrap.d,/usr/share/nova/rootwrap |
(ListOpt) Comma-separated list of directories containing filter definition files. Defines where rootwrap filters are stored. Directories defined on this line should all exist, and be owned and writable only by the root user. |
If the root wrapper is not performing correctly, you can add a
workaround option into the nova.conf configuration file. This
workaround re-configures the root wrapper configuration to fall back to
running commands as sudo, and is a Kilo release feature.
Including this workaround in your configuration file safeguards your environment from issues that can impair root wrapper performance. Tool changes that have impacted Python Build Reasonableness (PBR) for example, are a known issue that affects root wrapper performance.
To set up this workaround, configure the disable_rootwrap option in
the [workaround] section of the nova.conf configuration file.
The filters definition files contain lists of filters that rootwrap will
use to allow or deny a specific command. They are generally suffixed by
.filters. Since they are in the trusted security path, they need to
be owned and writable only by the root user. Their location is specified
in the rootwrap.conf file.
Filter definition files use an INI file format with a [Filters]
section and several lines, each with a unique parameter name, which
should be different for each filter you define:
|
Configuration option=Default value |
(Type) Description |
|
[Filters] filter_name=kpartx: CommandFilter, /sbin/kpartx, root |
(ListOpt) Comma-separated list containing the filter class to use, followed by the Filter arguments (which vary depending on the Filter class selected). |
5.4.8.2 Configure the rootwrap daemon #
Administrators can use rootwrap daemon support instead of running
rootwrap with sudo. The rootwrap daemon reduces the
overhead and performance loss that results from running
oslo.rootwrap with sudo. Each call that needs rootwrap
privileges requires a new instance of rootwrap. The daemon
prevents overhead from the repeated calls. The daemon does not support
long running processes, however.
To enable the rootwrap daemon, set use_rootwrap_daemon to True
in the Compute service configuration file.
5.4.9 Configure migrations #
Only administrators can perform live migrations. If your cloud is configured to use cells, you can perform live migration within but not between cells.
Migration enables an administrator to move a virtual-machine instance from one compute host to another. This feature is useful when a compute host requires maintenance. Migration can also be useful to redistribute the load when many VM instances are running on a specific physical machine.
The migration types are:
Non-live migration (sometimes referred to simply as 'migration'). The instance is shut down for a period of time to be moved to another hypervisor. In this case, the instance recognizes that it was rebooted.
Live migration (or 'true live migration'). Almost no instance downtime. Useful when the instances must be kept running during the migration. The different types of live migration are:
Shared storage-based live migration. Both hypervisors have access to shared storage.
Block live migration. No shared storage is required. Incompatible with read-only devices such as CD-ROMs and Configuration Drive (config_drive).
Volume-backed live migration. Instances are backed by volumes rather than ephemeral disk, no shared storage is required, and migration is supported (currently only available for libvirt-based hypervisors).
The following sections describe how to configure your hosts and compute nodes for migrations by using the KVM and XenServer hypervisors.
5.4.9.1 KVM-Libvirt #
5.4.9.1.2 Example Compute installation environment #
Prepare at least three servers. In this example, we refer to the servers as
HostA,HostB, andHostC:HostAis the Cloud Controller, and should run these services:nova-api,nova-scheduler,nova-network,cinder-volume, andnova-objectstore.HostBandHostCare the compute nodes that runnova-compute.
Ensure that
NOVA-INST-DIR(set withstate_pathin thenova.conffile) is the same on all hosts.In this example,
HostAis the NFSv4 server that exportsNOVA-INST-DIR/instancesdirectory.HostBandHostCare NFSv4 clients that mountHostA.
Configuring your system
Configure your DNS or
/etc/hostsand ensure it is consistent across all hosts. Make sure that the three hosts can perform name resolution with each other. As a test, use thepingcommand to ping each host from one another:$ ping HostA $ ping HostB $ ping HostC
Ensure that the UID and GID of your Compute and libvirt users are identical between each of your servers. This ensures that the permissions on the NFS mount works correctly.
Ensure you can access SSH without a password and without StrictHostKeyChecking between
HostBandHostCasnovauser (set with the owner ofnova-computeservice). Direct access from one compute host to another is needed to copy the VM file across. It is also needed to detect if the source and target compute nodes share a storage subsystem.Export
NOVA-INST-DIR/instancesfromHostA, and ensure it is readable and writable by the Compute user onHostBandHostC.For more information, see: SettingUpNFSHowTo or CentOS/Red Hat: Setup NFS v4.0 File Server
Configure the NFS server at
HostAby adding the following line to the/etc/exportsfile:NOVA-INST-DIR/instances HostA/255.255.0.0(rw,sync,fsid=0,no_root_squash)
Change the subnet mask (
255.255.0.0) to the appropriate value to include the IP addresses ofHostBandHostC. Then restart theNFSserver:# /etc/init.d/nfs-kernel-server restart # /etc/init.d/idmapd restart
On both compute nodes, enable the
execute/searchbit on your shared directory to allow qemu to be able to use the images within the directories. On all hosts, run the following command:$ chmod o+x NOVA-INST-DIR/instances
Configure NFS on
HostBandHostCby adding the following line to the/etc/fstabfileHostA:/ /NOVA-INST-DIR/instances nfs4 defaults 0 0
Ensure that you can mount the exported directory
$ mount -a -v
Check that
HostAcan see theNOVA-INST-DIR/instances/directory$ ls -ld NOVA-INST-DIR/instances/ drwxr-xr-x 2 nova nova 4096 2012-05-19 14:34 nova-install-dir/instances/
Perform the same check on
HostBandHostC, paying special attention to the permissions (Compute should be able to write)$ ls -ld NOVA-INST-DIR/instances/ drwxr-xr-x 2 nova nova 4096 2012-05-07 14:34 nova-install-dir/instances/ $ df -k Filesystem 1K-blocks Used Available Use% Mounted on /dev/sda1 921514972 4180880 870523828 1% / none 16498340 1228 16497112 1% /dev none 16502856 0 16502856 0% /dev/shm none 16502856 368 16502488 1% /var/run none 16502856 0 16502856 0% /var/lock none 16502856 0 16502856 0% /lib/init/rw HostA: 921515008 101921792 772783104 12% /var/lib/nova/instances ( <--- this line is important.)
Update the libvirt configurations so that the calls can be made securely. These methods enable remote access over TCP and are not documented here.
SSH tunnel to libvirtd's UNIX socket
libvirtd TCP socket, with GSSAPI/Kerberos for auth+data encryption
libvirtd TCP socket, with TLS for encryption and x509 client certs for authentication
libvirtd TCP socket, with TLS for encryption and Kerberos for authentication
Restart
libvirt. After you run the command, ensure that libvirt is successfully restarted# stop libvirt-bin && start libvirt-bin $ ps -ef | grep libvirt root 1145 1 0 Nov27 ? 00:00:03 /usr/sbin/libvirtd -d -l\
Configure your firewall to allow libvirt to communicate between nodes. By default, libvirt listens on TCP port 16509, and an ephemeral TCP range from 49152 to 49261 is used for the KVM communications. Based on the secure remote access TCP configuration you chose, be careful which ports you open, and always understand who has access. For information about ports that are used with libvirt, see the libvirt documentation.
Configure the downtime required for the migration by adjusting these parameters in the
nova.conffile:live_migration_downtime = 500 live_migration_downtime_steps = 10 live_migration_downtime_delay = 75
The
live_migration_downtimeparameter sets the maximum permitted downtime for a live migration, in milliseconds. This setting defaults to 500 milliseconds.The
live_migration_downtime_stepsparameter sets the total number of incremental steps to reach the maximum downtime value. This setting defaults to 10 steps.The
live_migration_downtime_delayparameter sets the amount of time to wait between each step, in seconds. This setting defaults to 75 seconds.You can now configure other options for live migration. In most cases, you will not need to configure any options. For advanced configuration options, see the OpenStack Configuration Reference Guide.
5.4.9.1.3 Enabling true live migration #
Prior to the Kilo release, the Compute service did not use the libvirt
live migration function by default. To enable this function, add the
following line to the [libvirt] section of the nova.conf file:
live_migration_flag=VIR_MIGRATE_UNDEFINE_SOURCE,VIR_MIGRATE_PEER2PEER,VIR_MIGRATE_LIVE,VIR_MIGRATE_TUNNELLEDOn versions older than Kilo, the Compute service does not use libvirt's live migration by default because there is a risk that the migration process will never end. This can happen if the guest operating system uses blocks on the disk faster than they can be migrated.
5.4.9.1.4 Block migration #
Configuring KVM for block migration is exactly the same as the above
configuration in Section 5.4.9.1.1, “Shared storage”
the section called shared storage, except that NOVA-INST-DIR/instances
is local to each host rather than shared. No NFS client or server
configuration is required.
To use block migration, you must use the
--block-migrateparameter with the live migration command.Block migration is incompatible with read-only devices such as CD-ROMs and Configuration Drive (config_drive).
Since the ephemeral drives are copied over the network in block migration, migrations of instances with heavy I/O loads may never complete if the drives are writing faster than the data can be copied over the network.
5.4.9.2 XenServer #
5.4.9.2.1 Shared storage #
Prerequisites
Compatible XenServer hypervisors. For more information, see the Requirements for Creating Resource Pools section of the XenServer Administrator's Guide.
Shared storage. An NFS export, visible to all XenServer hosts.
To use shared storage live migration with XenServer hypervisors, the hosts must be joined to a XenServer pool. To create that pool, a host aggregate must be created with specific metadata. This metadata is used by the XAPI plug-ins to establish the pool.
Using shared storage live migrations with XenServer Hypervisors
Add an NFS VHD storage to your master XenServer, and set it as the default storage repository. For more information, see NFS VHD in the XenServer Administrator's Guide.
Configure all compute nodes to use the default storage repository (
sr) for pool operations. Add this line to yournova.confconfiguration files on all compute nodes:sr_matching_filter=default-sr:true
Create a host aggregate. This command creates the aggregate, and then displays a table that contains the ID of the new aggregate
$ openstack aggregate create --zone AVAILABILITY_ZONE POOL_NAME
Add metadata to the aggregate, to mark it as a hypervisor pool
$ openstack aggregate set --property hypervisor_pool=true AGGREGATE_ID

$ openstack aggregate set --property operational_state=created AGGREGATE_ID
Make the first compute node part of that aggregate
$ openstack aggregate add host AGGREGATE_ID MASTER_COMPUTE_NAME
The host is now part of a XenServer pool.
Add hosts to the pool
$ openstack aggregate add host AGGREGATE_ID COMPUTE_HOST_NAME
NoteThe added compute node and the host will shut down to join the host to the XenServer pool. The operation will fail if any server other than the compute node is running or suspended on the host.
5.4.9.2.2 Block migration #
Compatible XenServer hypervisors. The hypervisors must support the Storage XenMotion feature. See your XenServer manual to make sure your edition has this feature.
NoteTo use block migration, you must use the
--block-migrateparameter with the live migration command.Block migration works only with EXT local storage storage repositories, and the server must not have any volumes attached.
5.4.10 Migrate instances #
This section discusses how to migrate running instances from one OpenStack Compute server to another OpenStack Compute server.
Before starting a migration, review the Configure migrations section. Section 5.4.9, “Configure migrations”.
Although the nova command is called live-migration,
under the default Compute configuration options, the instances
are suspended before migration. For more information, see
Configure migrations.
in the OpenStack Configuration Reference.
Migrating instances
Check the ID of the instance to be migrated:
$ openstack server list
ID
Name
Status
Networks
d1df1b5a-70c4-4fed-98b7-423362f2c47c
vm1
ACTIVE
private=a.b.c.d
d693db9e-a7cf-45ef-a7c9-b3ecb5f22645
vm2
ACTIVE
private=e.f.g.h
Check the information associated with the instance. In this example,
vm1is running onHostB:$ openstack server show d1df1b5a-70c4-4fed-98b7-423362f2c47c
Property
Value
...
OS-EXT-SRV-ATTR:host
...
flavor
id
name
private network
status
...
...
HostB
...
m1.tiny
d1df1b5a-70c4-4fed-98b7-423362f2c47c
vm1
a.b.c.d
ACTIVE
...
Select the compute node the instance will be migrated to. In this example, we will migrate the instance to
HostC, becausenova-computeis running on it:Table 5.6: openstack compute service list #Binary
Host
Zone
Status
State
Updated_at
nova-consoleauth
HostA
internal
enabled
up
2014-03-25T10:33:25.000000
nova-scheduler
HostA
internal
enabled
up
2014-03-25T10:33:25.000000
nova-conductor
HostA
internal
enabled
up
2014-03-25T10:33:27.000000
nova-compute
HostB
nova
enabled
up
2014-03-25T10:33:31.000000
nova-compute
HostC
nova
enabled
up
2014-03-25T10:33:31.000000
nova-cert
HostA
internal
enabled
up
2014-03-25T10:33:31.000000
Check that
HostChas enough resources for migration:# openstack host show HostC
HOST
PROJECT
cpu
memory_mb
disk_gb
HostC
(total)
16
32232
878
HostC
(used_now)
22
21284
442
HostC
(used_max)
22
21284
422
HostC
p1
22
21284
422
HostC
p2
22
21284
422
cpu: Number of CPUsmemory_mb: Total amount of memory, in MBdisk_gb: Total amount of space for NOVA-INST-DIR/instances, in GB
In this table, the first row shows the total amount of resources available on the physical server. The second line shows the currently used resources. The third line shows the maximum used resources. The fourth line and below shows the resources available for each project.
Migrate the instance using the
openstack server migratecommand:$ openstack server migrate SERVER --live HOST_NAME
In this example, SERVER can be the ID or name of the instance. Another example:
$ openstack server migrate d1df1b5a-70c4-4fed-98b7-423362f2c47c --live HostC
Migration of d1df1b5a-70c4-4fed-98b7-423362f2c47c initiated.
WarningWhen using live migration to move workloads between Icehouse and Juno compute nodes, it may cause data loss because libvirt live migration with shared block storage was buggy (potential loss of data) before version 3.32. This issue can be solved when we upgrade to RPC API version 4.0.
Check that the instance has been migrated successfully, using
openstack server list. If the instance is still running onHostB, check the log files atsrc/destfornova-computeandnova-schedulerto determine why.
5.4.11 Configure remote console access #
To provide a remote console or remote desktop access to guest virtual machines, use VNC or SPICE HTML5 through either the OpenStack dashboard or the command line. Best practice is to select one or the other to run.
5.4.11.1 About nova-consoleauth #
Both client proxies leverage a shared service to manage token
authentication called nova-consoleauth. This service must be running for
either proxy to work. Many proxies of either type can be run against a
single nova-consoleauth service in a cluster configuration.
Do not confuse the nova-consoleauth shared service with
nova-console, which is a XenAPI-specific service that most recent
VNC proxy architectures do not use.
5.4.11.2 SPICE console #
OpenStack Compute supports VNC consoles to guests. The VNC protocol is fairly limited, lacking support for multiple monitors, bi-directional audio, reliable cut-and-paste, video streaming and more. SPICE is a new protocol that aims to address the limitations in VNC and provide good remote desktop support.
SPICE support in OpenStack Compute shares a similar architecture to the
VNC implementation. The OpenStack dashboard uses a SPICE-HTML5 widget in
its console tab that communicates to the nova-spicehtml5proxy service by
using SPICE-over-websockets. The nova-spicehtml5proxy service
communicates directly with the hypervisor process by using SPICE.
VNC must be explicitly disabled to get access to the SPICE console. Set
the vnc_enabled option to False in the [DEFAULT] section to
disable the VNC console.
Use the following options to configure SPICE as the console for OpenStack Compute:
|
[spice] | |
|---|---|
|
Spice configuration option = Default value |
Description |
|
|
(BoolOpt) Enable spice guest agent support |
|
|
(BoolOpt) Enable spice related features |
|
|
(StrOpt) Location of spice HTML5 console proxy, in the form "http://127.0.0.1:6082/spice_auto.html" |
|
|
(StrOpt) Host on which to listen for incoming requests |
|
|
(IntOpt) Port on which to listen for incoming requests |
|
|
(StrOpt) Keymap for spice |
|
|
(StrOpt) IP address on which instance spice server should listen |
|
|
(StrOpt) The address to which proxy clients (like nova-spicehtml5proxy) should connect |
5.4.11.3 VNC console proxy #
The VNC proxy is an OpenStack component that enables compute service users to access their instances through VNC clients.
The web proxy console URLs do not support the websocket protocol scheme (ws://) on python versions less than 2.7.4.
The VNC console connection works as follows:
A user connects to the API and gets an
access_urlsuch as,http://ip:port/?token=xyz.The user pastes the URL in a browser or uses it as a client parameter.
The browser or client connects to the proxy.
The proxy talks to
nova-consoleauthto authorize the token for the user, and maps the token to the private host and port of the VNC server for an instance.The compute host specifies the address that the proxy should use to connect through the
nova.conffile option,vncserver_proxyclient_address. In this way, the VNC proxy works as a bridge between the public network and private host network.The proxy initiates the connection to VNC server and continues to proxy until the session ends.
The proxy also tunnels the VNC protocol over WebSockets so that the
noVNC client can talk to VNC servers. In general, the VNC proxy:
Bridges between the public network where the clients live and the private network where VNC servers live.
Mediates token authentication.
Transparently deals with hypervisor-specific connection details to provide a uniform client experience.

5.4.11.3.1 VNC configuration options #
To customize the VNC console, use the following configuration options in
your nova.conf file:
To support Section 5.4.9, “Configure migrations”,
you cannot specify a specific IP address for vncserver_listen,
because that IP address does not exist on the destination host.
|
Configuration option = Default value |
Description |
|---|---|
|
[DEFAULT] | |
|
|
(BoolOpt) Become a daemon (background process) |
|
|
(StrOpt) SSL key file (if separate from cert) |
|
|
(StrOpt) Host on which to listen for incoming requests |
|
|
(IntOpt) Port on which to listen for incoming requests |
|
|
(BoolOpt) Record sessions to FILE.[session_number] |
|
|
(BoolOpt) Source is ipv6 |
|
|
(BoolOpt) Disallow non-encrypted connections |
|
|
(StrOpt) Run webserver on same port. Serve files from DIR. |
|
[vmware] | |
|
|
(IntOpt) VNC starting port |
|
|
vnc_port_total = 10000 |
|
[vnc] | |
|
enabled = True |
(BoolOpt) Enable VNC related features |
|
novncproxy_base_url = http://127.0.0.1:6080/vnc_auto.html |
(StrOpt) Location of VNC console proxy, in the form "http://127.0.0.1:6080/vnc_auto.html" |
|
vncserver_listen = 127.0.0.1 |
(StrOpt) IP address on which instance vncservers should listen |
|
vncserver_proxyclient_address = 127.0.0.1 |
(StrOpt) The address to which proxy clients should connect |
The
vncserver_proxyclient_addressdefaults to127.0.0.1, which is the address of the compute host that Compute instructs proxies to use when connecting to instance servers.For all-in-one XenServer domU deployments, set this to
169.254.0.1.For multi-host XenServer domU deployments, set to a
dom0
management IP
on the same network as the proxies.For multi-host libvirt deployments, set to a host management IP on the same network as the proxies.
5.4.11.3.2 Typical deployment #
A typical deployment has the following components:
A
nova-consoleauthprocess. Typically runs on the controller host.One or more
nova-novncproxyservices. Supports browser-based noVNC clients. For simple deployments, this service typically runs on the same machine asnova-apibecause it operates as a proxy between the public network and the private compute host network.One or more compute hosts. These compute hosts must have correctly configured options, as follows.
5.4.11.3.3 nova-novncproxy (noVNC) #
You must install the noVNC package, which contains the nova-novncproxy
service. As root, run the following command:
# apt-get install nova-novncproxy
The service starts automatically on installation.
To restart the service, run:
# service nova-novncproxy restart
The configuration option parameter should point to your nova.conf
file, which includes the message queue server address and credentials.
By default, nova-novncproxy binds on 0.0.0.0:6080.
To connect the service to your Compute deployment, add the following
configuration options to your nova.conf file:
vncserver_listen=0.0.0.0Specifies the address on which the VNC service should bind. Make sure it is assigned one of the compute node interfaces. This address is the one used by your domain file.
<graphics type="vnc" autoport="yes" keymap="en-us" listen="0.0.0.0"/>
NoteTo use live migration, use the 0.0.0.0 address.
vncserver_proxyclient_address=127.0.0.1The address of the compute host that Compute instructs proxies to use when connecting to instance
vncservers.
5.4.11.3.4 Frequently asked questions about VNC access to virtual machines #
Q: I want VNC support in the OpenStack dashboard. What services do I need?
A: You need
nova-novncproxy,nova-consoleauth, and correctly configured compute hosts.Q: When I use ``nova get-vnc-console`` or click on the VNC tab of the OpenStack dashboard, it hangs. Why?
A: Make sure you are running
nova-consoleauth(in addition tonova-novncproxy). The proxies rely onnova-consoleauthto validate tokens, and waits for a reply from them until a timeout is reached.Q: My VNC proxy worked fine during my all-in-one test, but now it doesn't work on multi host. Why?
A: The default options work for an all-in-one install, but changes must be made on your compute hosts once you start to build a cluster. As an example, suppose you have two servers:
PROXYSERVER (public_ip=172.24.1.1, management_ip=192.168.1.1)
COMPUTESERVER (management_ip=192.168.1.2)
Your
nova-computeconfiguration file must set the following values:# These flags help construct a connection data structure vncserver_proxyclient_address=192.168.1.2 novncproxy_base_url=http://172.24.1.1:6080/vnc_auto.html # This is the address where the underlying vncserver (not the proxy) # will listen for connections. vncserver_listen=192.168.1.2
Q: My noVNC does not work with recent versions of web browsers. Why?
A: Make sure you have installed
python-numpy, which is required to support a newer version of the WebSocket protocol (HyBi-07+).Q: How do I adjust the dimensions of the VNC window image in the OpenStack dashboard?
A: These values are hard-coded in a Django HTML template. To alter them, edit the
_detail_vnc.htmltemplate file. The location of this file varies based on Linux distribution. On Ubuntu 14.04, the file is at/usr/share/pyshared/horizon/dashboards/nova/instances/templates/instances/_detail_vnc.html.Modify the
widthandheightoptions, as follows:<iframe src="{{ vnc_url }}" width="720" height="430"></iframe>Q: My noVNC connections failed with ValidationError: Origin header protocol does not match. Why?
A: Make sure the
base_urlmatch your TLS setting. If you are using https console connections, make sure that the value ofnovncproxy_base_urlis set explicitly where thenova-novncproxyservice is running.
5.4.12 Configure Compute service groups #
The Compute service must know the status of each compute node to effectively manage and use them. This can include events like a user launching a new VM, the scheduler sending a request to a live node, or a query to the ServiceGroup API to determine if a node is live.
When a compute worker running the nova-compute daemon starts, it calls the join API to join the compute group. Any service (such as the scheduler) can query the group's membership and the status of its nodes. Internally, the ServiceGroup client driver automatically updates the compute worker status.
5.4.12.1 Database ServiceGroup driver #
By default, Compute uses the database driver to track if a node is live.
In a compute worker, this driver periodically sends a db update
command to the database, saying “I'm OK” with a timestamp. Compute uses
a pre-defined timeout (service_down_time) to determine if a node is
dead.
The driver has limitations, which can be problematic depending on your environment. If a lot of compute worker nodes need to be checked, the database can be put under heavy load, which can cause the timeout to trigger, and a live node could incorrectly be considered dead. By default, the timeout is 60 seconds. Reducing the timeout value can help in this situation, but you must also make the database update more frequently, which again increases the database workload.
The database contains data that is both transient (such as whether the node is alive) and persistent (such as entries for VM owners). With the ServiceGroup abstraction, Compute can treat each type separately.
5.4.12.1.1 ZooKeeper ServiceGroup driver #
The ZooKeeper ServiceGroup driver works by using ZooKeeper ephemeral
nodes. ZooKeeper, unlike databases, is a distributed system, with its
load divided among several servers. On a compute worker node, the driver
can establish a ZooKeeper session, then create an ephemeral znode in the
group directory. Ephemeral znodes have the same lifespan as the session.
If the worker node or the nova-compute daemon crashes, or a network
partition is in place between the worker and the ZooKeeper server
quorums, the ephemeral znodes are removed automatically. The driver
can be given group membership by running the ls command in the
group directory.
The ZooKeeper driver requires the ZooKeeper servers and client libraries. Setting up ZooKeeper servers is outside the scope of this guide (for more information, see Apache Zookeeper). These client-side Python libraries must be installed on every compute node:
- python-zookeeper
The official Zookeeper Python binding
- evzookeeper
This library makes the binding work with the eventlet threading model.
This example assumes the ZooKeeper server addresses and ports are
192.168.2.1:2181, 192.168.2.2:2181, and 192.168.2.3:2181.
These values in the /etc/nova/nova.conf file are required on every
node for the ZooKeeper driver:
# Driver for the ServiceGroup service
servicegroup_driver="zk"

[zookeeper]
address="192.168.2.1:2181,192.168.2.2:2181,192.168.2.3:2181"
5.4.12.1.2 Memcache ServiceGroup driver #
The memcache ServiceGroup driver uses memcached, a distributed memory object caching system that is used to increase site performance. For more details, see memcached.org.
To use the memcache driver, you must install memcached. You might already have it installed, as the same driver is also used for the OpenStack Object Storage and OpenStack dashboard. To install memcached, see the Environment -> Memcached section in the Installation Tutorials and Guides depending on your distribution.
These values in the /etc/nova/nova.conf file are required on every
node for the memcache driver:
# Driver for the ServiceGroup service
servicegroup_driver = "mc"

# Memcached servers. Use either a list of memcached servers to use for caching (list value),
# or "<None>" for in-process caching (default).
memcached_servers = <None>

# Timeout; maximum time since last check-in for up service (integer value).
# Helps to define whether a node is dead
service_down_time = 60
5.4.13 Security hardening #
OpenStack Compute can be integrated with various third-party technologies to increase security. For more information, see the OpenStack Security Guide.
5.4.13.1 Trusted compute pools #
Administrators can designate a group of compute hosts as trusted using trusted compute pools. The trusted hosts use hardware-based security features, such as the Intel Trusted Execution Technology (TXT), to provide an additional level of security. Combined with an external stand-alone, web-based remote attestation server, cloud providers can ensure that the compute node runs only software with verified measurements and can ensure a secure cloud stack.
Trusted compute pools provide the ability for cloud subscribers to request services run only on verified compute nodes.
The remote attestation server performs node verification like this:
Compute nodes boot with Intel TXT technology enabled.
The compute node BIOS, hypervisor, and operating system are measured.
When the attestation server challenges the compute node, the measured data is sent to the attestation server.
The attestation server verifies the measurements against a known good database to determine node trustworthiness.
A description of how to set up an attestation service is beyond the scope of this document. For an open source project that you can use to implement an attestation service, see the Open Attestation project.

Enable scheduling support for trusted compute pools by adding these lines to the
DEFAULTsection of the/etc/nova/nova.conffile:[DEFAULT] compute_scheduler_driver=nova.scheduler.filter_scheduler.FilterScheduler scheduler_available_filters=nova.scheduler.filters.all_filters scheduler_default_filters=AvailabilityZoneFilter,RamFilter,ComputeFilter,TrustedFilter
Specify the connection information for your attestation service by adding these lines to the
trusted_computingsection of the/etc/nova/nova.conffile:[trusted_computing] attestation_server = 10.1.71.206 attestation_port = 8443 # If using OAT v2.0 after, use this port: # attestation_port = 8181 attestation_server_ca_file = /etc/nova/ssl.10.1.71.206.crt # If using OAT v1.5, use this api_url: attestation_api_url = /AttestationService/resources # If using OAT pre-v1.5, use this api_url: # attestation_api_url = /OpenAttestationWebServices/V1.0 attestation_auth_blob = i-am-openstack
In this example:
- server
Host name or IP address of the host that runs the attestation service
- port
HTTPS port for the attestation service
- server_ca_file
Certificate file used to verify the attestation server's identity
- api_url
The attestation service's URL path
- auth_blob
An authentication blob, required by the attestation service.
Save the file, and restart the
nova-computeandnova-schedulerservice to pick up the changes.
To customize the trusted compute pools, use these configuration option settings:
|
Configuration option = Default value |
Description |
|---|---|
|
[trusted_computing] | |
|
attestation_api_url = /OpenAttestationWebServices/V1.0 |
(StrOpt) Attestation web API URL |
|
attestation_auth_blob = None |
(StrOpt) Attestation authorization blob - must change |
|
attestation_auth_timeout = 60 |
(IntOpt) Attestation status cache valid period length |
|
attestation_insecure_ssl = False |
(BoolOpt) Disable SSL cert verification for Attestation service |
|
attestation_port = 8443 |
(StrOpt) Attestation server port |
|
attestation_server = None |
(StrOpt) Attestation server HTTP |
|
attestation_server_ca_file = None |
(StrOpt) Attestation server Cert file for Identity verification |
Flavors can be designated as trusted using the
nova flavor-key setcommand. In this example, them1.tinyflavor is being set as trusted:$ nova flavor-key m1.tiny set trust:trusted_host=trusted
You can request that your instance is run on a trusted host by specifying a trusted flavor when booting the instance:
$ openstack server create --flavor m1.tiny \
  --key-name myKeypairName --image myImageID newInstanceName
5.4.13.2 Encrypt Compute metadata traffic #
Enabling SSL encryption
OpenStack supports encrypting Compute metadata traffic with HTTPS.
Enable SSL encryption in the metadata_agent.ini file.
Enable the HTTPS protocol.
nova_metadata_protocol = https
Determine whether insecure SSL connections are accepted for Compute metadata server requests. The default value is
False.nova_metadata_insecure = False
Specify the path to the client certificate.
nova_client_cert = PATH_TO_CERT
Specify the path to the private key.
nova_client_priv_key = PATH_TO_KEY
5.4.14 Recover from a failed compute node #
If you deploy Compute with a shared file system, you can use several methods to quickly recover from a node failure. This section discusses manual recovery.
5.4.14.1 Evacuate instances #
If a hardware malfunction or other error causes the cloud compute node to
fail, you can use the nova evacuate command to evacuate instances.
See the OpenStack Administrator Guide.
5.4.14.2 Manual recovery #
To manually recover a failed compute node:
Identify the VMs on the affected hosts by using a combination of the
openstack server listandopenstack server showcommands or theeuca-describe-instancescommand.For example, this command displays information about the i-000015b9 instance that runs on the np-rcc54 node:
$ euca-describe-instances
i-000015b9 at3-ui02 running nectarkey (376, np-rcc54) 0 m1.xxlarge 2012-06-19T00:48:11.000Z 115.146.93.60
Query the Compute database for the status of the host. This example converts an EC2 API instance ID to an OpenStack ID. If you use the
novacommands, you can substitute the ID directly. This example output is truncated:mysql> SELECT * FROM instances WHERE id = CONV('15b9', 16, 10) \G; *************************** 1. row *************************** created_at: 2012-06-19 00:48:11 updated_at: 2012-07-03 00:35:11 deleted_at: NULL ... id: 5561 ... power_state: 5 vm_state: shutoff ... hostname: at3-ui02 host: np-rcc54 ... uuid: 3f57699a-e773-4650-a443-b4b37eed5a06 ... task_state: NULL ...NoteFind the credentials for your database in
/etc/nova.conffile.Decide to which compute host to move the affected VM. Run this database command to move the VM to that host:
mysql> UPDATE instances SET host = 'np-rcc46' WHERE uuid = '3f57699a-e773-4650-a443-b4b37eed5a06';
If you use a hypervisor that relies on libvirt, such as KVM, update the
libvirt.xmlfile in/var/lib/nova/instances/[instance ID]with these changes:Change the
DHCPSERVERvalue to the host IP address of the new compute host.Update the VNC IP to
0.0.0.0.
Reboot the VM:
$ openstack server reboot 3f57699a-e773-4650-a443-b4b37eed5a06
Typically, the database update and openstack server reboot command
recover a VM from a failed host. However, if problems persist, try one of
these actions:
Use
virshto recreate the network filter configuration.Restart Compute services.
Update the
vm_stateandpower_statefields in the Compute database.
5.4.14.3 Recover from a UID/GID mismatch #
Sometimes when you run Compute with a shared file system or an automated configuration tool, files on your compute node might use the wrong UID or GID. This UID or GID mismatch can prevent you from running live migrations or starting virtual machines.
This procedure runs on nova-compute hosts, based on the KVM hypervisor:
Set the nova UID to the same number in
/etc/passwdon all hosts. For example, set the UID to112.NoteChoose UIDs or GIDs that are not in use for other users or groups.
Set the
libvirt-qemuUID to the same number in the/etc/passwdfile on all hosts. For example, set the UID to119.Set the
novagroup to the same number in the/etc/groupfile on all hosts. For example, set the group to120.Set the
libvirtdgroup to the same number in the/etc/groupfile on all hosts. For example, set the group to119.Stop the services on the compute node.
Change all files that the nova user or group owns. For example:
# find / -uid 108 -exec chown nova {} \;
# note the 108 here is the old nova UID before the change
# find / -gid 120 -exec chgrp nova {} \;
Repeat all steps for the
libvirt-qemufiles, if required.Restart the services.
To verify that all files use the correct IDs, run the
findcommand.
5.4.14.4 Recover cloud after disaster #
This section describes how to manage your cloud after a disaster and back up persistent storage volumes. Backups are mandatory, even outside of disaster scenarios.
For a definition of a disaster recovery plan (DRP), see http://en.wikipedia.org/wiki/Disaster_Recovery_Plan.
A disk crash, network loss, or power failure can affect several components in your cloud architecture. The worst disaster for a cloud is a power loss. A power loss affects these components:
A cloud controller (
nova-api,nova-objectstore,nova-network)A compute node (
nova-compute)A storage area network (SAN) used by OpenStack Block Storage (
cinder-volumes)
Before a power loss:
Create an active iSCSI session from the SAN to the cloud controller (used for the
cinder-volumesLVM's VG).Create an active iSCSI session from the cloud controller to the compute node (managed by
cinder-volume).Create an iSCSI session for every volume (so 14 EBS volumes requires 14 iSCSI sessions).
Create
iptablesorebtablesrules from the cloud controller to the compute node. This allows access from the cloud controller to the running instance.Save the current state of the database, the current state of the running instances, and the attached volumes (mount point, volume ID, volume status, etc), at least from the cloud controller to the compute node.
After power resumes and all hardware components restart:
The iSCSI session from the SAN to the cloud no longer exists.
The iSCSI session from the cloud controller to the compute node no longer exists.
nova-network reapplies configurations on boot and, as a result, recreates the iptables and ebtables from the cloud controller to the compute node.
Instances stop running.
Instances are not lost because neither
destroynorterminateran. The files for the instances remain on the compute node.The database does not update.
Begin recovery
Do not add any steps or change the order of steps in this procedure.
Check the current relationship between the volume and its instance, so that you can recreate the attachment.
Use the
openstack volume listcommand to get this information. Note that theopenstackclient can get volume information from OpenStack Block Storage.Update the database to clean the stalled state. Do this for every volume by using these queries:
mysql> use cinder;
mysql> update volumes set mountpoint=NULL;
mysql> update volumes set status="available" where status <>"error_deleting";
mysql> update volumes set attach_status="detached";
mysql> update volumes set instance_id=0;
Use
openstack volume listcommand to list all volumes.Restart the instances by using the
openstack server reboot INSTANCEcommand. Important
Some instances completely reboot and become reachable, while some might stop at the plymouth stage. This is expected behavior. DO NOT reboot a second time.
Instance state at this stage depends on whether you added an
/etc/fstabentry for that volume. Images built with the cloud-init package remain in apendingstate, while others skip the missing volume and start. You perform this step to ask Compute to reboot every instance so that the stored state is preserved. It does not matter if not all instances come up successfully. For more information about cloud-init, see help.ubuntu.com/community/CloudInit/.If required, run the
openstack server add volumecommand to reattach the volumes to their respective instances. This example uses a file of listed volumes to reattach them:#!/bin/bash while read line; do volume=`echo $line | $CUT -f 1 -d " "` instance=`echo $line | $CUT -f 2 -d " "` mount_point=`echo $line | $CUT -f 3 -d " "` echo "ATTACHING VOLUME FOR INSTANCE - $instance" openstack server add volume $instance $volume $mount_point sleep 2 done < $volumes_tmp_fileInstances that were stopped at the plymouth stage now automatically continue booting and start normally. Instances that previously started successfully can now see the volume.
Log in to the instances with SSH and reboot them.
If some services depend on the volume or if a volume has an entry in fstab, you can now restart the instance. Restart directly from the instance itself and not through
nova:# shutdown -r now
When you plan for and complete a disaster recovery, follow these tips:
Use the
errors=remountoption in thefstabfile to prevent data corruption.In the event of an I/O error, this option prevents writes to the disk. Add this configuration option into the cinder-volume server that performs the iSCSI connection to the SAN and into the instances'
fstabfiles.Do not add the entry for the SAN's disks to the cinder-volume's
fstabfile.Some systems hang on that step, which means you could lose access to your cloud-controller. To re-run the session manually, run this command before performing the mount:
# iscsiadm -m discovery -t st -p $SAN_IP $ iscsiadm -m node --target-name $IQN -p $SAN_IP -l
On your instances, if you have the whole
/home/directory on the disk, leave a user's directory with the user's bash files and theauthorized_keysfile instead of emptying the/home/directory and mapping the disk on it.This action enables you to connect to the instance without the volume attached, if you allow only connections through public keys.
To script the disaster recovery plan (DRP), use the https://github.com/Razique bash script.
This script completes these steps:
Creates an array for instances and their attached volumes.
Updates the MySQL database.
Restarts all instances with euca2ools.
Reattaches the volumes.
Uses Compute credentials to make an SSH connection into every instance.
The script includes a test mode, which enables you to perform the sequence
for only one instance.
To reproduce the power loss, connect to the compute node that runs that
instance and close the iSCSI session. Do not detach the volume by using the
openstack server remove volume command. You must manually close the
iSCSI session. This example closes an iSCSI session with the number 15:
# iscsiadm -m session -u -r 15
Do not forget the -r option. Otherwise, all sessions close.
There is potential for data loss while running instances during this procedure. If you are using Liberty or earlier, ensure you have the correct patch and set the options appropriately.
5.4.15 Advanced configuration #
OpenStack clouds run on platforms that differ greatly in the capabilities that they provide. By default, the Compute service seeks to abstract the underlying hardware that it runs on, rather than exposing specifics about the underlying host platforms. This abstraction manifests itself in many ways. For example, rather than exposing the types and topologies of CPUs running on hosts, the service exposes a number of generic CPUs (virtual CPUs, or vCPUs) and allows for overcommitting of these. In a similar manner, rather than exposing the individual types of network devices available on hosts, generic software-powered network ports are provided. These features are designed to allow high resource utilization and allows the service to provide a generic cost-effective and highly scalable cloud upon which to build applications.
This abstraction is beneficial for most workloads. However, there are some workloads where determinism and per-instance performance are important, if not vital. In these cases, instances can be expected to deliver near-native performance. The Compute service provides features to improve individual instance for these kind of workloads.
5.4.15.1 Attaching physical PCI devices to guests #
The PCI passthrough feature in OpenStack allows full access and direct control of a physical PCI device in guests. This mechanism is generic for any kind of PCI device, and runs with a Network Interface Card (NIC), Graphics Processing Unit (GPU), or any other devices that can be attached to a PCI bus. Correct driver installation is the only requirement for the guest to properly use the devices.
Some PCI devices provide Single Root I/O Virtualization and Sharing (SR-IOV) capabilities. When SR-IOV is used, a physical device is virtualized and appears as multiple PCI devices. Virtual PCI devices are assigned to the same or different guests. In the case of PCI passthrough, the full physical device is assigned to only one guest and cannot be shared.
To enable PCI passthrough, follow the steps below:
Configure nova-scheduler (Controller)
Configure nova-api (Controller)**
Configure a flavor (Controller)
Enable PCI passthrough (Compute)
Configure PCI devices in nova-compute (Compute)
The PCI device with address 0000:41:00.0 is used as an example. This
will differ between environments.
5.4.15.1.1 Configure nova-scheduler (Controller) #
Configure
nova-scheduleras specified in Configure nova-scheduler.Restart the
nova-schedulerservice.
5.4.15.1.2 Configure nova-api (Controller) #
Specify the PCI alias for the device.
Configure a PCI alias
a1to request a PCI device with avendor_idof0x8086and aproduct_idof0x154d. Thevendor_idandproduct_idcorrespond the PCI device with address0000:41:00.0.Edit
/etc/nova/nova.conf:[default] pci_alias = { "vendor_id":"8086", "product_id":"154d", "device_type":"type-PF", "name":"a1" }For more information about the syntax of
pci_alias, refer to nova.conf configuration options.Restart the
nova-apiservice.
5.4.15.1.3 Configure a flavor (Controller) #
Configure a flavor to request two PCI devices, each with vendor_id of
0x8086 and product_id of 0x154d:
# openstack flavor set m1.large --property "pci_passthrough:alias"="a1:2"
For more information about the syntax for pci_passthrough:alias, refer to
flavor.
5.4.15.1.4 Enable PCI passthrough (Compute) #
Enable VT-d and IOMMU. For more information, refer to steps one and two in Create Virtual Functions.
5.4.15.1.5 Configure PCI devices (Compute) #
Configure
nova-computeto allow the PCI device to pass through to VMs. Edit/etc/nova/nova.conf:[default] pci_passthrough_whitelist = { "address": "0000:41:00.0" }Alternatively specify multiple PCI devices using whitelisting:
[default]
pci_passthrough_whitelist = { "vendor_id": "8086", "product_id": "10fb" }
All PCI devices matching the
vendor_idandproduct_idare added to the pool of PCI devices available for passthrough to VMs.For more information about the syntax of
pci_passthrough_whitelist, refer to nova.conf configuration options.Specify the PCI alias for the device.
From the Newton release, to resize guest with PCI device, configure the PCI alias on the compute node as well.
Configure a PCI alias
a1to request a PCI device with avendor_idof0x8086and aproduct_idof0x154d. Thevendor_idandproduct_idcorrespond the PCI device with address0000:41:00.0.Edit
/etc/nova/nova.conf:[default] pci_alias = { "vendor_id":"8086", "product_id":"154d", "device_type":"type-PF", "name":"a1" }For more information about the syntax of
pci_alias, refer to nova.conf configuration options.Restart the
nova-computeservice.
5.4.15.1.6 Create instances with PCI passthrough devices #
The nova-scheduler selects a destination host that has PCI devices
available with the specified vendor_id and product_id that matches the
pci_alias from the flavor.
# openstack server create --flavor m1.large --image cirros-0.3.4-x86_64-uec --wait test-pci
5.4.15.2 CPU topologies #
The NUMA topology and CPU pinning features in OpenStack provide high-level control over how instances run on hypervisor CPUs and the topology of virtual CPUs available to instances. These features help minimize latency and maximize performance.
5.4.15.2.1 SMP, NUMA, and SMT #
- Symmetric multiprocessing (SMP)
SMP is a design found in many modern multi-core systems. In an SMP system, there are two or more CPUs and these CPUs are connected by some interconnect. This provides CPUs with equal access to system resources like memory and input/output ports.
- Non-uniform memory access (NUMA)
NUMA is a derivative of the SMP design that is found in many multi-socket systems. In a NUMA system, system memory is divided into cells or nodes that are associated with particular CPUs. Requests for memory on other nodes are possible through an interconnect bus. However, bandwidth across this shared bus is limited. As a result, competition for this resource can incur performance penalties.
- Simultaneous Multi-Threading (SMT)
SMT is a design complementary to SMP. Whereas CPUs in SMP systems share a bus and some memory, CPUs in SMT systems share many more components. CPUs that share components are known as thread siblings. All CPUs appear as usable CPUs on the system and can execute workloads in parallel. However, as with NUMA, threads compete for shared resources.
In OpenStack, SMP CPUs are known as cores, NUMA cells or nodes are known as sockets, and SMT CPUs are known as threads. For example, a quad-socket, eight core system with Hyper-Threading would have four sockets, eight cores per socket and two threads per core, for a total of 64 CPUs.
5.4.15.2.2 Customizing instance NUMA placement policies #
The functionality described below is currently only supported by the libvirt/KVM driver.
When running workloads on NUMA hosts, it is important that the vCPUs executing processes are on the same NUMA node as the memory used by these processes. This ensures all memory accesses are local to the node and thus do not consume the limited cross-node memory bandwidth, adding latency to memory accesses. Similarly, large pages are assigned from memory and benefit from the same performance improvements as memory allocated using standard pages. Thus, they also should be local. Finally, PCI devices are directly associated with specific NUMA nodes for the purposes of DMA. Instances that use PCI or SR-IOV devices should be placed on the NUMA node associated with these devices.
By default, an instance floats across all NUMA nodes on a host. NUMA awareness
can be enabled implicitly through the use of huge pages or pinned CPUs or
explicitly through the use of flavor extra specs or image metadata. In all
cases, the NUMATopologyFilter filter must be enabled. Details on this
filter are provided in Scheduling configuration guide.
The NUMA node(s) used are normally chosen at random. However, if a PCI passthrough or SR-IOV device is attached to the instance, then the NUMA node that the device is associated with will be used. This can provide important performance improvements. However, booting a large number of similar instances can result in unbalanced NUMA node usage. Care should be taken to mitigate this issue. See this discussion for more details.
Inadequate per-node resources will result in scheduling failures. Resources that are specific to a node include not only CPUs and memory, but also PCI and SR-IOV resources. It is not possible to use multiple resources from different nodes without requesting a multi-node layout. As such, it may be necessary to ensure PCI or SR-IOV resources are associated with the same NUMA node or force a multi-node layout.
When used, NUMA awareness allows the operating system of the instance to intelligently schedule the workloads that it runs and minimize cross-node memory bandwidth. To restrict an instance's vCPUs to a single host NUMA node, run:
$ openstack flavor set m1.large --property hw:numa_nodes=1
Some workloads have very demanding requirements for memory access latency or bandwidth that exceed the memory bandwidth available from a single NUMA node. For such workloads, it is beneficial to spread the instance across multiple host NUMA nodes, even if the instance's RAM/vCPUs could theoretically fit on a single NUMA node. To force an instance's vCPUs to spread across two host NUMA nodes, run:
$ openstack flavor set m1.large --property hw:numa_nodes=2
The allocation of instances vCPUs and memory from different host NUMA nodes can be configured. This allows for asymmetric allocation of vCPUs and memory, which can be important for some workloads. To spread the 6 vCPUs and 6 GB of memory of an instance across two NUMA nodes and create an asymmetric 1:2 vCPU and memory mapping between the two nodes, run:
$ openstack flavor set m1.large --property hw:numa_nodes=2
$ openstack flavor set m1.large \  # configure guest node 0
  --property hw:numa_cpus.0=0,1 \
  --property hw:numa_mem.0=2048
$ openstack flavor set m1.large \  # configure guest node 1
  --property hw:numa_cpus.1=2,3,4,5 \
  --property hw:numa_mem.1=4096
For more information about the syntax for hw:numa_nodes, hw:numa_cpus.N
and hw:num_mem.N, refer to the Flavors guide.
5.4.15.2.3 Customizing instance CPU pinning policies #
The functionality described below is currently only supported by the libvirt/KVM driver.
By default, instance vCPU processes are not assigned to any particular host CPU, instead, they float across host CPUs like any other process. This allows for features like overcommitting of CPUs. In heavily contended systems, this provides optimal system performance at the expense of performance and latency for individual instances.
Some workloads require real-time or near real-time behavior, which is not possible with the latency introduced by the default CPU policy. For such workloads, it is beneficial to control which host CPUs are bound to an instance's vCPUs. This process is known as pinning. No instance with pinned CPUs can use the CPUs of another pinned instance, thus preventing resource contention between instances. To configure a flavor to use pinned vCPUs, a use a dedicated CPU policy. To force this, run:
$ openstack flavor set m1.large --property hw:cpu_policy=dedicated
Host aggregates should be used to separate pinned instances from unpinned instances as the latter will not respect the resourcing requirements of the former.
When running workloads on SMT hosts, it is important to be aware of the impact that thread siblings can have. Thread siblings share a number of components and contention on these components can impact performance. To configure how to use threads, a CPU thread policy should be specified. For workloads where sharing benefits performance, use thread siblings. To force this, run:
$ openstack flavor set m1.large \
  --property hw:cpu_policy=dedicated \
  --property hw:cpu_thread_policy=require
For other workloads where performance is impacted by contention for resources, use non-thread siblings or non-SMT hosts. To force this, run:
$ openstack flavor set m1.large \
  --property hw:cpu_policy=dedicated \
  --property hw:cpu_thread_policy=isolate
Finally, for workloads where performance is minimally impacted, use thread siblings if available. This is the default, but it can be set explicitly:
$ openstack flavor set m1.large \
  --property hw:cpu_policy=dedicated \
  --property hw:cpu_thread_policy=prefer
For more information about the syntax for hw:cpu_policy and
hw:cpu_thread_policy, refer to the Flavors guide.
Applications are frequently packaged as images. For applications that require real-time or near real-time behavior, configure image metadata to ensure created instances are always pinned regardless of flavor. To configure an image to use pinned vCPUs and avoid thread siblings, run:
$ openstack image set [IMAGE_ID] \
  --property hw_cpu_policy=dedicated \
  --property hw_cpu_thread_policy=isolate
Image metadata takes precedence over flavor extra specs. Thus, configuring
competing policies causes an exception. By setting a shared policy
through image metadata, administrators can prevent users configuring CPU
policies in flavors and impacting resource utilization. To configure this
policy, run:
$ openstack image set [IMAGE_ID] --property hw_cpu_policy=shared
There is no correlation required between the NUMA topology exposed in the instance and how the instance is actually pinned on the host. This is by design. See this invalid bug for more information.
For more information about image metadata, refer to the Image metadata guide.
5.4.15.2.4 Customizing instance CPU topologies #
The functionality described below is currently only supported by the libvirt/KVM driver.
In addition to configuring how an instance is scheduled on host CPUs, it is possible to configure how CPUs are represented in the instance itself. By default, when instance NUMA placement is not specified, a topology of N sockets, each with one core and one thread, is used for an instance, where N corresponds to the number of instance vCPUs requested. When instance NUMA placement is specified, the number of sockets is fixed to the number of host NUMA nodes to use and the total number of instance CPUs is split over these sockets.
Some workloads benefit from a custom topology. For example, in some operating systems, a different license may be needed depending on the number of CPU sockets. To configure a flavor to use a maximum of two sockets, run:
$ openstack flavor set m1.large --property hw:cpu_sockets=2
Similarly, to configure a flavor to use one core and one thread, run:
$ openstack flavor set m1.large \
  --property hw:cpu_cores=1 \
  --property hw:cpu_threads=1
If specifying all values, the product of sockets multiplied by cores
multiplied by threads must equal the number of instance vCPUs. If specifying
any one of these values or the multiple of two values, the values must be a
factor of the number of instance vCPUs to prevent an exception. For example,
specifying hw:cpu_sockets=2 on a host with an odd number of cores fails.
Similarly, specifying hw:cpu_cores=2 and hw:cpu_threads=4 on a host
with ten cores fails.
For more information about the syntax for hw:cpu_sockets, hw:cpu_cores
and hw:cpu_threads, refer to the Flavors guide.
It is also possible to set upper limits on the number of sockets, cores, and threads used. Unlike the hard values above, it is not necessary for this exact number to used because it only provides a limit. This can be used to provide some flexibility in scheduling, while ensuring certains limits are not exceeded. For example, to ensure no more than two sockets are defined in the instance topology, run:
$ openstack flavor set m1.large --property=hw:cpu_max_sockets=2
For more information about the syntax for hw:cpu_max_sockets,
hw:cpu_max_cores, and hw:cpu_max_threads, refer to the Flavors
guide.
Applications are frequently packaged as images. For applications that prefer certain CPU topologies, configure image metadata to hint that created instances should have a given topology regardless of flavor. To configure an image to request a two-socket, four-core per socket topology, run:
$ openstack image set [IMAGE_ID] \
  --property hw_cpu_sockets=2 \
  --property hw_cpu_cores=4
To constrain instances to a given limit of sockets, cores or threads, use the
max_ variants. To configure an image to have a maximum of two sockets and a
maximum of one thread, run:
$ openstack image set [IMAGE_ID] \
  --property hw_cpu_max_sockets=2 \
  --property hw_cpu_max_threads=1
Image metadata takes precedence over flavor extra specs. Configuring competing
constraints causes an exception. By setting a max value for sockets, cores,
or threads, administrators can prevent users configuring topologies that might,
for example, incur an additional licensing fees.
For more information about image metadata, refer to the Image metadata guide.
5.4.15.3 Huge pages #
The huge page feature in OpenStack provides important performance improvements for applications that are highly memory IO-bound.
Huge pages may also be referred to hugepages or large pages, depending on the source. These terms are synonyms.
5.4.15.3.1 Pages, the TLB and huge pages #
- Pages
Physical memory is segmented into a series of contiguous regions called pages. Each page contains a number of bytes, referred to as the page size. The system retrieves memory by accessing entire pages, rather than byte by byte.
- Translation Lookaside Buffer (TLB)
A TLB is used to map the virtual addresses of pages to the physical addresses in actual memory. The TLB is a cache and is not limitless, storing only the most recent or frequently accessed pages. During normal operation, processes will sometimes attempt to retrieve pages that are not stored in the cache. This is known as a TLB miss and results in a delay as the processor iterates through the pages themselves to find the missing address mapping.
- Huge Pages
The standard page size in x86 systems is 4 kB. This is optimal for general purpose computing but larger page sizes - 2 MB and 1 GB - are also available. These larger page sizes are known as huge pages. Huge pages result in less efficient memory usage as a process will not generally use all memory available in each page. However, use of huge pages will result in fewer overall pages and a reduced risk of TLB misses. For processes that have significant memory requirements or are memory intensive, the benefits of huge pages frequently outweigh the drawbacks.
- Persistent Huge Pages
On Linux hosts, persistent huge pages are huge pages that are reserved upfront. The HugeTLB provides for the mechanism for this upfront configuration of huge pages. The HugeTLB allows for the allocation of varying quantities of different huge page sizes. Allocation can be made at boot time or run time. Refer to the Linux hugetlbfs guide for more information.
- Transparent Huge Pages (THP)
On Linux hosts, transparent huge pages are huge pages that are automatically provisioned based on process requests. Transparent huge pages are provisioned on a best effort basis, attempting to provision 2 MB huge pages if available but falling back to 4 kB small pages if not. However, no upfront configuration is necessary. Refer to the Linux THP guide for more information.
5.4.15.3.2 Enabling huge pages on the host #
Persistent huge pages are required owing to their guaranteed availability.
However, persistent huge pages are not enabled by default in most environments.
The steps for enabling huge pages differ from platform to platform and only the
steps for Linux hosts are described here. On Linux hosts, the number of
persistent huge pages on the host can be queried by checking /proc/meminfo:
$ grep Huge /proc/meminfo
AnonHugePages:         0 kB
ShmemHugePages:        0 kB
HugePages_Total:       0
HugePages_Free:        0
HugePages_Rsvd:        0
HugePages_Surp:        0
Hugepagesize:       2048 kB
In this instance, there are 0 persistent huge pages (HugePages_Total) and 0
transparent huge pages (AnonHugePages) allocated. Huge pages can be
allocated at boot time or run time. Huge pages require a contiguous area of
memory - memory that gets increasingly fragmented the long a host is running.
Identifying contiguous areas of memory is a issue for all huge page sizes, but
it's particularly problematic for larger huge page sizes such as 1 GB huge
pages. Allocating huge pages at boot time will ensure the correct number of huge
pages is always available, while allocating them at run time can fail if memory
has become too fragmented.
To allocate huge pages at run time, the kernel boot parameters must be extended
to include some huge page-specific parameters. This can be achieved by
modifying /etc/default/grub and appending the hugepagesz,
hugepages, and transparent_hugepages=never arguments to
GRUB_CMDLINE_LINUX. To allocate, for example, 2048 persistent 2 MB huge
pages at boot time, run:
# echo 'GRUB_CMDLINE_LINUX="$GRUB_CMDLINE_LINUX hugepagesz=2M hugepages=2048 transparent_hugepage=never"' > /etc/default/grub
$ grep GRUB_CMDLINE_LINUX /etc/default/grub
GRUB_CMDLINE_LINUX="..."
GRUB_CMDLINE_LINUX="$GRUB_CMDLINE_LINUX hugepagesz=2M hugepages=2048 transparent_hugepage=never"
Persistent huge pages are not usable by standard host OS processes. Ensure enough free, non-huge page memory is reserved for these processes.
Reboot the host, then validate that huge pages are now available:
$ grep "Huge" /proc/meminfo
AnonHugePages:         0 kB
ShmemHugePages:        0 kB
HugePages_Total:    2048
HugePages_Free:     2048
HugePages_Rsvd:        0
HugePages_Surp:        0
Hugepagesize:       2048 kB
There are now 2048 2 MB huge pages totalling 4 GB of huge pages. These huge pages must be mounted. On most platforms, this happens automatically. To verify that the huge pages are mounted, run:
# mount | grep huge
hugetlbfs on /dev/hugepages type hugetlbfs (rw)
In this instance, the huge pages are mounted at /dev/hugepages. This mount
point varies from platform to platform. If the above command did not return
anything, the hugepages must be mounted manually. To mount the huge pages at
/dev/hugepages, run:
# mkdir -p /dev/hugepages
# mount -t hugetlbfs hugetlbfs /dev/hugepages
There are many more ways to configure huge pages, including allocating huge pages at run time, specifying varying allocations for different huge page sizes, or allocating huge pages from memory affinitized to different NUMA nodes. For more information on configuring huge pages on Linux hosts, refer to the Linux hugetlbfs guide.
5.4.15.3.3 Customizing instance huge pages allocations #
The functionality described below is currently only supported by the libvirt/KVM driver.
For performance reasons, configuring huge pages for an instance will
implicitly result in a NUMA topology being configured for the instance.
Configuring a NUMA topology for an instance requires enablement of
NUMATopologyFilter. Refer to Section 5.4.15.2, “CPU topologies” for more
information.
By default, an instance does not use huge pages for its underlying memory. However, huge pages can bring important or required performance improvements for some workloads. Huge pages must be requested explicitly through the use of flavor extra specs or image metadata. To request an instance use huge pages, run:
$ openstack flavor set m1.large --property hw:mem_page_size=large
Different platforms offer different huge page sizes. For example: x86-based platforms offer 2 MB and 1 GB huge page sizes. Specific huge page sizes can be also be requested, with or without a unit suffix. The unit suffix must be one of: Kb(it), Kib(it), Mb(it), Mib(it), Gb(it), Gib(it), Tb(it), Tib(it), KB, KiB, MB, MiB, GB, GiB, TB, TiB. Where a unit suffix is not provided, Kilobytes are assumed. To request an instance to use 2 MB huge pages, run one of:
$ openstack flavor set m1.large --property hw:mem_page_size=2Mb
$ openstack flavor set m1.large --property hw:mem_page_size=2048
Enabling huge pages for an instance can have negative consequences for other instances by consuming limited huge pages resources. To explicitly request an instance use small pages, run:
$ openstack flavor set m1.large --property hw:mem_page_size=small
Explicitly requesting any page size will still result in a NUMA topology being applied to the instance, as described earlier in this document.
Finally, to leave the decision of huge or small pages to the compute driver, run:
$ openstack flavor set m1.large --property hw:mem_page_size=any
For more information about the syntax for hw:mem_page_size, refer to the
Flavors guide.
Applications are frequently packaged as images. For applications that require the IO performance improvements that huge pages provides, configure image metadata to ensure instances always request the specific page size regardless of flavor. To configure an image to use 1 GB huge pages, run:
$ openstack image set [IMAGE_ID] --property hw_mem_page_size=1GB
Image metadata takes precedence over flavor extra specs. Thus, configuring
competing page sizes causes an exception. By setting a small page size
through image metadata, administrators can prevent users requesting huge pages
in flavors and impacting resource utilization. To configure this page size,
run:
$ openstack image set [IMAGE_ID] --property hw_mem_page_size=small
Explicitly requesting any page size will still result in a NUMA topology being applied to the instance, as described earlier in this document.
For more information about image metadata, refer to the Image metadata guide.
5.5 Troubleshoot Compute #
Common problems for Compute typically involve misconfigured
networking or credentials that are not sourced properly in the
environment. Also, most flat networking configurations do not
enable ping or ssh from a compute node
to the instances that run on that node. Another common problem
is trying to run 32-bit images on a 64-bit compute node.
This section shows you how to troubleshoot Compute.
5.5.1 Compute service logging #
Compute stores a log file for each service in
/var/log/nova. For example, nova-compute.log
is the log for the nova-compute service. You can set the
following options to format log strings for the nova.log
module in the nova.conf file:
logging_context_format_stringlogging_default_format_string
If the log level is set to debug, you can also specify
logging_debug_format_suffix to append extra formatting.
For information about what variables are available for the
formatter, see Formatter Objects.
You have two logging options for OpenStack Compute based on
configuration settings. In nova.conf, include the
logfile option to enable logging. Alternatively you can set
use_syslog = 1 so that the nova daemon logs to syslog.
5.5.2 Guru Meditation reports #
A Guru Meditation report is sent by the Compute service upon receipt of the
SIGUSR2 signal (SIGUSR1 before Mitaka). This report is a
general-purpose error report that includes details about the current state
of the service. The error report is sent to stderr.
For example, if you redirect error output to nova-api-err.log
using nova-api 2>/var/log/nova/nova-api-err.log,
resulting in the process ID 8675, you can then run:
# kill -USR2 8675
This command triggers the Guru Meditation report to be printed to
/var/log/nova/nova-api-err.log.
The report has the following sections:
Package: Displays information about the package to which the process belongs, including version information.
Threads: Displays stack traces and thread IDs for each of the threads within the process.
Green Threads: Displays stack traces for each of the green threads within the process (green threads do not have thread IDs).
Configuration: Lists all configuration options currently accessible through the CONF object for the current process.
For more information, see Guru Meditation Reports.
5.5.3 Common errors and fixes for Compute #
The ask.openstack.org site offers a place to ask and answer questions, and you can also mark questions as frequently asked questions. This section describes some errors people have posted previously. Bugs are constantly being fixed, so online resources are a great way to get the most up-to-date errors and fixes.
5.5.4 Credential errors, 401, and 403 forbidden errors #
5.5.4.1 Problem #
Missing credentials cause a 403 forbidden error.
5.5.4.2 Solution #
To resolve this issue, use one of these methods:
- Manual method
Gets the
novarcfile from the project ZIP file, saves existing credentials in case of override, and manually sources thenovarcfile.
- Script method
Generates
novarcfrom the project ZIP file and sources it for you.
When you run nova-api the first time, it generates the certificate
authority information, including openssl.cnf. If you
start the CA services before this, you might not be
able to create your ZIP file. Restart the services.
When your CA information is available, create your ZIP file.
Also, check your HTTP proxy settings to see whether they cause problems with
novarc creation.
5.5.5 Instance errors #
5.5.5.1 Problem #
Sometimes a particular instance shows pending or you cannot SSH to
it. Sometimes the image itself is the problem. For example, when you
use flat manager networking, you do not have a DHCP server and certain
images do not support interface injection; you cannot connect to
them.
5.5.5.2 Solution #
To fix instance errors use an image that does support this method, such as Ubuntu, which obtains an IP address correctly with FlatManager network settings.
To troubleshoot other possible problems with an instance, such as
an instance that stays in a spawning state, check the directory for
the particular instance under /var/lib/nova/instances on
the nova-compute host and make sure that these files are present:
libvirt.xmldiskdisk-rawkernelramdiskconsole.log, after the instance starts.
If any files are missing, empty, or very small, the nova-compute
service did not successfully download the images from the Image service.
Also check nova-compute.log for exceptions. Sometimes they do not
appear in the console output.
Next, check the log file for the instance in the /var/log/libvirt/qemu
directory to see if it exists and has any useful error messages in it.
Finally, from the /var/lib/nova/instances directory for the instance,
see if this command returns an error:
# virsh create libvirt.xml
5.5.6 Empty log output for Linux instances #
5.5.6.1 Problem #
You can view the log output of running instances
from either the tab of the dashboard or the output of
nova console-log. In some cases, the log output of a running
Linux instance will be empty or only display a single character (for example,
the ? character).
This occurs when the Compute service attempts to retrieve the log output of the instance via a serial console while the instance itself is not configured to send output to the console.
5.5.6.2 Solution #
To rectify this, append the following parameters to kernel arguments specified in the instance's boot loader:
console=tty0 console=ttyS0,115200n8Upon rebooting, the instance will be configured to send output to the Compute service.
5.5.7 Reset the state of an instance #
5.5.7.1 Problem #
Instances can remain in an intermediate state, such as deleting.
5.5.7.2 Solution #
You can use the nova reset-state command to manually reset
the state of an instance to an error state. You can then delete the
instance. For example:
$ nova reset-state c6bbbf26-b40a-47e7-8d5c-eb17bf65c485
$ openstack server delete c6bbbf26-b40a-47e7-8d5c-eb17bf65c485
You can also use the --active parameter to force the instance back
to an active state instead of an error state. For example:
$ nova reset-state --active c6bbbf26-b40a-47e7-8d5c-eb17bf65c485
5.5.8 Injection problems #
5.5.8.1 Problem #
Instances may boot slowly, or do not boot. File injection can cause this problem.
5.5.8.2 Solution #
To disable injection in libvirt, set the following in nova.conf:
[libvirt]
inject_partition = -2If you have not enabled the configuration drive and you want to make user-specified files available from the metadata server for to improve performance and avoid boot failure if injection fails, you must disable injection.
5.5.9 Disable live snapshotting #
5.5.9.1 Problem #
Administrators using libvirt version 1.2.2 may experience problems
with live snapshot creation. Occasionally, libvirt version 1.2.2 fails
to create live snapshots under the load of creating concurrent snapshot.
5.5.9.2 Solution #
To effectively disable the libvirt live snapshotting, until the problem
is resolved, configure the disable_libvirt_livesnapshot option.
You can turn off the live snapshotting mechanism by setting up its value to
True in the [workarounds] section of the nova.conf file:
[workarounds]
disable_libvirt_livesnapshot = True