Administration Guide
- 1 About This Guide
- 2 Cluster Management
- 3 Software Management
- 4 Cluster Updates
- 5 Upgrading SUSE CaaS Platform
- 6 Security
- 7 Logging
- 8 Monitoring
- 9 Storage
- 10 Integration
- 11 GPU-Dependent Workloads
- 12 Cluster Disaster Recovery
- 13 Backup and Restore with Velero
- 14 Miscellaneous
- 15 Troubleshooting
- 16 Glossary
- A Contributors
- B GNU Licenses
6 Security #
6.1 Network Access Considerations #
It is good security practice not to expose the kubernetes API server on the public internet. Use network firewalls that only allow access from trusted subnets.
6.2 Access Control #
Users access the API using kubectl, client libraries, or by making REST requests.
Both human users and Kubernetes service accounts can be authorized for API access.
When a request reaches the API, it goes through several stages, that can be explained with the following three questions:
Authentication: who are you? This is accomplished via Section 6.3, “Authentication” to validate the user’s entity and respond to the corresponding user group after successful login.
Authorization: what kind of access do you have? This is accomplished via Section 6.5, “Role-Based Access Control (RBAC)” API, that is a set of permissions for the previously authenticated user. Permissions are purely additive (there are no "deny" rules). A role can be defined within a namespace with a Role, or cluster-wide with a ClusterRole.
Admission Control: what are you trying to do? This is accomplished via Section 6.6, “Admission Controllers”. They can modify (mutate) or validate (accept or reject) requests.
Unlike authentication and authorization, if any admission controller rejects, then the request is immediately rejected.
Users can access with a Web browser or command line to do the authentication or self-configure kubectl to access authorized resources.
6.2.1 Authentication and Authorization Flow #
Authentication is composed of:
Dex (https://github.com/dexidp/dex) is an identity provider service (idP) that uses OIDC (Open ID Connect: https://openid.net/connect/) to drive authentication for client applications. It acts as a portal to defer authentication to the provider through connected identity providers (connectors).
Client:
Web browser: Gangway (https://github.com/heptiolabs/gangway): a Web application that enables authentication flow for your SUSE CaaS Platform. The user can log in, authorize access, download
kubeconfig, or self-configurekubectl.Command-line:
skuba auth login, a CLI application that enables authentication flow for your SUSE CaaS Platform. The user can log in, authorize access, and getkubeconfig.
For authorization (Role-Based Access Control, RBAC), administrators can use kubectl to create corresponding
RoleBinding or ClusterRoleBinding for a user or group to limit resource access.
6.2.1.1 Web Flow #

The user requests access through Gangway.
Gangway redirects to Dex.
Dex redirects to a connected identity provider (connector). User login and a request to approve access are generated.
Dex continues with OIDC authentication flow on behalf of the user and creates/updates data to Kubernetes CRDs.
Dex redirects the user to Gangway. This redirect includes (ID/refresh) tokens.
Gangway returns a link to download
kubeconfigor self-configureskubectlinstructions to the user.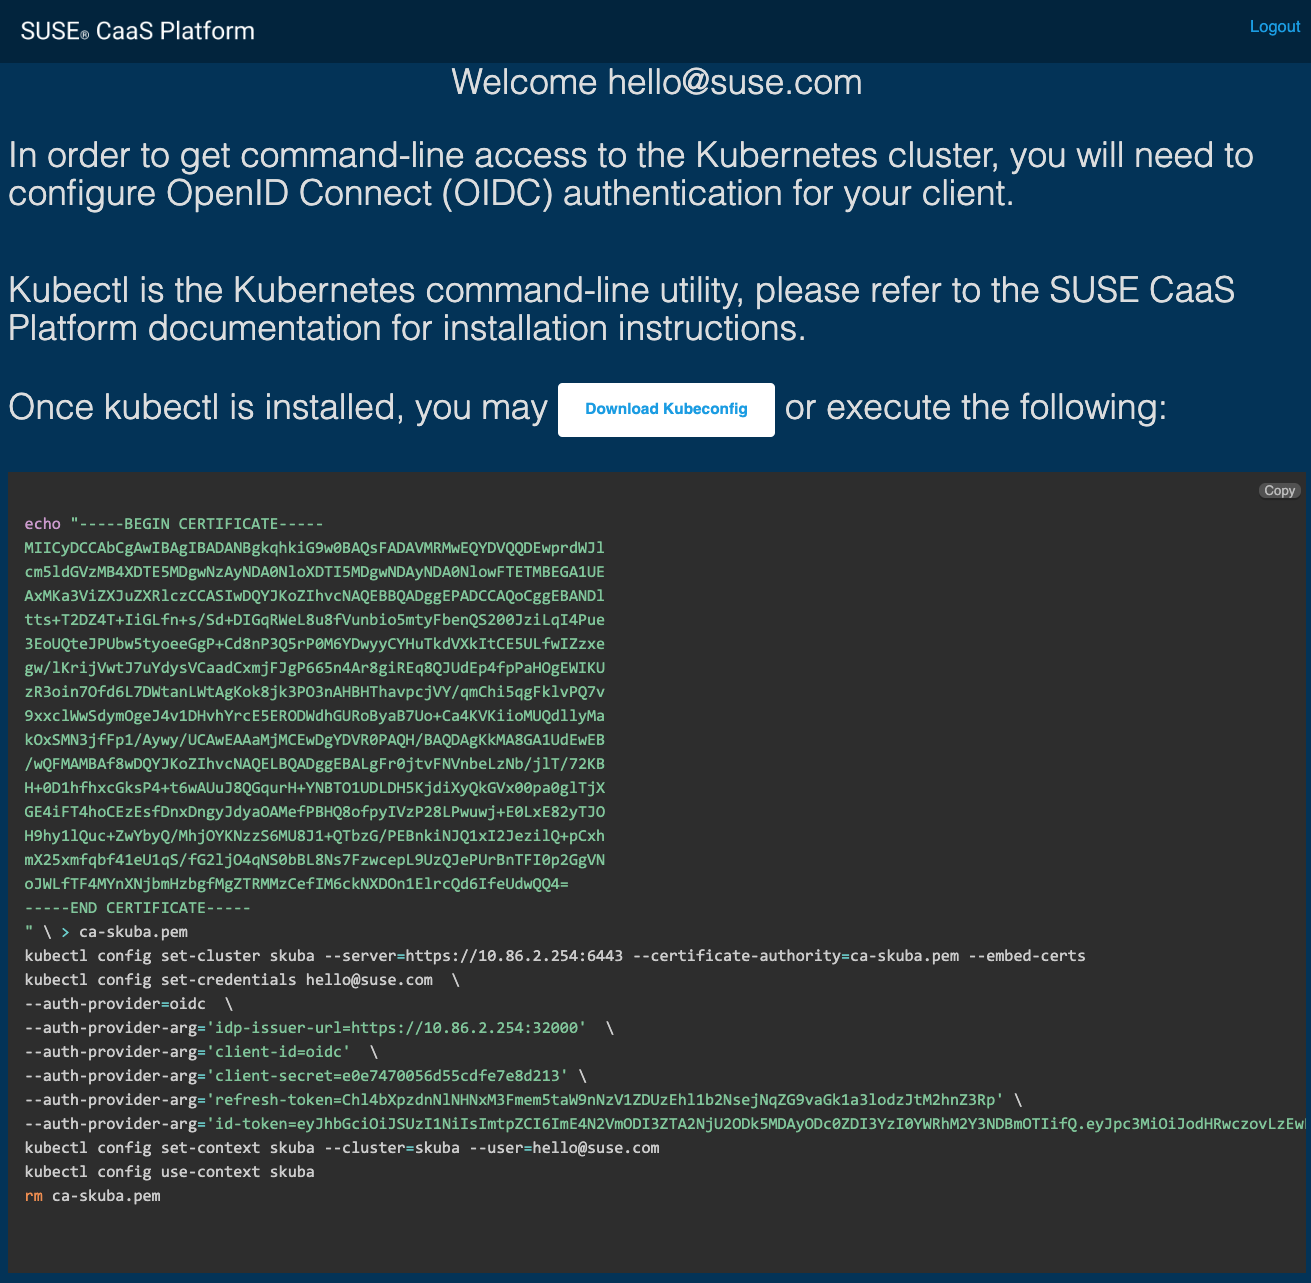
User downloads
kubeconfor self-configureskubectl.User uses
kubectlto connect to the Kubernetes API server.Kubernetes CRDs validate the Kubernetes API server request and return a response.
The
kubectlconnects to the authorized Kubernetes resources through the Kubernetes API server.
6.2.1.2 CLI Flow #
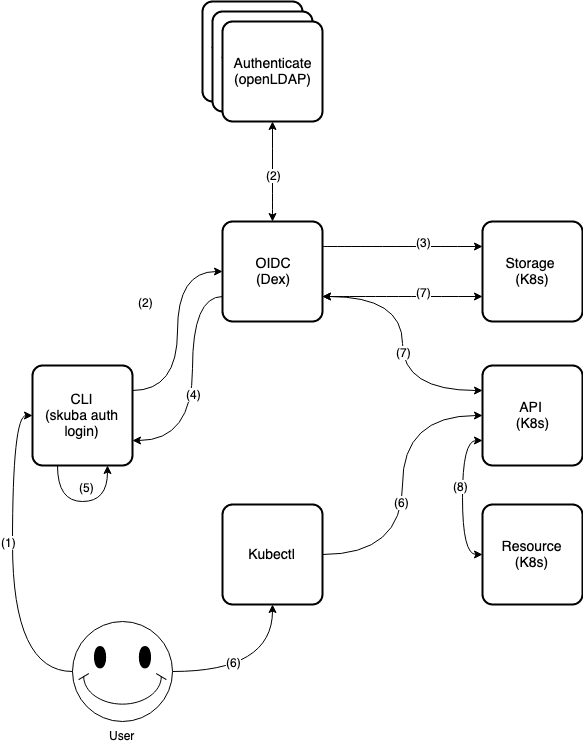
User requests access through
skuba auth loginwith the Dex server URL, username and password.Dex uses received username and password to log in and approve the access request to the connected identity providers (connectors).
Dex continues with the OIDC authentication flow on behalf of the user and creates/updates data to the Kubernetes CRDs.
Dex returns the ID token and refreshes token to
skuba auth login.skuba auth logingenerates the kubeconfig filekubeconf.txt.User uses
kubectlto connect the Kubernetes API server.Kubernetes CRDs validate the Kubernetes API server request and return a response.
The
kubectlconnects to the authorized Kubernetes resources through Kubernetes API server.
6.3 Authentication #
SUSE CaaS Platform supports user authentication via an external LDAP server like "389 Directory Server" (389-ds) and "Active Directory" by updating the built-in Dex LDAP connector configuration, the administrators can update LDAP identity providers before or after platform deployment.
6.3.1 Deploying an External LDAP Server #
If you already have an existed LDAP server, you could skip this part.
Deploying an External 389 Directory Server
The 389 Directory Server image
registry.suse.com/caasp/v4.5/389-ds:1.4.3will automatically generate a self-signed certificate and key. The following instructions show how to deploy the "389 Directory Server" with a customized configuration using container commands.Prepare the customized 389 Directory configuration and enter it into the terminal in the following format:
DS_DM_PASSWORD=                                 # Admin Password
DS_SUFFIX="dc=example,dc=org"                   # Domain Suffix
DATA_DIR=<PWD>/389_ds_data                      # Directory Server Data on Host Machine to Mount
Execute the following command to deploy 389-ds in the same terminal. This will start a non-TLS port (
389) and a TLS port (636) together with an automatically self-signed certificate and key.docker run -d \ -p 389:3389 \ -p 636:3636 \ -e DS_DM_PASSWORD=<DS_DM_PASSWORD> \ -e DS_SUFFIX=<DS_SUFFIX> \ -v <DATA_DIR>:/data \ --name 389-ds registry.suse.com/caasp/v4.5/389-ds:1.4.3
Deploying an External 389 Directory Server with an External Certificate
To replace the automatically generated certificate with your own, follow these steps:
Stop the running container:
docker stop 389-ds
Copy the external certificate
ca.certandpwdfile.txtto a mounted data directory<DATA_DIR>/ssca/.ca.cert: CA Certificate.pwdfile.txt: Password for the CA Certificate.
Copy the external certificate
Server-Cert-Key.pem,Server-Cert.crt, andpwdfile-import.txtto a mounted data directory<DATA_DIR>/config/.Server-Cert-Key.pem: PRIVATE KEY.Server-Cert.crt: CERTIFICATE.pwdfile-import.txt: Password for the PRIVATE KEY.
Execute the following command to run the 389 Directory Server with a mounted data the directory from the previous step:
docker start 389-ds
Note: Known Issues
The error message is a warning for 389-ds version 1.4.3 when replacing external certificates.
ERR - attrcrypt_cipher_init - No symmetric key found for cipher AES in backend exampleDB, attempting to create one...
INFO - attrcrypt_cipher_init - Key for cipher AES successfully generated and stored
ERR - attrcrypt_cipher_init - No symmetric key found for cipher 3DES in backend exampleDB, attempting to create one...
INFO - attrcrypt_cipher_init - Key for cipher 3DES successfully generated and stored
It is due to the encrypted key being stored in the dse.ldif.
When replacing the key and certificate in /data/config, 389ds searches dse.ldif for symmetric key and create one if it does not exist.
389-ds developers are planning a fix that switches 389-ds to use the nssdb exclusively.
6.3.2 Examples of Usage #
In both directories, user-regular1 and user-regular2 are members of the k8s-users group,
and user-admin is a member of the k8s-admins group.
In Active Directory, user-bind is a simple user that is a member of the default Domain Users group.
Hence, we can use it to authenticate, because it has read-only access to Active Directory.
The mail attribute is used to create the RBAC rules.
6.3.2.1 389 Directory Server: #
Example LDIF configuration to initialize LDAP using an LDAP command:
dn: dc=example,dc=org
objectClass: top
objectClass: domain
dc: example
dn: cn=Directory Administrators,dc=example,dc=org
objectClass: top
objectClass: groupofuniquenames
cn: Directory Administrators
uniqueMember: cn=Directory Manager
dn: ou=Groups,dc=example,dc=org
objectClass: top
objectClass: organizationalunit
ou: Groups
dn: ou=People,dc=example,dc=org
objectClass: top
objectClass: organizationalunit
ou: People
dn: ou=Users,dc=example,dc=org
objectclass: top
objectclass: organizationalUnit
ou: Users
Example LDIF configuration to configure ACL using an LDAP command:
dn: dc=example,dc=org
changetype: modify
add: aci
aci: (targetattr!="userPassword || aci")(version 3.0; acl "Enable anonymous access"; allow (read, search, compare) userdn="ldap:///anyone";)
aci: (targetattr="carLicense || description || displayName || facsimileTelephoneNumber || homePhone || homePostalAddress || initials || jpegPhoto || labeledURI || mail || mobile || pager || photo || postOfficeBox || postalAddress || postalCode || preferredDeliveryMethod || preferredLanguage || registeredAddress || roomNumber || secretary || seeAlso || st || street || telephoneNumber || telexNumber || title || userCertificate || userPassword || userSMIMECertificate || x500UniqueIdentifier")(version 3.0; acl "Enable self write for common attributes"; allow (write) userdn="ldap:///self";)
aci: (targetattr ="*")(version 3.0;acl "Directory Administrators Group";allow (all) (groupdn = "ldap:///cn=Directory Administrators, dc=example,dc=org");)
Example LDIF configuration to create user
user-regular1using an LDAP command:dn: uid=user-regular1,ou=Users,dc=example,dc=org changetype: add uid: user-regular1 userPassword: SSHA_PASSWORD 1 objectClass: posixaccount objectClass: inetOrgPerson objectClass: person objectClass: inetUser objectClass: organizationalPerson uidNumber: 1200 gidNumber: 500 givenName: User mail: user-regular1@example.org sn: Regular1 homeDirectory: /home/regular1 cn: User Regular1SSHA_PASSWORD: The user’s new hashed password.
Use
/usr/sbin/slappasswdto generate the SSHA hash./usr/sbin/slappasswd -h {SSHA} -s <USER_PASSWORD>Use
/usr/bin/pwdhashto generate the SSHA hash./usr/bin/pwdhash -s SSHA <USER_PASSWORD>
Example LDIF configuration to create user
user-regular2using an LDAP command:dn: uid=user-regular2,ou=Users,dc=example,dc=org changetype: add uid: user-regular2 userPassword: SSHA_PASSWORD 1 objectClass: posixaccount objectClass: inetOrgPerson objectClass: person objectClass: inetUser objectClass: organizationalPerson uidNumber: 1300 gidNumber: 500 givenName: User mail: user-regular2@example.org sn: Regular1 homeDirectory: /home/regular2 cn: User Regular2SSHA_PASSWORD: The user’s new hashed password.
Use
/usr/sbin/slappasswdto generate the SSHA hash./usr/sbin/slappasswd -h {SSHA} -s <USER_PASSWORD>Use
/usr/bin/pwdhashto generate the SSHA hash./usr/bin/pwdhash -s SSHA <USER_PASSWORD>
Example LDIF configuration to create user
user-adminusing an LDAP command:dn: uid=user-admin,ou=Users,dc=example,dc=org changetype: add uid: user-admin userPassword: SSHA_PASSWORD 1 objectClass: posixaccount objectClass: inetOrgPerson objectClass: person objectClass: inetUser objectClass: organizationalPerson uidNumber: 1000 gidNumber: 100 givenName: User mail: user-admin@example.org sn: Admin homeDirectory: /home/admin cn: User AdminSSHA_PASSWORD: The user’s new hashed password.
Use
/usr/sbin/slappasswdto generate the SSHA hash./usr/sbin/slappasswd -h {SSHA} -s <USER_PASSWORD>Use
/usr/bin/pwdhashto generate the SSHA hash./usr/bin/pwdhash -s SSHA <USER_PASSWORD>
Example LDIF configuration to create group
k8s-usersusing an LDAP command:dn: cn=k8s-users,ou=Groups,dc=example,dc=org changetype: add gidNumber: 500 objectClass: groupOfNames objectClass: posixGroup cn: k8s-users ou: Groups memberUid: user-regular1 memberUid: user-regular2
Example LDIF configuration to create group
k8s-adminsusing an LDAP command:dn: cn=k8s-admins,ou=Groups,dc=example,dc=org changetype: add gidNumber: 100 objectClass: groupOfNames objectClass: posixGroup cn: k8s-admins ou: Groups memberUid: user-admin
6.3.2.2 Active Directory #
Example LDIF configuration to create user
user-regular1using an LDAP command:dn: cn=user-regular1,ou=Users,dc=example,dc=org objectClass: top objectClass: person objectClass: organizationalPerson objectClass: user cn: user-regular1 sn: Regular1 givenName: User distinguishedName: cn=user-regular1,ou=Users,dc=example,dc=org displayName: User Regular1 memberOf: cn=Domain Users,ou=Users,dc=example,dc=org memberOf: cn=k8s-users,ou=Groups,dc=example,dc=org name: user-regular1 sAMAccountName: user-regular1 objectCategory: cn=Person,cn=Schema,cn=Configuration,dc=example,dc=org mail: user-regular1@example.org
Example LDIF configuration to create user
user-regular2using an LDAP command:dn: cn=user-regular2,ou=Users,dc=example,dc=org objectClass: top objectClass: person objectClass: organizationalPerson objectClass: user cn: user-regular2 sn: Regular2 givenName: User distinguishedName: cn=user-regular2,ou=Users,dc=example,dc=org displayName: User Regular2 memberOf: cn=Domain Users,ou=Users,dc=example,dc=org memberOf: cn=k8s-users,ou=Groups,dc=example,dc=org name: user-regular2 sAMAccountName: user-regular2 objectCategory: cn=Person,cn=Schema,cn=Configuration,dc=example,dc=org mail: user-regular2@example.org
Example LDIF configuration to create user
user-bindusing an LDAP command:dn: cn=user-bind,ou=Users,dc=example,dc=org objectClass: top objectClass: person objectClass: organizationalPerson objectClass: user cn: user-bind sn: Bind givenName: User distinguishedName: cn=user-bind,ou=Users,dc=example,dc=org displayName: User Bind memberOf: cn=Domain Users,ou=Users,dc=example,dc=org name: user-bind sAMAccountName: user-bind objectCategory: cn=Person,cn=Schema,cn=Configuration,dc=example,dc=org mail: user-bind@example.org
Example LDIF configuration to create user
user-adminusing an LDAP command:dn: cn=user-admin,ou=Users,dc=example,dc=org objectClass: top objectClass: person objectClass: organizationalPerson objectClass: user cn: user-admin sn: Admin givenName: User distinguishedName: cn=user-admin,ou=Users,dc=example,dc=org displayName: User Admin memberOf: cn=Domain Users,ou=Users,dc=example,dc=org memberOf: cn=k8s-admins,ou=Groups,dc=example,dc=org name: user-admin sAMAccountName: user-admin objectCategory: cn=Person,cn=Schema,cn=Configuration,dc=example,dc=org mail: user-admin@example.org
Example LDIF configuration to create group
k8s-usersusing an LDAP command:dn: cn=k8s-users,ou=Groups,dc=example,dc=org objectClass: top objectClass: group cn: k8s-users member: cn=user-regular1,ou=Users,dc=example,dc=org member: cn=user-regular2,ou=Users,dc=example,dc=org distinguishedName: cn=k8s-users,ou=Groups,dc=example,dc=org name: k8s-users sAMAccountName: k8s-users objectCategory: cn=Group,cn=Schema,cn=Configuration,dc=example,dc=org
Example LDIF configuration to create group
k8s-adminsusing an LDAP command:dn: cn=k8s-admins,ou=Groups,dc=example,dc=org objectClass: top objectClass: group cn: k8s-admins member: cn=user-admin,ou=Users,dc=example,dc=org distinguishedName: cn=k8s-admins,ou=Groups,dc=example,dc=org name: k8s-admins sAMAccountName: k8s-admins objectCategory: cn=Group,cn=Schema,cn=Configuration,dc=example,dc=org
6.4 Managing LDAP Users and Groups #
You can use standard LDAP administration tools for managing organizations, groups and users remotely.
To do so, install the openldap2-client package on a computer in your network
and make sure that the computer can connect to the LDAP server
(389 Directory Server) on port 389 or secure port 636.
6.4.1 Adding a New Organizational Unit #
To add a new organizational unit, create an LDIF file (
create_ou_groups.ldif) like this:dn: ou=OU_NAME,dc=example,dc=org changetype: add objectclass: top objectclass: organizationalUnit ou: OU_NAME
Substitute OU_NAME with an organizational unit name of your choice.
Run
ldapmodifyto add the new organizational unit:LDAP_PROTOCOL=ldap # ldap, ldaps LDAP_NODE_FQDN=localhost # FQDN of 389 Directory Server LDAP_NODE_PROTOCOL=:389 # Non-TLS (:389), TLS (:636) BIND_DN="cn=Directory Manager" # Admin User LDIF_FILE=./create_ou_groups.ldif # LDIF Configuration File DS_DM_PASSWORD= # Admin Password ldapmodify -v -H <LDAP_PROTOCOL>://<LDAP_NODE_FQDN><LDAP_NODE_PROTOCOL> -D "<BIND_DN>" -f <LDIF_FILE> -w <DS_DM_PASSWORD>
6.4.2 Removing an Organizational Unit #
To remove an organizational unit, create an LDIF file (
delete_ou_groups.ldif) like this:dn: ou=OU_NAME,dc=example,dc=org changetype: delete
Substitute OU_NAME with the name of the organizational unit you would like to remove.
Execute
ldapmodifyto remove the organizational unit:LDAP_PROTOCOL=ldap # ldap, ldaps LDAP_NODE_FQDN=localhost # FQDN of 389 Directory Server LDAP_NODE_PROTOCOL=:389 # Non-TLS (:389), TLS (:636) BIND_DN="cn=Directory Manager" # Admin User LDIF_FILE=./delete_ou_groups.ldif # LDIF Configuration File DS_DM_PASSWORD= # Admin Password ldapmodify -v -H <LDAP_PROTOCOL>://<LDAP_NODE_FQDN><LDAP_NODE_PROTOCOL> -D "<BIND_DN>" -f <LDIF_FILE> -w <DS_DM_PASSWORD>
6.4.3 Adding a New Group to an Organizational Unit #
To add a new group to an organizational unit, create an LDIF file (
create_groups.ldif) like this:dn: cn=GROUP,ou=OU_NAME,dc=example,dc=org changetype: add objectClass: top objectClass: groupOfNames cn: GROUP
GROUP: Group name
OU_NAME: Organizational unit name
Run
ldapmodifyto add the new group to the organizational unit:LDAP_PROTOCOL=ldap # ldap, ldaps LDAP_NODE_FQDN=localhost # FQDN of 389 Directory Server LDAP_NODE_PROTOCOL=:389 # Non-TLS (:389), TLS (:636) BIND_DN="cn=Directory Manager" # Admin User LDIF_FILE=./create_groups.ldif # LDIF Configuration File DS_DM_PASSWORD= # Admin Password ldapmodify -v -H <LDAP_PROTOCOL>://<LDAP_NODE_FQDN><LDAP_NODE_PROTOCOL> -D "<BIND_DN>" -f <LDIF_FILE> -w <DS_DM_PASSWORD>
6.4.4 Removing a Group from an Organizational Unit #
To remove a group from an organizational unit, create an LDIF file (
delete_ou_groups.ldif) like this:dn: cn=GROUP,ou=OU_NAME,dc=example,dc=org changetype: delete
GROUP: Group name
OU_NAME: organizational unit name
Execute
ldapmodifyto remove the group from the organizational unit:LDAP_PROTOCOL=ldap # ldap, ldaps LDAP_NODE_FQDN=localhost # FQDN of 389 Directory Server LDAP_NODE_PROTOCOL=:389 # Non-TLS (:389), TLS (:636) BIND_DN="cn=Directory Manager" # Admin User LDIF_FILE=./delete_ou_groups.ldif # LDIF Configuration File DS_DM_PASSWORD= # Admin Password ldapmodify -v -H <LDAP_PROTOCOL>://<LDAP_NODE_FQDN><LDAP_NODE_PROTOCOL> -D "<BIND_DN>" -f <LDIF_FILE> -w <DS_DM_PASSWORD>
6.4.4.1 Adding a New User #
To add a new user, create an LDIF file (
new_user.ldif) like this:dn: uid=USERID,ou=OU_NAME,dc=example,dc=org objectClass: person objectClass: inetOrgPerson objectClass: top uid: USERID userPassword: PASSWORD_HASH givenname: FIRST_NAME sn: SURNAME cn: FULL_NAME mail: E-MAIL_ADDRESS
USERID: User ID (UID) of the new user. This value must be a unique number.
OU_NAME: organizational unit name
PASSWORD_HASH: The user’s hashed password.SSHA_PASSWORD: The user’s new hashed password.
Use
/usr/sbin/slappasswdto generate the SSHA hash./usr/sbin/slappasswd -h {SSHA} -s <USER_PASSWORD>Use
/usr/bin/pwdhashto generate the SSHA hash./usr/bin/pwdhash -s SSHA <USER_PASSWORD>
FIRST_NAME: The user’s first name
SURNAME: The user’s last name
FULL_NAME: The user’s full name
E-MAIL_ADDRESS: The user’s e-mail address
Execute
ldapaddto add the new user:LDAP_PROTOCOL=ldap # ldap, ldaps LDAP_NODE_FQDN=localhost # FQDN of 389 Directory Server LDAP_NODE_PROTOCOL=:389 # Non-TLS (:389), TLS (:636) BIND_DN="cn=Directory Manager" # Admin User LDIF_FILE=./new_user.ldif # LDIF Configuration File DS_DM_PASSWORD= # Admin Password ldapadd -v -H <LDAP_PROTOCOL>://<LDAP_NODE_FQDN><LDAP_NODE_PROTOCOL> -D "<BIND_DN>" -f <LDIF_FILE> -w <DS_DM_PASSWORD>
6.4.4.2 Showing User Attributes #
To show the attributes of a user, use the
ldapsearchcommand:LDAP_PROTOCOL=ldap # ldap, ldaps LDAP_NODE_FQDN=localhost # FQDN of 389 Directory Server LDAP_NODE_PROTOCOL=:389 # Non-TLS (:389), TLS (:636) USERID=user1 BASE_DN="uid=<USERID>,dc=example,dc=org" BIND_DN="cn=Directory Manager" # Admin User DS_DM_PASSWORD= # Admin Password ldapsearch -v -x -H <LDAP_PROTOCOL>://<LDAP_NODE_FQDN><LDAP_NODE_PROTOCOL> -b "<BASE_DN>" -D "<BIND_DN>" -w <DS_DM_PASSWORD>
6.4.4.3 Modifying a User #
The following procedure shows how to modify a user in the LDAP server.
See the LDIF files for examples of how to change rootdn password, a user password and add a user to the
Administrators group.
To modify other fields, you can use the password example, replacing userPassword
with other field names you want to change.
Create an LDIF file (
modify_rootdn.ldif), which contains the change to the LDAP server:dn: cn=config changetype: modify replace: nsslapd-rootpw nsslapd-rootpw: NEW_PASSWORD
NEW_PASSWORD: The user’s new hashed password.
Use
/usr/sbin/slappasswdto generate the SSHA hash./usr/sbin/slappasswd -h {SSHA} -s <USER_PASSWORD>Use
/usr/bin/pwdhashto generate the SSHA hash./usr/bin/pwdhash -s SSHA <USER_PASSWORD>
Create an LDIF file (
modify_user.ldif), which contains the change to the LDAP server:dn: uid=USERID,ou=OU_NAME,dc=example,dc=org changetype: modify replace: userPassword userPassword: NEW_PASSWORD
USERID: The desired user’s ID
OU_NAME: organizational unit name
NEW_PASSWORD: The user’s new hashed password.
Use
/usr/sbin/slappasswdto generate the SSHA hash./usr/sbin/slappasswd -h {SSHA} -s <USER_PASSWORD>Use
/usr/bin/pwdhashto generate the SSHA hash./usr/bin/pwdhash -s SSHA <USER_PASSWORD>
Add the user to the
Administratorsgroup:dn: cn=Administrators,ou=Groups,dc=example,dc=org changetype: modify add: uniqueMember uniqueMember: uid=USERID,ou=OU_NAME,dc=example,dc=org
USERID: Substitute with the user’s ID.
OU_NAME: organizational unit name
Execute
ldapmodifyto change user attributes:LDAP_PROTOCOL=ldap # ldap, ldaps LDAP_NODE_FQDN=localhost # FQDN of 389 Directory Server LDAP_NODE_PROTOCOL=:389 # Non-TLS (:389), TLS (:636) BIND_DN="cn=Directory Manager" # Admin User LDIF_FILE=./modify_user.ldif # LDIF Configuration File DS_DM_PASSWORD= # Admin Password ldapmodify -v -H <LDAP_PROTOCOL>://<LDAP_NODE_FQDN><LDAP_NODE_PROTOCOL> -D "<BIND_DN>" -f <LDIF_FILE> -w <DS_DM_PASSWORD>
6.4.4.4 Deleting a User #
To delete a user from the LDAP server, follow these steps:
Create an LDIF file (
delete_user.ldif) that specifies the name of the entry:dn: uid=USER_ID,ou=OU_NAME,dc=example,dc=org changetype: delete
USERID: Substitute this with the user’s ID.
OU_NAME: organizational unit name
Run
ldapmodifyto delete the user:LDAP_PROTOCOL=ldap # ldap, ldaps LDAP_NODE_FQDN=localhost # FQDN of 389 Directory Server LDAP_NODE_PROTOCOL=:389 # Non-TLS (:389), TLS (:636) BIND_DN="cn=Directory Manager" # Admin User LDIF_FILE=./delete_user.ldif # LDIF Configuration File DS_DM_PASSWORD= # Admin Password ldapmodify -v -H <LDAP_PROTOCOL>://<LDAP_NODE_FQDN><LDAP_NODE_PROTOCOL> -D "<BIND_DN>" -f <LDIF_FILE> -w <DS_DM_PASSWORD>
6.4.4.5 Changing Your own LDAP Password from CLI #
To perform a change to your own user password from CLI.
LDAP_PROTOCOL=ldap                                  # ldap, ldaps
LDAP_NODE_FQDN=localhost                            # FQDN of 389 Directory Server
LDAP_NODE_PROTOCOL=:389                             # Non-TLS (:389), TLS (:636)
BIND_DN=                                            # User's binding dn
DS_DM_PASSWORD=                                     # Old Password
NEW_DS_DM_PASSWORD=                                 # New Password

ldappasswd -v -H <LDAP_PROTOCOL>://<LDAP_NODE_FQDN><LDAP_NODE_PROTOCOL>  -x -D "<BIND_DN>" -w <DS_DM_PASSWORD> -a <DS_DM_PASSWORD> -s <NEW_DS_DM_PASSWORD>
6.4.5 Configuring the Authentication Connector #
Administrators can update the authentication connector settings before or after SUSE CaaS Platform deployment as follows:
Based on the manifest in
<CLUSTER_NAME>/addons/dex/base/dex.yaml, provide a kustomize patch to<CLUSTER_NAME>/addons/dex/patches/custom.yamlof the form of strategic merge patch or a JSON 6902 patch.Read https://github.com/kubernetes-sigs/kustomize/blob/master/docs/glossary.md#patchstrategicmerge and https://github.com/kubernetes-sigs/kustomize/blob/master/docs/glossary.md#patchjson6902 to get more information.
Adapt ConfigMap by adding LDAP configuration to the connector section. For detailed configuration of the LDAP connector, refer to the Dex documentation https://github.com/dexidp/dex/blob/v2.23.0/Documentation/connectors/ldap.md.

Note
Besides the LDAP connector, you can also set up other connectors. For additional connectors, refer to the available connector configurations in the Dex repository: https://github.com/dexidp/dex/tree/v2.23.0/Documentation/connectors.

Tip: Base64 ecoded PEM file
A base64 encoded PEM file can be generated by running:
cat <ROOT_CA_PEM_FILE> | base64 | awk '\{print\}' ORS='' && echoExamples of Usage (
<CLUSTER_NAME>/addons/dex/patches/custom.yaml):LDAP 389-DS TLS Connector:
apiVersion: v1
kind: ConfigMap
metadata:
  name: oidc-dex-config
  namespace: kube-system
data:
  config.yaml: |
    connectors:
    - type: ldap
      # Required field for connector id.
      id: 389ds
      # Required field for connector name.
      name: 389ds
      config:
        # Host and optional port of the LDAP server in the form "host:port".
        # If the port is not supplied, it will be guessed based on "insecureNoSSL",
        # and "startTLS" flags. 389 for insecure or StartTLS connections, 636
        # otherwise.
        host: ldap.example.org:636

        # The following field is required if the LDAP host is not using TLS (port 389).
        # Because this option inherently leaks passwords to anyone on the same network
        # as dex, THIS OPTION MAY BE REMOVED WITHOUT WARNING IN A FUTURE RELEASE.
        #
        # insecureNoSSL: true

        # If a custom certificate isn't provided, this option can be used to turn on
        # TLS certificate checks. As noted, it is insecure and shouldn't be used outside
        # of explorative phases.
        #
        insecureSkipVerify: true

        # When connecting to the server, connect using the ldap:// protocol then issue
        # a StartTLS command. If unspecified, connections will use the ldaps:// protocol
        #
        # startTLS: true

        # Path to a trusted root certificate file. Default: use the host's root CA.
        # rootCA: /etc/dex/pki/ca.crt

        # A raw certificate file can also be provided inline.
        rootCAData: <BASE64_ENCODED_PEM_FILE>

        # The DN and password for an application service account. The connector uses
        # these credentials to search for users and groups. Not required if the LDAP
        # server provides access for anonymous auth.
        # Please note that if the bind password contains a `$`, it has to be saved in an
        # environment variable which should be given as the value to `bindPW`.
        bindDN: cn=Directory Manager
        bindPW: <BIND_DN_PASSWORD>

        # The attribute to display in the provided password prompt. If unset, will
        # display "Username"
        usernamePrompt: Email Address

        # User search maps a username and password entered by a user to a LDAP entry.
        userSearch:
          # BaseDN to start the search from. It will translate to the query
          # "(&(objectClass=person)(mail=<USERNAME>))".
          baseDN: ou=Users,dc=example,dc=org
          # Optional filter to apply when searching the directory.
          filter: "(objectClass=person)"

          # username attribute used for comparing user entries. This will be translated
          # and combined with the other filter as "(<attr>=<USERNAME>)".
          username: mail
          # The following three fields are direct mappings of attributes on the user entry.
          # String representation of the user.
          idAttr: DN
          # Required. Attribute to map to Email.
          emailAttr: mail
          # Maps to display the name of users. No default value.
          nameAttr: cn

        # Group search queries for groups given a user entry.
        groupSearch:
          # BaseDN to start the search from. It will translate to the query
          # "(&(objectClass=group)(member=<USER_UID>))".
          baseDN: ou=Groups,dc=example,dc=org
          # Optional filter to apply when searching the directory.
          filter: "(objectClass=groupOfNames)"

          # Following two fields are used to match a user to a group. It adds an additional
          # requirement to the filter that an attribute in the group must match the user's
          # attribute value.
          userAttr: uid
          groupAttr: memberUid

          # Represents group name.
          nameAttr: cn
Active Directory TLS Connector using email:
apiVersion: v1
kind: ConfigMap
metadata:
  name: oidc-dex-config
  namespace: kube-system
data:
  config.yaml: |
    connectors:
    - type: ldap
      # Required field for connector id.
      id: AD
      # Required field for connector name.
      name: AD
      config:
        # Host and optional port of the LDAP server in the form "host:port".
        # If the port is not supplied, it will be guessed based on "insecureNoSSL",
        # and "startTLS" flags. 389 for insecure or StartTLS connections, 636
        # otherwise.
        host: ad.example.org:636

        # Following field is required if the LDAP host is not using TLS (port 389).
        # Because this option inherently leaks passwords to anyone on the same network
        # as dex, THIS OPTION MAY BE REMOVED WITHOUT WARNING IN A FUTURE RELEASE.
        #
        # insecureNoSSL: true

        # If a custom certificate isn't provided, this option can be used to turn on
        # TLS certificate checks. As noted, it is insecure and shouldn't be used outside
        # of explorative phases.
        #
        # insecureSkipVerify: true

        # When connecting to the server, connect using the ldap:// protocol then issue
        # a StartTLS command. If unspecified, connections will use the ldaps:// protocol
        #
        # startTLS: true

        # Path to a trusted root certificate file. Default: use the host's root CA.
        # rootCA: /etc/dex/ldap.ca

        # A raw certificate file can also be provided inline.
        rootCAData: <BASE_64_ENCODED_PEM_FILE>

        # The DN and password for an application service account. The connector uses
        # these credentials to search for users and groups. Not required if the LDAP
        # server provides access for anonymous auth.
        # Please note that if the bind password contains a `$`, it has to be saved in an
        # environment variable which should be given as the value to `bindPW`.
        bindDN: cn=user-admin,ou=Users,dc=example,dc=org
        bindPW: <BIND_DN_PASSWORD>

        # The attribute to display in the provided password prompt. If unset, will
        # display "Username"
        usernamePrompt: Email Address

        # User search maps a username and password entered by a user to a LDAP entry.
        userSearch:
          # BaseDN to start the search from. It will translate to the query
          # "(&(objectClass=person)(mail=<USERNAME>))".
          baseDN: ou=Users,dc=example,dc=org
          # Optional filter to apply when searching the directory.
          filter: "(objectClass=person)"

          # username attribute used for comparing user entries. This will be translated
          # and combined with the other filter as "(<attr>=<USERNAME>)".
          username: mail
          # The following three fields are direct mappings of attributes on the user entry.
          # String representation of the user.
          idAttr: distinguishedName
          # Required. Attribute to map to Email.
          emailAttr: mail
          # Maps to display the name of users. No default value.
          nameAttr: sAMAccountName

        # Group search queries for groups given a user entry.
        groupSearch:
          # BaseDN to start the search from. It will translate to the query
          # "(&(objectClass=group)(member=<USER_UID>))".
          baseDN: ou=Groups,dc=example,dc=org
          # Optional filter to apply when searching the directory.
          filter: "(objectClass=group)"

          # Following two fields are used to match a user to a group. It adds an additional
          # requirement to the filter that an attribute in the group must match the user's
          # attribute value.
          userAttr: distinguishedName
          groupAttr: member

          # Represents group name.
          nameAttr: sAMAccountName
Active Directory TLS Connector using sAMAccountName:
apiVersion: v1
kind: ConfigMap
metadata:
  name: oidc-dex-config
  namespace: kube-system
data:
  config.yaml: |
    connectors:
    - type: ldap
      # Required field for connector id.
      id: AD
      # Required field for connector name.
      name: AD
      config:
        # Host and optional port of the LDAP server in the form "host:port".
        # If the port is not supplied, it will be guessed based on "insecureNoSSL",
        # and "startTLS" flags. 389 for insecure or StartTLS connections, 636
        # otherwise.
        host: ad.example.org:636

        # Following field is required if the LDAP host is not using TLS (port 389).
        # Because this option inherently leaks passwords to anyone on the same network
        # as dex, THIS OPTION MAY BE REMOVED WITHOUT WARNING IN A FUTURE RELEASE.
        #
        # insecureNoSSL: true

        # If a custom certificate isn't provided, this option can be used to turn on
        # TLS certificate checks. As noted, it is insecure and shouldn't be used outside
        # of explorative phases.
        #
        # insecureSkipVerify: true

        # When connecting to the server, connect using the ldap:// protocol then issue
        # a StartTLS command. If unspecified, connections will use the ldaps:// protocol
        #
        # startTLS: true

        # Path to a trusted root certificate file. Default: use the host's root CA.
        # rootCA: /etc/dex/ldap.ca

        # A raw certificate file can also be provided inline.
        rootCAData: <BASE_64_ENCODED_PEM_FILE>

        # The DN and password for an application service account. The connector uses
        # these credentials to search for users and groups. Not required if the LDAP
        # server provides access for anonymous auth.
        # Please note that if the bind password contains a `$`, it has to be saved in an
        # environment variable which should be given as the value to `bindPW`.
        bindDN: cn=user-admin,ou=Users,dc=example,dc=org
        bindPW: <BIND_DN_PASSWORD>

        # The attribute to display in the provided password prompt. If unset, will
        # display "Username"
        usernamePrompt: sAMAccountName

        # User search maps a username and password entered by a user to a LDAP entry.
        userSearch:
          # BaseDN to start the search from. It will translate to the query
          # "(&(objectClass=person)(mail=<USERNAME>))".
          baseDN: ou=Users,dc=example,dc=org
          # Optional filter to apply when searching the directory.
          filter: "(objectClass=person)"

          # username attribute used for comparing user entries. This will be translated
          # and combined with the other filter as "(<attr>=<USERNAME>)".
          username: sAMAccountName
          # The following three fields are direct mappings of attributes on the user entry.
          # String representation of the user.
          idAttr: sAMAccountName
          # Required. Attribute to map to Email.
          emailAttr: mail
          # Maps to display the name of users. No default value.
          nameAttr: sAMAccountName

        # Group search queries for groups given a user entry.
        groupSearch:
          # BaseDN to start the search from. It will translate to the query
          # "(&(objectClass=group)(member=<USER_UID>))".
          baseDN: ou=Groups,dc=example,dc=org
          # Optional filter to apply when searching the directory.
          filter: "(objectClass=group)"

          # Following two fields are used to match a user to a group. It adds an additional
          # requirement to the filter that an attribute in the group must match the user's
          # attribute value.
          userAttr: distinguishedName
          groupAttr: member

          # Represents group name.
          nameAttr: sAMAccountName
Create a
kustomization.yamlfile in<CLUSTER_NAME>/addons/dex/kustomization.yamlapiVersion: kustomize.config.k8s.io/v1beta1 kind: Kustomization resources: - base/dex.yaml patches: - patches/custom.yaml
Apply the changes with:
kubectl apply -k <CLUSTER_NAME>/addons/dex/
Then, refer to Section 6.5.2, “User Access” to access through Web or CLI.
6.5 Role-Based Access Control (RBAC) #
Kubernetes RBAC uses the rbac.authorization.k8s.io API group to drive authorization decisions,
allowing administrators to dynamically configure policies through the Kubernetes API.
The administrators can use Kubernetes RBAC to design user or group authorizations.
6.5.1 Role Management #
Roles define, which subjects (users or groups) can use which verbs (operations) on which resources. The following sections provide an overview of the verbs, resources, and how to create roles. Roles can then be assigned to users and groups.
6.5.1.1 List of Verbs #
This section provides an overview of the most common verbs (operations) used for defining roles.
Verbs correspond to sub-commands of kubectl.
- create
Create a resource.
- delete
Delete resources.
- deletecollection
Delete a collection of a resource (can only be invoked using the Kubernetes API).
- get
Display individual resources.
- list
Display collections.
- patch
Update an API object in place.
- proxy
Allows running
kubectlin a mode where it acts as a reverse proxy.- update
Update fields of a resource, for example, annotations or labels.
- watch
Watch resource.
6.5.1.2 List of Resources #
This section provides an overview of the most common resources used for defining roles.
- Autoscaler
https://v1-18.docs.kubernetes.io/docs/tasks/run-application/horizontal-pod-autoscale/
- ConfigMaps
https://v1-18.docs.kubernetes.io/docs/tasks/configure-pod-container/configure-pod-configmap/
- Cronjob
https://v1-18.docs.kubernetes.io/docs/concepts/workloads/controllers/cron-jobs/
- DaemonSet
https://v1-18.docs.kubernetes.io/docs/concepts/workloads/controllers/daemonset/
- Deployment
https://v1-18.docs.kubernetes.io/docs/concepts/workloads/controllers/deployment/
- Ingress
https://v1-18.docs.kubernetes.io/docs/concepts/services-networking/ingress/
- Job
https://v1-18.docs.kubernetes.io/docs/concepts/workloads/controllers/jobs-run-to-completion/
- Namespace
https://v1-18.docs.kubernetes.io/docs/concepts/overview/working-with-objects/namespaces/
- Node
https://v1-18.docs.kubernetes.io/docs/concepts/architecture/nodes/
- Pod
https://v1-18.docs.kubernetes.io/docs/concepts/workloads/pods/pod-overview/
- Persistent Volumes
https://v1-18.docs.kubernetes.io/docs/concepts/storage/persistent-volumes/
- Secrets
https://v1-18.docs.kubernetes.io/docs/concepts/configuration/secret/
- Service
https://v1-18.docs.kubernetes.io/docs/concepts/services-networking/service/
- ReplicaSets
https://v1-18.docs.kubernetes.io/docs/concepts/workloads/controllers/replicaset/
6.5.1.3 Creating Roles #
Roles are defined in YAML files.
To apply role definitions to Kubernetes, use kubectl apply -f YAML_FILE.
The following examples provide an overview of different use cases of roles.
Simple Role for Core Resource:
This example allows us to
get,watch, andlistallpodsin the namespacedefault.kind: Role apiVersion: rbac.authorization.k8s.io/v1 metadata: name: view-pods 1 namespace: default 2 rules: - apiGroups: [""] 3 resources: ["pods"] 4 verbs: ["get", "watch", "list"] 5
Name of the role. This is required to associate the rule with a group or user. For details, refer to Section 6.5.1.4, “Create Role Bindings”.
Namespace the new group should be allowed to access. Use
defaultfor Kubernetes' default namespace.Kubernetes API groups. Use
""for the core group. Usekubectl api-resourcesto list all API groups.Kubernetes resources. For a list of available resources, refer to Section 6.5.1.2, “List of Resources”.
Kubernetes verbs. For a list of available verbs, refer to Section 6.5.1.1, “List of Verbs”.
Cluster Role for Creation of Pods:
This example creates a cluster role to allow
create podscluster-wide. Note theClusterRolevalue forkind.kind: ClusterRole apiVersion: rbac.authorization.k8s.io/v1 metadata: name: admin-create-pods 1 rules: - apiGroups: [""] 2 resources: ["pods"] 3 verbs: ["create"] 4
Name of the cluster role. This is required to associate the rule with a group or user. For details, refer to Section 6.5.1.4, “Create Role Bindings”.
Kubernetes API groups. Use
""for the core group. Usekubectl api-resourcesto list all API groups.Kubernetes resources. For a list of available resources, refer to Section 6.5.1.2, “List of Resources”.
Kubernetes verbs. For a list of available verbs, refer to Section 6.5.1.1, “List of Verbs”.
6.5.1.4 Create Role Bindings #
To bind a group or user to a role or cluster role, create a YAML file that contains the role or cluster role binding description.
Then apply the binding with kubectl apply -f YAML_FILE.
The following examples provide an overview of different use cases of role bindings.
Binding a User to a Role:
This example shows how to bind a user to a defined role.
kind: RoleBinding
apiVersion: rbac.authorization.k8s.io/v1
metadata:
  name: <ROLE_BINDING_NAME> 1
  namespace: <NAMESPACE> 2
subjects:
- kind: User
  name: <LDAP_USER_NAME> 3
  apiGroup: rbac.authorization.k8s.io
roleRef:
  kind: Role
  name: <ROLE_NAME> 4
  apiGroup: rbac.authorization.k8s.io
Defines a name for this new role binding.
Name of the namespace to which the binding applies.
Name of the LDAP user to which this binding applies.
Name of the role used. For defining rules, refer to Section 6.5.1.3, “Creating Roles”.
Binding a User to a Cluster Role:
This example shows how to bind a user to a defined cluster role.
kind: ClusterRoleBinding
apiVersion: rbac.authorization.k8s.io/v1
metadata:
  name: <CLUSTER_ROLE_BINDING_NAME> 1
subjects:
- kind: User
  name: <LDAP_USER_NAME> 2
  apiGroup: rbac.authorization.k8s.io
roleRef:
  kind: ClusterRole
  name: <CLUSER_ROLE_NAME> 3
  apiGroup: rbac.authorization.k8s.io
Defines a name for this new cluster role binding.
Name of the LDAP user to which this binding applies.
Name of the cluster role used. For defining rules, refer to Section 6.5.1.3, “Creating Roles”.
Binding a Group to a Role:
This example shows how to bind a group to a defined role.
kind: RoleBinding
apiVersion: rbac.authorization.k8s.io/v1
metadata:
  name: <ROLE_BINDING_NAME> 1
  namespace: <NAMESPACE> 2
subjects:
- kind: Group
  name: <LDAP_GROUP_NAME> 3
  apiGroup: rbac.authorization.k8s.io
roleRef:
  kind: Role
  name: <ROLE_NAME> 4
  apiGroup: rbac.authorization.k8s.io
Defines a name for this new role binding.
Name of the namespace to which the binding applies.
Name of the LDAP group to which this binding applies.
Name of the role used. For defining rules, refer to Section 6.5.1.3, “Creating Roles”.
Binding a Group to a Cluster Role:
This example shows how to bind a group to a defined cluster role.
kind: ClusterRoleBinding
apiVersion: rbac.authorization.k8s.io/v1
metadata:
  name: <CLUSTER_ROLE_BINDING_NAME> 1
subjects:
- kind: Group
  name: <LDAP_GROUP_NAME> 2
  apiGroup: rbac.authorization.k8s.io
roleRef:
  kind: ClusterRole
  name: <CLUSER_ROLE_NAME> 3
  apiGroup: rbac.authorization.k8s.io
Defines a name for this new cluster role binding.
Name of the LDAP group to which this binding applies.
Name of the cluster role used. For defining rules, refer to Section 6.5.1.3, “Creating Roles”.
Important
When creating new Roles, ClusterRoles, RoleBindings, and ClusterRoleBindings, it is important to keep in mind the Principle of Least Privilege:
"define rules such that the account bound to the Role or ClusterRole has the minimum amount of permissions needed to fulfill its purpose and no more."
For instance, granting the admin ClusterRole to most accounts is most likely unnecessary,
when a reduced-scope role would be enough to fulfill the account’s purpose.
This helps reduce the attack surface if an account is compromised.
It is also recommended to periodically review your Roles and ClusterRoles to ensure they are still required and are not overly-permissive.
6.5.2 User Access #
Using the web browser:
Go to the login page at
https://<CONTROL_PLANE_IP/FQDN>:32001.Click "Sign In".
Choose a login method.
Enter login credentials.
Download
kubeconfigor self-configurekubectlwith the provided setup instructions.
Using the CLI:
Run
skuba auth loginwith Dex server URLhttps://<CONTROL_PLANE_IP/FQDN>:32000, login username and password.The kubeconfig
kubeconf.txtis generated at your current directory.
6.5.3 Access Kubernetes Resources #
The user can now access resources in the authorized <NAMESPACE>.
If the user has the proper permissions to access the resources, the output should look like this:
# kubectl -n <NAMESPACE> get pod

NAMESPACE     NAME                                 READY   STATUS    RESTARTS   AGE
kube-system   dex-844dc9b8bb-w2zkm                 1/1     Running   0          19d
kube-system   gangway-944dc9b8cb-w2zkm             1/1     Running   0          19d
kube-system   cilium-76glw                         1/1     Running   0          27d
kube-system   cilium-fvgcv                         1/1     Running   0          27d
kube-system   cilium-j5lpx                         1/1     Running   0          27d
kube-system   cilium-operator-5d9cc4fbb7-g5plc     1/1     Running   0          34d
kube-system   cilium-vjf6p                         1/1     Running   8          27d
kube-system   coredns-559fbd6bb4-2r982             1/1     Running   9          46d
kube-system   coredns-559fbd6bb4-89k2j             1/1     Running   9          46d
kube-system   etcd-my-master                       1/1     Running   5          46d
kube-system   kube-apiserver-<CLUSTER_NAME>            1/1     Running   0          19d
kube-system   kube-controller-manager-my-master    1/1     Running   14         46d
kube-system   kube-proxy-62hls                     1/1     Running   4          46d
kube-system   kube-proxy-fhswj                     1/1     Running   0          46d
kube-system   kube-proxy-r4h42                     1/1     Running   1          39d
kube-system   kube-proxy-xsdf4                     1/1     Running   0          39d
kube-system   kube-scheduler-my-master             1/1     Running   13         46d
If the user does not have the right permissions to access a resource,
they will receive a Forbidden message.
Error from server (Forbidden): pods is forbidden
6.5.4 OIDC Tokens #
The kubeconfig file (kubeconf.txt) contains the OIDC tokens necessary to perform authentication and authorization in the cluster.
OIDC tokens have an expiration date which means that they need to be refreshed after some time.
Important
If you use the same user in multiple kubeconfig files distributed among multiple machines,
this can lead to issues. Due to the nature of access and refresh tokens (https://tools.ietf.org/html/rfc6749#page-10) only one of the machines will be fully able to refresh the token set at any given time.
The user will be able to download multiple 'kubeconfig' files. However, the file with the same user is likely to be valid only for single access until expiration.
Dex regards one session per user. The id-token and refresh-token are refreshed together.
If a second user is trying to login to get a new id-token, Dex will invalidate the previous id-token and refresh-token for the first user.
The first user is still able to continue using the old id-token until expiration. After expiration, the first user is not allowed to refresh the id-token due to the invalid refresh-token.
Only the second user will have a valid refresh-token now. The first user will encounter an error like: "msg="failed to rotate keys: keys already rotated by another server instance".
If sharing the same id-token in many places, all of them can be used until expiration.
The first user to refresh the id-token and refresh token will be able to continue accessing the cluster.
All other users will encounter an error Refresh token is invalid or has already been claimed by another client because the refresh-token got updated by the first user.
Please use separate users for each kubeconfig file to avoid this situation.
Find out how to add more users in Section 6.4.4.1, “Adding a New User”.
You can also check information about the user and the respective OIDC tokens in the kubeconfig file under the users section:
users:
- name: myuser
  user:
    auth-provider:
      config:
        client-id: oidc
        client-secret: <SECRET>
        id-token:  <ID_TOKEN>
        idp-issuer-url: https://<IP>:<PORT>
        refresh-token: <REFRESH_TOKEN>
      name: oidc
6.6 Admission Controllers #
6.6.1 Introduction #
After user authentication and authorization, admission takes place to complete the access control for the Kubernetes API. As the final step in the access control process, admission enhances the security layer by mandating a reasonable security baseline across a specific namespace or the entire cluster. The built-in PodSecurityPolicy admission controller is perhaps the most prominent example of it.
Apart from the security aspect, admission controllers can enforce custom policies to adhere to certain best-practices such as having good labels, annotation, resource limits, or other settings. It is worth noting that instead of only validating the request, admission controllers are also capable of "fixing" a request by mutating it, such as automatically adding resource limits if the user forgets to.
The admission is controlled by admission controllers which may only be configured by the cluster administrator. The admission control process happens in two phases:
In the first phase, mutating admission controllers are run. They are empowered to automatically change the requested object to comply with certain cluster policies by making modifications to it if needed.
In the second phase, validating admission controllers are run. Based on the results of the previous mutating phase, an admission controller can either allow the request to proceed and reach
etcdor deny it.
Important
If any of the controllers in either phase reject the request, the entire request is rejected immediately and an error is returned to the end-user.
6.6.2 Configured admission controllers #
Important
Any modification of this list prior to the creation of the cluster will be overwritten by these default settings.
The ability to add or remove individual admission controllers will be provided with one of the upcoming releases of SUSE CaaS Platform.
The complete list of admission controllers can be found at https://v1-18.docs.kubernetes.io/docs/reference/access-authn-authz/admission-controllers/#what-does-each-admission-controller-do
The default admission controllers enabled in SUSE CaaS Platform are:
NodeRestrictionPodSecurityPolicy
6.7 Pod Security Policies #
Note
Please note that criteria for designing PodSecurityPolicy are not part of this document.
"Pod Security Policy" (stylized as PodSecurityPolicy and abbreviated "PSP") is a security
measure implemented by Kubernetes to control which specifications a pod must meet
to be allowed to run in the cluster. They control various aspects of execution of
pods and interactions with other parts of the software infrastructure.
You can find more general information about PodSecurityPolicy in the Kubernetes Docs.
User access to the cluster is controlled via "Role Based Access Control (RBAC)". Each PodSecurityPolicy is associated with one or more users or service accounts so they are allowed to launch pods with the associated specifications. The policies are associated with users or service accounts via role bindings.
Note
The default policies shipped with SUSE CaaS Platform are a good start, but depending on security requirements, adjustments should be made or additional policies should be created.
6.7.1 Default Policies #
SUSE CaaS Platform 4 currently ships with two default policies:
Privileged (full access everywhere)
Unprivileged (only very basic access)
All pods running the containers for the basic SUSE CaaS Platform software are
deployed into the kube-system namespace and run with the "privileged" policy.
All authenticated system users (group system:authenticated) and service accounts in kube-system (system:serviceaccounts:kube-system)
have a RoleBinding (suse:caasp:psp:privileged) to run pods using the privileged policy in the kube-system namespace.
Any other pods launched in any other namespace are, by default, deployed in unprivileged mode.
Important
You must configure RBAC rules and PodSecurityPolicy to provide proper functionality and security.
6.7.2 Policy Definition #
The policy definitions are embedded in the cluster bootstrap manifest (GitHub).
During the bootstrap with skuba, the policy files will be stored on your
workstation in the cluster definition folder under addons/psp/base. These policy files
will be installed automatically for all cluster nodes.
The file names of the files created are:
podsecuritypolicy-unprivileged.yamland
podsecuritypolicy-privileged.yaml.
6.7.2.1 Policy File Examples #
This is the unprivileged policy as a configuration file. You can use this
as a basis to develop your own PodSecurityPolicy which should be saved as custom-psp.yaml
addons/psp/patches directory.
apiVersion: policy/v1beta1
kind: PodSecurityPolicy
metadata:
  name: suse.caasp.psp.unprivileged
  annotations:
    apparmor.security.beta.kubernetes.io/allowedProfileNames: runtime/default
    apparmor.security.beta.kubernetes.io/defaultProfileName: runtime/default
    seccomp.security.alpha.kubernetes.io/allowedProfileNames: runtime/default
    seccomp.security.alpha.kubernetes.io/defaultProfileName: runtime/default
spec:
  # Privileged
  privileged: false
  # Volumes and File Systems
  volumes:
    # Kubernetes Pseudo Volume Types
    - configMap
    - secret
    - emptyDir
    - downwardAPI
    - projected
    - persistentVolumeClaim
    # Networked Storage
    - nfs
    - rbd
    - cephFS
    - glusterfs
    - fc
    - iscsi
    # Cloud Volumes
    - cinder
    - gcePersistentDisk
    - awsElasticBlockStore
    - azureDisk
    - azureFile
    - vsphereVolume
  allowedHostPaths:
    # Note: We don't allow hostPath volumes above, but set this to a path we
    # control anyway as a belt+braces protection. /dev/null may be a better
    # option, but the implications of pointing this towards a device are
    # unclear.
    - pathPrefix: /opt/kubernetes-hostpath-volumes
  readOnlyRootFilesystem: false
  # Users and groups
  runAsUser:
    rule: RunAsAny
  supplementalGroups:
    rule: RunAsAny
  fsGroup:
    rule: RunAsAny
  # Privilege Escalation
  allowPrivilegeEscalation: false
  defaultAllowPrivilegeEscalation: false
  # Capabilities
  allowedCapabilities: []
  defaultAddCapabilities: []
  requiredDropCapabilities: []
  # Host namespaces
  hostPID: false
  hostIPC: false
  hostNetwork: false
  hostPorts:
  - min: 0
    max: 65535
  # SELinux
  seLinux:
    # SELinux is unused in CaaSP
    rule: 'RunAsAny'
---
apiVersion: rbac.authorization.k8s.io/v1
kind: ClusterRole
metadata:
  name: suse:caasp:psp:unprivileged
rules:
  - apiGroups: ['extensions']
    resources: ['podsecuritypolicies']
    verbs: ['use']
    resourceNames: ['suse.caasp.psp.unprivileged']
---
# Allow all users and serviceaccounts to use the unprivileged
# PodSecurityPolicy
apiVersion: rbac.authorization.k8s.io/v1
kind: ClusterRoleBinding
metadata:
  name: suse:caasp:psp:default
roleRef:
  kind: ClusterRole
  name: suse:caasp:psp:unprivileged
  apiGroup: rbac.authorization.k8s.io
subjects:
- kind: Group
  apiGroup: rbac.authorization.k8s.io
  name: system:serviceaccounts
- kind: Group
  apiGroup: rbac.authorization.k8s.io
  name: system:authenticated
6.7.3 Creating a PodSecurityPolicy #
In order to properly secure and run your Kubernetes workloads you must configure RBAC rules for your desired users create a PodSecurityPolicy adequate for your respective workloads and then link the user accounts to the PodSecurityPolicy using (Cluster)RoleBinding.
https://v1-18.docs.kubernetes.io/docs/concepts/policy/pod-security-policy/
6.8 NGINX Ingress Controller #
Kubernetes ingress exposes HTTP and HTTPS routes from the outside of a cluster to services created inside the cluster. An Ingress controller with an ingress controller service is responsible for supporting the Kubernetes ingress. In order to use Kubernetes ingress, you need to install the ingress controller with the ingress controller service exposed to the outside of the cluster. Traffic routing is controlled by rules defined on the Ingress resource from the backend services.
6.8.1 Configure and deploy NGINX ingress controller #
6.8.1.1 Define networking configuration #
Choose which networking configuration the ingress controller should have.
Create a file nginx-ingress-config-values.yaml with one of the following examples as content:
# Enable the creation of pod security policy
podSecurityPolicy:
  enabled: false

# Create a specific service account
serviceAccount:
  create: true
  name: nginx-ingress

controller:
  # Number of controller pods
  replicaCount: 3
[ADD CONTENT HERE] 1Add one of the following sections at this point to configure for a specific type of exposing the service.
|
6.8.1.2 Deploy ingress controller from helm chart #
Add the SUSE helm charts repository by running:
helm repo add suse https://kubernetes-charts.suse.com
Then you can deploy the ingress controller and use the previously created configuration file to configure the networking type.
kubectl create namespace nginx-ingress
helm install nginx-ingress suse/nginx-ingress \
--namespace nginx-ingress \
--values nginx-ingress-config-values.yaml
The result should be two running pods:
kubectl -n nginx-ingress get pod
NAME                                             READY     STATUS    RESTARTS   AGE
nginx-ingress-controller-74cffccfc-p8xbb         1/1       Running   0          4s
nginx-ingress-default-backend-6b9b546dc8-mfkjk   1/1       Running   0          4s
Depending on the networking configuration you chose before, the result should be two services:
NodePort
kubectl get svc -n nginx-ingress
NAME                            TYPE        CLUSTER-IP       EXTERNAL-IP   PORT(S)         AGE
nginx-ingress-controller        NodePort    10.100.108.7     <none>        443:32443/TCP   2d1h
nginx-ingress-default-backend   ClusterIP   10.109.118.128   <none>        80/TCP          2d1h
External IPs
kubectl get svc -n nginx-ingress
NAME                            TYPE           CLUSTER-IP     EXTERNAL-IP   PORT(S)         AGE
nginx-ingress-controller        LoadBalancer   10.103.103.27  10.86.4.158   443:30275/TCP   12s
nginx-ingress-default-backend   ClusterIP      10.100.48.17   <none>        80/TCP          12s
LoadBalancer
kubectl get svc -n nginx-ingress
NAME                            TYPE           CLUSTER-IP       EXTERNAL-IP   PORT(S)         AGE
nginx-ingress-controller        LoadBalancer   10.106.160.255   10.86.5.176   443:31868/TCP   3h58m
nginx-ingress-default-backend   ClusterIP      10.111.140.50    <none>        80/TCP          3h58m
6.8.1.3 Create DNS entries #
You should configure proper DNS names in any production environment. k8s-dashboard.com will be the domain name we will use in the ingress resource.
These values are only for example purposes.
NodePort
The services will be publicly exposed on each node of the cluster at port 32443 for HTTPS.
In this example, we will use a worker node with IP 10.86.14.58.
k8s-dashboard.com IN A 10.86.14.58
Or add this entry to /etc/hosts
10.86.14.58 k8s-dashboard.com
External IPs
The services will be exposed on a specific node of the cluster, at the assigned port for HTTPS.
In this example, we used the external IP 10.86.4.158.
k8s-dashboard.com IN A 10.86.4.158
Or add this entry to /etc/hosts
10.86.4.158 k8s-dashboard.com
LoadBalancer
The services will be exposed on an assigned node of the cluster, at the assigned port for HTTPS.
In this example, LoadBalancer provided the external IP 10.86.5.176.
k8s-dashboard.com IN A 10.86.5.176
Or add this entry to /etc/hosts
10.86.5.176 k8s-dashboard.com
6.8.2 Deploy Kubernetes Dashboard as an example #
Important
This example uses the upstream chart for the Kubernetes dashboard. There is currently no officially supported version of the Kubernetes dashboard available from SUSE.
Deploy Kubernetes dashboard.
kubectl apply -f https://raw.githubusercontent.com/kubernetes/dashboard/v2.0.0/aio/deploy/recommended.yaml
Create the
cluster-adminaccount to access the Kubernetes dashboard.This will show how to create simple admin user using Service Account, grant it the admin permission then use the token to access the kubernetes dashboard.
kubectl create serviceaccount dashboard-admin -n kube-system

kubectl create clusterrolebinding dashboard-admin \
--clusterrole=cluster-admin \
--serviceaccount=kube-system:dashboard-admin
Create the TLS secret.
Please refer to Section 6.9.9.1.1, “Trusted Server Certificate” on how to sign the trusted certificate. In this example, crt and key are generated by a self-signed certificate.
openssl req -x509 -nodes -days 365 -newkey rsa:2048 \
-keyout /tmp/dashboard-tls.key -out /tmp/dashboard-tls.crt \
-subj "/CN=k8s-dashboard.com/O=k8s-dashboard"

kubectl create secret tls dashboard-tls \
--key /tmp/dashboard-tls.key --cert /tmp/dashboard-tls.crt \
-n kubernetes-dashboard
Create the ingress resource.
We will create an ingress to access the backend service using the ingress controller. Create
dashboard-ingress.yamlwith the appropriate valuesapiVersion: networking.k8s.io/v1beta1 kind: Ingress metadata: name: dashboard-ingress namespace: kubernetes-dashboard annotations: kubernetes.io/ingress.class: nginx ingress.kubernetes.io/ssl-passthrough: "true" nginx.ingress.kubernetes.io/secure-backends: "true" nginx.ingress.kubernetes.io/rewrite-target: / spec: tls: - hosts: - k8s-dashboard.com secretName: dashboard-tls rules: - host: k8s-dashboard.com http: paths: - path: / backend: serviceName: kubernetes-dashboard servicePort: 443Deploy dashboard ingress.
kubectl apply -f dashboard-ingress.yaml
The result will look like this:
kubectl get ing -n kubernetes-dashboard
NAMESPACE            NAME                 HOSTS               ADDRESS   PORTS     AGE
kubernetes-dashboard dashboard-ingress    k8s-dashboard.com             80, 443   2d
Access Kubernetes Dashboard Kubernetes dashboard will be accessible through ingress domain name with the configured ingress controller port.
Note: Access Token
Now we’re ready to get the token from dashboard-admin by following command.
kubectl describe secrets -n kube-system \ $(kubectl -n kube-system get secret | awk '/dashboard-admin/{print $1}')NodePort:
https://k8s-dashboard.com:32443External IPs:
https://k8s-dashboard.comLoadBalancer:
https://k8s-dashboard.com
6.9 Certificates #
During the installation of SUSE CaaS Platform, a CA (Certificate Authority) certificate is generated, which is then used to authenticate and verify all communication. This process also creates and distributes client and server certificates for the components.
6.9.1 Communication Security #
Communication is secured with TLS v1.2 using the AES 128 CBC cipher. All certificates are 2048 bit RSA encrypted.
6.9.2 Certificate Validity #
The CA certificate is valid for 3650 days (10 years) by default. Client and server certificates are valid for 365 days (1 year) by default.
6.9.3 Certificate Location #
Required CAs for SUSE CaaS Platform are stored on all control plane nodes:
| Common Name | Path | Description |
|---|---|---|
kubernetes | /etc/kubernetes/pki/ca.crt,key | kubernetes general CA |
etcd-ca | /etc/kubernetes/pki/etcd/ca.crt,key | Etcd cluster |
kubelet-ca | /var/lib/kubelet/pki/kubelet-ca.crt,key | Kubelet components |
front-proxy-ca | /etc/kubernetes/pki/front-proxy-ca.crt,key | Front-proxy components |
The control plane certificates stored in the Kubernetes cluster on control plane nodes:
| Common Name | Parent CA | Path | Kind |
|---|---|---|---|
kubernetes | /etc/kubernetes/pki/ca.crt,key | CA | |
kube-apiserver | kubernetes | /etc/kubernetes/pki/apiserver.crt,key | Server |
kube-apiserver-etcd-client | etcd-ca | /etc/kubernetes/pki/apiserver-etcd-client.crt,key | Client |
kube-apiserver-kubelet-client | kubernetes | /etc/kubernetes/pki/apiserver-kubelet-client.crt,key | Client |
etcd-ca | /etc/kubernetes/pki/etcd/ca.crt,key | CA | |
kube-etcd-healthcheck-client | etcd-ca | /etc/kubernetes/pki/etcd/healthcheck-client.crt,key | Client |
kube-etcd-peer | etcd-ca | /etc/kubernetes/pki/etcd/peer.crt,key | Server,Client |
kube-etcd-server | etcd-ca | /etc/kubernetes/pki/etcd/server.crt,key | Server,Client |
kubelet-ca | /var/lib/kubeket/pki/kubelet-ca.crt,key | CA | |
system:node:<nodeName> | kubernetes | /var/lib/kubeket/pki/kubelet-client-current.pem | Client |
system:node:<nodeName> | kubelet-ca | /var/lib/kubelet/pki/kubelet-server-current.pem | Server |
front-proxy-ca | /etc/kubernetes/pki/front-proxy-ca.crt,key | CA | |
front-proxy-client | front-proxy-ca | /etc/kubernetes/pki/front-proxy-client.crt,key | Client |
kubernetes-admin | kubernetes | /etc/kubernetes/admin.conf | Client |
system:kube-controller-manager | kubernetes | /etc/kubernetes/controller-manager.conf | Client |
system:kube-scheduler | kubernetes | /etc/kubernetes/scheduler.conf | Client |
system:node:<nodeName> | kubernetes | /etc/kubernetes/kubelet.conf | Client |
Warning
If a node was bootstrapped/joined before Kubernetes version 1.17, you have to manually modify the contents of kubelet.conf to point to the automatically rotated kubelet client certificates by replacing client-certificate-data and client-key-data with:
client-certificate: /var/lib/kubelet/pki/kubelet-client-current.pem
client-key: /var/lib/kubelet/pki/kubelet-client-current.pem
The addon certificates stored in the Kubernetes cluster Secret resource:
| Common Name | Parent CA | Secret Resource Name | Kind |
|---|---|---|---|
oidc-dex | kubernetes | oidc-dex-cert | Server |
oidc-gangway | kubernetes | oidc-gangway-cert | Server |
metrics-server | kubernetes | metrics-server-cert | Server |
cilium-etcd-client | etcd-ca | cilium-secret | Client |
6.9.4 Monitoring Certificates #
We use cert-exporter to monitor nodes' on-host certificates and addons' secret certificates. The cert-exporter collects the metrics of certificates expiration periodically (1 hour by default) and exposes them through the /metrics endpoint. Then, the Prometheus server can scrape these metrics from the endpoint periodically.
helm repo add suse https://kubernetes-charts.suse.com
helm install <RELEASE_NAME> suse/cert-exporter
6.9.4.1 Prerequisites #
To monitor certificates, we need to set up monitoring stack by following the Section 8.1, “Monitoring Stack” on how to deploy it.
Label the skuba addon certificates
kubectl label --overwrite secret oidc-dex-cert -n kube-system caasp.suse.com/skuba-addon=true
kubectl label --overwrite secret oidc-gangway-cert -n kube-system caasp.suse.com/skuba-addon=true
kubectl label --overwrite secret metrics-server-cert -n kube-system caasp.suse.com/skuba-addon=true
kubectl label --overwrite secret cilium-secret -n kube-system caasp.suse.com/skuba-addon=true
Note
You might see the following console output:
secret/oidc-dex-cert not labeled
secret/oidc-gangway-cert not labeled
secret/metrics-server-cert not labeled
secret/cilium-secret not labeled
This is because
skubahas already added the labels for you.
6.9.4.2 Prometheus Alerts #
Use Prometheus alerts to reactively receive the status of the certificates, follow the Section 8.1.3.2.3, “Alertmanager Configuration Example” on how to configure the Prometheus Alertmanager and Prometheus Server.
6.9.4.3 Grafana Dashboards #
Use Grafana to proactively monitor the status of the certificates, follow the Section 8.1.3.2.6, “Adding Grafana Dashboards” to install the Grafana dashboard to monitors certificates.
6.9.4.4 Monitor Custom Secret Certificates #
You can monitor custom secret TLS certificates that you created manually or using cert-manager.
For example:
Monitor cert-manager issued certificates in the
cert-managert-testnamespace.helm install <RELEASE_NAME> suse/cert-exporter \ --set customSecret.enabled=true \ --set customSecret.certs[0].name=cert-manager \ --set customSecret.certs[0].namespace=cert-manager-test \ --set customSecret.certs[0].includeKeys="{*.crt,*.pem}" \ --set customSecret.certs[0].annotationSelector="{cert-manager.io/certificate-name}"Monitor certificates in all namespaces filtered by label selector.
helm install <RELEASE_NAME> suse/cert-exporter \ --set customSecret.enabled=true \ --set customSecret.certs[0].name=self-signed-cert \ --set customSecret.certs[0].includeKeys="{*.crt,*.pem}" \ --set customSecret.certs[0].labelSelector="{key=value}"Deploy both 1. and 2. together.
helm install <RELEASE_NAME> suse/cert-exporter \ --set customSecret.enabled=true \ --set customSecret.certs[0].name=cert-manager \ --set customSecret.certs[0].namespace=cert-manager-test \ --set customSecret.certs[0].includeKeys="{*.crt,*.pem}" \ --set customSecret.certs[0].annotationSelector="{cert-manager.io/certificate-name}" \ --set customSecret.certs[1].name=self-signed-cert \ --set customSecret.certs[1].includeKeys="{*.crt,*.pem}" \ --set customSecret.certs[1].labelSelector="{key=value}"Monitor custom certificates only, disregarding node and addon certificates.
helm install <RELEASE_NAME> suse/cert-exporter \
    --set node.enabled=false \
    --set addon.enabled=false \
    --set customSecret.enabled=true \
    --set customSecret.certs[0].name=cert-manager \
    --set customSecret.certs[0].namespace=cert-manager-test \
    --set customSecret.certs[0].includeKeys="{*.crt,*.pem}" \
    --set customSecret.certs[0].annotationSelector="{cert-manager.io/certificate-name}" \
    --set customSecret.certs[1].name=self-signed-cert \
    --set customSecret.certs[1].includeKeys="{*.crt,*.pem}" \
    --set customSecret.certs[1].labelSelector="{key=value}"
6.9.5 Deployment with a Custom CA Certificate #
Warning
Please plan carefully when deploying with a custom CA certificate. This certificate can not be reconfigured once deployed and requires a full re-installation of the cluster to replace.
Administrators can provide custom CA certificates (root CAs or intermediate CAs) during cluster deployment and decide which CA components to replace (multiple CA certificates) or if to replace all with a single CA certificate.
After you have run skuba cluster init, go to the <CLUSTER_NAME> folder that has been generated,
Create a pki folder and put your custom CA certificate into the pki folder.
Note: Extracting Certificate And Key From Combined PEM File
Some PKIs will issue certificates and keys in a combined .pem file.
In order to use the contained certificate, you must extract them into separate files using openssl.
Extract the certificate:
openssl x509 -in /path/to/file.pem -out /path/to/file.crt
Extract the key:
openssl rsa -in /path/to/file.pem -out /path/to/file.key
Replacing the Kubernetes CA certificate:
mkdir -p <CLUSTER_NAME>/pki
cp <CUSTOM_APISERVER_CA_CERT_PATH> <CLUSTER_NAME>/pki/ca.crt
cp <CUSTOM_APISERVER_CA_KEY_PATH> <CLUSTER_NAME>/pki/ca.key
chmod 644 <CLUSTER_NAME>/pki/ca.crt
chmod 600 <CLUSTER_NAME>/pki/ca.key
Replacing the
etcdCA certificate:mkdir -p <CLUSTER_NAME>/pki/etcd cp <CUSTOM_ETCD_CA_CERT_PATH> <CLUSTER_NAME>/pki/etcd/ca.crt cp <CUSTOM_ETCD_CA_KEY_PATH> <CLUSTER_NAME>/pki/etcd/ca.key chmod 644 <CLUSTER_NAME>/pki/etcd/ca.crt chmod 600 <CLUSTER_NAME>/pki/etcd/ca.key
Replacing the
kubeletCA certificate:mkdir -p <CLUSTER_NAME>/pki cp <CUSTOM_KUBELET_CA_CERT_PATH> <CLUSTER_NAME>/pki/kubelet-ca.crt cp <CUSTOM_KUBELET_CA_KEY_PATH> <CLUSTER_NAME>/pki/kubelet-ca.key chmod 644 <CLUSTER_NAME>/pki/kubelet-ca.crt chmod 600 <CLUSTER_NAME>/pki/kubelet-ca.key
Replacing the
front-end proxyCA certificate:mkdir -p <CLUSTER_NAME>/pki cp <CUSTOM_FRONTPROXY_CA_CERT_PATH> <CLUSTER_NAME>/pki/front-proxy-ca.crt cp <CUSTOM_FRONTPROXY_CA_KEY_PATH> <CLUSTER_NAME>/pki/front-proxy-ca.key chmod 644 <CLUSTER_NAME>/pki/front-proxy-ca.crt chmod 600 <CLUSTER_NAME>/pki/front-proxy-ca.key
After this process, bootstrap the cluster with skuba node bootstrap.
6.9.6 Replace OIDC Server Certificate Signed By A Trusted CA Certificate #
During Cluster Deployment:
With a Trusted CA Key:
mkdir -p <CLUSTER_NAME>/pki
cp <CUSTOM_OIDC_CA_CERT_PATH> <CLUSTER_NAME>/pki/oidc-ca.crt
cp <CUSTOM_OIDC_CA_KEY_PATH> <CLUSTER_NAME>/pki/oidc-ca.key
chmod 644 <CLUSTER_NAME>/pki/oidc-ca.crt
chmod 600 <CLUSTER_NAME>/pki/oidc-ca.key
After this process, bootstrap the cluster with
skuba node bootstrap. skuba uploads the local OIDC CA certificate to the remote path specified in the local filekubeadm-init.confkeyoidc-ca-file. When installing the add-on, skuba generates the OIDC server certificates and keys which are signed by the provided OIDC CA certificate and key pair and then stored to its Secret resource.Without a Trusted CA Key:
Use command
skuba cert generate-csrto generate the OIDC server CSRs and keys in<my-cluster>/pkifolder. After the CA signs the CSRs and issued the server certificates, put the OIDC CA certificate and the OIDC server certificates in<my-cluster>/pkifolder.After this process, bootstrap the cluster with
skuba node bootstrap. skuba uploads the local OIDC CA certificate to the remote path specified in the local filekubeadm-init.confkeyoidc-ca-file. At the time installing the add-on, skuba uploads the OIDC CA certificate and OIDC server certificate and key pair to its Secret resource.
After Cluster Deployment:
With a Trusted CA Key:
Please refer to Section 6.9.7.3, “Addon Certificate Rotation” on how to use cert-manager and reloader to issue
oidc-dexandoidc-gangwaycertificates signed by trusted CA certificate/key.Without a Trusted CA Key:

Warning
Because the custom trusted CA certificate is not in the Kubernetes cluster, administrators must handle server certificate rotation manually before the certificate expires.
Warning
The
oidc-dexandoidc-gangwayserver certificate and key is replaced whenskuba addon upgrade applycontains a dex or gangway addon upgrade. Make sure to reapply your changes after runningskuba addon upgrade apply, had you modified the default settings of oidc-dex and oidc-gangway addons.Replace the
oidc-dexserver certificate:Backup the original
oidc-dexserver certificate and key from secret resource.mkdir -p pki.bak kubectl get secret oidc-dex-cert -n kube-system -o yaml | tee pki.bak/oidc-dex-cert.yaml > /dev/null cat pki.bak/oidc-dex-cert.yaml | grep tls.crt | awk '{print $2}' | base64 --decode | tee pki.bak/oidc-dex.crt > /dev/null cat pki.bak/oidc-dex-cert.yaml | grep tls.key | awk '{print $2}' | base64 --decode | tee pki.bak/oidc-dex.key > /dev/nullGet the original SAN IP address(es) and DNS(s), run:
openssl x509 -noout -text -in pki.bak/oidc-dex.crt | grep -oP '(?<=IP Address:)[^,]+'
openssl x509 -noout -text -in pki.bak/oidc-dex.crt | grep -oP '(?<=DNS:)[^,]+'
Sign the
oidc-dexserver certificate with the trusted CA certificate.Please refer to Section 6.9.9.1.1, “Trusted Server Certificate” on how to sign the trusted certificate. The
server.conffor IP.1 is the original SAN IP address if present, DNS.1 is the original SAN DNS if present.Then, import your trusted certificate into the Kubernetes cluster. The trusted CA certificates is
<TRUSTED_CA_CERT_PATH>, trusted server certificate and key are<SIGNED_OIDC_DEX_SERVER_CERT_PATH>and<SIGNED_OIDC_DEX_SERVER_KEY_PATH>.Create a secret manifest file
oidc-dex-cert.yamland update the secret dataca.crt,tls.crt, andtls.keywith base64; encoded with trusted CA certificate, signed oidc-dex server certificate and key respectively.apiVersion: v1 kind: Secret metadata: name: oidc-dex-cert namespace: kube-system labels: caasp.suse.com/skuba-addon: "true" type: kubernetes.io/tls data: ca.crt: cat <TRUSTED_CA_CERT_PATH> | base64 | awk '\{print\}' ORS='' && echo tls.crt: cat <SIGNED_OIDC_DEX_SERVER_CERT_PATH> | base64 | awk '\{print\}' ORS='' && echo tls.key: cat <SIGNED_OIDC_DEX_SERVER_KEY_PATH> | base64 | awk '\{print\}' ORS='' && echoApply the secret manifest file and restart
oidc-dexpods.kubectl replace -f oidc-dex-cert.yaml kubectl rollout restart deployment/oidc-dex -n kube-system
Replace the
oidc-gangwayserver certificate:Backup the original
oidc-gangwayserver certificate and key from secret resource.mkdir -p pki.bak kubectl get secret oidc-gangway-cert -n kube-system -o yaml | tee pki.bak/oidc-gangway-cert.yaml > /dev/null cat pki.bak/oidc-gangway-cert.yaml | grep tls.crt | awk '{print $2}' | base64 --decode | tee pki.bak/oidc-gangway.crt > /dev/null cat pki.bak/oidc-gangway-cert.yaml | grep tls.key | awk '{print $2}' | base64 --decode | tee pki.bak/oidc-gangway.key > /dev/nullGet the original SAN IP address(es) and DNS(s), run:
openssl x509 -noout -text -in pki.bak/oidc-gangway.crt | grep -oP '(?<=IP Address:)[^,]+'
openssl x509 -noout -text -in pki.bak/oidc-gangway.crt | grep -oP '(?<=DNS:)[^,]+'
Sign the
oidc-gangwayserver certificate with the trusted CA certificate.Please refer to Section 6.9.9.1.1, “Trusted Server Certificate” on how to sign the trusted certificate. The
server.conffor IP.1 is the original SAN IP address if present, DNS.1 is the original SAN DNS if present.Then, import your trusted certificate into the Kubernetes cluster. The trusted CA certificates is
<TRUSTED_CA_CERT_PATH>, trusted server certificate and key are<SIGNED_OIDC_GANGWAY_SERVER_CERT_PATH>and<SIGNED_OIDC_GANGWAY_SERVER_KEY_PATH>.Create a secret manifest file
oidc-gangway-cert.yamland update the secret dataca.crt,tls.crt, andtls.keywith base64; encoded with trusted CA certificate, signedoidc-gangwayserver certificate and key respectively.apiVersion: v1 kind: Secret metadata: name: oidc-gangway-cert namespace: kube-system labels: caasp.suse.com/skuba-addon: "true" type: kubernetes.io/tls data: ca.crt: cat <TRUSTED_CA_CERT_PATH> | base64 | awk '\{print\}' ORS='' && echo tls.crt: cat <SIGNED_OIDC_GANGWAY_SERVER_CERT_PATH> | base64 | awk '\{print\}' ORS='' && echo tls.key: cat <SIGNED_OIDC_GANGWAY_SERVER_KEY_PATH> | base64 | awk '\{print\}' ORS='' && echoApply the secret manifest file and restart
oidc-gangwaypods.kubectl replace -f oidc-gangway-cert.yaml kubectl rollout restart deployment/oidc-gangway -n kube-system
Replace the OIDC CA for
kube-apiserver:Copy custom OIDC CA which was used for
oidc-dexandoidc-gangwayto/etc/kubernetes/pki/oidc-ca.crton all SUSE CaaS Platform master nodesssh <USERNAME>@<MASTER_NODE_IP_ADDRESS/FQDN> sudo mv oidc-ca.crt /etc/kubernetes/pki/oidc-ca.crt
Update
oidc-ca-fileoption inkubeadmconfigmapkubectl get configmap -n kube-system kubeadm-config -o yaml > kubeadm-config.yaml sed -i "s|oidc-ca-file: .*|oidc-ca-file: /etc/kubernetes/pki/oidc-ca.crt|" kubeadm-config.yaml kubectl apply -f kubeadm-config.yaml
Update
oidc-ca-filein static pod manifest for kube-apiserver in/etc/kubernetes/manifests/kube-apiserver.yamlon all SUSE CaaS Platform master nodessed -i "s|oidc-ca-file=.*|oidc-ca-file=/etc/kubernetes/pki/oidc-ca.crt|" /etc/kubernetes/manifests/kube-apiserver.yaml
6.9.7 Automatic Certificate Renewal #
SUSE CaaS Platform renews the control plane certificates and kubeconfigs automatically in two ways:
During node upgrade: When the node is upgraded, all the
kubeadmmanaged certificates and kubeconfigs get rotated. The time to rotate the kubelet client and server certificate is controlled bykubeletdaemon.Note
During node upgrade, neither the
kubeletclient certificate nor server certificate get rotated.Via the
kuceroaddon: If the administrator is not able to upgrade the cluster, thekucero(KUbernetes control plane CErtificate ROtation) addon rotates all thekubeadmmanaged certificates and kubeconfigs and signskubeletserver CSR.kucerois akubeadmchecker/renewer in the form of a DaemonSet. Its job is to periodically check and renew control planekubeadmmanaged certificates/kubeconfigs, and check thekubeletclient and server enables auto rotation, and also a signer to signkubeletserver CSR.
Note: Time to rotate the kubelet client and server certificate
The kubelet client and server certificate renews automatically at approximately 70%-90% of the total lifetime of the certificate, the kubelet daemon would use new client and server certificates without downtime.
Note: Kubelet client and server certificate signing flow
The configuration which controls the kubelet daemon to send out the CSR within the Kubernetes cluster is controlled by the configuration /var/lib/kubelet/config.yaml.
The key rotateCertificates controls the kubelet client certificate; the key serverTLSBootstrap controls the kubelet server certificate.
When the client or server certificate is going to expire, the kubelet daemon sends the kubelet client or server CSR within the Kubernetes cluster.
The kube-controller-manager signs the kubelet client CSR with the Kubernetes CA cert/key pair, kucero addon signs the kubelet server CSR with the kubelet CA cert/key pair.
Then, the kubelet daemon saves the signed certificate under the folder /var/lib/kubelet/pki and updates the client or server certificate symlink points to the latest signed certificate.
The path of kubelet client certificate is /var/lib/kubelet/pki/kubelet-client-current.pem.
The path of kubelet server certificate is /var/lib/kubelet/pki/kubelet-server-current.pem.
6.9.7.1 Control Plane Nodes Certificate Rotation #
Control Plane Node Certificates are rotated in two ways:
During node upgrade: when doing a control plane update,
skuba node upgrade applyrunskubeadm upgradecommands behind the scenes.kubeadm upgrade applyandkubeadm upgrade noderenews and uses newkubeadmmanaged certificates on the node, including those stored in kubeconfig files, regardless of the remaining time for which the certificate was still valid.Via the
kuceroaddon:kubeadmmanaged certificates/kubeconfigs: akubeadmchecker/renewer to periodical checks (default interval is 1 hour) the kubeadm managed certificates/kubeconfigs, and rotates the certificates/kubeconfigs if the residual time is less than the total time (default 720 hours). Administrators can change the default time to renew the certificates/kubeconfigs by adding--renew-before=<duration>`(duration format is XhYmZs) to the kucero daemonset or change the default polling period for checking the certificates/kubeconfigs by adding--polling-period=<duration>(duration format isXhYmZs).kubeletclient and server certificates: Akubeletconfiguration checker/updater periodically checks (default interval is 1 hour) if the kubelet configuration enables the client and server auto rotation. If not, kucero will help enable the client and server auto-rotation by configuringrotateCertificates: trueandserverTLSBootstrap: truein/var/lib/kubelet/config.yaml. After that, thekubeletdaemon will send out the CSR within the Kubernetes cluster if the client or server is going to expire, the corresponding CSR signer and approver will sign and approve the CSR, then thekubeletdaemon saves the signed certificate under the folder/var/lib/kubelet/pkiand updates the symlink points to the latest signed certificate.
6.9.7.2 Worker Node Certificate Rotation #
Worker Node Certificates are rotated in one way:
Via the kucero addon:
kubeletclient and server certificates: Akubeletconfiguration checker/updater periodically checks (default interval is 1 hour) if the kubelet configuration enables the client and server auto rotation. If not, kucero will help enable the client and server auto-rotation by configuringrotateCertificates: trueandserverTLSBootstrap: truein/var/lib/kubelet/config.yaml. After that, thekubeletdaemon will send out the CSR within the Kubernetes cluster if the client or server is going to expire, the corresponding CSR signer and approver will sign and approve the CSR, then thekubeletdaemon saves the signed certificate under the folder/var/lib/kubelet/pkiand updates the symlink points to the latest signed certificate.
6.9.7.3 Addon Certificate Rotation #
The addon certificates can be automatically rotated by leveraging the functions of the open-source solutions cert-manager and reloader. cert-manager is for automatically rotating certificates stored in Secrets, and reloader is for watching and reconciling the updated Secrets to execute a rolling upgrade of the affected Deployments or DaemonSet.
Install reloader via helm chart:
helm install <RELEASE_NAME> \
    --namespace cert-manager \
    --create-namespace \
    suse/reloader
Install cert-manager via helm chart:
helm install <RELEASE_NAME> \
    --namespace cert-manager \
    --create-namespace \
    --set global.leaderElection.namespace=cert-manager \
    --set installCRDs=true \
    suse/cert-manager
Cert-Manager CA Issuer Resource
The cert-manager CA issuer is a Kubernetes resource that represents a certificate authority (CA), which can generate signed certificates by honoring certificate signing requests (CSR). Each cert-manager certificate resource requires one referenced issuer in the ready state to be able to honor CSR requests.
Note
An
Issueris a namespaced resource, and it can not issue certificates to the certificate resources in other namespaces.If you want to create a single Issuer that can be consumed in multiple namespaces, you should consider creating a
ClusterIssuerresource. This is almost identical to the Issuer resource, however, it is cluster-wide so it can be used to issue certificates in all namespaces.Cert-Manager Certificate Resource
The cert-manager has a custom resource, Certificate, which can be used to define a requested x509 certificate which will be renewed and kept up to date by an Issuer or ClusterIssuer resource.
6.9.7.3.1 Client Certificate Rotation #
Warning
If you are running a cluster using cilium version before 1.6, the cilium data is stored in the ETCD cluster, not the custom resources (CR). `skuba` generates a client certificate to read/write the cilium date to the ETCD cluster and the client certificate will expire after 1 year. Please follow the below steps to use cert-manager to automatically renew the cilium client certificate.
Check the SUSE CaaS Platform cilium version before 1.6
CILIUM_OPERATOR=`kubectl get pod -l name=cilium-operator --namespace kube-system -o jsonpath='{.items[0].metadata.name}'`
kubectl exec -it ${CILIUM_OPERATOR} --namespace kube-system -- cilium-operator --version
To let
reloaderdo an automatic rolling upgrade of the cilium addon DaemonSet, we need to label the addons:kubectl annotate --overwrite daemonset/cilium -n kube-system secret.reloader.stakater.com/reload=cilium-secret
Upload the ETCD CA cert/key pair to Secret in the
kube-systemnamespacekubectl create secret tls etcd-ca --cert=pki/etcd/ca.crt --key=pki/etcd/ca.key -n kube-system
Create a Cert-Manager CA Issuer Resource
Create a CA issuer called
etcd-cathat will sign incoming certificate requests based on the CA certificate and private key stored in the secretetcd-caused to trust newly signed certificates.cat << EOF > issuer-etcd-ca.yaml apiVersion: cert-manager.io/v1alpha3 kind: Issuer metadata: name: etcd-ca namespace: kube-system spec: ca: secretName: etcd-ca EOF kubectl create -f issuer-etcd-ca.yamlCreate a Cert-Manager Certificate Resource
Create a certificate resource
cilium-etcd-clientthat will watch and auto-renews the secretcilium-secretif the certificate residual time is less than therenewBeforevalue.cat << EOF > cilium-etcd-client-certificate.yaml apiVersion: cert-manager.io/v1alpha3 kind: Certificate metadata: name: cilium-etcd-client-cert namespace: kube-system spec: subject: organizations: - system:masters commonName: cilium-etcd-client duration: 8760h # 1 year renewBefore: 720h # 1 month secretName: cilium-secret issuerRef: name: etcd-ca kind: Issuer group: cert-manager.io isCA: false usages: - digital signature - key encipherment - client auth keySize: 2048 keyAlgorithm: rsa keyEncoding: pkcs1 EOF kubectl create -f cilium-etcd-client-certificate.yaml
6.9.7.3.2 Server Certificates Rotation #
Prerequisites
To let
reloaderdo an automatic rolling upgrade of the addon Deployments or DaemonSet, we need to label the addons:kubectl annotate --overwrite deployment/oidc-dex -n kube-system secret.reloader.stakater.com/reload=oidc-dex-cert kubectl annotate --overwrite deployment/oidc-gangway -n kube-system secret.reloader.stakater.com/reload=oidc-gangway-cert kubectl annotate --overwrite deployment/metrics-server -n kube-system secret.reloader.stakater.com/reload=metrics-server-cert
Upload the Kubernetes CA cert/key pair to Secret in the
kube-systemnamespace:kubectl create secret tls kubernetes-ca --cert=pki/ca.crt --key=pki/ca.key -n kube-system
Note
If you want to use a custom trusted CA certificate/key to sign the certificate, upload to the secret resource.
kubectl create secret tls custom-trusted-ca --cert=<CUSTOM_TRUSTED_CA_CERT> --key=<CUSTOM_TRUSTED_CA_KEY> -n kube-system
Create a Cert-Manager CA Issuer Resource
Create a CA issuer called
kubernetes-cathat will sign incoming certificate requests based on the CA certificate and private key stored in the secretkubernetes-caused to trust newly signed certificates.cat << EOF > issuer-kubernetes-ca.yaml apiVersion: cert-manager.io/v1alpha3 kind: Issuer metadata: name: kubernetes-ca 1 namespace: kube-system spec: ca: secretName: kubernetes-ca 2 EOF kubectl create -f issuer-kubernetes-ca.yaml
Note
If you want to use custom trusted CA certificate/key to sign the certificate, create a custom trusted CA issuer.
cat << EOF > custom-trusted-kubernetes-ca-issuer.yaml apiVersion: cert-manager.io/v1alpha3 kind: Issuer 1 metadata: name: custom-trusted-kubernetes-ca namespace: kube-system spec: ca: secretName: custom-trusted-kubernetes-ca EOF kubectl create -f custom-trusted-kubernetes-ca-issuer.yamlIssuer or ClusterIssuer.
Create a Cert-Manager Certificate Resource
Create a certificate resource that will watch and auto-renews the secret if the certificate residual time is less than the
renewBeforevalue.oidc-dex certificate
cat << EOF > oidc-dex-certificate.yaml apiVersion: cert-manager.io/v1alpha3 kind: Certificate metadata: name: oidc-dex-cert namespace: kube-system spec: subject: organizations: - system:masters commonName: oidc-dex duration: 8760h # 1 year 1 renewBefore: 720h # 1 month 2 # At least one of a DNS Name or IP address is required. dnsNames: - $(cat admin.conf | grep server | awk '{print $2}' | sed 's/https:\/\///g' | sed 's/:6443//g') 3 ipAddresses: - $(cat admin.conf | grep server | awk '{print $2}' | sed 's/https:\/\///g' | sed 's/:6443//g') 4 secretName: oidc-dex-cert issuerRef: name: kubernetes-ca 5 kind: Issuer 6 group: cert-manager.io isCA: false usages: - digital signature - key encipherment - server auth keySize: 2048 keyAlgorithm: rsa keyEncoding: pkcs1 EOF kubectl create -f oidc-dex-certificate.yamlDefault length of certificate validity, in the format (XhYmZs).
Certificate renewal time before validity expires, in the format (XhYmZs).
DNSNames is a list of subject alt names to be used on the Certificate.
IPAddresses is a list of IP addresses to be used on the Certificate.
The cert-manager issuer name.
Issuer or ClusterIssuer.
This certificate will tell cert-manager to attempt to use the Issuer named kubernetes-ca to obtain a certificate key pair for the domain list in dnsNames and ipAddresses. If successful, the resulting key and certificate will be stored in a secret named oidc-dex-cert with keys of tls.key and tls.crt respectively.
The dnsNames and ipAddresses fields specify a list of Subject Alternative Names to be associated with the certificate.
The referenced Issuer must exist in the same namespace as the Certificate. A Certificate can alternatively reference a ClusterIssuer which is cluster-wide so it can be referenced from any namespace.
Note
If you want to use a custom trusted CA Issuer/ClusterIssuer, change the value of
nameunderissuerReftocustom-trusted-caand the value ofkindunderissuerReftoIssuer/ClusterIssuer.oidc-gangway certificate
cat << EOF > oidc-gangway-certificate.yaml apiVersion: cert-manager.io/v1alpha3 kind: Certificate metadata: name: oidc-gangway-cert namespace: kube-system spec: subject: organizations: - system:masters commonName: oidc-gangway duration: 8760h # 1 year 1 renewBefore: 720h # 1 month 2 # At least one of a DNS Name or IP address is required. dnsNames: - $(cat admin.conf | grep server | awk '{print $2}' | sed 's/https:\/\///g' | sed 's/:6443//g') 3 ipAddresses: - $(cat admin.conf | grep server | awk '{print $2}' | sed 's/https:\/\///g' | sed 's/:6443//g') 4 secretName: oidc-gangway-cert issuerRef: name: kubernetes-ca 5 kind: Issuer 6 group: cert-manager.io isCA: false usages: - digital signature - key encipherment - server auth keySize: 2048 keyAlgorithm: rsa keyEncoding: pkcs1 EOF kubectl create -f oidc-gangway-certificate.yamlDefault length of certificate validity, in the format (XhYmZs).
Certificate renewal time before validity expires, in the format (XhYmZs).
DNSNames is a list of subject alt names to be used on the Certificate.
IPAddresses is a list of IP addresses to be used on the Certificate.
The cert-manager issuer name.
Issuer or ClusterIssuer.
Note
If you want to use a custom trusted CA Issuer/ClusterIssuer, change the value of
nameunderissuerReftocustom-trusted-caand the value ofkindunderissuerReftoIssuer/ClusterIssuer.metrics-server certificate
cat << EOF > metrics-server-certificate.yaml apiVersion: cert-manager.io/v1alpha3 kind: Certificate metadata: name: metrics-server-cert namespace: kube-system spec: subject: organizations: - system:masters commonName: metrics-server.kube-system.svc duration: 8760h # 1 year 1 renewBefore: 720h # 1 month 2 # At least one of a DNS Name or IP address is required. dnsNames: - $(cat admin.conf | grep server | awk '{print $2}' | sed 's/https:\/\///g' | sed 's/:6443//g') 3 ipAddresses: - $(cat admin.conf | grep server | awk '{print $2}' | sed 's/https:\/\///g' | sed 's/:6443//g') 4 secretName: metrics-server-cert issuerRef: name: kubernetes-ca 5 kind: Issuer 6 group: cert-manager.io isCA: false usages: - digital signature - key encipherment - server auth keySize: 2048 keyAlgorithm: rsa keyEncoding: pkcs1 EOF kubectl create -f metrics-server-certificate.yamlDefault length of certificate validity, in the format (XhYmZs).
Certificate renewal time before validity expires, in the format (XhYmZs).
DNSNames is a list of subject alt names to be used on the Certificate.
IPAddresses is a list of IP addresses to be used on the Certificate.
The cert-manager issuer name.
Issuer or ClusterIssuer.
Warning: Cert-Manager Known Issue
Once the cert-manager has issued a certificate to the secret, if you change the certificate inside the secret manually, or you manually change the current certificate duration to a value lower than the value renewBefore, the certificate won’t be renewed immediately but will be scheduled to renew near the certificate expiry date.
This is because the cert-manager is not designed to pick up changes you make to the certificate in the secret.
6.9.8 Manual Certificate Renewal #
Important
If you are running multiple control plane nodes, you need to run the followings commands sequentially on all control plane nodes.
6.9.8.1 Renewing Control Plane Certificates #
Replace kubeadm-managed certificates:
To SSH into the control plane node, renew all
kubeadmcertificates and reboot, run the following:ssh <USERNAME>@<MASTER_NODE_IP_ADDRESS/FQDN> sudo cp -r /etc/kubernetes/pki /etc/kubernetes/pki.bak sudo kubeadm alpha certs renew all sudo systemctl restart kubelet
Copy the renewed
admin.conffrom one of the control plane nodes to your local environment:ssh <USERNAME>@<MASTER_NODE_IP_ADDRESS/FQDN> sudo cat /etc/kubernetes/admin.conf
Replace the
kubeletserver certificate:
Important
You need to generate
kubeletserver certificate for all the nodes on one of control plane nodes. ThekubeletCA certificate key only exists on the control plane nodes. Therefore, after generating re-signedkubeletserver certificate/key for worker nodes, you have to copy eachkubeletserver certificate/key from the control plane node to the corresponding worker node.Backup the original
kubeletcertificates and keys on it’s node.sudo cp -r /var/lib/kubelet/pki /var/lib/kubelet/pki.bak
Get the O/OU/CN, run the command on it’s node:
openssl x509 -noout -subject -in /var/lib/kubelet/pki.bak/kubelet.crt
Get the original SAN IP address(es) and DNS(s), run the command on it’s node:
openssl x509 -noout -text -in /var/lib/kubelet/pki.bak/kubelet.crt | grep -oP '(?<=IP Address:)[^,]+'
openssl x509 -noout -text -in /var/lib/kubelet/pki.bak/kubelet.crt | grep -oP '(?<=DNS:)[^,]+'
At one of the control plane node, sign the corresponding node
kubeletserver certificate with the CA certificate/key/var/lib/kubelt/pki/kubelet-ca.crtand/var/lib/kubelet/pki/kubelet-ca.key, please refer to Section 6.9.9.1.1, “Trusted Server Certificate” on how to sign the trusted server certificate. Theserver.conffor O/OU/CN recommends be the same as original one, for IP.1 is the original SAN IP address if present, DNS.1 is the original SAN DNS if present.Copy the signed certificate/key from one ofthe control plane node to the corresponding node.
Finally, update the
kubeletserver certificate and key file/var/lib/kubelet/kubelet.crtand/var/lib/kubelet/kubelet.keyrespectively, and restartkubeletservice on it’s node.sudo cp <CUSTOM_KUBELET_SERVER_CERT_PATH> /var/lib/kubelet/pki/kubelet.crt sudo cp <CUSTOM_KUBELET_SERVER_KEY_PATH> /var/lib/kubelet/pki/kubelet.key chmod 644 /var/lib/kubelet/pki/kubelet.crt chmod 600 /var/lib/kubelet/pki/kubelet.key sudo systemctl restart kubelet
6.9.8.2 Renewing Addon Certificates: #
In the admin node, regenerate the certificates:
Replace the
oidc-dexserver certificate:Backup the original
oidc-dexserver certificate and key from secret resource.mkdir -p <CLUSTER_NAME>/pki.bak kubectl get secret oidc-dex-cert -n kube-system -o "jsonpath={.data['tls\.crt']}" | base64 --decode | tee <CLUSTER_NAME>/pki.bak/oidc-dex.crt > /dev/null kubectl get secret oidc-dex-cert -n kube-system -o "jsonpath={.data['tls\.key']}" | base64 --decode | tee <CLUSTER_NAME>/pki.bak/oidc-dex.key > /dev/nullGet the original SAN IP address(es) and DNS(s), run:
openssl x509 -noout -text -in <CLUSTER_NAME>/pki.bak/oidc-dex.crt | grep -oP '(?<=IP Address:)[^,]+'
openssl x509 -noout -text -in <CLUSTER_NAME>/pki.bak/oidc-dex.crt | grep -oP '(?<=DNS:)[^,]+'
Sign the
oidc-dexserver certificate with the default kubernetes CA certificate or trusted CA certificate.Default kubernetes CA certificate
Please refer to Section 6.9.9.2.2, “Self-signed Server Certificate” on how to sign the self signed server certificate. The default kubernetes CA certificate and key are located at
/etc/kubernetes/pki/ca.crtand/etc/kubernetes/pki/ca.key. Theserver.conffor IP.1 is the original SAN IP address if present, DNS.1 is the original SAN DNS if present.Trusted CA certificate
Please refer to Section 6.9.9.1.1, “Trusted Server Certificate” on how to sign the trusted server certificate. The
server.conffor IP.1 is the original SAN IP address if present, DNS.1 is the original SAN DNS if present.
Import your certificate into the Kubernetes cluster. The CA certificate is
<CA_CERT_PATH>, server certificate and key are<SIGNED_OIDC_DEX_SERVER_CERT_PATH>and<SIGNED_OIDC_DEX_SERVER_KEY_PATH>.Create a secret manifest file
oidc-dex-cert.yamland update the secret dataca.crt,tls.crt, andtls.keywith base64; encoded with CA certificate, signedoidc-dexserver certificate and key respectively.apiVersion: v1 kind: Secret metadata: name: oidc-dex-cert namespace: kube-system labels: caasp.suse.com/skuba-addon: "true" type: kubernetes.io/tls data: ca.crt: cat <CA_CERT_PATH> | base64 | awk '\{print\}' ORS='' && echo tls.crt: cat <SIGNED_OIDC_DEX_SERVER_CERT_PATH> | base64 | awk '\{print\}' ORS='' && echo tls.key: cat <SIGNED_OIDC_DEX_SERVER_KEY_PATH> | base64 | awk '\{print\}' ORS='' && echoApply the secret manifest file and restart
oidc-dexpods.kubectl replace -f oidc-dex-cert.yaml kubectl rollout restart deployment/oidc-dex -n kube-system
Replace the
oidc-gangwayserver certificate:Backup the original
oidc-gangwayserver certificate and key from secret resource.mkdir -p <CLUSTER_NAME>/pki.bak kubectl get secret oidc-gangway-cert -n kube-system -o "jsonpath={.data['tls\.crt']}" | base64 --decode | tee <CLUSTER_NAME>/pki.bak/oidc-gangway.crt > /dev/null kubectl get secret oidc-gangway-cert -n kube-system -o "jsonpath={.data['tls\.key']}" | base64 --decode | tee <CLUSTER_NAME>/pki.bak/oidc-gangway.key > /dev/nullGet the original SAN IP address(es) and DNS(s), run:
openssl x509 -noout -text -in <CLUSTER_NAME>/pki.bak/oidc-gangway.crt | grep -oP '(?<=IP Address:)[^,]+'
openssl x509 -noout -text -in <CLUSTER_NAME>/pki.bak/oidc-gangway.crt | grep -oP '(?<=DNS:)[^,]+'
Sign the
oidc-gangwayserver certificate with the default kubernetes CA certificate or trusted CA certificate.Default kubernetes CA certificate
Please refer to Section 6.9.9.2.2, “Self-signed Server Certificate” on how to sign the self signed server certificate. The default kubernetes CA certificate and key are located at
/etc/kubernetes/pki/ca.crtand/etc/kubernetes/pki/ca.key. Theserver.conffor IP.1 is the original SAN IP address if present, DNS.1 is the original SAN DNS if present.Trusted CA certificate
Please refer to Section 6.9.9.1.1, “Trusted Server Certificate” on how to sign the trusted server certificate. The
server.conffor IP.1 is the original SAN IP address if present, DNS.1 is the original SAN DNS if present.
Import your certificate into the Kubernetes cluster. The CA certificates is
<CA_CERT_PATH>, server certificate and key are<SIGNED_OIDC_GANGWAY_SERVER_CERT_PATH>and<SIGNED_OIDC_GANGWAY_SERVER_KEY_PATH>.Create a secret manifest file
oidc-gangway-cert.yamland update the secret dataca.crt,tls.crt, andtls.keywith base64; encoded with CA certificate, signedoidc-gangwayserver certificate and key respectively.apiVersion: v1 kind: Secret metadata: name: oidc-gangway-cert namespace: kube-system labels: caasp.suse.com/skuba-addon: "true" type: kubernetes.io/tls data: ca.crt: cat <CA_CERT_PATH> | base64 | awk '\{print\}' ORS='' && echo tls.crt: cat <SIGNED_OIDC_GANGWAY_SERVER_CERT_PATH> | base64 | awk '\{print\}' ORS='' && echo tls.key: cat <SIGNED_OIDC_GANGWAY_SERVER_KEY_PATH> | base64 | awk '\{print\}' ORS='' && echoApply the secret manifest file and restart
oidc-gangwaypods.kubectl replace -f oidc-gangway-cert.yaml kubectl rollout restart deployment/oidc-gangway -n kube-system
Replace the
metrics-serverserver certificate:Backup the original
metrics-serverserver certificate and key from secret resource.mkdir -p <CLUSTER_NAME>/pki.bak kubectl get secret metrics-server-cert -n kube-system -o "jsonpath={.data['tls\.crt']}" | base64 --decode | tee <CLUSTER_NAME>/pki.bak/metrics-server.crt > /dev/null kubectl get secret metrics-server-cert -n kube-system -o "jsonpath={.data['tls\.key']}" | base64 --decode | tee <CLUSTER_NAME>/pki.bak/metrics-server.key > /dev/nullGet the O/OU/CN, run:
openssl x509 -noout -subject -in <CLUSTER_NAME>/pki.bak/metrics-server.crt
Get the original SAN IP address(es) and DNS(s), run:
openssl x509 -noout -text -in <CLUSTER_NAME>/pki.bak/metrics-server.crt | grep -oP '(?<=IP Address:)[^,]+'
openssl x509 -noout -text -in <CLUSTER_NAME>/pki.bak/metrics-server.crt | grep -oP '(?<=DNS:)[^,]+'
Sign the
metrics-server-certserver certificate with the default Kubernetes CA certificatePlease refer to Section 6.9.9.2.2, “Self-signed Server Certificate” on how to sign the self signed server certificate. The default Kubernetes CA certificate and key are located at
/etc/kubernetes/pki/ca.crtand/etc/kubernetes/pki/ca.key. Theserver.conffor O/OU/CN must be the same as original one,IP.1is the original SAN IP address if present,DNS.1is the original SAN DNS if present.Import your certificate into the Kubernetes cluster. The CA certificates is
<CA_CERT_PATH>, server certificate and key are<SIGNED_METRICS_SERVER_CERT_PATH>and<SIGNED_METRICS_SERVER_KEY_PATH>.Create a secret manifest file
oidc-metrics-server-cert.yamland update the secret dataca.crt,tls.crt, andtls.keywith base64; encoded with CA certificate, signedmetrics-serverserver certificate and key respectively.apiVersion: v1 kind: Secret metadata: name: metrics-server-cert namespace: kube-system labels: caasp.suse.com/skuba-addon: "true" type: kubernetes.io/tls data: ca.crt: cat <CA_CERT_PATH> | base64 | awk '\{print\}' ORS='' && echo tls.crt: cat <SIGNED_METRICS_SERVER_CERT_PATH> | base64 | awk '\{print\}' ORS='' && echo tls.key: cat <SIGNED_METRICS_SERVER_KEY_PATH> | base64 | awk '\{print\}' ORS='' && echoApply the secret manifest file and restart
metrics-serverpods.kubectl replace -f metrics-server-cert.yaml kubectl rollout restart deployment/metrics-server -n kube-system
6.9.9 How To Generate Certificates #
6.9.9.1 Trusted 3rd-Party Signed Certificate #
6.9.9.1.1 Trusted Server Certificate #
Generate a private key by following the steps below from a terminal window:
openssl genrsa -aes256 -out server.key 2048
Type the pass phrase to protect the key and press [Enter]
Re-enter the pass phrase.
Create a file server.conf with the appropriate values
[req]
distinguished_name = req_distinguished_name
req_extensions = v3_req
prompt = no

[req_distinguished_name]
C = CZ 1
ST = CZ 2
L = Prague 3
O = example 4
OU = com 5
CN = server.example.com 6
emailAddress = admin@example.com 7

[v3_req]
basicConstraints = critical,CA:FALSE
keyUsage = critical,digitalSignature,keyEncipherment
extendedKeyUsage = serverAuth
subjectAltName = @alt_names

[alt_names]
IP.1 = <SERVER-IP-ADDRESS> 8
DNS.1 = <SERVER-FQDN> 9
Country Name (2 letter code).
State or Province Name (full name).
Locality Name (eg, city).
Organization Name (eg, company).
Organizational Unit Name (eg, section).
Common Name (e.g. server FQDN or YOUR name)
Email Address
Server IP address if present. Add more IP.X below if the server has more than one IP address. Remove IP.1 if the server uses FQDN.
Server FQDN if present. Add more DNS.X below if the server has more than one domain name. Remove DNS.1 if the server uses an IP address.
Generate a certificate signing request (CSR)
openssl req -new -key server.key -config server.conf -out server.csr
Enter the pass phrase of the private key created in Step 1.
Check the certificate signing request (CSR)
openssl req -text -noout -verify -in server.csr
Sign the certificate
Send the certificate signing request (CSR) to the 3rd party for signing. You should receive the following files in return:
Server certificate (public key)
Intermediate CA and/or bundles that chain to the Trusted Root CA
6.9.9.1.2 Trusted Client Certificate #
Generate a private key by following the steps below from a terminal window:
openssl genrsa -aes256 -out client.key 2048
Type the pass phrase to protect the key and press [Enter]
Re-enter the pass phrase.
Create a file client.conf with the appropriate values
[req]
distinguished_name = req_distinguished_name
req_extensions = v3_req
prompt = no

[req_distinguished_name]
C = CZ 1
ST = CZ 2
L = Prague 3
O = example 4
OU = com 5
CN = client.example.com 6
emailAddress = admin@example.com 7

[v3_req]
basicConstraints = critical,CA:FALSE
keyUsage = critical,digitalSignature,keyEncipherment
extendedKeyUsage = clientAuth
Generate a certificate signing request (CSR)
openssl req -new -key client.key -config client.conf -out client.csr
Enter the pass phrase of the private key created in Step 1.
Check the certificate signing request (CSR)
openssl req -text -noout -verify -in client.csr
Sign the certificate
Send the certificate signing request (CSR) to the 3rd party for signing. You should receive the following files in return:
Client certificate (public key)
Intermediate CA and/or bundles that chain to the Trusted Root CA
6.9.9.2 Self-signed Server Certificate #
Note
In the case that you decide to use self-signed certificates, make sure that the Certificate Authority used for signing is configured securely as a trusted Certificate Authority on the clients.
In some cases you want to create self-signed certificates for testing. If you are using proper trusted 3rd-party CA signed certificates, skip the following steps and refer to Section 6.9.9.1.1, “Trusted Server Certificate”.
6.9.9.2.1 Self-signed CA Certificate #
Create a file ca.conf with the appropriate values
[req]
distinguished_name = req_distinguished_name
x509_extensions = v3_ca
prompt = no

[req_distinguished_name]
C = CZ 1
ST = CZ 2
L = Prague 3
O = example 4
OU = com 5
CN = Root CA 6
emailAddress = admin@example.com 7

[v3_ca]
basicConstraints = critical,CA:TRUE
keyUsage = critical,digitalSignature,keyEncipherment,keyCertSign
Sign the CA certificate
openssl genrsa -out ca.key 2048
openssl req -key ca.key -new -x509 -days 3650 -sha256 -config ca.conf -out ca.crt
6.9.9.2.2 Self-signed Server Certificate #
Create a file server.conf with the appropriate values
[req]
distinguished_name = req_distinguished_name
req_extensions = v3_req
prompt = no

[req_distinguished_name]
C = CZ 1
ST = CZ 2
L = Prague 3
O = example 4
OU = com 5
CN = example.com 6
emailAddress = admin@example.com 7

[v3_req]
basicConstraints = critical,CA:FALSE
keyUsage = critical,digitalSignature,keyEncipherment
extendedKeyUsage = serverAuth
subjectAltName = @alt_names

[alt_names]
IP.1 = <SERVER-IP-ADDRESS> 8
DNS.1 = <SERVER-FQDN> 9
Country Name (2 letter code).
State or Province Name (full name).
Locality Name (eg, city).
Organization Name (eg, company).
Organizational Unit Name (eg, section).
Common Name (e.g. server FQDN or YOUR name)
Email Address
Server IP address if present. Add more IP.X below if the server has more than one IP address. Remove IP.1 if the server uses FQDN.
Server FQDN if present. Add more DNS.X below if the server has more than one domain name. Remove DNS.1 if the server uses an IP address.
Generate the certificate
openssl genrsa -out server.key 2048
openssl req -key server.key -new -sha256 -out server.csr -config server.conf
openssl x509 -req -CA ca.crt -CAkey ca.key -CAcreateserial -in server.csr -out server.crt -days 365 -extensions v3_req -extfile server.conf
Check the signed certificate
openssl x509 -text -noout -in server.crt
6.9.9.2.3 Self-signed Client Certificate #
Create a file client.conf with the appropriate values
[req]
distinguished_name = req_distinguished_name
req_extensions = v3_req
prompt = no

[req_distinguished_name]
C = CZ 1
ST = CZ 2
L = Prague 3
O = example 4
OU = com 5
CN = client.example.com 6
emailAddress = admin@example.com 7

[v3_req]
basicConstraints = critical,CA:FALSE
keyUsage = critical,digitalSignature,keyEncipherment
extendedKeyUsage = clientAuth
Generate the certificate
openssl genrsa -out client.key 2048
openssl req -key client.key -new -sha256 -out client.csr -config client.conf
openssl x509 -req -CA ca.crt -CAkey ca.key -CAcreateserial -in client.csr -out client.crt -days 365 -extensions v3_req -extfile client.conf
Check the signed certificate
openssl x509 -text -noout -in client.crt