
Arm:Deploying SUSE Linux Enterprise Server Using Network PXE Boot
SUSE Linux Enterprise Server network PXE boot enables remote, automated operating system deployment across target Arm devices over a local area network. By loading the kernel, initrd and Agama installer directly from network infrastructure, administrators can efficiently provision standard or immutable system configurations at scale without physical media, reducing deployment time and ensuring consistent baseline installations.
Prerequisites
A properly configured DHCP server.
A properly configured PXE boot server. For details, refer to: PXE server installation.
1 Booting the machine #
To begin the remote installation of SLES, boot the target system over the network to load the installer environment. Follow these steps to initiate the network boot sequence and launch Agama.
The following procedure describes how to boot the client machine to start the remote deployment of SLES using the PXE client.
Power on the target machine or create a virtual machine. Make sure to use bridged networking.
Enter the boot menu and select booting using PXE or HTTP. Continue to boot the machine.
The machine should start the deployment. Kernel and
initrdare downloaded from the PXE boot server. Boot loader is started.In the GRUB 2 menu, select the installation target. You can pass kernel boot parameters if needed.
initrdconfigures the network and starts the SUSE Linux Enterprise Server deployment using Agama.
2 Selecting a product and installation mode #
In this step, you select the product and its installation mode.
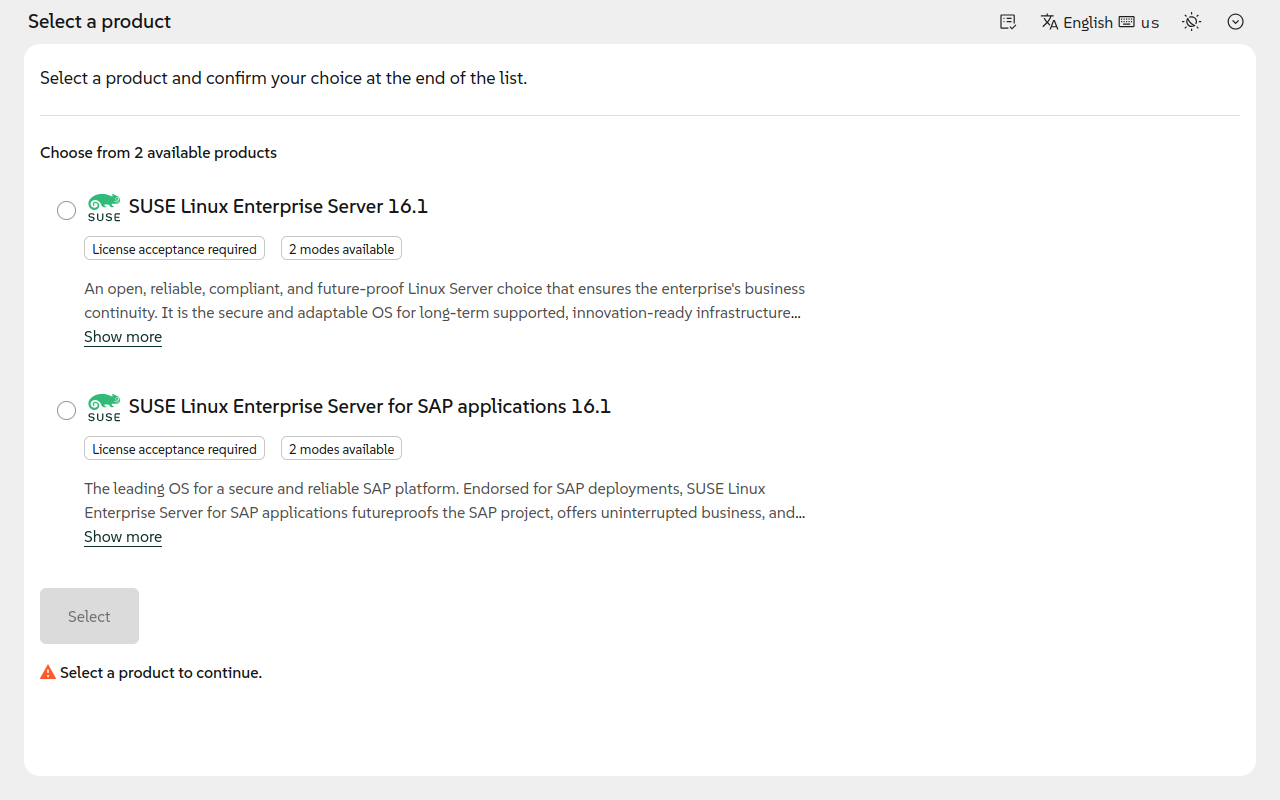
Select SUSE Linux Enterprise Server 16.1 for installation and choose its installation mode:
- Standard
The file system is writable. This mode offers maximum flexibility.
- Immutable
The root file system is write-protected. Updates are applied atomically to a new snapshot. The snapshot becomes active after a reboot.
Read and accept the license to continue.

At the top right of the installer, there is a tool bar with icons to access additional installer features:
- Status icon
Shows the status of the installer.
Idlemeans the installer is waiting for input.- Language and keyboard icons
Allows changing the language and keyboard layout of the installer. This affects only the installer interface, not the product to be installed. You can adjust the localization of the product later in Section 6, “Setting language and region”.
- Appearance icon
Allows changing the color scheme and contrast of the installer.
- More
Allows downloading the configuration in the JSON format and the installation logs.
3 Reviewing the installation overview #
The installation overview shows the most relevant settings. Each category displays a summary of its settings. Categories with invalid settings are marked. Configure them before you start the installation.
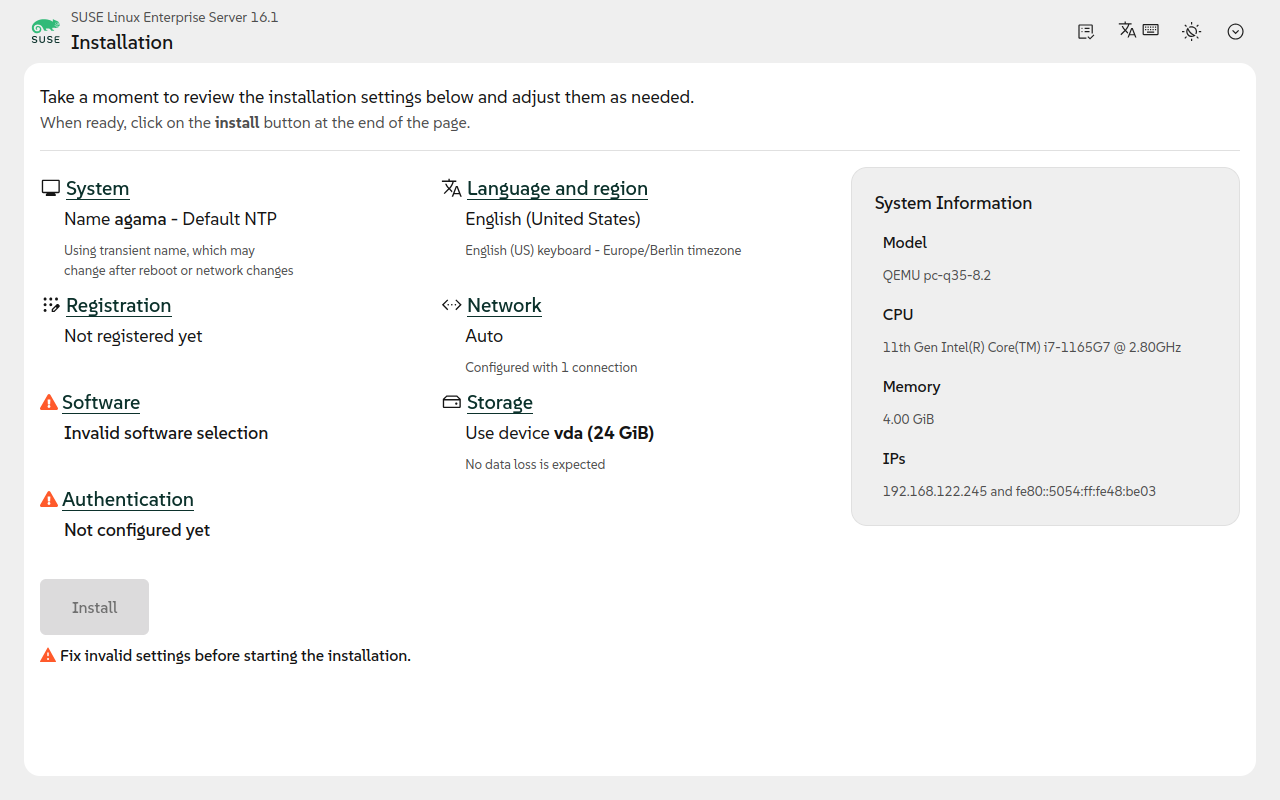
Select a category to adjust its settings.
There is no particular order for the configuration, but it is recommended to start with the settings and continue with the . Categories with pending or invalid settings must be resolved before proceeding with the installation.
4 Registering the system #
Register the product in the Registration screen.
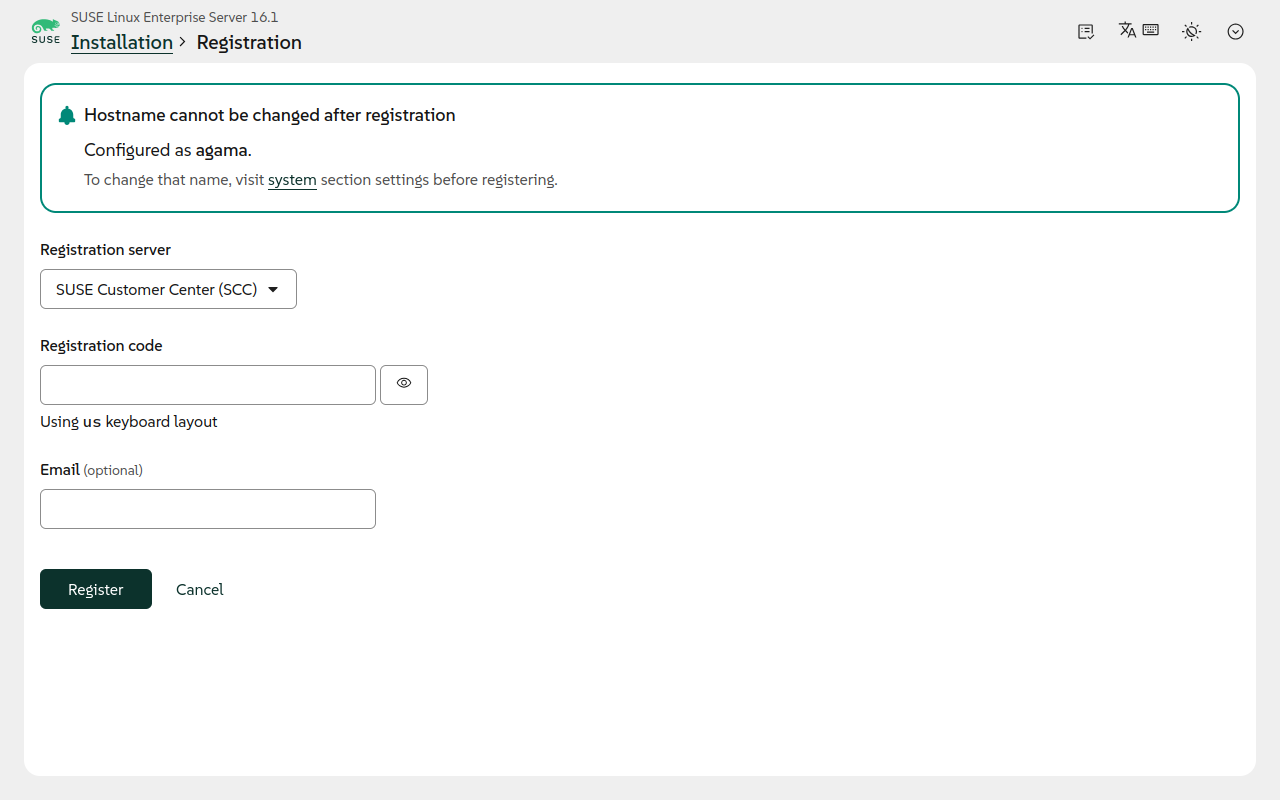
Choose a registration server and enter the details:
- Registration server
- SUSE Customer Center (SCC)
Register with the SUSE Customer Center. If your system is behind a firewall, make sure https://scc.suse.com/ is reachable from your network.
- Custom
Register with your own SUSE Multi-Linux Manager or RMT infrastructure and provide the Server URL. Use this option for air-gapped environments.
- Registration code
Enter a valid registration code for SUSE Linux Enterprise Server. The code is hidden by default but can be shown by clicking on the eye icon.
- Email (optional)
Optionally, enter a valid e-mail address. For organizations, we recommend using the address assigned to the registration code.
Click to register the system.
4.1 Registering extensions #
After successfully registering the base system, you can register additional extensions. The following extensions are available for SUSE Linux Enterprise Server 16.1:
- SUSE Linux Enterprise High Availability Extension 16.1
The SUSE Linux Enterprise High Availability extension provides mature, industry-leading open source high-availability clustering technologies that are easy to set up and use. You can deploy it in physical environments, virtual environments or both. It clusters physical servers, virtual servers or any combination of the two to suit the needs of your business.
To register your SUSE Linux Enterprise High Availability extension, enter its registration code and click Register.
- SUSE Package Hub 16.1
SUSE Package Hub is a free module providing access to community-maintained packages built to run on SUSE Linux Enterprise Server. Built from the same sources used in openSUSE distributions, these quality packages provide additional software to what is found in SUSE Linux Enterprise Server. The packages in this module are delivered without L3 support but do not interfere with the supportability of SUSE Linux Enterprise Server.
To register with the SUSE Package Hub, click . When the installer asks whether to trust the signing key of the SUSE Package Hub repository, click .
5 Configuring the system #
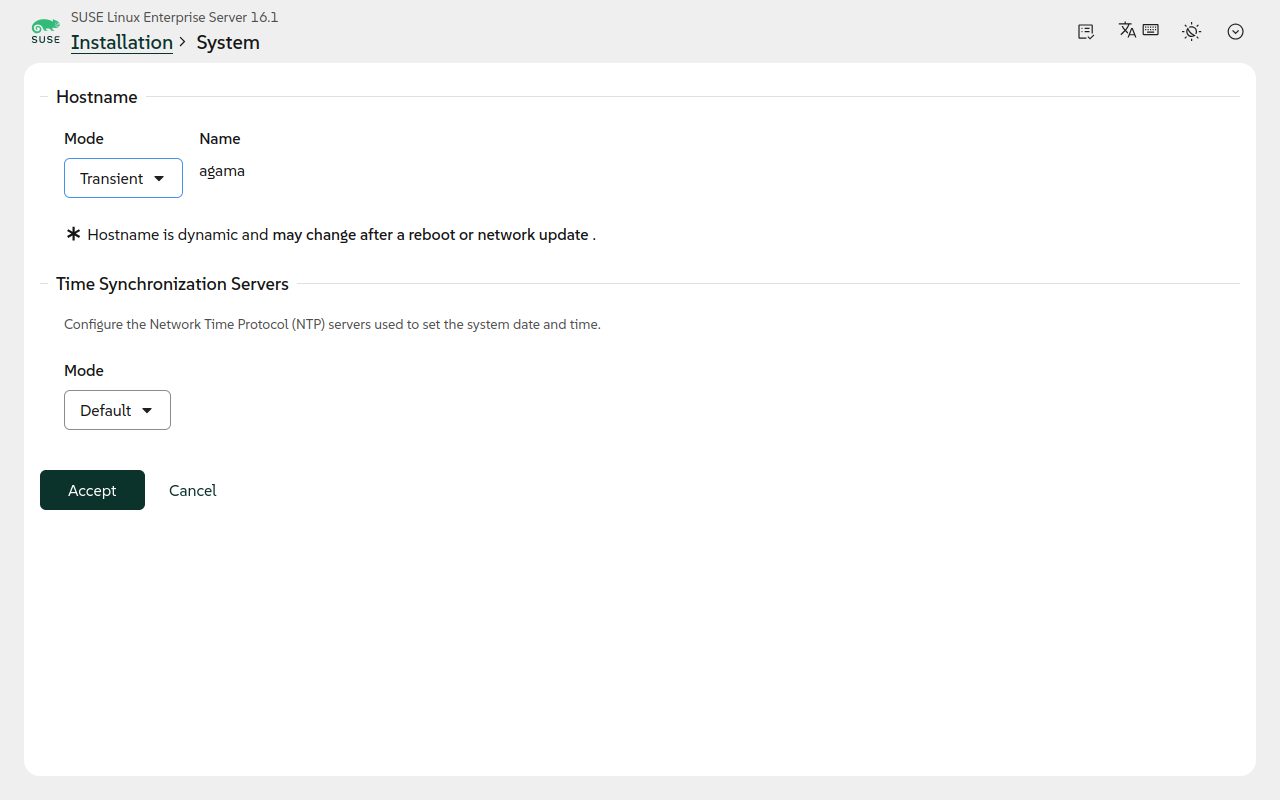
In the System screen, configure the host name and the time synchronization servers.
5.1 Setting the host name #
Set the host name of the system in one of the following modes.
- Transient (default)
The host name is assigned with DHCP and may change after a reboot or network change. The transient host name
agamais used for the installation.- Static
Set a static host name. You can either use a fully qualified domain name (FQDN) or the host name part only.

The host name is used for the registration with the SUSE Customer Center. If you do not set a host name,
your system will be registered with the transient host name agama.
Even if the system is assigned a new host name later, it will not automatically get
updated in the SUSE Customer Center. Therefore setting host name is recommended.
To update the host name in the SUSE Customer Center after registration, first change the system's
host name. Then use SUSEConnect to deregister the system and register it again under the new host name.
If you have multiple systems registered with the same host name in the SUSE Customer Center, it is difficult
to tell them apart. To identify a system, use its UUID. You can find it under
in the SUSE Customer Center and on the system by running
dmidecode -s system-uuid.
5.2 Setting time synchronization servers #
The system time is set with the Network Time Protocol (NTP) to ensure the system time is always correct. Choose one of the following modes:
- Default
The system uses one of the default SUSE NTP servers
1.suse.pool.ntp.orgto3.suse.pool.ntp.org. If your system is behind a firewall, make sure that these servers are reachable from your network.- Custom
In the custom mode, you can configure the NTP servers to use. Use this option for air-gapped environments. Specify servers by host name, IP address or FQDN. Separate multiple entries with colons.
Click to save your changes.
6 Setting language and region #
Adjust the localization settings, such as language, keyboard layout and time zone, in the Language and region screen.
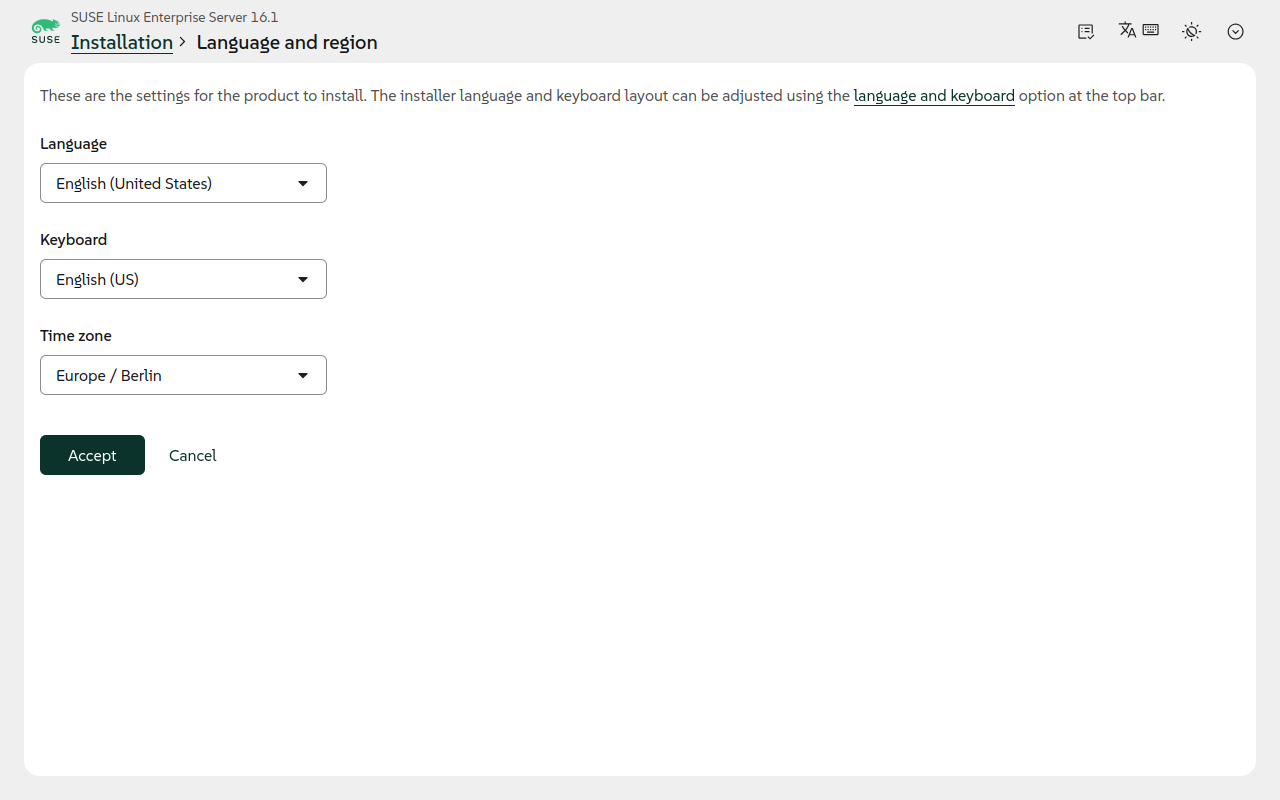
- Language
The language used for the system. It can be different from the language used during installation. Default value:
English (United States).- Keyboard
The keyboard used for the system. It can be different from the keyboard used during installation. Default value:
English (US).- Time Zone
The time zone of the system. The default value is determined automatically based on your network location.
Click to save your changes.
7 Configuring the network #
Manage network connections in the Network screen.
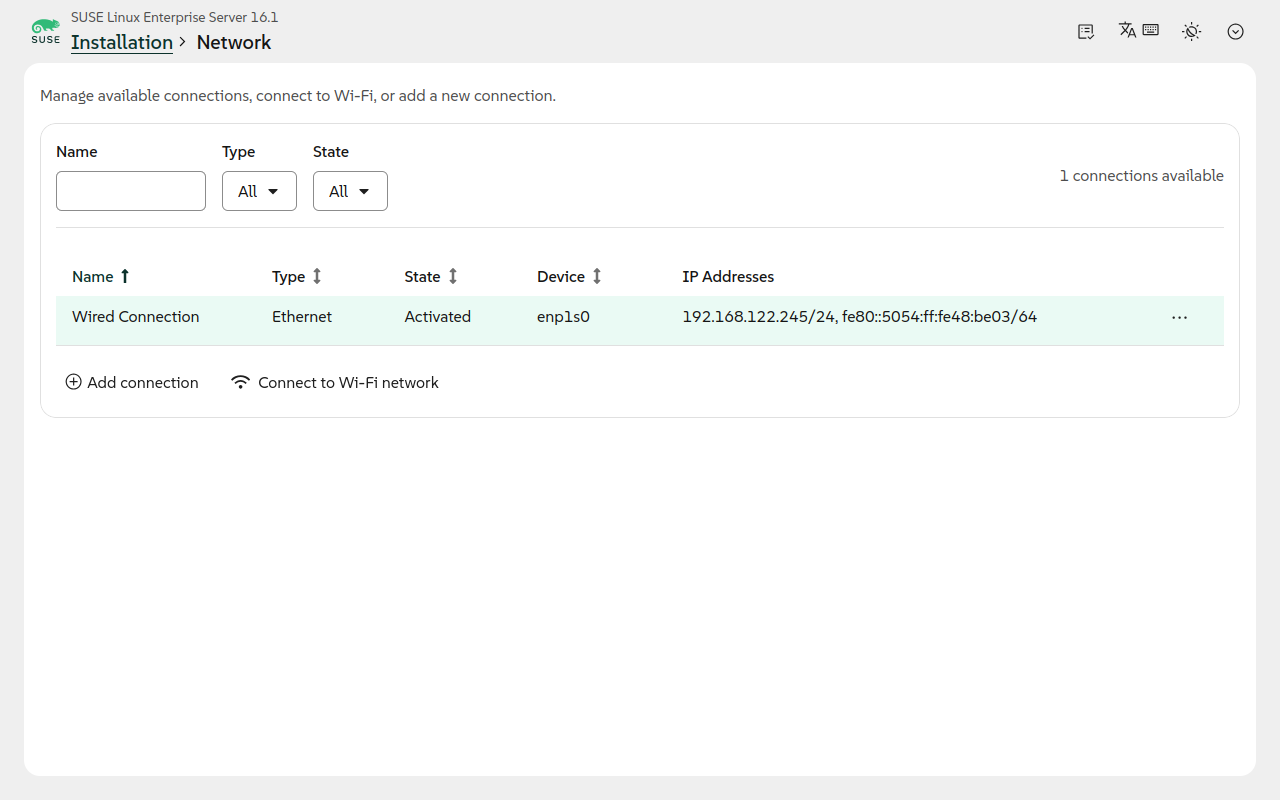
The overview shows the configured network connections in a table. Click the headers to sort the connections by name, type, state, device, or IP address. You can also filter by name (with wildcards), type and state.
7.1 Editing a connection #
By default, Agama configures a connection with DHCP. To edit a connection, click the three dots at the end or the line. The following options are available:
- Details
Shows the connection details, both the current status and the configuration.
- Edit connection
Edits the connection. For details, refer to Section 7.2, “Adding a new connection”.
- Disconnect
Temporarily disconnects the connection.
- Delete
Deletes the connection and frees the device for a different connection.
7.2 Adding a new connection #
Click to configure a new network connection. The following types are supported:
- Ethernet
- Bonding
- Bridge
- VLAN
- Name
Name of the connection. Meaningful names can use the destination (Internet), the connection type (Ethernet) or the device (eth0, if device binding is enabled). Free text, but it is recommended to avoid special characters.
- Device Binding
- None
The connection is available for all devices. After a reboot or relocatation the system, the device may change.
- Chosen by name
The connection is identified by its name in the system.
- Chosen by MAC
The connection is identified by its physical address.
One of None
- IPv4 settings
- Automatic
IP address and gateway are assigned from the network with DHCP.
- Manual
Static IP address, netmask and gateway. Enter an IPv4 address such as 192.168.1.1. or 192.168.1.1/24 The prefix is added automatically if omitted.
- Automatic + Manual
DHCP configuration from the network plus static addresses and gateway.
- IPv6 settings
- Automatic
IP address and gateway are assigned from the network with DHCP.
- Manual
Static IP address, netmask and gateway. Enter an IPv6 address such as 2001:db8::1 or 2001:db8::1/64. The prefix is added automatically if omitted.
- Automatic + Manual
DHCP configuration from the network plus static addresses and gateway.
- Use custom DNS servers
Enable and specify the addresses of the DNS servers.
- Use custom DNS search domains
Enable and specify the DNS search domain such as example.com.
8 Selecting software #
Add additional software to install, such as the KVM hypervisor or the Cockpit system management service.
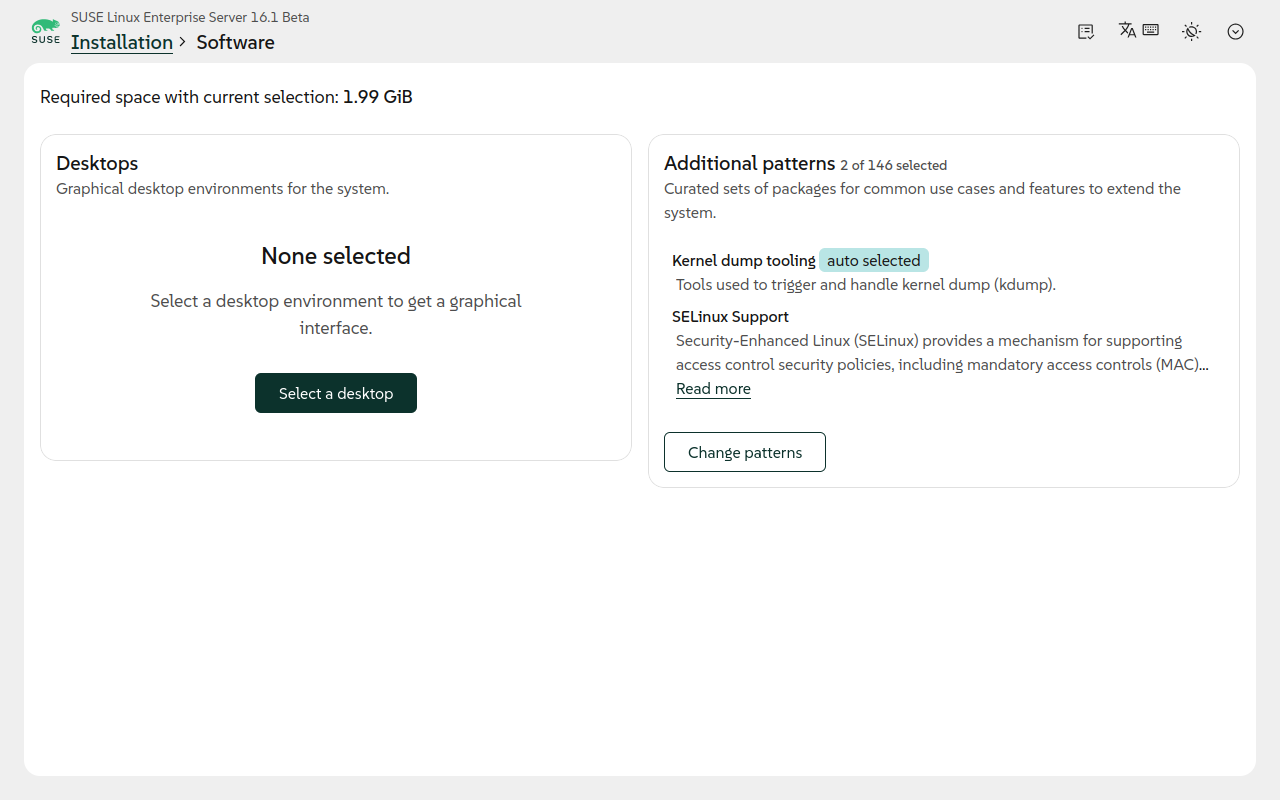

If you select the Package Hub add-on and see a popup, trust the GPG key for that repository.
8.1 Selecting a desktop #
Select a desktop environment to get a graphical interface. SUSE Linux Enterprise Server ships with the GNOME desktop.
8.2 Selecting additional software patterns #
Patterns are curated sets of packages for common use cases and features to extend the system.
The default installation includes Kernel dump tooling and
SELinux support. To remove them or install additional patterns, click
.
9 Configuring storage #
Select a storage device for the installation in the Storage screen.
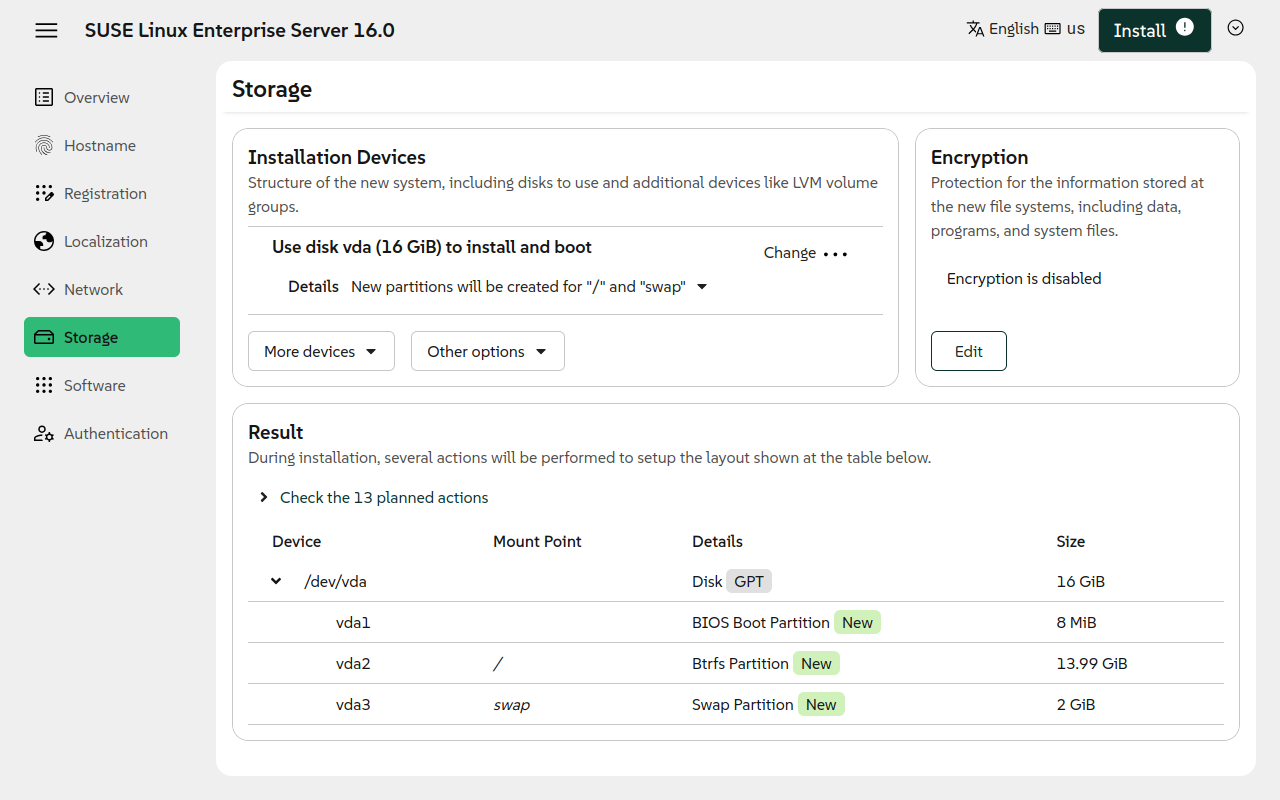
Currently installations on single discs or LVM are supported. To change the disk or use LVM, click the device name button in the section.
To detect an iSCSI disk, select the iSCSI initiator and click .
By default, the file systems are allocated as new partitions on the selected device. You can change this behavior in the drop-down list labeled in the section. The following space policies are available:
- Delete current content
All partitions are removed, and any data on the disks is lost.
- Shrink existing partitions
The data is kept, but Agama shrinks the current partitions as needed.
- Use available space
The data is kept. Only the space not assigned to any partition is used.
- Custom
Select what to do with each partition.
The current Agama user interface does not expose all the options supported by Agama's storage configuration. Complex configurations such as RAID can be applied through Agama profiles. For more information, refer to the article Automated Installation Using Agama.
If the selected storage already has a RAID configuration
—either from a previous installation or created by an Agama profile—the RAID
devices can be used for installation. In this case, you may see a message like
Use RAID 0 (60.00 GiB) to host LVM in the user interface. Please note in
this context, the term RAID 0 refers to the RAID device
(/dev/md/0), not the RAID level.
To edit individual partitions, expand the section by clicking . Optionally, you can configure Btrfs snapshots, boot options and enable full disk encryption (FDE).
10 Configuring authentication #
Before you continue, create an administrator account or configure authentication
for the root user.
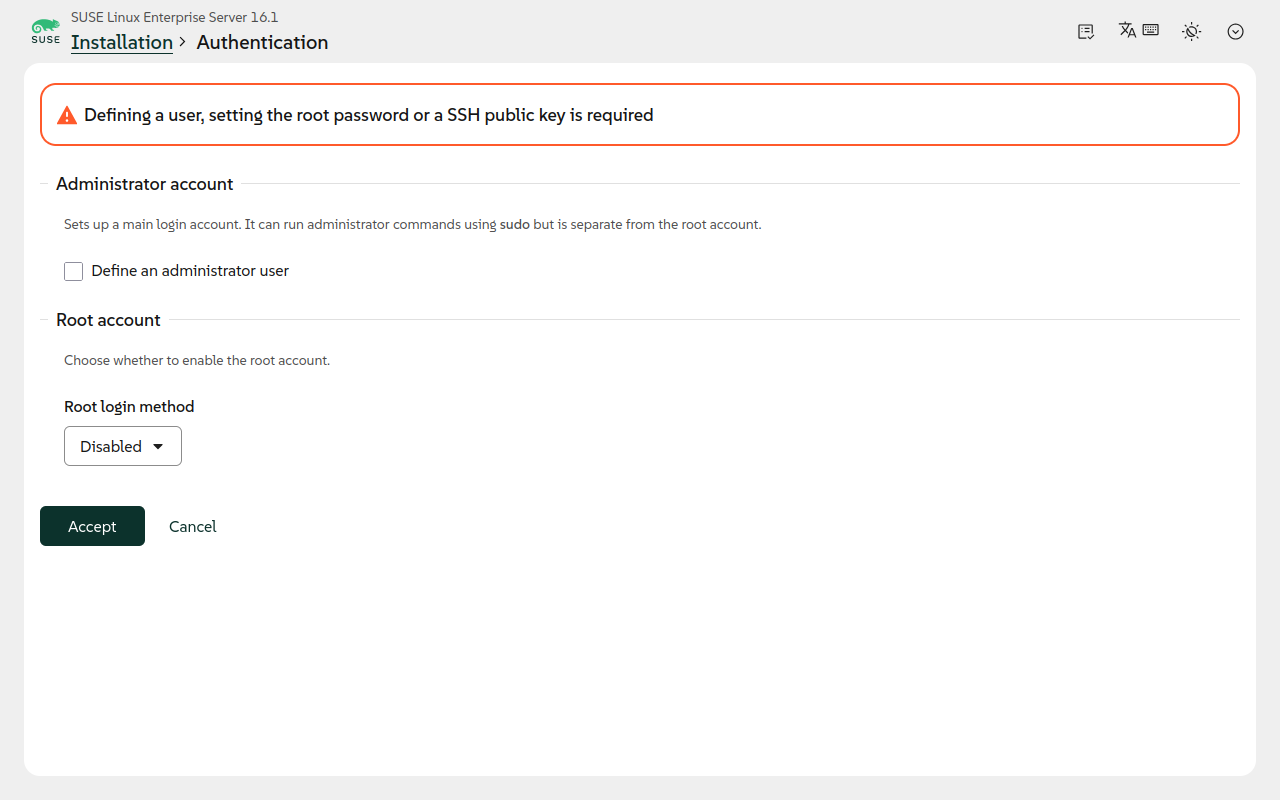
Before you can continue with the installation, you need to create an administrator account or
configure the authentication for the root user.
10.1 Creating an administrator account #
To improve security, root login is disabled in SUSE Linux Enterprise Server by default. Instead, an
administrator user is used as main login account. This administrator can run administrative
commands with sudo.
To create an administrator account, tick the checkbox and enter the necessary user details.
- Full name
Full name of the administrator user.
- Username
A user name. Only use lowercase letters (a-z), digits (0-9) and the characters
.(dot),-(hyphen) and_(underscore). Avoid other special characters and accented characters.- SSH Public Key (optional)
Paste one or more public SSH keys to enable passwordless login with SSH. To add a key, press Enter or →|. To remove a key, press <— or Del. To navigate between keys, use the ↑ and ↓ arrows.
root access
SSH access for root is disabled by default. Therefore it is strongly recommended to
create a system user. The first system user is granted sudo privileges automatically and
can also be used for accessing Cockpit.
10.2 Configuring the root user #
Configure the authentication methods for the root. You can use a secure
password, an SSH public key or both.
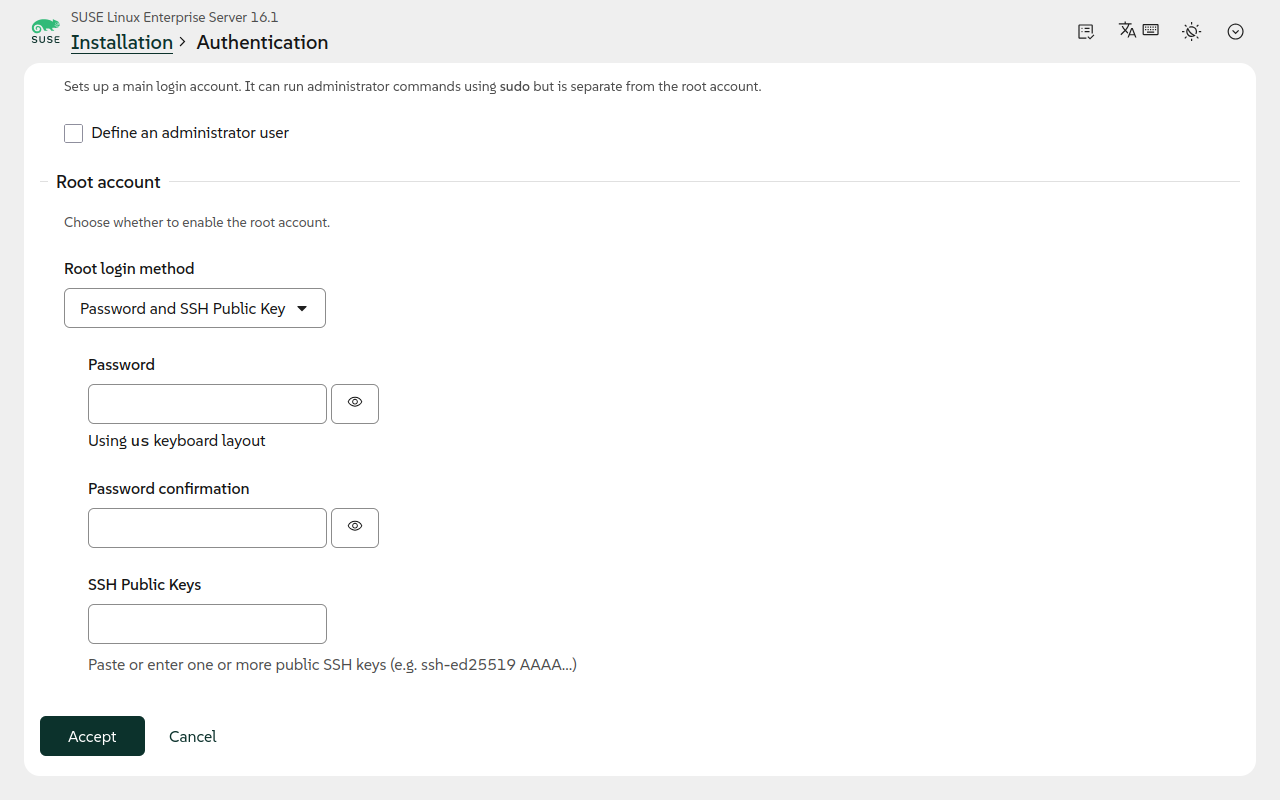
root authentication configuration #- Disabled
The
rootlogin is disabled and the administrator usessudofor all administrative tasks.- Password
The
rootcan log in with a password. Configure a strong password.- SSH Public Key
The
rootcan log in with an SSH public key. Paste one or more public SSH keys. To add a key, press Enter or →|. To remove a key, press <— or Del. To navigate between different keys, use the ↑ and ↓ arrows.- Password and SSH Public Key
The
rootuser can log in both with a password and SSH key(s). Configure both as described above.
11 Starting the installation #
Review the configuration in the installation overview.
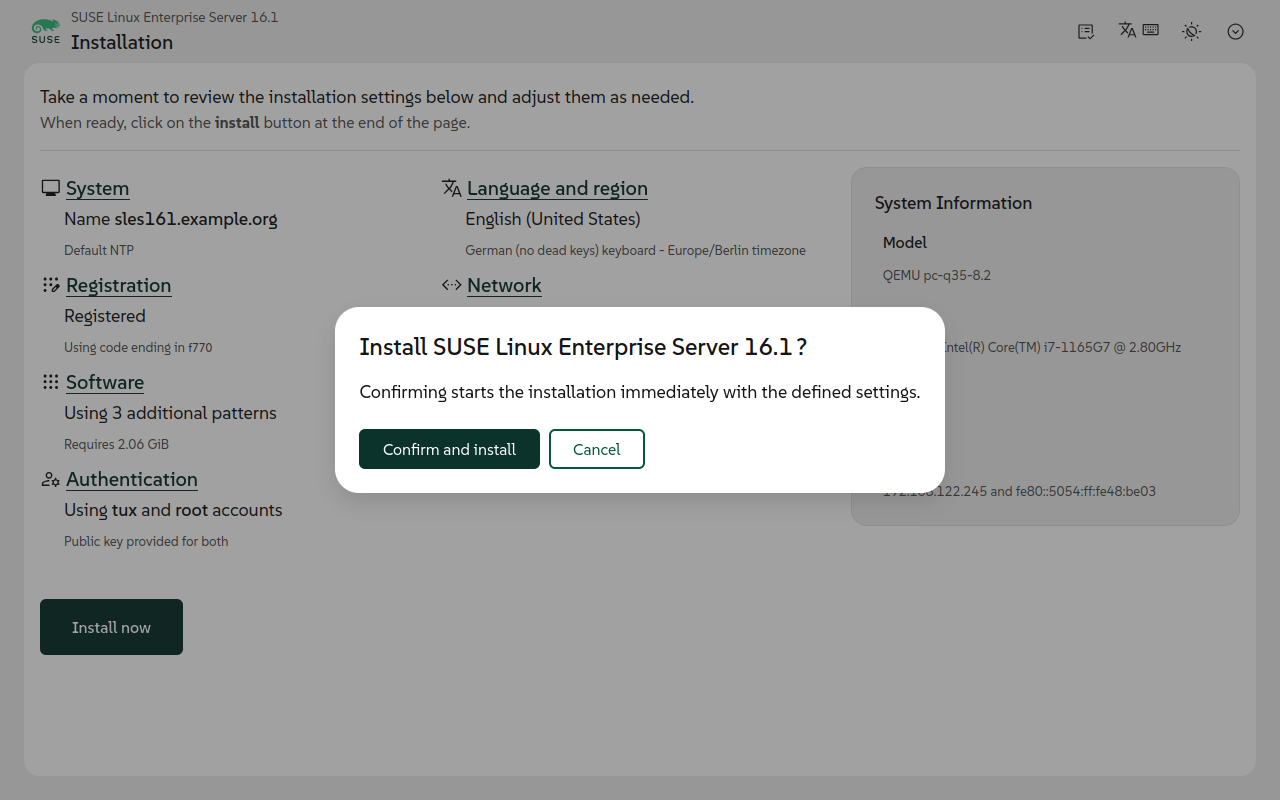
Click to start the installation.
Wait for the system installation to complete. The time of the installation depends on the system's performance, the installation size and your network connection speed.
You can use the arrow menu in the top right corner of the window to view the logs and system messages.
12 Rebooting the system #
When the installation completes, click .
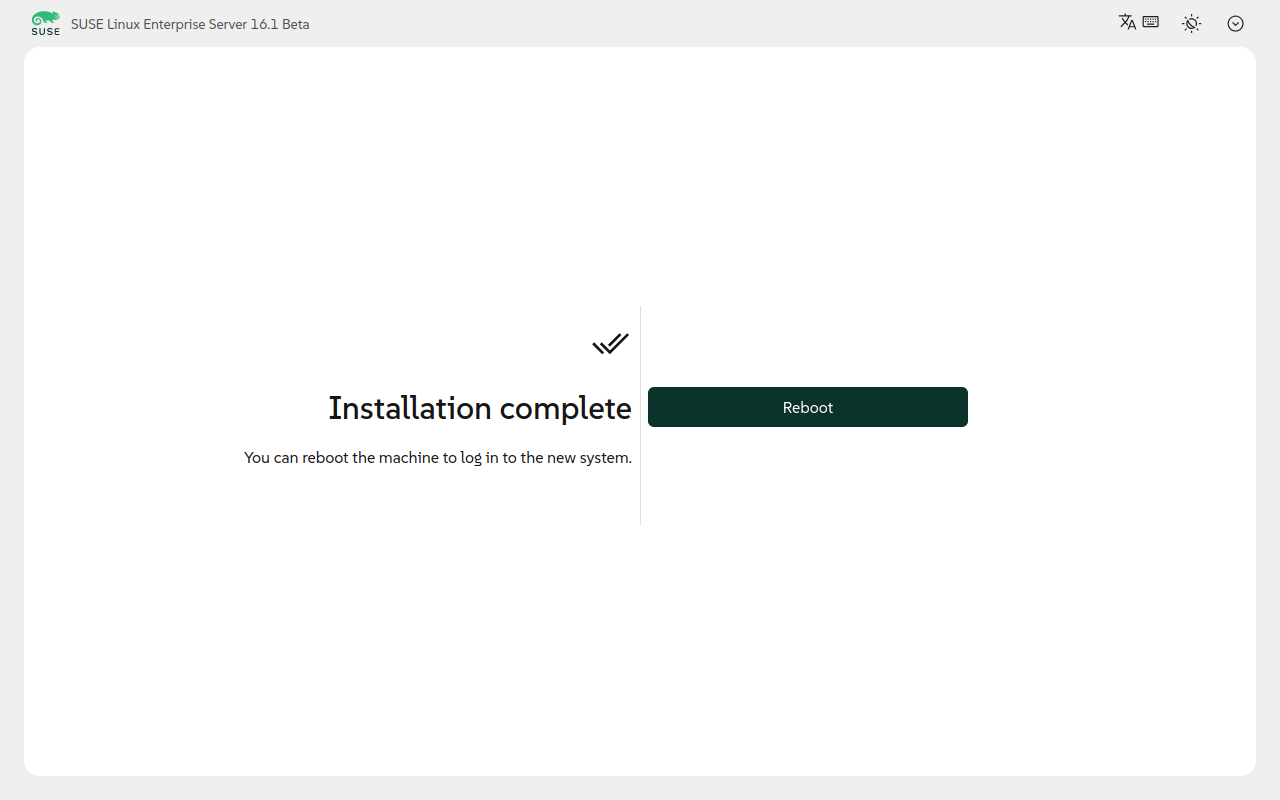
Once the installation is complete, select .
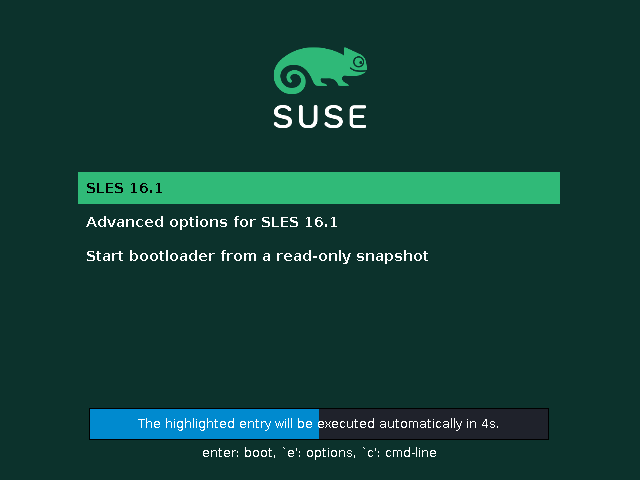
In the GRUB 2 boot menu, start the newly installed system.
13 Legal Notice #
Copyright© 2006– 2026 SUSE LLC and contributors. All rights reserved.
Permission is granted to copy, distribute and/or modify this document under the terms of the GNU Free Documentation License, Version 1.2 or (at your option) version 1.3; with the Invariant Section being this copyright notice and license. A copy of the license version 1.2 is included in the section entitled “GNU Free Documentation License”.
For SUSE trademarks, see https://www.suse.com/company/legal/. All other third-party trademarks are the property of their respective owners. Trademark symbols (®, ™ etc.) denote trademarks of SUSE and its affiliates. Asterisks (*) denote third-party trademarks.
All information found in this book has been compiled with utmost attention to detail. However, this does not guarantee complete accuracy. Neither SUSE LLC, its affiliates, the authors, nor the translators shall be held liable for possible errors or the consequences thereof.
GNU Free Documentation License
Copyright (C) 2000, 2001, 2002 Free Software Foundation, Inc. 51 Franklin St, Fifth Floor, Boston, MA 02110-1301 USA. Everyone is permitted to copy and distribute verbatim copies of this license document, but changing it is not allowed.
0. PREAMBLE #
The purpose of this License is to make a manual, textbook, or other functional and useful document "free" in the sense of freedom: to assure everyone the effective freedom to copy and redistribute it, with or without modifying it, either commercially or non-commercially. Secondarily, this License preserves for the author and publisher a way to get credit for their work, while not being considered responsible for modifications made by others.
This License is a kind of "copyleft", which means that derivative works of the document must themselves be free in the same sense. It complements the GNU General Public License, which is a copyleft license designed for free software.
We have designed this License to use it for manuals for free software, because free software needs free documentation: a free program should come with manuals providing the same freedoms that the software does. But this License is not limited to software manuals; it can be used for any textual work, regardless of subject matter or whether it is published as a printed book. We recommend this License principally for works whose purpose is instruction or reference.
1. APPLICABILITY AND DEFINITIONS #
This License applies to any manual or other work, in any medium, that contains a notice placed by the copyright holder saying it can be distributed under the terms of this License. Such a notice grants a world-wide, royalty-free license, unlimited in duration, to use that work under the conditions stated herein. The "Document", below, refers to any such manual or work. Any member of the public is a licensee, and is addressed as "you". You accept the license if you copy, modify or distribute the work in a way requiring permission under copyright law.
A "Modified Version" of the Document means any work containing the Document or a portion of it, either copied verbatim, or with modifications and/or translated into another language.
A "Secondary Section" is a named appendix or a front-matter section of the Document that deals exclusively with the relationship of the publishers or authors of the Document to the Document's overall subject (or to related matters) and contains nothing that could fall directly within that overall subject. (Thus, if the Document is in part a textbook of mathematics, a Secondary Section may not explain any mathematics.) The relationship could be a matter of historical connection with the subject or with related matters, or of legal, commercial, philosophical, ethical or political position regarding them.
The "Invariant Sections" are certain Secondary Sections whose titles are designated, as being those of Invariant Sections, in the notice that says that the Document is released under this License. If a section does not fit the above definition of Secondary then it is not allowed to be designated as Invariant. The Document may contain zero Invariant Sections. If the Document does not identify any Invariant Sections then there are none.
The "Cover Texts" are certain short passages of text that are listed, as Front-Cover Texts or Back-Cover Texts, in the notice that says that the Document is released under this License. A Front-Cover Text may be at most 5 words, and a Back-Cover Text may be at most 25 words.
A "Transparent" copy of the Document means a machine-readable copy, represented in a format whose specification is available to the general public, that is suitable for revising the document straightforwardly with generic text editors or (for images composed of pixels) generic paint programs or (for drawings) some widely available drawing editor, and that is suitable for input to text formatters or for automatic translation to a variety of formats suitable for input to text formatters. A copy made in an otherwise Transparent file format whose markup, or absence of markup, has been arranged to thwart or discourage subsequent modification by readers is not Transparent. An image format is not Transparent if used for any substantial amount of text. A copy that is not "Transparent" is called "Opaque".
Examples of suitable formats for Transparent copies include plain ASCII without markup, Texinfo input format, LaTeX input format, SGML or XML using a publicly available DTD, and standard-conforming simple HTML, PostScript or PDF designed for human modification. Examples of transparent image formats include PNG, XCF and JPG. Opaque formats include proprietary formats that can be read and edited only by proprietary word processors, SGML or XML for which the DTD and/or processing tools are not generally available, and the machine-generated HTML, PostScript or PDF produced by some word processors for output purposes only.
The "Title Page" means, for a printed book, the title page itself, plus such following pages as are needed to hold, legibly, the material this License requires to appear in the title page. For works in formats which do not have any title page as such, "Title Page" means the text near the most prominent appearance of the work's title, preceding the beginning of the body of the text.
A section "Entitled XYZ" means a named subunit of the Document whose title either is precisely XYZ or contains XYZ in parentheses following text that translates XYZ in another language. (Here XYZ stands for a specific section name mentioned below, such as "Acknowledgements", "Dedications", "Endorsements", or "History".) To "Preserve the Title" of such a section when you modify the Document means that it remains a section "Entitled XYZ" according to this definition.
The Document may include Warranty Disclaimers next to the notice which states that this License applies to the Document. These Warranty Disclaimers are considered to be included by reference in this License, but only as regards disclaiming warranties: any other implication that these Warranty Disclaimers may have is void and has no effect on the meaning of this License.
2. VERBATIM COPYING #
You may copy and distribute the Document in any medium, either commercially or non-commercially, provided that this License, the copyright notices, and the license notice saying this License applies to the Document are reproduced in all copies, and that you add no other conditions whatsoever to those of this License. You may not use technical measures to obstruct or control the reading or further copying of the copies you make or distribute. However, you may accept compensation in exchange for copies. If you distribute a large enough number of copies you must also follow the conditions in section 3.
You may also lend copies, under the same conditions stated above, and you may publicly display copies.
3. COPYING IN QUANTITY #
If you publish printed copies (or copies in media that commonly have printed covers) of the Document, numbering more than 100, and the Document's license notice requires Cover Texts, you must enclose the copies in covers that carry, clearly and legibly, all these Cover Texts: Front-Cover Texts on the front cover, and Back-Cover Texts on the back cover. Both covers must also clearly and legibly identify you as the publisher of these copies. The front cover must present the full title with all words of the title equally prominent and visible. You may add other material on the covers in addition. Copying with changes limited to the covers, as long as they preserve the title of the Document and satisfy these conditions, can be treated as verbatim copying in other respects.
If the required texts for either cover are too voluminous to fit legibly, you should put the first ones listed (as many as fit reasonably) on the actual cover, and continue the rest onto adjacent pages.
If you publish or distribute Opaque copies of the Document numbering more than 100, you must either include a machine-readable Transparent copy along with each Opaque copy, or state in or with each Opaque copy a computer-network location from which the general network-using public has access to download using public-standard network protocols a complete Transparent copy of the Document, free of added material. If you use the latter option, you must take reasonably prudent steps, when you begin distribution of Opaque copies in quantity, to ensure that this Transparent copy will remain thus accessible at the stated location until at least one year after the last time you distribute an Opaque copy (directly or through your agents or retailers) of that edition to the public.
It is requested, but not required, that you contact the authors of the Document well before redistributing any large number of copies, to give them a chance to provide you with an updated version of the Document.
4. MODIFICATIONS #
You may copy and distribute a Modified Version of the Document under the conditions of sections 2 and 3 above, provided that you release the Modified Version under precisely this License, with the Modified Version filling the role of the Document, thus licensing distribution and modification of the Modified Version to whoever possesses a copy of it. In addition, you must do these things in the Modified Version:
Use in the Title Page (and on the covers, if any) a title distinct from that of the Document, and from those of previous versions (which should, if there were any, be listed in the History section of the Document). You may use the same title as a previous version if the original publisher of that version gives permission.
List on the Title Page, as authors, one or more persons or entities responsible for authorship of the modifications in the Modified Version, together with at least five of the principal authors of the Document (all of its principal authors, if it has fewer than five), unless they release you from this requirement.
State on the Title page the name of the publisher of the Modified Version, as the publisher.
Preserve all the copyright notices of the Document.
Add an appropriate copyright notice for your modifications adjacent to the other copyright notices.
Include, immediately after the copyright notices, a license notice giving the public permission to use the Modified Version under the terms of this License, in the form shown in the Addendum below.
Preserve in that license notice the full lists of Invariant Sections and required Cover Texts given in the Document's license notice.
Include an unaltered copy of this License.
Preserve the section Entitled "History", Preserve its Title, and add to it an item stating at least the title, year, new authors, and publisher of the Modified Version as given on the Title Page. If there is no section Entitled "History" in the Document, create one stating the title, year, authors, and publisher of the Document as given on its Title Page, then add an item describing the Modified Version as stated in the previous sentence.
Preserve the network location, if any, given in the Document for public access to a Transparent copy of the Document, and likewise the network locations given in the Document for previous versions it was based on. These may be placed in the "History" section. You may omit a network location for a work that was published at least four years before the Document itself, or if the original publisher of the version it refers to gives permission.
For any section Entitled "Acknowledgements" or "Dedications", Preserve the Title of the section, and preserve in the section all the substance and tone of each of the contributor acknowledgements and/or dedications given therein.
Preserve all the Invariant Sections of the Document, unaltered in their text and in their titles. Section numbers or the equivalent are not considered part of the section titles.
Delete any section Entitled "Endorsements". Such a section may not be included in the Modified Version.
Do not retitle any existing section to be Entitled "Endorsements" or to conflict in title with any Invariant Section.
Preserve any Warranty Disclaimers.
If the Modified Version includes new front-matter sections or appendices that qualify as Secondary Sections and contain no material copied from the Document, you may at your option designate some or all of these sections as invariant. To do this, add their titles to the list of Invariant Sections in the Modified Version's license notice. These titles must be distinct from any other section titles.
You may add a section Entitled "Endorsements", provided it contains nothing but endorsements of your Modified Version by various parties--for example, statements of peer review or that the text has been approved by an organization as the authoritative definition of a standard.
You may add a passage of up to five words as a Front-Cover Text, and a passage of up to 25 words as a Back-Cover Text, to the end of the list of Cover Texts in the Modified Version. Only one passage of Front-Cover Text and one of Back-Cover Text may be added by (or through arrangements made by) any one entity. If the Document already includes a cover text for the same cover, previously added by you or by arrangement made by the same entity you are acting on behalf of, you may not add another; but you may replace the old one, on explicit permission from the previous publisher that added the old one.
The author(s) and publisher(s) of the Document do not by this License give permission to use their names for publicity for or to assert or imply endorsement of any Modified Version.
5. COMBINING DOCUMENTS #
You may combine the Document with other documents released under this License, under the terms defined in section 4 above for modified versions, provided that you include in the combination all of the Invariant Sections of all of the original documents, unmodified, and list them all as Invariant Sections of your combined work in its license notice, and that you preserve all their Warranty Disclaimers.
The combined work need only contain one copy of this License, and multiple identical Invariant Sections may be replaced with a single copy. If there are multiple Invariant Sections with the same name but different contents, make the title of each such section unique by adding at the end of it, in parentheses, the name of the original author or publisher of that section if known, or else a unique number. Make the same adjustment to the section titles in the list of Invariant Sections in the license notice of the combined work.
In the combination, you must combine any sections Entitled "History" in the various original documents, forming one section Entitled "History"; likewise combine any sections Entitled "Acknowledgements", and any sections Entitled "Dedications". You must delete all sections Entitled "Endorsements".
6. COLLECTIONS OF DOCUMENTS #
You may make a collection consisting of the Document and other documents released under this License, and replace the individual copies of this License in the various documents with a single copy that is included in the collection, provided that you follow the rules of this License for verbatim copying of each of the documents in all other respects.
You may extract a single document from such a collection, and distribute it individually under this License, provided you insert a copy of this License into the extracted document, and follow this License in all other respects regarding verbatim copying of that document.
7. AGGREGATION WITH INDEPENDENT WORKS #
A compilation of the Document or its derivatives with other separate and independent documents or works, in or on a volume of a storage or distribution medium, is called an "aggregate" if the copyright resulting from the compilation is not used to limit the legal rights of the compilation's users beyond what the individual works permit. When the Document is included in an aggregate, this License does not apply to the other works in the aggregate which are not themselves derivative works of the Document.
If the Cover Text requirement of section 3 is applicable to these copies of the Document, then if the Document is less than one half of the entire aggregate, the Document's Cover Texts may be placed on covers that bracket the Document within the aggregate, or the electronic equivalent of covers if the Document is in electronic form. Otherwise they must appear on printed covers that bracket the whole aggregate.
8. TRANSLATION #
Translation is considered a kind of modification, so you may distribute translations of the Document under the terms of section 4. Replacing Invariant Sections with translations requires special permission from their copyright holders, but you may include translations of some or all Invariant Sections in addition to the original versions of these Invariant Sections. You may include a translation of this License, and all the license notices in the Document, and any Warranty Disclaimers, provided that you also include the original English version of this License and the original versions of those notices and disclaimers. In case of a disagreement between the translation and the original version of this License or a notice or disclaimer, the original version will prevail.
If a section in the Document is Entitled "Acknowledgements", "Dedications", or "History", the requirement (section 4) to Preserve its Title (section 1) will typically require changing the actual title.
9. TERMINATION #
You may not copy, modify, sublicense, or distribute the Document except as expressly provided for under this License. Any other attempt to copy, modify, sublicense or distribute the Document is void, and will automatically terminate your rights under this License. However, parties who have received copies, or rights, from you under this License will not have their licenses terminated so long as such parties remain in full compliance.
10. FUTURE REVISIONS OF THIS LICENSE #
The Free Software Foundation may publish new, revised versions of the GNU Free Documentation License from time to time. Such new versions will be similar in spirit to the present version, but may differ in detail to address new problems or concerns. See https://www.gnu.org/copyleft/.
Each version of the License is given a distinguishing version number. If the Document specifies that a particular numbered version of this License "or any later version" applies to it, you have the option of following the terms and conditions either of that specified version or of any later version that has been published (not as a draft) by the Free Software Foundation. If the Document does not specify a version number of this License, you may choose any version ever published (not as a draft) by the Free Software Foundation.
ADDENDUM: How to use this License for your documents #
Copyright (c) YEAR YOUR NAME.
Permission is granted to copy, distribute and/or modify this document
under the terms of the GNU Free Documentation License, Version 1.2
or any later version published by the Free Software Foundation;
with no Invariant Sections, no Front-Cover Texts, and no Back-Cover Texts.
A copy of the license is included in the section entitled “GNU
Free Documentation License”.
If you have Invariant Sections, Front-Cover Texts and Back-Cover Texts, replace the “with...Texts.” line with this:
with the Invariant Sections being LIST THEIR TITLES, with the
Front-Cover Texts being LIST, and with the Back-Cover Texts being LIST.
If you have Invariant Sections without Cover Texts, or some other combination of the three, merge those two alternatives to suit the situation.
If your document contains nontrivial examples of program code, we recommend releasing these examples in parallel under your choice of free software license, such as the GNU General Public License, to permit their use in free software.