
Getting Started with GNOME Desktop
GNOME Desktop in SUSE Linux Enterprise Server for SAP applications 16.1 is a streamlined graphical user interface environment optimized for enterprise Linux operations. Operating by default on Wayland with legacy X11 support, it provides essential productivity tools, integrated accessibility features and remote desktop access to ensure a secure, highly efficient desktop experience tailored for enterprise environments.
1 Introduction to GNOME Desktop #
SUSE Linux Enterprise Server for SAP applications includes GNOME Desktop, a desktop environment with an easy-to-use graphical interface. This article describes the default configuration of GNOME Desktop. If you or your system administrator modify the defaults, certain aspects might be different, such as appearance or key combinations.
1.1 What is GNOME Desktop? #
GNOME Desktop is a streamlined, minimal graphical environment built on GNOME and optimized for enterprise use. It includes essential desktop components such as a terminal, text editor, file and Web browser, and basic multimedia and document viewers.
GNOME Desktop runs on Wayland by
default, with xwayland support for legacy X11 applications. It
offers infrastructure for accessibility, multilingual input and remote access using RDP.
Additional GNOME applications are excluded unless explicitly required, ensuring a
lightweight and secure experience.
1.2 Benefits of GNOME Desktop #
GNOME Desktop is a free, open source and easy-to-use desktop environment offering a variety of core applications to help you organize and complete your daily tasks. With built-in support for accessibility, multilingual input and remote access via RDP, GNOME Desktop is well-suited for enterprise environments.
2 Logging in and managing your GNOME Desktop session #
Learn how to log in to GNOME Desktop and how to pause or finish the session.
2.1 Starting a session #
When starting your system, you first see a login screen. All users must authenticate before starting a session. This step protects your personal information and data from unauthorized access.
In the login screen, select your user name.
If your user name is not listed, click . Then enter your user name and click .
Enter your password and confirm with Enter.

If the computer is used by a single person, you can enable Automatic Login for this user at system start. This saves time, but also impacts account security. Enable or disable Automatic Login during installationa or in › : Select the account and switch on . Disable Automatic Login to maintain account security.
2.2 Pausing or finishing your session #
To pause or end your session, open the menu in the upper-right corner of the top bar. Click the button and choose one of the options:
. Pauses your session and puts the computer into a low-power mode. Suspend mode can be configured to lock your screen so nobody can view or change your work. Waking up the computer is generally much quicker than a full start.
This mode is also known as suspend-to-RAM, sleep or standby mode.
. Ends the current session and restarts the computer. A restart is required to apply updates that cannot be applied online, such as kernel, firmware or driver updates (see Section 4.4, “Installing and updating software with GNOME Software”).
. Ends the current session and turns off the computer.
. Ends the current session and returns to the login screen. This allows you (or another user) to log in again.
. Keeps your current session active in the background while allowing another user to log in. You can return to your session later.
2.3 Locking the screen #
To lock the screen, open the menu in the upper-right corner of the top bar and click the padlock icon.
When you lock your screen, a curtain with a clock appears first. After a while, the screen turns black.
To unlock the screen, move the mouse or press a key to display the locked screen dialog. Enter your password and press Enter.
2.4 Logging out or switching users #
The option only appears in the menu if there is more than one user account on the system.
Open the menu and click the button.
Select one of the following options:
Logs you out of the current session and returns to the login screen.
Keeps your session active in the background so another user can log in. You can return to your session later.
2.5 Restarting or shutting down the computer #
Open the menu and click the button.
Select one of the following options:
Logs you out of the current session, then restarts the system.
Logs you out of the current session, then shuts down the system.
3 Navigating the GNOME user interface #
Learn how to use the overview, the and features and the menu.
3.1 overview #
The overview shows a preview of all open windows and icons for favorite and running applications. It also integrates searching and browsing.
To open the overview, you have the following options:
Click the button in the left corner of the top bar.
Move the mouse pointer to the upper-left hot corner.
Press the Meta key on your keyboard.
- Search box
Use the search box at the top to find applications, settings and files in your home directory.
To search, you do not need to click the search box. Start typing right after opening the overview. Search runs as you type, with no need to press Enter.
dashThe
dashis the bar at the bottom center. It contains your favorite applications and running applications. Hover over an icon to see the application name. A small dot underneath the icon indicates that the application is running.Right-click an icon for application-specific actions. Use to keep an application icon permanently in
dash. To remove a program icon fromdash, select . Drag icons to rearrange them.
3.2 and #
Click the clock on the top bar to see the current day and time. If you use or another supported calendar application, it also shows your upcoming appointments and notifications.
4 Working with GNOME Desktop #
Learn how to manage files, access removable media and use assistive technologies in GNOME Desktop.
4.1 Managing files and directories #
The GNOME Files application provides a graphical interface for managing local and remote
files. To launch it, press Meta, search for files and
select from the hit list.
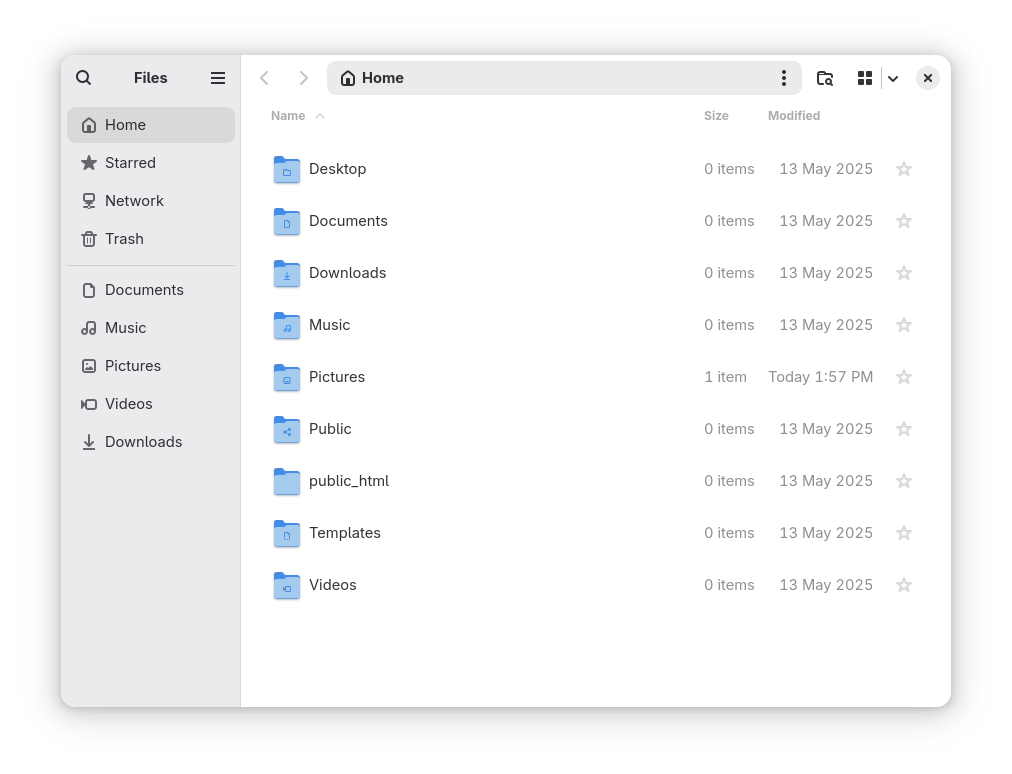
The main interface elements include the following:
- Toolbar
Includes back/forward navigation, a path bar with search function, view options (list or grid), sort controls and a three-dot menu for actions and settings specific to the current folder.
- Sidebar
Provides quick access to frequently used folders and network locations. Toggle the sidebar with F9.
- Main menu
The three-line icon at the top of the sidebar provides options like preferences, icon size, new folders, new windows and tabs.
- Content area
Displays files and folders in the selected view. Use the toolbar's view menu (top right) to switch between grid and list layouts.
- Context menus
Right-click items or empty space to open a menu. Options depend on where you click—on a file or folder, or on the background.
4.1.1 Useful key combinations #
The following table lists a selection of key combinations of GNOME Files.
|
Key Combination |
Action |
|---|---|
|
Alt–←/ Alt–→ |
Navigate backward/forward |
|
Alt–↑ |
Open parent directory |
|
Alt–↓ or Enter |
Open selected item |
|
Ctrl–L |
Switch the path bar from a button view to an editable text box.
The editable path bar supports the URI schema and can connect to remote servers
via FTP, SFTP, SSH, SMB and other protocols. For example, use
|
|
/ |
Jump to root directory |
|
Alt–Home |
Open home directory |
|
Del |
Move selected item to trash |
4.1.2 Administrative file tasks #
- Compressing files or directories
Right-click a directory, select , choose an archive format (
.zip,.tar.xzor.7z), then specify a destination.- Bookmarking locations
Navigate to the folder or file you want to bookmark and click the star icon to the right of its name. Bookmarked items are listed under in the sidebar, where they can be renamed or reordered.
4.2 Accessing removable media #
To access USB flash drives, CDs or DVDs, insert or attach the medium. An icon for the medium is automatically created on the desktop. For many media types, a window pops up automatically. If it doesn't, open and select the device in the sidebar.

Do not physically remove devices immediately after use. Even when no write activity is indicated, the drive may not have finished a previous operation.
To safely remove a device:
From the overview, open .
Locate the device in the sidebar and click the icon.
Now you can safely remove the device.
4.3 Assistive technologies #
The GNOME Desktop provides built-in assistive technologies for users with disabilities, including low vision or impaired motor skills.
4.3.1 Enabling assistive technologies #
To configure accessibility features, open the dialog by right-clicking the desktop and choosing . In the navigation pane, select . Each assistive feature can be enabled separately. To get quick access, turn on to display a person icon in the top bar.
4.3.2 Visual assistance #
reads displayed text as the focus moves.
increases color contrast of foreground and background interface elements.
uses shapes to indicate state in addition to, or instead of, using color.
enables visual animations throughout the user interface. Disabling it can reduce visual distraction.
increases the size of all text in the user interface.
improves pointer visibility.
play a sound when Num Lock or Caps Lock is toggled.
keeps scrollbars visible at all times.
4.3.3 Hearing assistance #
allows the system volume to exceed 100%, which can help users with hearing loss. Note that this may reduce sound quality.
shows a visual indication when an alert sound occurs. You can choose to flash either the window title or the entire screen. Use to preview the effect.
4.3.4 Typing assistance #
shows an on-screen keyboard at the bottom of the screen the next time you type.
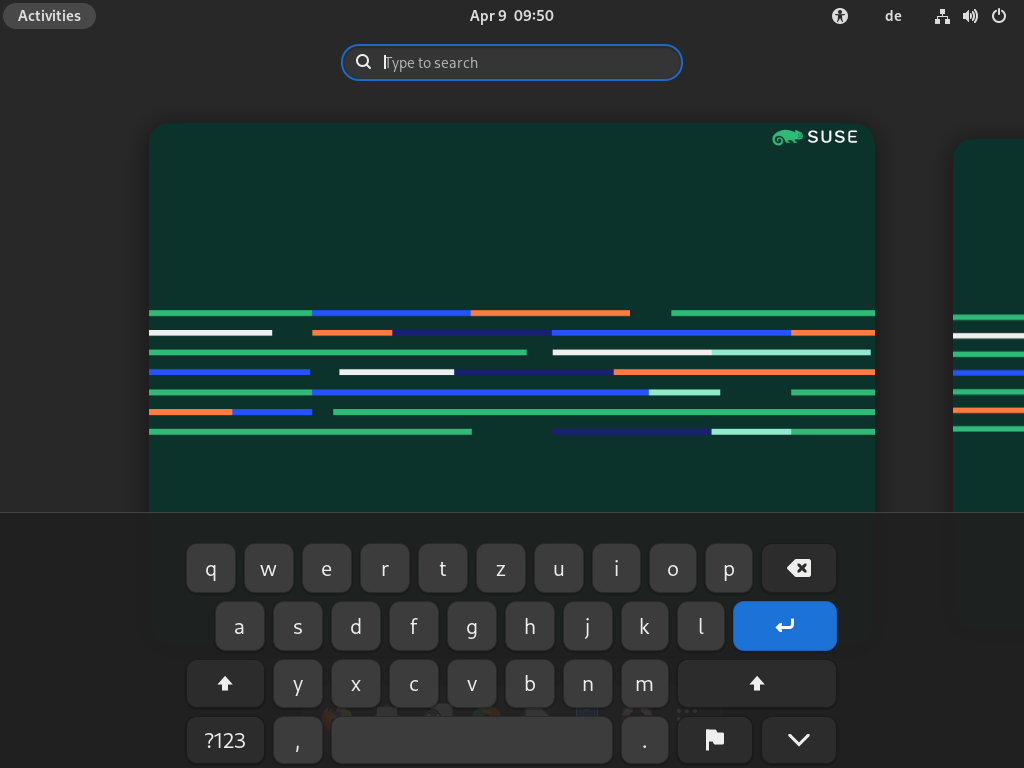 Figure 2: On-screen keyboard #
To enter numbers and symbols, press the button first. More symbols are available if you press the button. To return to the alphabetic keyboard, press the button.
To temporarily hide the keyboard, press the button with the arrow down icon. The keyboard is shown again automatically in the next situation where you can use it. To change your keyboard layout or change settings, press the button with the flag icon.
turns accessibility features on or off using the keyboard.
Text Cursor
controls if the cursor blinks in text fields.
adjusts the speed at which the cursor blinks, from to .
Typing Assist
repeats a key while it is held down.
lets you enter key combinations one key at a time. For example, with on, press Alt–→| to switch windows.
With sticky keys turned off, you need to hold down both keys at the same time. With sticky keys turned on, press Alt and then →| to do the same.
adds a delay between when a key is pressed and when it is accepted. This means that you need to hold down each key you want to type for a little while before it appears. Use slow keys if you accidentally press several keys at a time when you type, or if you find it difficult to press the right key on the keyboard first time.
ignores key presses that are rapidly repeated. This feature can help, for example, if you have hand tremors which cause you to press a key multiple times when you only want to press it once.
4.3.5 Pointing and Clicking #
In the section of the settings, you can enable and configure features that help people with mobility impairments related to using a mouse or other pointing devices.
moves the mouse pointer with the numeric keypad.
reveals the pointer location when you press the Left Ctrl key.
activates a window when you place the pointer it.
adjusts the time allowed between clicks for them to be recognized as a double-click.
Click Assist
performs a secondary click (usually equivalent to a right mouse button click) by holding the primary mouse button. This is useful if you find it difficult to move your fingers individually on one hand, or if your pointing device only has a single button.
triggers a click by hovering the mouse pointer over an item on the screen. This is useful if you find it difficult to move the mouse and click at the same time.
If this feature is turned on, a small hover click window may open and stay above all your other windows, allowing you to choose what type of click should happen when you hover. When you hover your mouse pointer over a button and do not move it, the pointer gradually changes color. When it has fully changed color, the button is clicked.
4.3.6 Zoom #
In the section of the settings, you can enable features that help people with visual impairments.
magnifies the entire screen.
offers detailed configuration options, including , and .
The includes options like , and sliders, and .
offers to invert colors in the magnifier region, plus , and options to adjust color effects.
4.4 Installing and updating software with GNOME Software #
SUSE Linux Enterprise Server for SAP applications 16.1 ships GNOME Software (gnome-software) as part of the software stack. Use it to receive desktop notifications about available updates, install applications, and install and update Flatpak applications from the GNOME graphical interface.
GNOME Software has been modified to support online updates. Unlike upstream GNOME Software, which applies most updates at the next reboot, most packages are updated while the system is running.
Critical updates such as kernel, firmware or driver updates still require a reboot. GNOME Software indicates when a restart is needed to complete an update.
4.4.1 How to install and update software #
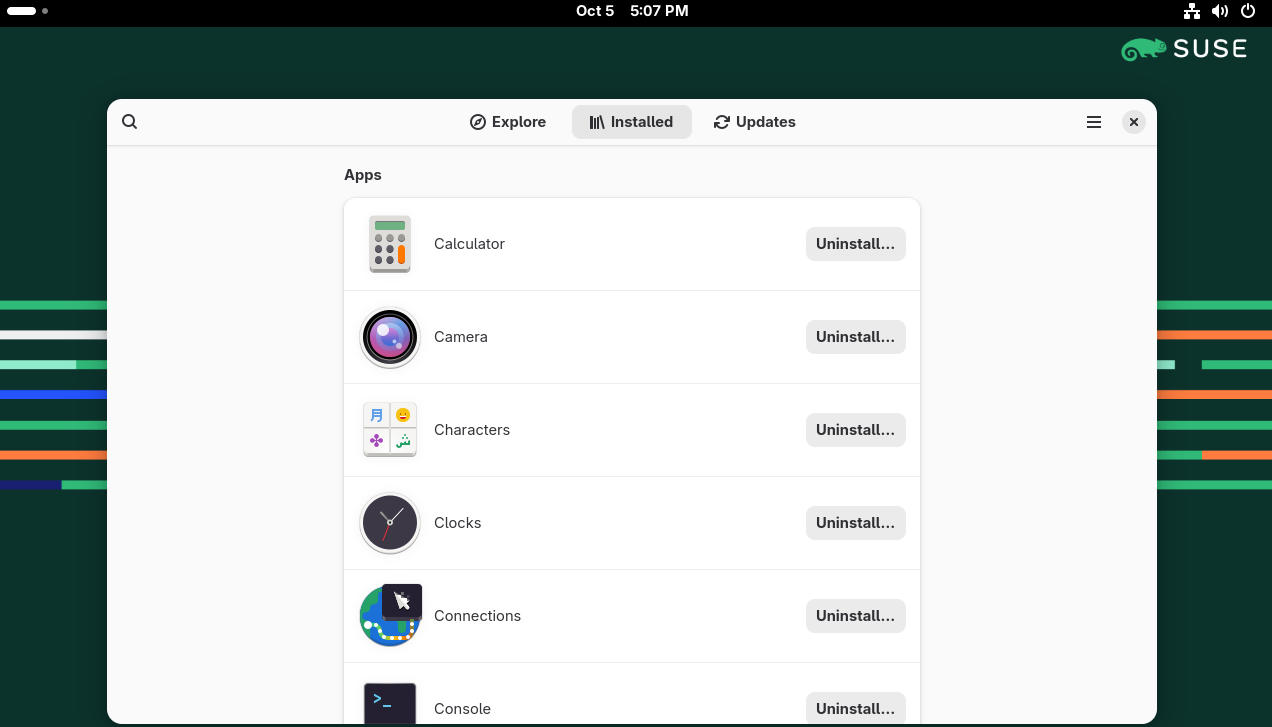
Open GNOME Software from the : Press Meta, type
softwareand select .To install an application, find it with the search function or by browsing, open it and click .
To update, open the tab and install the available updates. Updates that do not need a reboot are applied immediately. If a reboot is needed, restart using the menu (see Section 2.2, “Pausing or finishing your session”).
4.4.2 Managing Flatpak applications #
GNOME Software manages Flatpak applications, including installation, update notifications and updates. This also applies to Flatpak applications that cannot be detected by other management tools.
On transactional systems, the PackageKit plug-in of GNOME Software detects the
environment and disables itself. This prevents failed update operations on the read-only
root file system. GNOME Software can still manage Flatpak applications. Manage system
packages with the transactional-update tool instead.
5 Customizing the settings for GNOME Desktop #
Learn how to customize the settings for GNOME Desktop, like changing the background or configuring language and keyboard settings to suit your personal taste and needs.
5.1 Configuring the desktop background #
Right-click the desktop and choose .
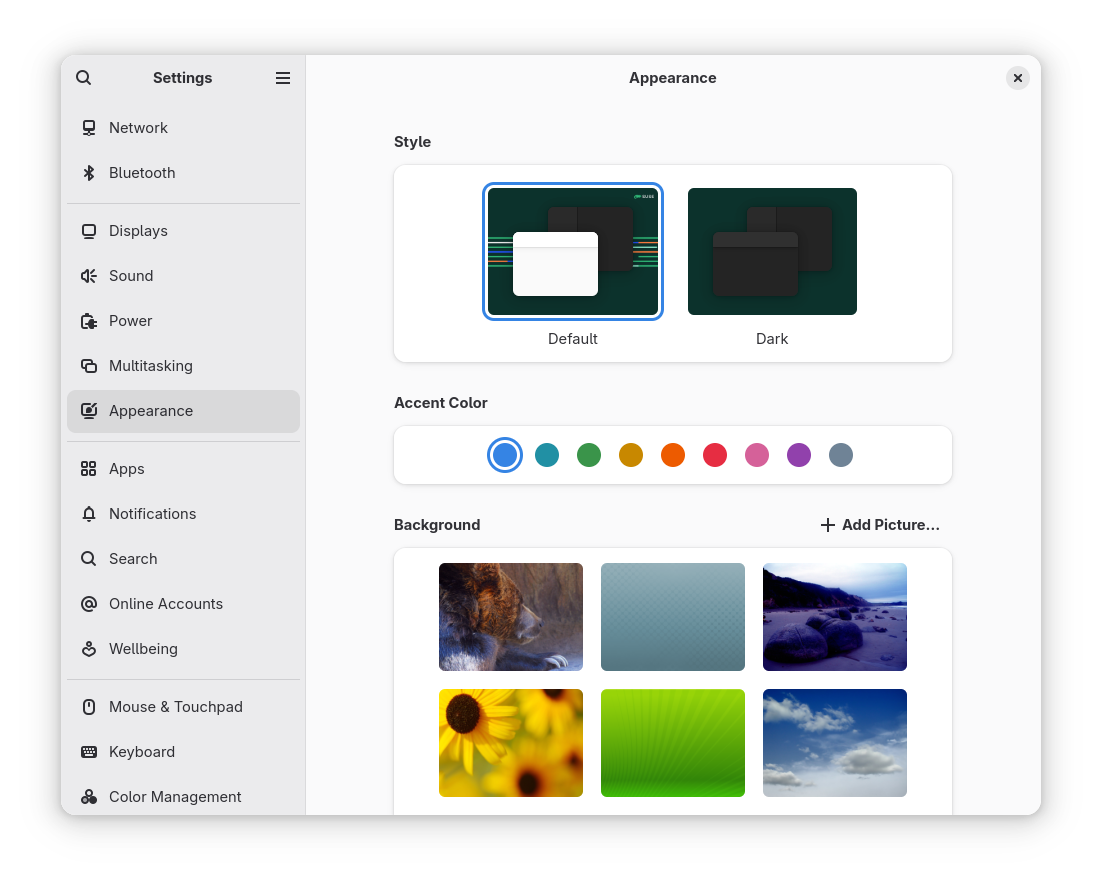 Figure 4: GNOME Background settings #
Select a preconfigured wallpaper in the content area.
Alternatively, click to select an image from your
Picturesdirectory (~/Pictures) or elsewhere in the file system.Close the dialog.
The new background is now shown on the desktop.
5.2 Configuring language settings #
The language setting determines the language of dialogs and menus and can also determine the keyboard and clock layout. Right-click the desktop and choose › › .
Here you can choose:
. Choose a language from the list. To apply the changes, you are prompted to the desktop session. To do so, you must log out and log back in.
. Choose a country for date, number, currency and related options. To apply the changes, log out and log back in.
5.3 Configuring the keyboard #
Refer to Section 4.3, “Assistive technologies” for additional settings, such as key auto-repetition and cursor blink rate, and accessibility features. To configure your keyboard layout, refer to Section 4.3.4, “Typing assistance ”.
ibus-setup do not take effect
On GNOME, settings made using ibus-setup have no effect. Always use
the application.
To change input methods, open in the navigation pane.
To change the key combination that switches input methods, use › . Then select the category and the entry .
To modify other shortcuts, select › .
This dialog shows the keyboard shortcuts that are configured for your system. To edit a key combination, click the entry that you want to change. To set a new key combination, press the respective keys. To disable a shortcut, press <— instead.
5.4 Entering special characters using the Compose Key #
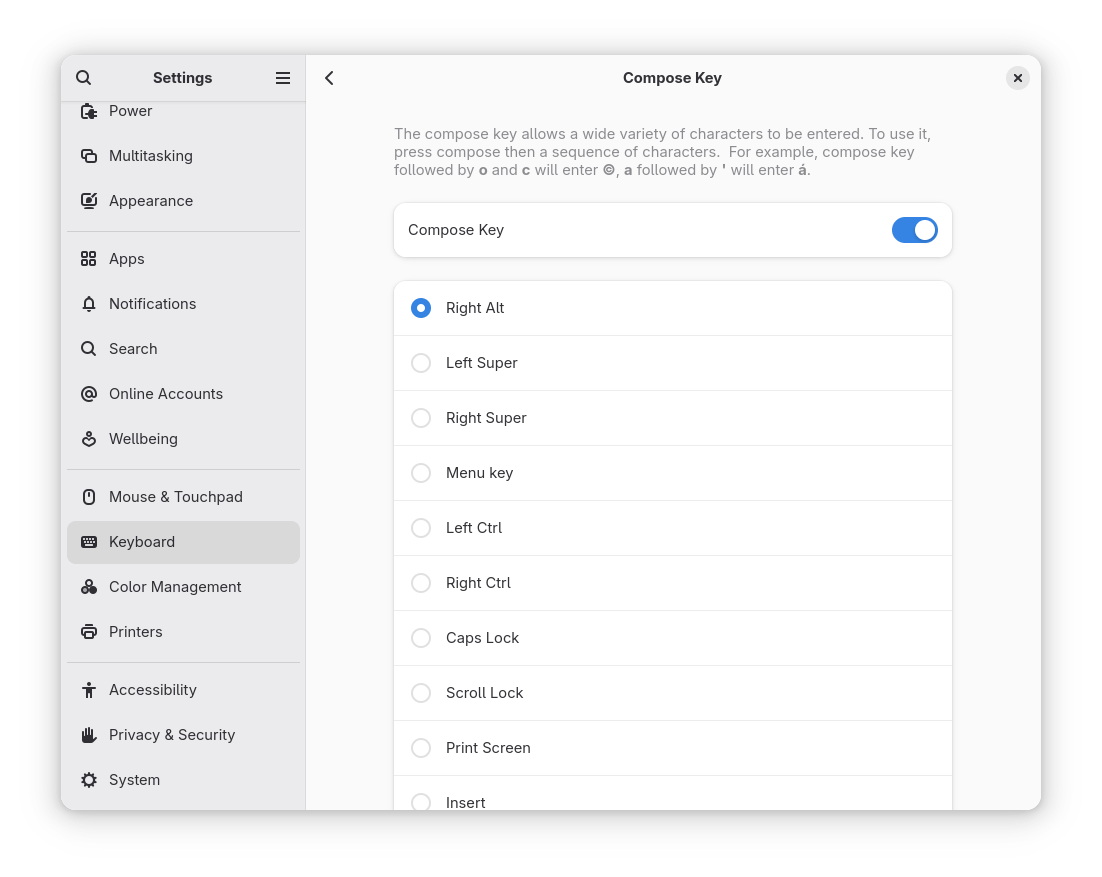
GNOME offers the that allows you to type special characters and symbols by pressing the designated followed by a sequence of other keys.
To enable and configure the , open › .
In the main panel, locate the section and select . Turn it on and select which key on your keyboard will act as the Compose Key.
Press and release the , then type a specific sequence of two or more characters. For example:
Press Compose Key, then o–c to enter ©.
Press Compose Key, then a–' to enter á.
Press Compose Key, then <–= to enter ≦.
Press Compose Key, then 1–2 to enter ½.
5.5 Configuring Bluetooth settings #
Right-click the desktop and choose › .
To use Bluetooth, set the switch at the top on.
Your computer is visible as long as the Bluetooth panel is open.
Note: Temporary visibilityThe switch is only needed for the initial connection. After the connection has been established, turn it off.
On the device you want to connect, turn on Bluetooth and visibility.
When the device is shown in the list, click it to establish a connection to it.
You are asked whether the PINs of the two devices match.
If the PINs match, confirm this on both your computer and the device.
The pairing is now established. On your computer, the device is shown as .
Depending on the device type, it is also now available in other applications, for example, as a storage device in GNOME Files, or a sound device in playback applications.
To connect to a paired Bluetooth device, select the device in the list and turn the switch on. You can send files to the connected device by using the button. With a mobile phone, you can use it as a network device by activating the appropriate option.
To remove a connected device from the list on your computer, click and confirm it. Also remove the pairing on your device itself.
5.6 Configuring power settings #
Settings available in this dialog depend on your hardware. In the following, the options that are typically available when using a laptop are described. On a workstation, many of the described options are not available.
Right-click the desktop and choose .
In the navigation pane, select .
In the section, set after how many minutes the screen blanks (or never).
In the section, configure the inactivity period after which the computer is suspended.
5.7 Configuring mouse and touchpad #
To modify mouse and touchpad options, right-click the desktop and choose . Then select .
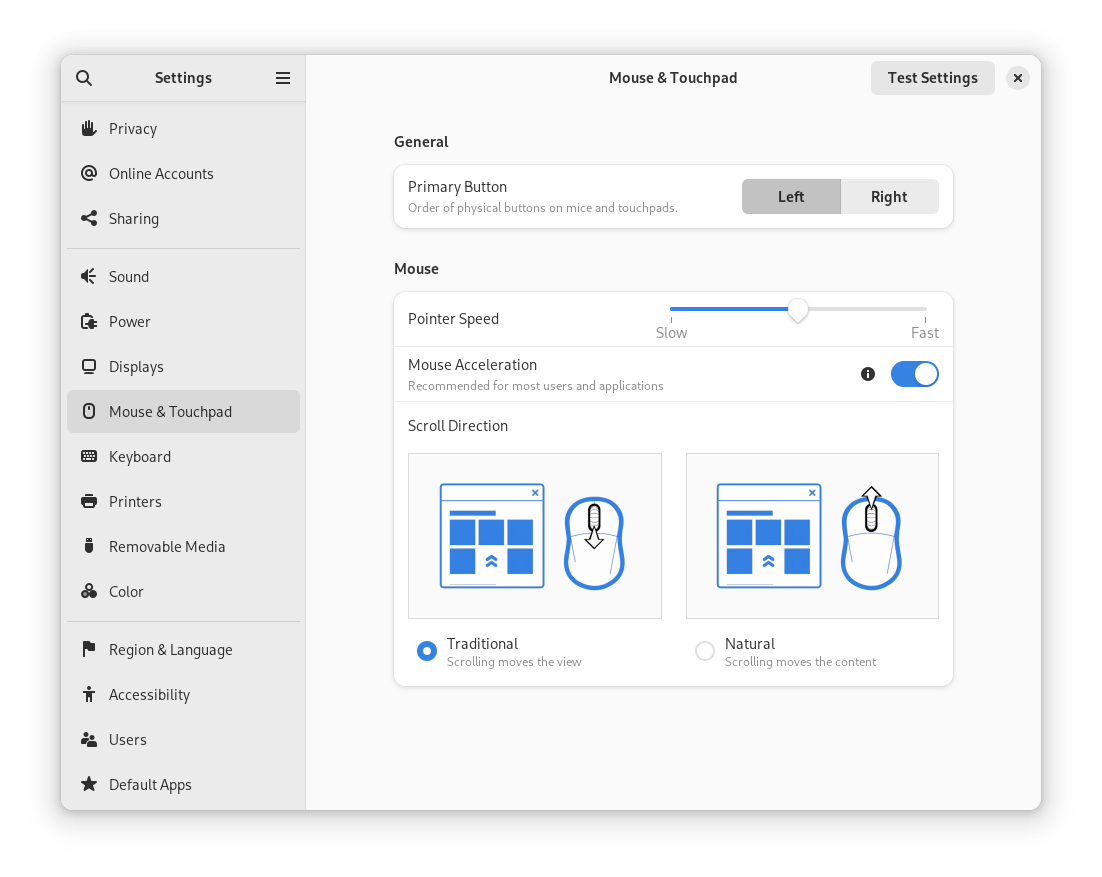
: Set the orientation (left or right).
: Use to adjust the sensitivity of the mouse pointer.
: with , content moves up when you push the wheel down. With , content moves in the same direction as the mouse wheel.
To test your settings, click and try the pointing device.
For the configuration of mouse accessibility options, refer to the Section 4.3.5, “Pointing and Clicking”.
5.8 Installing and configuring printers #
The dialog connects to any available local or remote CUPS servers and configures printers. Right-click the desktop and choose › . For details, refer to https://help.gnome.org/users/gnome-help/stable/printing.html.en.
5.9 Configuring screens #
To specify resolution and orientation for your screen or to configure multiple screens, right-click the desktop and choose . The configuration options depend on whether you use one or several monitors.
5.9.1 Configuring single monitor setup #
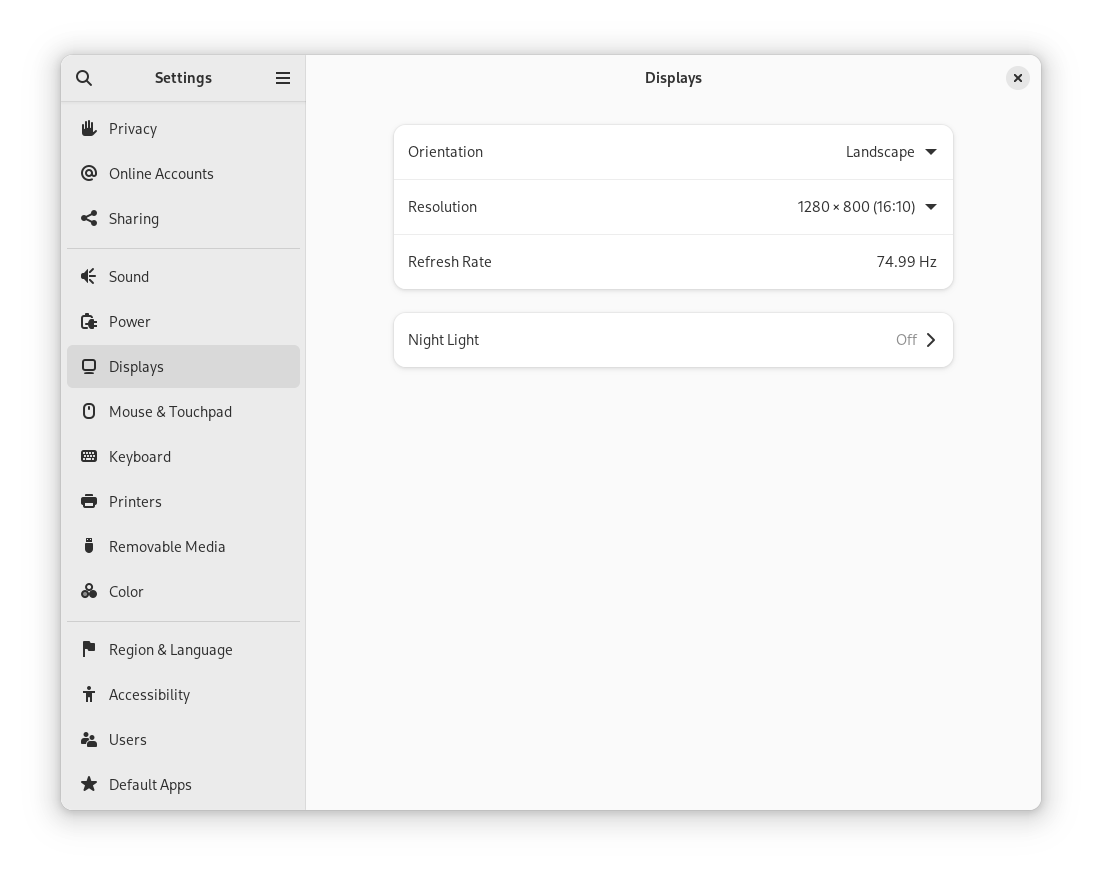
If you use a monitor which can change its orientation, you need to adjust the display before turning the monitor. Use to do this. Choose the orientation and click .
To change the screen resolution, click . Choose a new value and click .
If you work in a dark environment, your eyes can easily be strained by the monitor. To prevent this, change the screen's color palette to a warmer tone by turning on . Under , you can automate this setting by specifying at which time should be turned on and off.
5.9.2 Configuring multiple monitor setup #
To set up an additional monitor, connect the monitor to your computer. If your system does not recognize it immediately, or you want to adjust the settings, do the following:
Open the overview and start typing
Displays.Click .
In the display arrangement diagram, drag your displays to the relative positions you want.
Click to choose your primary display.
The primary display is the one with the and overview.
Select orientation, resolution or scale and refresh rate.
Click . The new settings are applied for 20 seconds before reverting. If you are happy with the settings, click .
With two or more screens, these display modes are available:
- Join Display
The screen edges are joined so windows and dialogs can pass from one display to another.
- Mirror
The same content is shown on all displays, with the same resolution and orientation for all.
- Single display
Only one display is configured, effectively turning off the other displays. For example, an external monitor connected to a docked laptop with the lid closed.
5.10 Configuring sound settings #
Right-click the desktop and choose › .
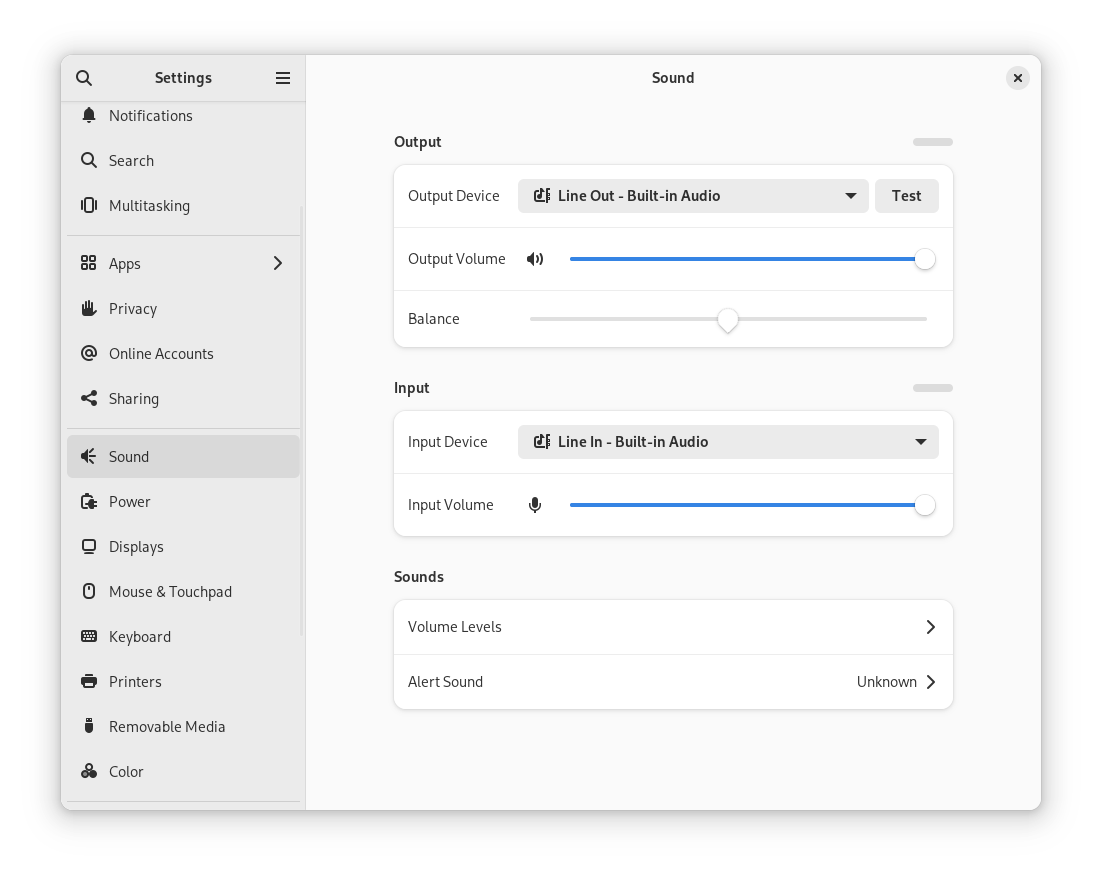
Use to select the device for sound output. Choose the and . Use to set input volume, mute temporarily or select the default . You can also choose an .
5.11 Configuring default applications #
Right-click the desktop and select › › .
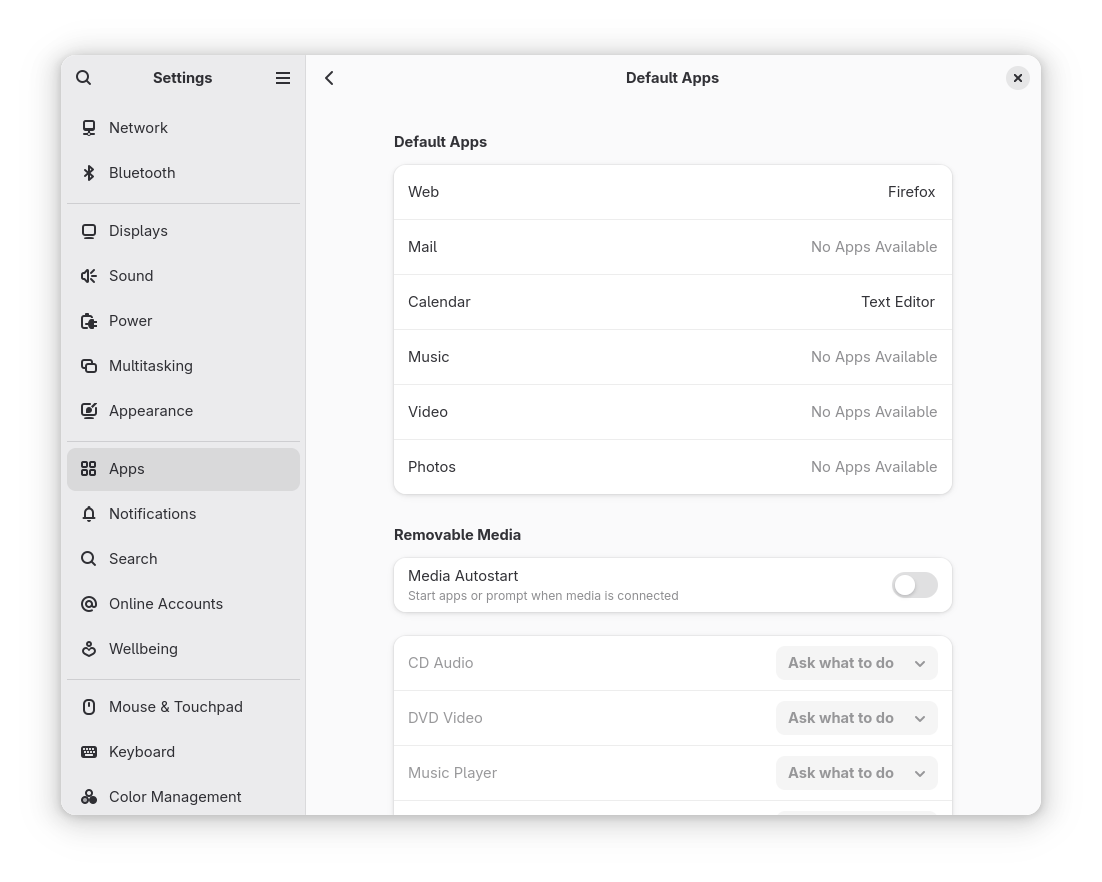 Figure 9: GNOME Default Apps #
In the section, select a preferred application per category. Categories without a suitable application show
No Apps
          Available
. Click a category to view and select one of the available applications.Below the default applications, the section allows you to configure how the system handles media devices such as audio CDs, video DVDs or USB drives. You can enable or disable to control whether applications start automatically when media is connected.
For each media type (CD Audio, DVD Video, Music Player, Photos), you can choose an action from a drop-down menu, such as
Ask what to door a specific application if available.
6 For more information #
SUSE Linux Enterprise Server for SAP applications comes with several sources of information and documentation, many of which are already integrated into your installed system.
To open the Help for GNOME from an application, click the button or press F1. Both options take you directly to the application's documentation in the help center.
You can also start GNOME Help by entering yelp in a terminal or via the
main menu by clicking › .
For more information on how to work with GNOME Desktop, see https://help.gnome.org.
7 Legal Notice #
Copyright© 2006– 2026 SUSE LLC and contributors. All rights reserved.
Permission is granted to copy, distribute and/or modify this document under the terms of the GNU Free Documentation License, Version 1.2 or (at your option) version 1.3; with the Invariant Section being this copyright notice and license. A copy of the license version 1.2 is included in the section entitled “GNU Free Documentation License”.
For SUSE trademarks, see https://www.suse.com/company/legal/. All other third-party trademarks are the property of their respective owners. Trademark symbols (®, ™ etc.) denote trademarks of SUSE and its affiliates. Asterisks (*) denote third-party trademarks.
All information found in this book has been compiled with utmost attention to detail. However, this does not guarantee complete accuracy. Neither SUSE LLC, its affiliates, the authors, nor the translators shall be held liable for possible errors or the consequences thereof.
GNU Free Documentation License
Copyright (C) 2000, 2001, 2002 Free Software Foundation, Inc. 51 Franklin St, Fifth Floor, Boston, MA 02110-1301 USA. Everyone is permitted to copy and distribute verbatim copies of this license document, but changing it is not allowed.
0. PREAMBLE #
The purpose of this License is to make a manual, textbook, or other functional and useful document "free" in the sense of freedom: to assure everyone the effective freedom to copy and redistribute it, with or without modifying it, either commercially or non-commercially. Secondarily, this License preserves for the author and publisher a way to get credit for their work, while not being considered responsible for modifications made by others.
This License is a kind of "copyleft", which means that derivative works of the document must themselves be free in the same sense. It complements the GNU General Public License, which is a copyleft license designed for free software.
We have designed this License to use it for manuals for free software, because free software needs free documentation: a free program should come with manuals providing the same freedoms that the software does. But this License is not limited to software manuals; it can be used for any textual work, regardless of subject matter or whether it is published as a printed book. We recommend this License principally for works whose purpose is instruction or reference.
1. APPLICABILITY AND DEFINITIONS #
This License applies to any manual or other work, in any medium, that contains a notice placed by the copyright holder saying it can be distributed under the terms of this License. Such a notice grants a world-wide, royalty-free license, unlimited in duration, to use that work under the conditions stated herein. The "Document", below, refers to any such manual or work. Any member of the public is a licensee, and is addressed as "you". You accept the license if you copy, modify or distribute the work in a way requiring permission under copyright law.
A "Modified Version" of the Document means any work containing the Document or a portion of it, either copied verbatim, or with modifications and/or translated into another language.
A "Secondary Section" is a named appendix or a front-matter section of the Document that deals exclusively with the relationship of the publishers or authors of the Document to the Document's overall subject (or to related matters) and contains nothing that could fall directly within that overall subject. (Thus, if the Document is in part a textbook of mathematics, a Secondary Section may not explain any mathematics.) The relationship could be a matter of historical connection with the subject or with related matters, or of legal, commercial, philosophical, ethical or political position regarding them.
The "Invariant Sections" are certain Secondary Sections whose titles are designated, as being those of Invariant Sections, in the notice that says that the Document is released under this License. If a section does not fit the above definition of Secondary then it is not allowed to be designated as Invariant. The Document may contain zero Invariant Sections. If the Document does not identify any Invariant Sections then there are none.
The "Cover Texts" are certain short passages of text that are listed, as Front-Cover Texts or Back-Cover Texts, in the notice that says that the Document is released under this License. A Front-Cover Text may be at most 5 words, and a Back-Cover Text may be at most 25 words.
A "Transparent" copy of the Document means a machine-readable copy, represented in a format whose specification is available to the general public, that is suitable for revising the document straightforwardly with generic text editors or (for images composed of pixels) generic paint programs or (for drawings) some widely available drawing editor, and that is suitable for input to text formatters or for automatic translation to a variety of formats suitable for input to text formatters. A copy made in an otherwise Transparent file format whose markup, or absence of markup, has been arranged to thwart or discourage subsequent modification by readers is not Transparent. An image format is not Transparent if used for any substantial amount of text. A copy that is not "Transparent" is called "Opaque".
Examples of suitable formats for Transparent copies include plain ASCII without markup, Texinfo input format, LaTeX input format, SGML or XML using a publicly available DTD, and standard-conforming simple HTML, PostScript or PDF designed for human modification. Examples of transparent image formats include PNG, XCF and JPG. Opaque formats include proprietary formats that can be read and edited only by proprietary word processors, SGML or XML for which the DTD and/or processing tools are not generally available, and the machine-generated HTML, PostScript or PDF produced by some word processors for output purposes only.
The "Title Page" means, for a printed book, the title page itself, plus such following pages as are needed to hold, legibly, the material this License requires to appear in the title page. For works in formats which do not have any title page as such, "Title Page" means the text near the most prominent appearance of the work's title, preceding the beginning of the body of the text.
A section "Entitled XYZ" means a named subunit of the Document whose title either is precisely XYZ or contains XYZ in parentheses following text that translates XYZ in another language. (Here XYZ stands for a specific section name mentioned below, such as "Acknowledgements", "Dedications", "Endorsements", or "History".) To "Preserve the Title" of such a section when you modify the Document means that it remains a section "Entitled XYZ" according to this definition.
The Document may include Warranty Disclaimers next to the notice which states that this License applies to the Document. These Warranty Disclaimers are considered to be included by reference in this License, but only as regards disclaiming warranties: any other implication that these Warranty Disclaimers may have is void and has no effect on the meaning of this License.
2. VERBATIM COPYING #
You may copy and distribute the Document in any medium, either commercially or non-commercially, provided that this License, the copyright notices, and the license notice saying this License applies to the Document are reproduced in all copies, and that you add no other conditions whatsoever to those of this License. You may not use technical measures to obstruct or control the reading or further copying of the copies you make or distribute. However, you may accept compensation in exchange for copies. If you distribute a large enough number of copies you must also follow the conditions in section 3.
You may also lend copies, under the same conditions stated above, and you may publicly display copies.
3. COPYING IN QUANTITY #
If you publish printed copies (or copies in media that commonly have printed covers) of the Document, numbering more than 100, and the Document's license notice requires Cover Texts, you must enclose the copies in covers that carry, clearly and legibly, all these Cover Texts: Front-Cover Texts on the front cover, and Back-Cover Texts on the back cover. Both covers must also clearly and legibly identify you as the publisher of these copies. The front cover must present the full title with all words of the title equally prominent and visible. You may add other material on the covers in addition. Copying with changes limited to the covers, as long as they preserve the title of the Document and satisfy these conditions, can be treated as verbatim copying in other respects.
If the required texts for either cover are too voluminous to fit legibly, you should put the first ones listed (as many as fit reasonably) on the actual cover, and continue the rest onto adjacent pages.
If you publish or distribute Opaque copies of the Document numbering more than 100, you must either include a machine-readable Transparent copy along with each Opaque copy, or state in or with each Opaque copy a computer-network location from which the general network-using public has access to download using public-standard network protocols a complete Transparent copy of the Document, free of added material. If you use the latter option, you must take reasonably prudent steps, when you begin distribution of Opaque copies in quantity, to ensure that this Transparent copy will remain thus accessible at the stated location until at least one year after the last time you distribute an Opaque copy (directly or through your agents or retailers) of that edition to the public.
It is requested, but not required, that you contact the authors of the Document well before redistributing any large number of copies, to give them a chance to provide you with an updated version of the Document.
4. MODIFICATIONS #
You may copy and distribute a Modified Version of the Document under the conditions of sections 2 and 3 above, provided that you release the Modified Version under precisely this License, with the Modified Version filling the role of the Document, thus licensing distribution and modification of the Modified Version to whoever possesses a copy of it. In addition, you must do these things in the Modified Version:
Use in the Title Page (and on the covers, if any) a title distinct from that of the Document, and from those of previous versions (which should, if there were any, be listed in the History section of the Document). You may use the same title as a previous version if the original publisher of that version gives permission.
List on the Title Page, as authors, one or more persons or entities responsible for authorship of the modifications in the Modified Version, together with at least five of the principal authors of the Document (all of its principal authors, if it has fewer than five), unless they release you from this requirement.
State on the Title page the name of the publisher of the Modified Version, as the publisher.
Preserve all the copyright notices of the Document.
Add an appropriate copyright notice for your modifications adjacent to the other copyright notices.
Include, immediately after the copyright notices, a license notice giving the public permission to use the Modified Version under the terms of this License, in the form shown in the Addendum below.
Preserve in that license notice the full lists of Invariant Sections and required Cover Texts given in the Document's license notice.
Include an unaltered copy of this License.
Preserve the section Entitled "History", Preserve its Title, and add to it an item stating at least the title, year, new authors, and publisher of the Modified Version as given on the Title Page. If there is no section Entitled "History" in the Document, create one stating the title, year, authors, and publisher of the Document as given on its Title Page, then add an item describing the Modified Version as stated in the previous sentence.
Preserve the network location, if any, given in the Document for public access to a Transparent copy of the Document, and likewise the network locations given in the Document for previous versions it was based on. These may be placed in the "History" section. You may omit a network location for a work that was published at least four years before the Document itself, or if the original publisher of the version it refers to gives permission.
For any section Entitled "Acknowledgements" or "Dedications", Preserve the Title of the section, and preserve in the section all the substance and tone of each of the contributor acknowledgements and/or dedications given therein.
Preserve all the Invariant Sections of the Document, unaltered in their text and in their titles. Section numbers or the equivalent are not considered part of the section titles.
Delete any section Entitled "Endorsements". Such a section may not be included in the Modified Version.
Do not retitle any existing section to be Entitled "Endorsements" or to conflict in title with any Invariant Section.
Preserve any Warranty Disclaimers.
If the Modified Version includes new front-matter sections or appendices that qualify as Secondary Sections and contain no material copied from the Document, you may at your option designate some or all of these sections as invariant. To do this, add their titles to the list of Invariant Sections in the Modified Version's license notice. These titles must be distinct from any other section titles.
You may add a section Entitled "Endorsements", provided it contains nothing but endorsements of your Modified Version by various parties--for example, statements of peer review or that the text has been approved by an organization as the authoritative definition of a standard.
You may add a passage of up to five words as a Front-Cover Text, and a passage of up to 25 words as a Back-Cover Text, to the end of the list of Cover Texts in the Modified Version. Only one passage of Front-Cover Text and one of Back-Cover Text may be added by (or through arrangements made by) any one entity. If the Document already includes a cover text for the same cover, previously added by you or by arrangement made by the same entity you are acting on behalf of, you may not add another; but you may replace the old one, on explicit permission from the previous publisher that added the old one.
The author(s) and publisher(s) of the Document do not by this License give permission to use their names for publicity for or to assert or imply endorsement of any Modified Version.
5. COMBINING DOCUMENTS #
You may combine the Document with other documents released under this License, under the terms defined in section 4 above for modified versions, provided that you include in the combination all of the Invariant Sections of all of the original documents, unmodified, and list them all as Invariant Sections of your combined work in its license notice, and that you preserve all their Warranty Disclaimers.
The combined work need only contain one copy of this License, and multiple identical Invariant Sections may be replaced with a single copy. If there are multiple Invariant Sections with the same name but different contents, make the title of each such section unique by adding at the end of it, in parentheses, the name of the original author or publisher of that section if known, or else a unique number. Make the same adjustment to the section titles in the list of Invariant Sections in the license notice of the combined work.
In the combination, you must combine any sections Entitled "History" in the various original documents, forming one section Entitled "History"; likewise combine any sections Entitled "Acknowledgements", and any sections Entitled "Dedications". You must delete all sections Entitled "Endorsements".
6. COLLECTIONS OF DOCUMENTS #
You may make a collection consisting of the Document and other documents released under this License, and replace the individual copies of this License in the various documents with a single copy that is included in the collection, provided that you follow the rules of this License for verbatim copying of each of the documents in all other respects.
You may extract a single document from such a collection, and distribute it individually under this License, provided you insert a copy of this License into the extracted document, and follow this License in all other respects regarding verbatim copying of that document.
7. AGGREGATION WITH INDEPENDENT WORKS #
A compilation of the Document or its derivatives with other separate and independent documents or works, in or on a volume of a storage or distribution medium, is called an "aggregate" if the copyright resulting from the compilation is not used to limit the legal rights of the compilation's users beyond what the individual works permit. When the Document is included in an aggregate, this License does not apply to the other works in the aggregate which are not themselves derivative works of the Document.
If the Cover Text requirement of section 3 is applicable to these copies of the Document, then if the Document is less than one half of the entire aggregate, the Document's Cover Texts may be placed on covers that bracket the Document within the aggregate, or the electronic equivalent of covers if the Document is in electronic form. Otherwise they must appear on printed covers that bracket the whole aggregate.
8. TRANSLATION #
Translation is considered a kind of modification, so you may distribute translations of the Document under the terms of section 4. Replacing Invariant Sections with translations requires special permission from their copyright holders, but you may include translations of some or all Invariant Sections in addition to the original versions of these Invariant Sections. You may include a translation of this License, and all the license notices in the Document, and any Warranty Disclaimers, provided that you also include the original English version of this License and the original versions of those notices and disclaimers. In case of a disagreement between the translation and the original version of this License or a notice or disclaimer, the original version will prevail.
If a section in the Document is Entitled "Acknowledgements", "Dedications", or "History", the requirement (section 4) to Preserve its Title (section 1) will typically require changing the actual title.
9. TERMINATION #
You may not copy, modify, sublicense, or distribute the Document except as expressly provided for under this License. Any other attempt to copy, modify, sublicense or distribute the Document is void, and will automatically terminate your rights under this License. However, parties who have received copies, or rights, from you under this License will not have their licenses terminated so long as such parties remain in full compliance.
10. FUTURE REVISIONS OF THIS LICENSE #
The Free Software Foundation may publish new, revised versions of the GNU Free Documentation License from time to time. Such new versions will be similar in spirit to the present version, but may differ in detail to address new problems or concerns. See https://www.gnu.org/copyleft/.
Each version of the License is given a distinguishing version number. If the Document specifies that a particular numbered version of this License "or any later version" applies to it, you have the option of following the terms and conditions either of that specified version or of any later version that has been published (not as a draft) by the Free Software Foundation. If the Document does not specify a version number of this License, you may choose any version ever published (not as a draft) by the Free Software Foundation.
ADDENDUM: How to use this License for your documents #
Copyright (c) YEAR YOUR NAME.
Permission is granted to copy, distribute and/or modify this document
under the terms of the GNU Free Documentation License, Version 1.2
or any later version published by the Free Software Foundation;
with no Invariant Sections, no Front-Cover Texts, and no Back-Cover Texts.
A copy of the license is included in the section entitled “GNU
Free Documentation License”.
If you have Invariant Sections, Front-Cover Texts and Back-Cover Texts, replace the “with...Texts.” line with this:
with the Invariant Sections being LIST THEIR TITLES, with the
Front-Cover Texts being LIST, and with the Back-Cover Texts being LIST.
If you have Invariant Sections without Cover Texts, or some other combination of the three, merge those two alternatives to suit the situation.
If your document contains nontrivial examples of program code, we recommend releasing these examples in parallel under your choice of free software license, such as the GNU General Public License, to permit their use in free software.